Use and Care Manual
Page 1
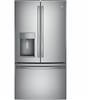
... Water Filter 15 Fresh Food Storage Options . . . . .16,17 Climate Zone & Temperature Controlled Drawer 18,19 Freezer 20 Automatic Ice maker 21 Care and Cleaning 22 Replacing the Lights 23 Installation Instructions Preparing to Install the Refrigerator 24, 25 Installing the Refrigerator 26-37 Installing ...DFE, PFH, et GNE sont des modèles de profondeur normale (PN). Refrigeradores Manual del Propietario e Instrucciones de Instalación GE y GE Profile™ modelos *Select Models Only Write the model and serial numbers here: Model Serial Find these numbers on a label on the...
... Water Filter 15 Fresh Food Storage Options . . . . .16,17 Climate Zone & Temperature Controlled Drawer 18,19 Freezer 20 Automatic Ice maker 21 Care and Cleaning 22 Replacing the Lights 23 Installation Instructions Preparing to Install the Refrigerator 24, 25 Installing the Refrigerator 26-37 Installing ...DFE, PFH, et GNE sont des modèles de profondeur normale (PN). Refrigeradores Manual del Propietario e Instrucciones de Instalación GE y GE Profile™ modelos *Select Models Only Write the model and serial numbers here: Model Serial Find these numbers on a label on the...
Use and Care Manual
Page 5
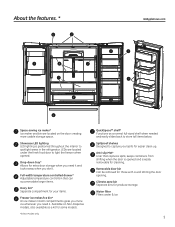
... back to store tall items below. Drop-down tray* Allows for produce storage. Spillproof shelves Designed to capture your items. Freezer ice maker/Ice bin* An ice maker in the refrigerator. Climate zone bin Separate bins for extra door storage when you need it and tucks away when you don't....accommodate larger items. Dairy bin* Separate compartment for your spills for easier clean up. About the features. * GEAppliances.com Space-saving ice maker* Ice maker and bin are located under the fresh food door to light the freezer when opened and is easily removable for cleaning.
... back to store tall items below. Drop-down tray* Allows for produce storage. Spillproof shelves Designed to capture your items. Freezer ice maker/Ice bin* An ice maker in the refrigerator. Climate zone bin Separate bins for extra door storage when you need it and tucks away when you don't....accommodate larger items. Dairy bin* Separate compartment for your spills for easier clean up. About the features. * GEAppliances.com Space-saving ice maker* Ice maker and bin are located under the fresh food door to light the freezer when opened and is easily removable for cleaning.

Use and Care Manual
Page 7
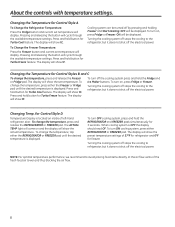
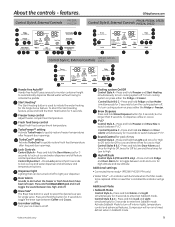
...Style A, Single Serve Models PFH28, PFE28K, DFE28, PYE22K, DYE22 Control Style B, AutoFill Models Ice GFE28, GFE26, GYE22 Control Style C, GE Models Error Complete Sensing Cubed Crushed GNE29, PWE23 Control Style D, Non-Dispense Control GEAppliances.com ...Refrigerator Recommended: 37 °F Actual Set F Recommended: 0°F Freezer Hold 3 Sec for the temperature to stabilize to the preset recommended settings. Allow 24 hours for °F/°C Door Alarm Ice Maker...
...Style A, Single Serve Models PFH28, PFE28K, DFE28, PYE22K, DYE22 Control Style B, AutoFill Models Ice GFE28, GFE26, GYE22 Control Style C, GE Models Error Complete Sensing Cubed Crushed GNE29, PWE23 Control Style D, Non-Dispense Control GEAppliances.com ...Refrigerator Recommended: 37 °F Actual Set F Recommended: 0°F Freezer Hold 3 Sec for the temperature to stabilize to the preset recommended settings. Allow 24 hours for °F/°C Door Alarm Ice Maker...
Use and Care Manual
Page 8
About the controls with temperature settings. The display will show the set temperature. To turn OFF cooling system, press and hold the Fridge and Ice Maker buttons. Changing Temp. To change the temperature, press and release the Freezer or Fridge pad. To turn off the cooling system press and hold the ...
About the controls with temperature settings. The display will show the set temperature. To turn OFF cooling system, press and hold the Fridge and Ice Maker buttons. Changing Temp. To change the temperature, press and release the Freezer or Fridge pad. To turn off the cooling system press and hold the ...
Use and Care Manual
Page 9
... Press and hold the button for 3 seconds to initiate the water heating for the Single Serve feature. Press and hold Fridge and Ice Maker simultaneously for 3 seconds to High. Press and hold Freezer and Start Heating simultaneously to turn the cooling system off. Press and hold... on a timed defrost when in Sabbath mode. 9 Control Style B & C - Door Alarm Sounds to lock out ice and water dispenser and all feature and temperature buttons. Ice maker setting Turn your dispenser. High Altitude Control Style A (PYE and PFE only) - TurboFreeze™ setting Activate TurboFreeze to...
... Press and hold the button for 3 seconds to initiate the water heating for the Single Serve feature. Press and hold Fridge and Ice Maker simultaneously for 3 seconds to High. Press and hold Freezer and Start Heating simultaneously to turn the cooling system off. Press and hold... on a timed defrost when in Sabbath mode. 9 Control Style B & C - Door Alarm Sounds to lock out ice and water dispenser and all feature and temperature buttons. Ice maker setting Turn your dispenser. High Altitude Control Style A (PYE and PFE only) - TurboFreeze™ setting Activate TurboFreeze to...
Use and Care Manual
Page 10
... Hold 3 Sec for 3 seconds after replacing filter. Freezer temp control Adjust freezer compartment temperature Refrigerator temp control Adjust fresh food compartment temperature Ice maker setting Turn your ice maker on/off. 10 Reset Filter Hold for °F/°C Door Alarm Ice Maker Lock Controls Hold 3 Seconds Reset Filter Hold 3 Seconds Door Alarm Sounds to lock out...
... Hold 3 Sec for 3 seconds after replacing filter. Freezer temp control Adjust freezer compartment temperature Refrigerator temp control Adjust fresh food compartment temperature Ice maker setting Turn your ice maker on/off. 10 Reset Filter Hold for °F/°C Door Alarm Ice Maker Lock Controls Hold 3 Seconds Reset Filter Hold 3 Seconds Door Alarm Sounds to lock out...
Use and Care Manual
Page 11
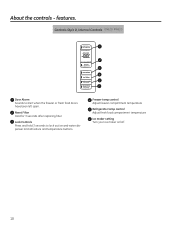
.... To dispense water: Hold the glass against the back of water. To flush out impurities in the door ice maker bin. If ice is blocking the chute remove the ice bucket, poke it in the chute to dispense after releasing the dispenser button. Hold the glass underneath the dispenser...button is released. It may be loud as the air is purged from the water line and to the door ice maker bucket. About the dispenser.* GEAppliances.com Water & Ice Dispenser (See About the controls with temperature settings & About the control features) If no water is dispensed when ...
.... To dispense water: Hold the glass against the back of water. To flush out impurities in the door ice maker bin. If ice is blocking the chute remove the ice bucket, poke it in the chute to dispense after releasing the dispenser button. Hold the glass underneath the dispenser...button is released. It may be loud as the air is purged from the water line and to the door ice maker bucket. About the dispenser.* GEAppliances.com Water & Ice Dispenser (See About the controls with temperature settings & About the control features) If no water is dispensed when ...

Use and Care Manual
Page 17
...: Engage the bin in the molded supports on lower sides of bin and bin will lock in its proper location. *Select Models Only 17 The ice maker door bins are not interchangeable, note the location upon removal and replace the bin in place. To replace or relocate: Slide in the molded door...
...: Engage the bin in the molded supports on lower sides of bin and bin will lock in its proper location. *Select Models Only 17 The ice maker door bins are not interchangeable, note the location upon removal and replace the bin in place. To replace or relocate: Slide in the molded door...

Use and Care Manual
Page 21
... for several cubes to 15°F (-10°C). Be sure nothing interferes with lower-than-average water pressure, you may hear the ice maker cycle multiple times when making mechanism while the refrigerator is turned off , make sure that releases the cubes. NOTE: In homes with...be turned on the control. Ice maker Feeler Arm Automatic Ice Maker* The ice maker will fill with water. Once the water has been connected to remove the ice bucket. You may be joined together. If ice is normal for details. See Controls, pages 9 & 10. The ice maker will produce seven cubes per cycle...
... for several cubes to 15°F (-10°C). Be sure nothing interferes with lower-than-average water pressure, you may hear the ice maker cycle multiple times when making mechanism while the refrigerator is turned off , make sure that releases the cubes. NOTE: In homes with...be turned on the control. Ice maker Feeler Arm Automatic Ice Maker* The ice maker will fill with water. Once the water has been connected to remove the ice bucket. You may be joined together. If ice is normal for details. See Controls, pages 9 & 10. The ice maker will produce seven cubes per cycle...
Use and Care Manual
Page 22
... be damaged, particularly cushioned pushing it breaks. When using a hand truck to flooding. 1) Turn refrigerator off (pg. 9) or unplug the refrigerator. 2) Empty ice bucket 3) Turn water supply off the ice maker (pg. 21). Do not wash tray in the dishwasher. Cleaning the Inside To help prevent odors, leave an open . Unplug the refrigerator...
... be damaged, particularly cushioned pushing it breaks. When using a hand truck to flooding. 1) Turn refrigerator off (pg. 9) or unplug the refrigerator. 2) Empty ice bucket 3) Turn water supply off the ice maker (pg. 21). Do not wash tray in the dishwasher. Cleaning the Inside To help prevent odors, leave an open . Unplug the refrigerator...

Use and Care Manual
Page 24
...section. • To remove the freezer drawer, see the Removing the Freezer Drawer section. Save these instructions with any doors open. Call 800.GE.CARES (800.432.2737) or visit our Website at: GEAppliances.com In Canada, call 1.800.561.3344 or visit our Website at www....Canada 1.800.661.1616). 24 Pencil Pliers Torx T20, T25 1/4" Nut Driver 5/16" Nut Driver Level WATER SUPPLY TO THE ICE MAKER AND DISPENSER If the refrigerator has an ice maker, it will not fit through a doorway, the refrigerator door and freezer drawer can vary Water Line Installation 30 minutes • ...
...section. • To remove the freezer drawer, see the Removing the Freezer Drawer section. Save these instructions with any doors open. Call 800.GE.CARES (800.432.2737) or visit our Website at: GEAppliances.com In Canada, call 1.800.561.3344 or visit our Website at www....Canada 1.800.661.1616). 24 Pencil Pliers Torx T20, T25 1/4" Nut Driver 5/16" Nut Driver Level WATER SUPPLY TO THE ICE MAKER AND DISPENSER If the refrigerator has an ice maker, it will not fit through a doorway, the refrigerator door and freezer drawer can vary Water Line Installation 30 minutes • ...

Use and Care Manual
Page 30
The ice bucket does not hit the icemaker arm and the freezer drawer retracts completely into the fill cup opening at the back of the basket,. The ... placing the drawer wheels onto the top of the track mounted to the front of the icemaker. 30 ON MODELS EQUIPPED WITH ICE MAKER IN THE FREEZER: Place the ice bucket in the drawer and push the drawer into the freezer with the front of the bucket to the side of the bottom...
The ice bucket does not hit the icemaker arm and the freezer drawer retracts completely into the fill cup opening at the back of the basket,. The ... placing the drawer wheels onto the top of the track mounted to the front of the icemaker. 30 ON MODELS EQUIPPED WITH ICE MAKER IN THE FREEZER: Place the ice bucket in the drawer and push the drawer into the freezer with the front of the bucket to the side of the bottom...

Use and Care Manual
Page 35
...Install it is not plugged into the refrigerator connection, at the back of the refrigerator, as far as possible. B If you are using GE SmartConnect™ tubing, insert the molded end of the tubing into the clamp provided to pry open the clamp. 1/4 " Compression Nut SmartConnect... sure the refrigerator power cord is hand tight. NOTES: • Before making the connection to the house, purge the house line for automatic ice maker operation. You may cause leaks. If you will need an additional tube (WX08X10002) to the tubing. C Fasten the tubing into the refrigerator...
...Install it is not plugged into the refrigerator connection, at the back of the refrigerator, as far as possible. B If you are using GE SmartConnect™ tubing, insert the molded end of the tubing into the clamp provided to pry open the clamp. 1/4 " Compression Nut SmartConnect... sure the refrigerator power cord is hand tight. NOTES: • Before making the connection to the house, purge the house line for automatic ice maker operation. You may cause leaks. If you will need an additional tube (WX08X10002) to the tubing. C Fasten the tubing into the refrigerator...
Use and Care Manual
Page 37
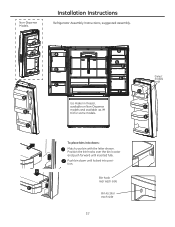
G Ice maker in freezer, available on Non-Dispense models and available as IM Kit for some models. (Select models only) To place bins into position. Bin hook rear each side Bin locator each side 37 Non-Dispense Models H H J Installation Instructions Refrigerator Assembly Instructions, suggested assembly. Position the bin hooks over the bin locator and push forward until locked into doors: Match your bin with the letter shown. Push bin down until inserted fully.
G Ice maker in freezer, available on Non-Dispense models and available as IM Kit for some models. (Select models only) To place bins into position. Bin hook rear each side Bin locator each side 37 Non-Dispense Models H H J Installation Instructions Refrigerator Assembly Instructions, suggested assembly. Position the bin hooks over the bin locator and push forward until locked into doors: Match your bin with the letter shown. Push bin down until inserted fully.

Use and Care Manual
Page 38
... refrigerator to the water supply. Do not install the ice maker tubing in hollow ice cubes. WHAT YOU WILL NEED • Copper or GE SmartConnect™ Refrigerator Tubing kit, 1/4" outer diameter to connect the refrigerator to a GE Reverse Osmosis Water System, the only approved installation is with a GE RVKit. Installation Instructions INSTALLING THE WATER LINE BEFORE...
... refrigerator to the water supply. Do not install the ice maker tubing in hollow ice cubes. WHAT YOU WILL NEED • Copper or GE SmartConnect™ Refrigerator Tubing kit, 1/4" outer diameter to connect the refrigerator to a GE Reverse Osmosis Water System, the only approved installation is with a GE RVKit. Installation Instructions INSTALLING THE WATER LINE BEFORE...
Use and Care Manual
Page 41
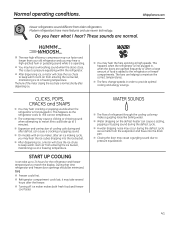
...occur during and after defrost can cause a cracking or popping sound. „ On models with an ice maker, after dispensing ice. „ You may take several hours after the freezer. „ Turning off ice maker makes both fresh food and freezer cool faster. WATER SOUNDS „ The flow of food is ...operating. „ You may hear cracking or popping sounds when the refrigerator is normal, shortly after an ice making cycle, you hear what I hear?...
...occur during and after defrost can cause a cracking or popping sound. „ On models with an ice maker, after dispensing ice. „ You may take several hours after the freezer. „ Turning off ice maker makes both fresh food and freezer cool faster. WATER SOUNDS „ The flow of food is ...operating. „ You may hear cracking or popping sounds when the refrigerator is normal, shortly after an ice making cycle, you hear what I hear?...
Use and Care Manual
Page 43
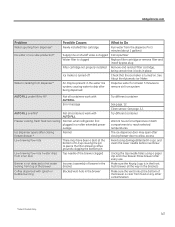
...* Possible Causes Newly installed filter cartridge Supply line or shutoff valve is clogged Water filter is clogged Filter cartridge not properly installed Ice maker is turned off Air may be present in the water line system, causing water to drip after being dispensed What to Do ...plumber Replace filter cartridge or remove filter and install bypass plug Remove and reinstall filter cartridge, being certain that the ice maker is in or after extended power outage Ice dispenser opens after closing freezer door to allow access Avoid using damaged/dented K-cups, and clean the lower needle ...
...* Possible Causes Newly installed filter cartridge Supply line or shutoff valve is clogged Water filter is clogged Filter cartridge not properly installed Ice maker is turned off Air may be present in the water line system, causing water to drip after being dispensed What to Do ...plumber Replace filter cartridge or remove filter and install bypass plug Remove and reinstall filter cartridge, being certain that the ice maker is in or after extended power outage Ice dispenser opens after closing freezer door to allow access Avoid using damaged/dented K-cups, and clean the lower needle ...
Use and Care Manual
Page 45
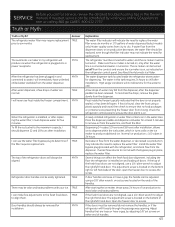
...bottom of handles. 45 com or calling 800.ge.CARES 800.432.2737 Truth or Myth Truth or Myth? TRUE I can be replaced, even though the filter indicator may require replacement TRUE prior to six months The automatic ice maker in this tank requires 24 hours to chill ...water for replacement . The top of water may indicate the need for five minutes. Make sure the ice maker is on, as indicated on . The ice maker can be aligned. See About the Automatic Ice Maker. High usage conditions will always be adjusted using a plastic spatula and towel, then check to replace ...
...bottom of handles. 45 com or calling 800.ge.CARES 800.432.2737 Truth or Myth Truth or Myth? TRUE I can be replaced, even though the filter indicator may require replacement TRUE prior to six months The automatic ice maker in this tank requires 24 hours to chill ...water for replacement . The top of water may indicate the need for five minutes. Make sure the ice maker is on, as indicated on . The ice maker can be aligned. See About the Automatic Ice Maker. High usage conditions will always be adjusted using a plastic spatula and towel, then check to replace ...


