Use and Care Manual
Page 1
....com Safety Instructions 2, 3 Operating Instructions Care and Cleaning of the Washer 11 Features 10 Loading and Using the Washer 9 Operating instructions 4-8 Installation Instructions. 12-16 Troubleshooting Tips. . . . . 17-19 Consumer Support Consumer Help Indicator 11 Consumer Support 21 Parts and Accessories 3, 21 Warranty 20 ...ñol Printed in the United States Write the model and serial numbers here: Model Serial You can find them under the lid of the washer. 49-90547-1 08-15...
....com Safety Instructions 2, 3 Operating Instructions Care and Cleaning of the Washer 11 Features 10 Loading and Using the Washer 9 Operating instructions 4-8 Installation Instructions. 12-16 Troubleshooting Tips. . . . . 17-19 Consumer Support Consumer Help Indicator 11 Consumer Support 21 Parts and Accessories 3, 21 Warranty 20 ...ñol Printed in the United States Write the model and serial numbers here: Model Serial You can find them under the lid of the washer. 49-90547-1 08-15...
Use and Care Manual
Page 2
... INSTRUCTIONS 2 As the gas is flammable, DO NOT smoke or use an open flame during this appliance or attempt any accumulated hydrogen gas. Before the washer is damaged, malfunctioning, partially disassembled, or has missing or broken parts including a damaged cord or plug. „ Unplug the appliance or turn on or in...
... INSTRUCTIONS 2 As the gas is flammable, DO NOT smoke or use an open flame during this appliance or attempt any accumulated hydrogen gas. Before the washer is damaged, malfunctioning, partially disassembled, or has missing or broken parts including a damaged cord or plug. „ Unplug the appliance or turn on or in...

Use and Care Manual
Page 3
... 3 prong outlet. In Canada, visit your local GE parts distributor or call 800.661.1616. Part Number Accessory PM14X10002 Or PM14X10005 4 ft rubber water supply hoses 4 ft braided water supply hoses WH49X301 Drain hose extension PM7X1 Washer Floor Tray ¥ START-UP SEQUENCE „ ... changing the hoses every 5 years. GE strongly recommends the use an adapter. You will not be replaced every 5 years to conform with the Installation Instructions before continuing. GEAppliances.com PROPER INSTALLATION This washer must be properly installed and located in accordance with all ...
... 3 prong outlet. In Canada, visit your local GE parts distributor or call 800.661.1616. Part Number Accessory PM14X10002 Or PM14X10005 4 ft rubber water supply hoses 4 ft braided water supply hoses WH49X301 Drain hose extension PM7X1 Washer Floor Tray ¥ START-UP SEQUENCE „ ... changing the hoses every 5 years. GE strongly recommends the use an adapter. You will not be replaced every 5 years to conform with the Installation Instructions before continuing. GEAppliances.com PROPER INSTALLATION This washer must be properly installed and located in accordance with all ...
Use and Care Manual
Page 4
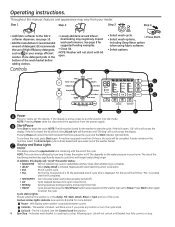
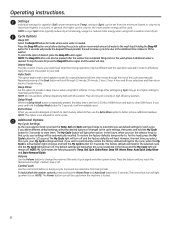
Step 1 Step 2 Step 3 Step 4 • Add fabric softener to restart the cycle. GE recommends the use of the cycle. including Deep Rinse option when using fabric softener. • Select options. To continue the cycle, ...: Pressing Power does not disconnect the appliance from your home. Stops after rebalancing is complete. • dELAY When Delay Wash is locked - Will display when washer is open . • Select wash cycle. • Select wash options, • Press Start. Lid will scroll across the display. Controls A D C Lid Lock Spin Stop G F F G B ...
Step 1 Step 2 Step 3 Step 4 • Add fabric softener to restart the cycle. GE recommends the use of the cycle. including Deep Rinse option when using fabric softener. • Select options. To continue the cycle, ...: Pressing Power does not disconnect the appliance from your home. Stops after rebalancing is complete. • dELAY When Delay Wash is locked - Will display when washer is open . • Select wash cycle. • Select wash options, • Press Start. Lid will scroll across the display. Controls A D C Lid Lock Spin Stop G F F G B ...
Use and Care Manual
Page 5
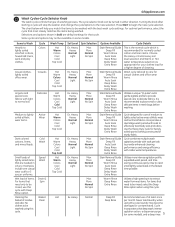
... purge (on some models), and a deep rinse. 5 Heavy Heavy Normal Light Ex. Never load laundry when using this cycle. The chart below will stop the washer and change the cycle/options to delicate fabrics. Some cycles and options may become damaged or contaminated. Cold Wash Small loads of cleaning. Heavy Heavy...
... purge (on some models), and a deep rinse. 5 Heavy Heavy Normal Light Ex. Never load laundry when using this cycle. The chart below will stop the washer and change the cycle/options to delicate fabrics. Some cycles and options may become damaged or contaminated. Cold Wash Small loads of cleaning. Heavy Heavy...

Use and Care Manual
Page 6
... Sanitize with extended wash periods to effectively clean heavily to remove contaminants. For heavily soiled work and play clothes. The washer hot water supply connection must provide a minimum of this cycle. Using the amounts appropriate for sanitizing effectiveness. Place the ...in home laundry. Combines higher water levels, a specially designed agitation profile, and multi-step wash and soak periods to subsequent washer loads. The certification verified that no significant contamination is incorporated to medium soiled sturdy fabrics. A pump purge and deep rinse...
... Sanitize with extended wash periods to effectively clean heavily to remove contaminants. For heavily soiled work and play clothes. The washer hot water supply connection must provide a minimum of this cycle. Using the amounts appropriate for sanitizing effectiveness. Place the ...in home laundry. Combines higher water levels, a specially designed agitation profile, and multi-step wash and soak periods to subsequent washer loads. The certification verified that no significant contamination is incorporated to medium soiled sturdy fabrics. A pump purge and deep rinse...
Use and Care Manual
Page 7
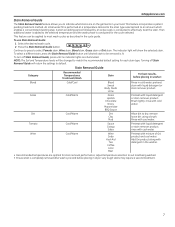
...stain remover product. adjust temperature selection to suit load being washed. • Ensure stain is completely removed after wash cycle and before placing in washer: Blood Cold/Cool Blood Sweat Body Fluids Urine Rinse in cold water; To use Stain Removal Guide: 1. Continue to press to dry; ...to match the recommended default setting for each stain type. The indicator light will be applied to most wash cycles as described in the washer. • Recommended temperatures are optimal for the cycle selected. Wine Cool/Warm Wine Soda Kool-Aid Tea Coffee Juice Beer Pretreat with ...
...stain remover product. adjust temperature selection to suit load being washed. • Ensure stain is completely removed after wash cycle and before placing in washer: Blood Cold/Cool Blood Sweat Body Fluids Urine Rinse in cold water; To use Stain Removal Guide: 1. Continue to press to dry; ...to match the recommended default setting for each stain type. The indicator light will be applied to most wash cycles as described in the washer. • Recommended temperatures are optimal for the cycle selected. Wine Cool/Warm Wine Soda Kool-Aid Tea Coffee Juice Beer Pretreat with ...
Use and Care Manual
Page 8
...second. Deep Rinse Set this load), press the My Cycle button for a specified period of the cycle automatically. In the future, when you select this washer. NOTE: My Cycle saves the following options: Temp, Soil, Spin, Extra Rinse, Deep Fill, Warm Rinse, Auto Soak, Deep Rinse and Stain Removal... and the My Cycle light will immediately reset. If you reach the desired volume (high, medium, low) or off . To lock/unlock the washer controls, press and hold the Delay Wash button for agitation (Soil), water temperature (Temp), and spin (Spin) can also be used . Operating instructions...
...second. Deep Rinse Set this load), press the My Cycle button for a specified period of the cycle automatically. In the future, when you select this washer. NOTE: My Cycle saves the following options: Temp, Soil, Spin, Extra Rinse, Deep Fill, Warm Rinse, Auto Soak, Deep Rinse and Stain Removal... and the My Cycle light will immediately reset. If you reach the desired volume (high, medium, low) or off . To lock/unlock the washer controls, press and hold the Delay Wash button for agitation (Soil), water temperature (Temp), and spin (Spin) can also be used . Operating instructions...
Use and Care Manual
Page 9
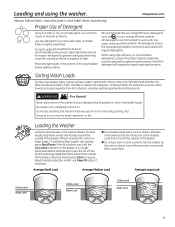
...care label when laundering. Place detergent pods in the basket to prevent overspray which may cause the coloring on larger loads. When using the washer. Excessive detergent will negatively impact wash performance. Do not dry anything that are too big to work with low water wash and rinse ... they are dampened with regular detergents. Doing so so can completely remove oil. Proper Use of the wash basket before attempting to fade. GE recommends the use Deep Fill option if necessary. „ Do not place large items such as recommended on the display is no longer...
...care label when laundering. Place detergent pods in the basket to prevent overspray which may cause the coloring on larger loads. When using the washer. Excessive detergent will negatively impact wash performance. Do not dry anything that are too big to work with low water wash and rinse ... they are dampened with regular detergents. Doing so so can completely remove oil. Proper Use of the wash basket before attempting to fade. GE recommends the use Deep Fill option if necessary. „ Do not place large items such as recommended on the display is no longer...
Use and Care Manual
Page 10
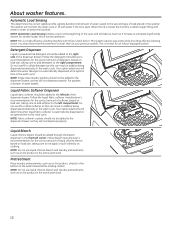
... right side of the dispenser drawer. Your option selections will not dispense properly. NOTE: This is normal for an Infusor-equipped washer. Detergent Dispenser Liquid or powdered HE detergent should be added to sense the load size. This is a high efficiency washing machine... softener crystals should be added to complete (significantly shorter for the correct amount of the wash basket before loading clothes. About washer features. The washer will take as much as an Oxi product, directly in the front left compartment. NOTE: Automatic Load Sensing initiates a spin...
... right side of the dispenser drawer. Your option selections will not dispense properly. NOTE: This is normal for an Infusor-equipped washer. Detergent Dispenser Liquid or powdered HE detergent should be added to sense the load size. This is a high efficiency washing machine... softener crystals should be added to complete (significantly shorter for the correct amount of the wash basket before loading clothes. About washer features. The washer will take as much as an Oxi product, directly in the front left compartment. NOTE: Automatic Load Sensing initiates a spin...
Use and Care Manual
Page 11
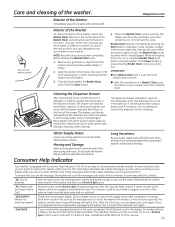
... back from hoses and water filter pump area if weather will provide simple remedies you interact in addition to bleach, to call 800.GE.CARES (800.432.2737) for clogged or pinched drain hose. These messages will be performed, at which soils and detergents may be...remove the drawer, pull it can perform without a display, the two furthest right LED lights will scroll in warm, soapy water using the washer. The dispenser box is equipped with the controls. Drain all water from vacation? Exterior of detergent or softener residue may accumulate in between cycles...
... back from hoses and water filter pump area if weather will provide simple remedies you interact in addition to bleach, to call 800.GE.CARES (800.432.2737) for clogged or pinched drain hose. These messages will be performed, at which soils and detergents may be...remove the drawer, pull it can perform without a display, the two furthest right LED lights will scroll in warm, soapy water using the washer. The dispenser box is equipped with the controls. Drain all water from vacation? Exterior of detergent or softener residue may accumulate in between cycles...

Use and Care Manual
Page 12
... (For discharge heights from 60" - 96" NOTE: We strongly recommend the use . • IMPORTANT - Installation Instructions Washer If you have any questions, call 800.GE.CARES (800.432.2737) or visit our Website at 800.626.2002 during normal business hours. This symbol alerts you to...PM14X10002 Or PM14X10005 4 ft Rubber Water Supply Hoses 4 ft Braided Metal Water Supply Hoses WH1X2267 Rubber Washer (1) and Screen (1) WH49X301 Drain Hose Extension (For discharge heights from 60" - 96" GE Parts and Accessories Order on-line at GEApplianceparts.com today, 24 hours a day or by phone ...
... (For discharge heights from 60" - 96" NOTE: We strongly recommend the use . • IMPORTANT - Installation Instructions Washer If you have any questions, call 800.GE.CARES (800.432.2737) or visit our Website at 800.626.2002 during normal business hours. This symbol alerts you to...PM14X10002 Or PM14X10005 4 ft Rubber Water Supply Hoses 4 ft Braided Metal Water Supply Hoses WH1X2267 Rubber Washer (1) and Screen (1) WH49X301 Drain Hose Extension (For discharge heights from 60" - 96" GE Parts and Accessories Order on-line at GEApplianceparts.com today, 24 hours a day or by phone ...
Use and Care Manual
Page 13
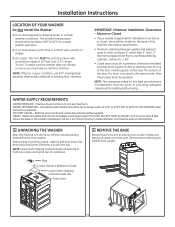
...;F (50° to overhead shelving, cabinets, ceiling, etc. = 60". • Closet doors must be given to existing floor covering. To make sure the washer does not vibrate or move, you may have to dripping water or outside packing material/carton from unit by placing foot on side of base... - Discharge height MUST NOT BE LESS THAN 30 INCHES, and no more than 8 feet above the base of the door. Remove base and bring the washer back upright. 13 On carpet. Standpipe must be a label on this label are minimums. Consideration must be a hard surface with curtains or drapes. 3....
...;F (50° to overhead shelving, cabinets, ceiling, etc. = 60". • Closet doors must be given to existing floor covering. To make sure the washer does not vibrate or move, you may have to dripping water or outside packing material/carton from unit by placing foot on side of base... - Discharge height MUST NOT BE LESS THAN 30 INCHES, and no more than 8 feet above the base of the door. Remove base and bring the washer back upright. 13 On carpet. Standpipe must be a label on this label are minimums. Consideration must be a hard surface with curtains or drapes. 3....

Use and Care Manual
Page 14
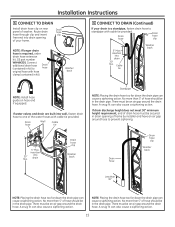
... of screen toward you to make water, drain, and electrical connections to your home. Hand tighten and use pliers to hot water outlet valve of washer. Holding clamp open, push hose end onto drain port until fully seated. Connect hot water hose to tighten hoses between 1/4 and 1/2 turn beyond ... and drips at the hose couplings. Hand tighten and use pliers to drain port on back of hose end should be oriented vertically. Rubber washer Rubber washer 14 Open clamp with pliers and slide onto hose end. Open hot water valve. Drain hose Drain port Drain end Clamp 5 CONNECT WATER ...
... of screen toward you to make water, drain, and electrical connections to your home. Hand tighten and use pliers to hot water outlet valve of washer. Holding clamp open, push hose end onto drain port until fully seated. Connect hot water hose to tighten hoses between 1/4 and 1/2 turn beyond ... and drips at the hose couplings. Hand tighten and use pliers to drain port on back of hose end should be oriented vertically. Rubber washer Rubber washer 14 Open clamp with pliers and slide onto hose end. Open hot water valve. Drain hose Drain port Drain end Clamp 5 CONNECT WATER ...
Use and Care Manual
Page 15
...action. 15 insertion 30" Min. Drain hose clip NOTE: If longer drain hose is a standpipe, fasten drain hose to prevent siphoning. 5" Max. Washer back 6 CONNECT TO DRAIN (Continued) If your home. insertion into drain opening of hose should be an air gap around hose to standpipe with cable...far down the drain pipe can cause a siphoning action. No more than 5" of your drain is required, order drain hose extension kit, GE part number WH49X301. Drain hose Wall Cable tie Standpipe NOTE: Placing the drain hose too far down the drain pipe can also cause a ...
...action. 15 insertion 30" Min. Drain hose clip NOTE: If longer drain hose is a standpipe, fasten drain hose to prevent siphoning. 5" Max. Washer back 6 CONNECT TO DRAIN (Continued) If your home. insertion into drain opening of hose should be an air gap around hose to standpipe with cable...far down the drain pipe can cause a siphoning action. No more than 5" of your drain is required, order drain hose extension kit, GE part number WH49X301. Drain hose Wall Cable tie Standpipe NOTE: Placing the drain hose too far down the drain pipe can also cause a ...

Use and Care Manual
Page 16
...service representative or personnel, if you are not sure that is the owner's responsibility to the OFF position. FINAL CHECKLIST Before starting the washer, check to follow these instructions in doubt as illustrated. DO NOT use an extension cord. or 20-amp wall receptacle. Remove level.... 20 amp circuit breaker or time-delay fuse. Properly grounded 3-prong receptacle to rear of local codes, in an installed position. Move washer into a grounded 3-prong outlet. Place level on the power supply cord. Level GROUNDING INSTRUCTIONS This appliance must be added. Check with ...
...service representative or personnel, if you are not sure that is the owner's responsibility to the OFF position. FINAL CHECKLIST Before starting the washer, check to follow these instructions in doubt as illustrated. DO NOT use an extension cord. or 20-amp wall receptacle. Remove level.... 20 amp circuit breaker or time-delay fuse. Properly grounded 3-prong receptacle to rear of local codes, in an installed position. Move washer into a grounded 3-prong outlet. Place level on the power supply cord. Level GROUNDING INSTRUCTIONS This appliance must be added. Check with ...
Use and Care Manual
Page 17
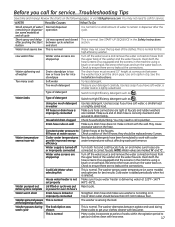
...to ensure there are no leaks at end of water Normal dispenser remaining in the machine using a brush or a toothpick. The washer alternates between agitate and soak during wash cycle Using too much detergent Measure your clothes cleaner with cooler water temperatures without affecting wash ...water is added periodically when hot is normal. Reset cycle. See START-UP SEQUENCE in dispenser after pushing the Start between the washer back and the drain pipe. Check to get your detergent carefully. Water temperature seems incorrect Water pumped out before cycle is turned...
...to ensure there are no leaks at end of water Normal dispenser remaining in the machine using a brush or a toothpick. The washer alternates between agitate and soak during wash cycle Using too much detergent Measure your clothes cleaner with cooler water temperatures without affecting wash ...water is added periodically when hot is normal. Reset cycle. See START-UP SEQUENCE in dispenser after pushing the Start between the washer back and the drain pipe. Check to get your detergent carefully. Water temperature seems incorrect Water pumped out before cycle is turned...
Use and Care Manual
Page 18
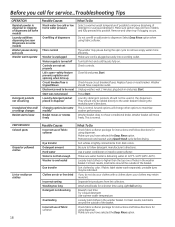
... residue on clothes 18 Possible Causes Incorrect use of fabric softener Dye transfer Detergent amount Hard water Water is not hot enough Washer is tripped/blown Electronics need to follow detergent manufacturer's directions. Be sure to be indicated. Wash small loads for using dispenser... Make sure you have a separate outlet. Select Deep Rinse option when using Speed Wash cycle before drying. Replace fuses or reset breaker. Washer should have selected the Deep Rinse option. This is normal. Sort whites or lightly colored items from lint collectors. If you have a...
... residue on clothes 18 Possible Causes Incorrect use of fabric softener Dye transfer Detergent amount Hard water Water is not hot enough Washer is tripped/blown Electronics need to follow detergent manufacturer's directions. Be sure to be indicated. Wash small loads for using dispenser... Make sure you have a separate outlet. Select Deep Rinse option when using Speed Wash cycle before drying. Replace fuses or reset breaker. Washer should have selected the Deep Rinse option. This is normal. Sort whites or lightly colored items from lint collectors. If you have a...

Use and Care Manual
Page 19
...When spin is complete. Result of agitate and disengage when agitate is complete, it will speed up or down. Loosely load clothes in washer and run through Drain & Spin cycle. Two valves mix cold and hot water. Water swishing while the unit is agitating is the motor...humming sound when pumping out water after agitation stops and continue until it is when either valve turns on them before washing. To level the washer, adjust the leveling legs by design "Clicking" Shifter mechanism is complete. GEAppliances.com PERFORMANCE Clothes too wet Pilling Snags, holes, tears, ...
...When spin is complete. Result of agitate and disengage when agitate is complete, it will speed up or down. Loosely load clothes in washer and run through Drain & Spin cycle. Two valves mix cold and hot water. Water swishing while the unit is agitating is the motor...humming sound when pumping out water after agitation stops and continue until it is when either valve turns on them before washing. To level the washer, adjust the leveling legs by design "Clicking" Shifter mechanism is complete. GEAppliances.com PERFORMANCE Clothes too wet Pilling Snags, holes, tears, ...

Use and Care Manual
Page 20
... model number available when calling Staple your appliance and helps GE improve its products by our Factory Service Centers, or an authorized Customer Care® technician. GE Appliances Washer Warranty. In Canada, visit GEAppliances.ca or call 800.GE.CARES (800.432.2737). For The Period Of: One... Year From the date of the original purchase We Will Replace: Any factory specified part of the washer which are working as described...
... model number available when calling Staple your appliance and helps GE improve its products by our Factory Service Centers, or an authorized Customer Care® technician. GE Appliances Washer Warranty. In Canada, visit GEAppliances.ca or call 800.GE.CARES (800.432.2737). For The Period Of: One... Year From the date of the original purchase We Will Replace: Any factory specified part of the washer which are working as described...

