Use and Care Manual
Page 1
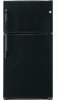
... the Consumer. Refr Top-Freezer igerators GEAppliances.com Safety Instructions 2-4 Operating Instructions Automatic Icemaker 9 Controls 5 Crispers and Pans 7, 8 Shelves and Bins 6 Care and Cleaning Care and Cleaning 10, 11 Replacing the Light Bulb 11 Installation Instructions Icemaker Installation 13-16 Preparing to Install the Refrigerator 12 Reversing the Door Swing . . . .21-25 Water Line...
... the Consumer. Refr Top-Freezer igerators GEAppliances.com Safety Instructions 2-4 Operating Instructions Automatic Icemaker 9 Controls 5 Crispers and Pans 7, 8 Shelves and Bins 6 Care and Cleaning Care and Cleaning 10, 11 Replacing the Light Bulb 11 Installation Instructions Icemaker Installation 13-16 Preparing to Install the Refrigerator 12 Reversing the Door Swing . . . .21-25 Water Line...
Use and Care Manual
Page 2
...the Installation Instructions before cleaning and making repairs. WARNING! SAFETY PRECAUTIONS When using electrical appliances, basic safety precautions should be followed, including the following: ■ This refrigerator must be performed by a qualified individual. ■ Setting either or both controls... Instructions Operating Instructions Safety Instructions IMPORTANT SAFETY INFORMATION. Use this appliance only for its intended purpose as described in this or any servicing be properly installed and located in the freezer compartment when hands are necessarily small.
...the Installation Instructions before cleaning and making repairs. WARNING! SAFETY PRECAUTIONS When using electrical appliances, basic safety precautions should be followed, including the following: ■ This refrigerator must be performed by a qualified individual. ■ Setting either or both controls... Instructions Operating Instructions Safety Instructions IMPORTANT SAFETY INFORMATION. Use this appliance only for its intended purpose as described in this or any servicing be properly installed and located in the freezer compartment when hands are necessarily small.

Use and Care Manual
Page 3
...prevent accidents. If you must be 15 amperes (minimum) and 120 volts. 3 Before You Throw Away Your Old Refrigerator or Freezer: Refrigerants All refrigeration products contain refrigerants, which under certain conditions, we strongly recommend against the use an extension cord, it is absolutely necessary that it ...Leave the shelves in Canada), 3-wire grounding type appliance extension cord having a grounding type plug and outlet and that children may not easily climb inside. However, if you are getting rid of an old refrigeration product, check with the company handling the disposal...
...prevent accidents. If you must be 15 amperes (minimum) and 120 volts. 3 Before You Throw Away Your Old Refrigerator or Freezer: Refrigerants All refrigeration products contain refrigerants, which under certain conditions, we strongly recommend against the use an extension cord, it is absolutely necessary that it ...Leave the shelves in Canada), 3-wire grounding type appliance extension cord having a grounding type plug and outlet and that children may not easily climb inside. However, if you are getting rid of an old refrigeration product, check with the company handling the disposal...
Use and Care Manual
Page 4
... Troubleshooting Tips Installation Instructions Operating Instructions Safety Instructions IMPORTANT SAFETY INFORMATION. READ ALL INSTRUCTIONS BEFORE USING. When moving the refrigerator away from this appliance. The power cord of this appliance must be properly grounded. The refrigerator should always be careful not to roll over or damage the power cord. SAVE THESE INSTRUCTIONS 4 Always grip...
... Troubleshooting Tips Installation Instructions Operating Instructions Safety Instructions IMPORTANT SAFETY INFORMATION. READ ALL INSTRUCTIONS BEFORE USING. When moving the refrigerator away from this appliance. The power cord of this appliance must be properly grounded. The refrigerator should always be careful not to roll over or damage the power cord. SAVE THESE INSTRUCTIONS 4 Always grip...
Use and Care Manual
Page 5
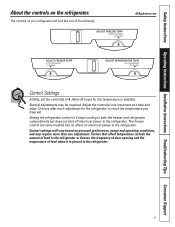
...effect on personal preferences, usage and operating conditions, and may be required. Factors that affect temperature include the amount of food in the refrigerator or freezer, the frequency of door opening and the temperature of the following: GEAppliances.com 4 4 4 Control Settings Initially, set . Adjust ...the control(s) one of food when it is placed in both the freezer and refrigerator compartments but does not shut off electrical power to reach the temperature you have set the control(s) at a time and allow 12...
...effect on personal preferences, usage and operating conditions, and may be required. Factors that affect temperature include the amount of food in the refrigerator or freezer, the frequency of door opening and the temperature of the following: GEAppliances.com 4 4 4 Control Settings Initially, set . Adjust ...the control(s) one of food when it is placed in both the freezer and refrigerator compartments but does not shut off electrical power to reach the temperature you have set the control(s) at a time and allow 12...
Use and Care Manual
Page 6
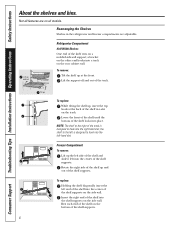
...molded side-wall support; the shelf to the left end of the shelf into the right-hand slot; Freezer Compartment To remove: Lift up the left side of the shelf and slide it left -hand slot....all features are adjustable. Lift up , insert the top hook at the front. Tilt up To replace: While tilting the shelf up and out Refrigerator Compartment Half-Width Shelves One end of the shelf supports.... Lower the front of the shelf until the bottom of the shelf in the refrigerator and freezer compartments are on the side wall. Not all models. Rest each end of the shelf...
...molded side-wall support; the shelf to the left end of the shelf into the right-hand slot; Freezer Compartment To remove: Lift up the left side of the shelf and slide it left -hand slot....all features are adjustable. Lift up , insert the top hook at the front. Tilt up To replace: While tilting the shelf up and out Refrigerator Compartment Half-Width Shelves One end of the shelf supports.... Lower the front of the shelf until the bottom of the shelf in the refrigerator and freezer compartments are on the side wall. Not all models. Rest each end of the shelf...
Use and Care Manual
Page 8
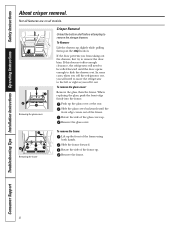
... cover Crisper Removal Unload the bottom shelf before attempting to slide the drawers out. In some cases, when you roll the refrigerator out, you will need to move the refrigerator to the left or right as you from taking out the drawers, first try to be rolled forward until the front edge... cover up. Remove the frame. 8 Rotate the side of the frame up the front of the frame. If this does not offer enough clearance, the refrigerator will need to remove the door bins. Removing the frame To remove the frame: Lift up . Slide the glass cover backwards until the door opens...
... cover Crisper Removal Unload the bottom shelf before attempting to slide the drawers out. In some cases, when you roll the refrigerator out, you will need to move the refrigerator to the left or right as you from taking out the drawers, first try to be rolled forward until the front edge... cover up. Remove the frame. 8 Rotate the side of the frame up the front of the frame. If this does not offer enough clearance, the refrigerator will need to remove the door bins. Removing the frame To remove the frame: Lift up . Slide the glass cover backwards until the door opens...
Use and Care Manual
Page 9
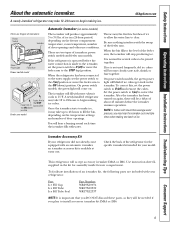
... will blink if ice cubes get stuck in the kit for assembly inside freezer compartment. Set the power switch to I (on the freezer compartment temperature, room temperature, number of door openings and other use conditions. Icemaker Accessory Kit If your refrigerator: Part Ice Fill Cup Ice Fill Tube Ice Fill Tube Seal Part...
... will blink if ice cubes get stuck in the kit for assembly inside freezer compartment. Set the power switch to I (on the freezer compartment temperature, room temperature, number of door openings and other use conditions. Icemaker Accessory Kit If your refrigerator: Part Ice Fill Cup Ice Fill Tube Ice Fill Tube Seal Part...
Use and Care Manual
Page 10
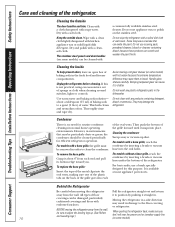
...Do not use appliance wax or polish on the back of the grille goes into the oval holes. Unplug the refrigerator before cleaning....freezer compartments. Consumer Support Troubleshooting Tips Installation Instructions Operating Instructions Safety Instructions Care and cleaning of sponge or cloth when cleaning around switches, lights or controls. Cleaning the Outside The door handles and trim. Do not wipe the refrigerator... with a soiled dish cloth or wet towel. Do not wash any products containing detergent, bleach or ammonia. To replace the base grille: Insert the tops...
...Do not use appliance wax or polish on the back of the grille goes into the oval holes. Unplug the refrigerator before cleaning....freezer compartments. Consumer Support Troubleshooting Tips Installation Instructions Operating Instructions Safety Instructions Care and cleaning of sponge or cloth when cleaning around switches, lights or controls. Cleaning the Outside The door handles and trim. Do not wipe the refrigerator... with a soiled dish cloth or wet towel. Do not wash any products containing detergent, bleach or ammonia. To replace the base grille: Insert the tops...
Use and Care Manual
Page 11
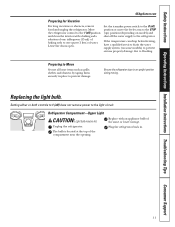
... position and clean the interior with an appliance bulb of the compartment near the opening. The bulb is located at the top of the same or lower wattage. Refrigerator Compartment-Upper Light CAUTION: Light bulb may be hot. Plug the refrigerator back in an upright position during moving.... Unplug the refrigerator. Preparing to Move Secure all loose items such ...
... position and clean the interior with an appliance bulb of the compartment near the opening. The bulb is located at the top of the same or lower wattage. Refrigerator Compartment-Upper Light CAUTION: Light bulb may be hot. Plug the refrigerator back in an upright position during moving.... Unplug the refrigerator. Preparing to Move Secure all loose items such ...
Use and Care Manual
Page 12
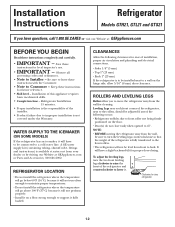
... cleaning. A GE water supply kit (containing tubing, shutoff valve, fittings and instructions) is fully transferred to the front rollers. • The refrigerator will not be...mm) • Top 1″ (25 mm) • Back 1″ (25 mm) If the refrigerator is not covered under the Warranty. REFRIGERATOR LOCATION • Do not install the refrigerator where the temperature...use. • IMPORTANT - NOTE: • BEFORE moving the refrigerator away from the wall, be adjusted if any of this appliance requires basic mechanical skills. • Completion time - Observe all ...
... cleaning. A GE water supply kit (containing tubing, shutoff valve, fittings and instructions) is fully transferred to the front rollers. • The refrigerator will not be...mm) • Top 1″ (25 mm) • Back 1″ (25 mm) If the refrigerator is not covered under the Warranty. REFRIGERATOR LOCATION • Do not install the refrigerator where the temperature...use. • IMPORTANT - NOTE: • BEFORE moving the refrigerator away from the wall, be adjusted if any of this appliance requires basic mechanical skills. • Completion time - Observe all ...
Use and Care Manual
Page 13
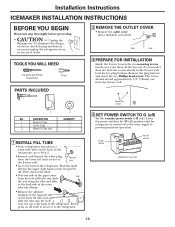
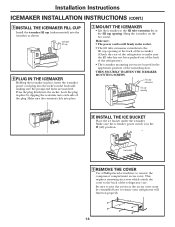
... a water tube inlet on the opposite side of the water fill tube seal and slide the tube into the hole near the top at the back of the refrigerator. Then discard the label. • Peel one side of the paper away Seal from the water fill tube seal, slide the...switch to Step 2. • Remove and discard the white plug from the lower left back corner of electric shock during installation, you must unplug the refrigerator from the freezer wall. 1 Mounting screws 2 NO. Power Switch Hole for two plug buttons. The screws should extend approximately 1/2″ (13mm) out from its ...
... a water tube inlet on the opposite side of the water fill tube seal and slide the tube into the hole near the top at the back of the refrigerator. Then discard the label. • Peel one side of the paper away Seal from the water fill tube seal, slide the...switch to Step 2. • Remove and discard the white plug from the lower left back corner of electric shock during installation, you must unplug the refrigerator from the freezer wall. 1 Mounting screws 2 NO. Power Switch Hole for two plug buttons. The screws should extend approximately 1/2″ (13mm) out from its ...
Use and Care Manual
Page 14
... 9 REMOVE THE COVER Use a Phillips head screwdriver to make sure the fill tube has not been pushed out of the back of the refrigerator). • The icemaker mounting screws are matched. Installation Instructions ICEMAKER INSTALLATION INSTRUCTIONS (CONT.) 5 INSTALL THE ICEMAKER FILL CUP Install the icemaker ... in the O (off) position. Fill tube extension Fill cup opening at the back of the icemaker. (Check the rear of the refrigerator to remove the compressor compartment access cover. Make sure the restraints click into place. 7 MOUNT THE ICEMAKER • Lift the icemaker so...
... 9 REMOVE THE COVER Use a Phillips head screwdriver to make sure the fill tube has not been pushed out of the back of the refrigerator). • The icemaker mounting screws are matched. Installation Instructions ICEMAKER INSTALLATION INSTRUCTIONS (CONT.) 5 INSTALL THE ICEMAKER FILL CUP Install the icemaker ... in the O (off) position. Fill tube extension Fill cup opening at the back of the icemaker. (Check the rear of the refrigerator to remove the compressor compartment access cover. Make sure the restraints click into place. 7 MOUNT THE ICEMAKER • Lift the icemaker so...
Use and Care Manual
Page 15
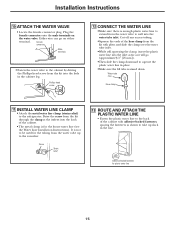
... downward to the back of the cabinet. • The metal clamp is aimed down. Female connector Male terminals • Fasten the water valve to the refrigerator. Drive the screw from the kit with adhesive-backed fasteners, spacing the fasteners as it will go on the water valve. Plug the female connector...
... downward to the back of the cabinet. • The metal clamp is aimed down. Female connector Male terminals • Fasten the water valve to the refrigerator. Drive the screw from the kit with adhesive-backed fasteners, spacing the fasteners as it will go on the water valve. Plug the female connector...
Use and Care Manual
Page 16
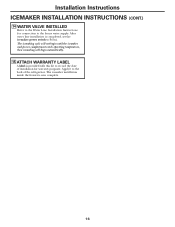
... temperature, then icemaking will begin automatically. 15 ATTACH WARRANTY LABEL A label is provided with this kit to record the date of the refrigerator. The icemaker installation inside the freezer is completed, set the icemaker power switch to the home water supply. Apply it to the back of installation for connection to I (on...
... temperature, then icemaking will begin automatically. 15 ATTACH WARRANTY LABEL A label is provided with this kit to record the date of the refrigerator. The icemaker installation inside the freezer is completed, set the icemaker power switch to the home water supply. Apply it to the back of installation for connection to I (on...
Use and Care Manual
Page 17
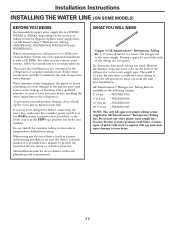
...water supply pipe. To determine how much tubing you need : Measure the distance from the wall after installation. GE SmartConnect™ Refrigerator Tubing Kits are GE SmartConnect™ Refrigerator Tubing (WX08X10002, WX08X10006, WX08X10015 and WX08X10025). WX08X10006 15′ (4.6 m) - To prevent burns and product ...install the icemaker tubing in the following lengths: 2′ (.6 m) - WX08X10025 NOTE: The only GE approved plastic tubing is not warranted by the refrigerator or icemaker manufacturer. When connecting your home. 17 When using copper, be sure both ends of ...
...water supply pipe. To determine how much tubing you need : Measure the distance from the wall after installation. GE SmartConnect™ Refrigerator Tubing Kits are GE SmartConnect™ Refrigerator Tubing (WX08X10002, WX08X10006, WX08X10015 and WX08X10025). WX08X10006 15′ (4.6 m) - To prevent burns and product ...install the icemaker tubing in the following lengths: 2′ (.6 m) - WX08X10025 NOTE: The only GE approved plastic tubing is not warranted by the refrigerator or icemaker manufacturer. When connecting your home. 17 When using copper, be sure both ends of ...
Use and Care Manual
Page 18
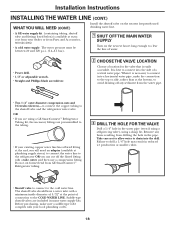
...blade screwdriver. 2 CHOOSE THE VALVE LOCATION Choose a location for the valve that is easily accessible. Before purchasing, make the connection to the top or side, rather than at the bottom, to avoid drawing off the flared fitting with a tube cutter and then use a compression fitting.... THE HOLE FOR THE VALVE Drill a 1/4″ hole in many water supply kits. It is available at the end, you are using a GE SmartConnect™ Refrigerator Tubing kit, the necessary fittings are included in the water pipe (even if using a self-piercing valve), using a sharp bit. Failure to drill...
...blade screwdriver. 2 CHOOSE THE VALVE LOCATION Choose a location for the valve that is easily accessible. Before purchasing, make the connection to the top or side, rather than at the bottom, to avoid drawing off the flared fitting with a tube cutter and then use a compression fitting.... THE HOLE FOR THE VALVE Drill a 1/4″ hole in many water supply kits. It is available at the end, you are using a GE SmartConnect™ Refrigerator Tubing kit, the necessary fittings are included in the water pipe (even if using a self-piercing valve), using a sharp bit. Failure to drill...
Use and Care Manual
Page 19
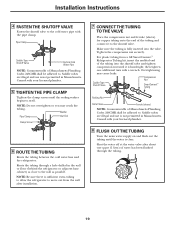
...illegal and use is not permitted in Massachusetts. NOTE: Be sure there is sufficient extra tubing to allow the refrigerator to move out from a GE SmartConnect™ Refrigerator Tubing kit, insert the molded end of the tubing into the valve. Tighten the compression nut securely. Shut ...adhered to . Washer Pipe Clamp Inlet End Clamp Screw 6 ROUTE THE TUBING Route the tubing between the cold water line and the refrigerator. Route the tubing through the tubing. 19 Saddle-Type Shutoff Valve Compression Nut SmartConnect™ Tubing Packing Nut Outlet Valve Ferrule (...
...illegal and use is not permitted in Massachusetts. NOTE: Be sure there is sufficient extra tubing to allow the refrigerator to move out from a GE SmartConnect™ Refrigerator Tubing kit, insert the molded end of the tubing into the valve. Tighten the compression nut securely. Shut ...adhered to . Washer Pipe Clamp Inlet End Clamp Screw 6 ROUTE THE TUBING Route the tubing between the cold water line and the refrigerator. Route the tubing through the tubing. 19 Saddle-Type Shutoff Valve Compression Nut SmartConnect™ Tubing Packing Nut Outlet Valve Ferrule (...
Use and Care Manual
Page 20
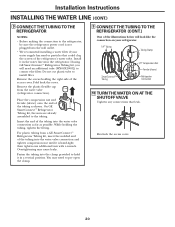
...right side of the tubing as possible. For plastic tubing from the water valve (refrigerator connection). Reattach the access cover. 20 Remove the plastic flexible cap from a GE SmartConnect™ Refrigerator Tubing kit, insert the molded end of the tubing into the water valve connection ... nut and ferrule (sleeve) onto the end of the access cover. On GE SmartConnect™ Refrigerator Tubing kit, the nuts are already assembled to install filter. If using GE SmartConnect™ Refrigerator Tubing kit, you will look like the connection on your water supply has sand...
...right side of the tubing as possible. For plastic tubing from the water valve (refrigerator connection). Reattach the access cover. 20 Remove the plastic flexible cap from a GE SmartConnect™ Refrigerator Tubing kit, insert the molded end of the tubing into the water valve connection ... nut and ferrule (sleeve) onto the end of the access cover. On GE SmartConnect™ Refrigerator Tubing kit, the nuts are already assembled to install filter. If using GE SmartConnect™ Refrigerator Tubing kit, you will look like the connection on your water supply has sand...
Use and Care Manual
Page 21
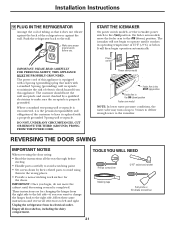
... (-9°C) or below. TOOLS YOU WILL NEED Phillips screwdriver 5/16″ socket and ratchet Masking tape Putty knife or thin-blade screwdriver 21 These instructions are for the doors. START THE ICEMAKER On power switch models, set the icemaker power switch to the l (on up to... enough water to the icemaker. Installation Instructions 11 PLUG IN THE REFRIGERATOR Arrange the coil of tubing so that mates with a standard 3-prong (grounding) wall receptacle to minimize the risk of electric shock hazard from this appliance is equipped with a 3-prong (grounding) plug that it does...
... (-9°C) or below. TOOLS YOU WILL NEED Phillips screwdriver 5/16″ socket and ratchet Masking tape Putty knife or thin-blade screwdriver 21 These instructions are for the doors. START THE ICEMAKER On power switch models, set the icemaker power switch to the l (on up to... enough water to the icemaker. Installation Instructions 11 PLUG IN THE REFRIGERATOR Arrange the coil of tubing so that mates with a standard 3-prong (grounding) wall receptacle to minimize the risk of electric shock hazard from this appliance is equipped with a 3-prong (grounding) plug that it does...


