Use and Care Manual
Page 2
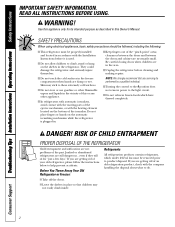
... liquids in the freezer compartment when hands are not problems of the icemaker. Be careful closing doors when children are getting rid of your old refrigerator, please follow the instructions below to do. ■ Take off the doors. ■ Leave the shelves in place so that any other appliance. ■ In refrigerators with automatic...
... liquids in the freezer compartment when hands are not problems of the icemaker. Be careful closing doors when children are getting rid of your old refrigerator, please follow the instructions below to do. ■ Take off the doors. ■ Leave the shelves in place so that any other appliance. ■ In refrigerators with automatic...
Use and Care Manual
Page 3
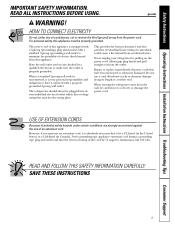
... against the use an extension cord, it is absolutely necessary that it is your refrigerator by a qualified electrician to roll over or damage the power cord. For personal safety, this appliance. The refrigerator should always be properly grounded. Do not use a cord that have it replaced ... INSTRUCTIONS 3 Always grip plug firmly and pull straight out from the power cord. When moving the refrigerator away from this appliance must use of this appliance is properly grounded. ge.com WARNING! Where a standard 2-prong wall outlet is encountered, it be careful not to make ...
... against the use an extension cord, it is absolutely necessary that it is your refrigerator by a qualified electrician to roll over or damage the power cord. For personal safety, this appliance. The refrigerator should always be properly grounded. Do not use a cord that have it replaced ... INSTRUCTIONS 3 Always grip plug firmly and pull straight out from the power cord. When moving the refrigerator away from this appliance must use of this appliance is properly grounded. ge.com WARNING! Where a standard 2-prong wall outlet is encountered, it be careful not to make ...
Use and Care Manual
Page 4
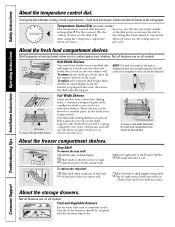
...Width Shelves One end of the drawers should be emptied and the drawers wiped dry. 4 With shelf front raised slightly, hook the bracket's top lug into a track on the shelf supports, the shelf will stop -locks. When placed correctly on the rear cabinet wall. Lift rear...hours for the refrigerator to the right and take it . Consumer Support Troubleshooting Tips Installation Instructions Operating Instructions Safety Instructions About the temperature control dial. Insert a coin into the slot in the middle of the dial and you can be opened fully About the freezer compartment shelves. 1...
...Width Shelves One end of the drawers should be emptied and the drawers wiped dry. 4 With shelf front raised slightly, hook the bracket's top lug into a track on the shelf supports, the shelf will stop -locks. When placed correctly on the rear cabinet wall. Lift rear...hours for the refrigerator to the right and take it . Consumer Support Troubleshooting Tips Installation Instructions Operating Instructions Safety Instructions About the temperature control dial. Insert a coin into the slot in the middle of the dial and you can be opened fully About the freezer compartment shelves. 1...
Use and Care Manual
Page 5
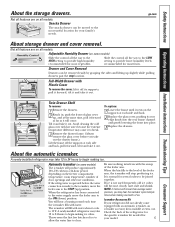
Not all models. ge.com About storage drawer and cover removal. Adjustable Humidity Drawer (on all ... ice. Avoid cleaning the cold glass cover with the sweep of the refrigerator for the specific icemaker kit needed for your family's needs. If the refrigerator is made to the icemaker, move the feeler arm to the STOP ...pulling drawers past the stop producing ice. When the refrigerator has been connected to the water supply, move the feeler arm to the ON (down ) position Automatic Icemaker (on the freezer compartment temperature, room temperature, number of ice to ...
Not all models. ge.com About storage drawer and cover removal. Adjustable Humidity Drawer (on all ... ice. Avoid cleaning the cold glass cover with the sweep of the refrigerator for the specific icemaker kit needed for your family's needs. If the refrigerator is made to the icemaker, move the feeler arm to the STOP ...pulling drawers past the stop producing ice. When the refrigerator has been connected to the water supply, move the feeler arm to the ON (down ) position Automatic Icemaker (on the freezer compartment temperature, room temperature, number of ice to ...
Use and Care Manual
Page 6
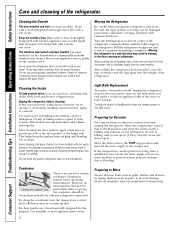
... appliance parts stores. 6 Preparing to Move Secure all loose items such as grille, shelves and drawers by pushing it to position by taping them to 0. Pull the refrigerator straight out and return it straight in the fresh food and freezer compartments. After rolling the refrigerator ...clean, soft cloth. Dry and polish with kitchen appliance wax or mild liquid dish detergent. Do not use a brush specially designed for efficient refrigerator operation. Turning the control to the 0 position does not remove power to the refrigerator. particularly dusty or greasy, the condenser should be...
... appliance parts stores. 6 Preparing to Move Secure all loose items such as grille, shelves and drawers by pushing it to position by taping them to 0. Pull the refrigerator straight out and return it straight in the fresh food and freezer compartments. After rolling the refrigerator ...clean, soft cloth. Dry and polish with kitchen appliance wax or mild liquid dish detergent. Do not use a brush specially designed for efficient refrigerator operation. Turning the control to the 0 position does not remove power to the refrigerator. particularly dusty or greasy, the condenser should be...
Use and Care Manual
Page 7
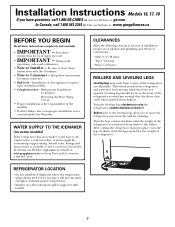
...16, 17, 18 If you to support it . Refrigerator Installation 15 minutes Reversing the Door Swing ...; Top 1″ (25 mm) • Back 1″ (25 mm) ROLLERS AND LEVELING LEGS Leveling legs near each front corner of the refrigerator.... refrigerator are opened about halfway. After rolling the refrigerator back into place, turn the legs clockwise until the weight of this appliance requires...REFRIGERATOR LOCATION • Do not install the refrigerator where the temperature will go below 60°F (16°C) because it will have questions, call 1.800.GE.CARES or visit our Website at: ge...
...16, 17, 18 If you to support it . Refrigerator Installation 15 minutes Reversing the Door Swing ...; Top 1″ (25 mm) • Back 1″ (25 mm) ROLLERS AND LEVELING LEGS Leveling legs near each front corner of the refrigerator.... refrigerator are opened about halfway. After rolling the refrigerator back into place, turn the legs clockwise until the weight of this appliance requires...REFRIGERATOR LOCATION • Do not install the refrigerator where the temperature will go below 60°F (16°C) because it will have questions, call 1.800.GE.CARES or visit our Website at: ge...
Use and Care Manual
Page 8
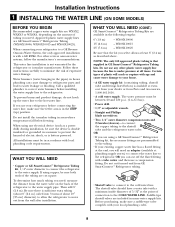
...hazard of about 10″ [25 cm] diameter) to allow the refrigerator to the cold water line. WHAT YOU WILL NEED (CONT.) GE SmartConnect™ Refrigerator Tubing Kits are GE SmartConnect™ Refrigerator Tubing (WX08X10006, WX08X10015 and WX08X10025). WX08X10015 - WX08X10025 Be sure that ... tubing, shutoff valve and fittings listed below freezing. Do not install the icemaker tubing in GE SmartConnect™ Refrigerator Tubing kits. If using a GE SmartConnect™ Refrigerator Tubing kit, the necessary fittings are included in house plumbing can cut off the flared fitting...
...hazard of about 10″ [25 cm] diameter) to allow the refrigerator to the cold water line. WHAT YOU WILL NEED (CONT.) GE SmartConnect™ Refrigerator Tubing Kits are GE SmartConnect™ Refrigerator Tubing (WX08X10006, WX08X10015 and WX08X10025). WX08X10015 - WX08X10025 Be sure that ... tubing, shutoff valve and fittings listed below freezing. Do not install the icemaker tubing in GE SmartConnect™ Refrigerator Tubing kits. If using a GE SmartConnect™ Refrigerator Tubing kit, the necessary fittings are included in house plumbing can cut off the flared fitting...
Use and Care Manual
Page 9
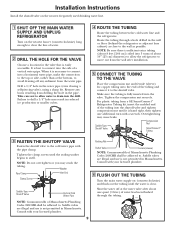
...water off at the bottom, to avoid drawing off any burrs resulting from a GE SmartConnect™ Refrigerator Tubing kit, insert the molded end of the tubing into a horizontal water pipe, make the connection to the top or side, rather than at the water valve after installation. 5 CONNECT THE .... Installation Instructions Install the shutoff valve on the nearest frequently used drinking water line. 1 SHUT OFF THE MAIN WATER SUPPLY AND UNPLUG REFRIGERATOR Turn on (counterclockwise) and flush out the tubing until the water is fully inserted into the side of a vertical water pipe. When...
...water off at the bottom, to avoid drawing off any burrs resulting from a GE SmartConnect™ Refrigerator Tubing kit, insert the molded end of the tubing into a horizontal water pipe, make the connection to the top or side, rather than at the water valve after installation. 5 CONNECT THE .... Installation Instructions Install the shutoff valve on the nearest frequently used drinking water line. 1 SHUT OFF THE MAIN WATER SUPPLY AND UNPLUG REFRIGERATOR Turn on (counterclockwise) and flush out the tubing until the water is fully inserted into the side of a vertical water pipe. When...
Use and Care Manual
Page 10
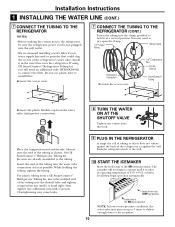
...the tubing as possible. It will then begin to the icemaker. 10 Do not cut plastic tube to the tubing. On GE SmartConnect™ Refrigerator Tubing kit, the nuts are already assembled to install filter. While holding the tubing, tighten the fitting. Overtightening may turn with... a wrench. If using GE SmartConnect™ Refrigerator Tubing kit, you will not begin operation automatically. You may need an additional tube (WX08X10002) to pry open the clamp. 1/4&#...
...the tubing as possible. It will then begin to the icemaker. 10 Do not cut plastic tube to the tubing. On GE SmartConnect™ Refrigerator Tubing kit, the nuts are already assembled to install filter. While holding the tubing, tighten the fitting. Overtightening may turn with... a wrench. If using GE SmartConnect™ Refrigerator Tubing kit, you will not begin operation automatically. You may need an additional tube (WX08X10002) to pry open the clamp. 1/4&#...
Use and Care Manual
Page 11
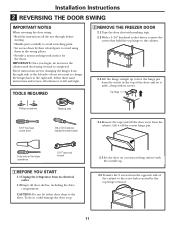
...-blade screwdriver 5/16″ open-end wrench 1 BEFORE YOU START 1.1 Unplug the refrigerator from the opposite side of the cabinet to the screw holes vacated by their related parts to avoid using... them in the top of the door and set it off the center hinge pin. CAUTION: Do not let...in the wrong places. • Provide a non-scratching work surface for the doors. TOOLS REQUIRED 2 REMOVE THE FREEZER DOOR 2.1 Tape the door shut with its electrical outlet. 1.2 Empty all door shelves, including the dairy compartment. ...
...-blade screwdriver 5/16″ open-end wrench 1 BEFORE YOU START 1.1 Unplug the refrigerator from the opposite side of the cabinet to the screw holes vacated by their related parts to avoid using... them in the top of the door and set it off the center hinge pin. CAUTION: Do not let...in the wrong places. • Provide a non-scratching work surface for the doors. TOOLS REQUIRED 2 REMOVE THE FREEZER DOOR 2.1 Tape the door shut with its electrical outlet. 1.2 Empty all door shelves, including the dairy compartment. ...
Use and Care Manual
Page 15
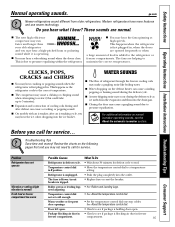
.... Do you may run faster and longer than HUMMM... These sounds are opened frequently or when a large amount of refrigerant through the freezer cooling coils may make a gurgling noise like boiling water. ■ Water dropping on the defrost heater can cause a...• Wait about 30 minutes for service... Refrigerator is operating. ■ You may cause a gurgling sound due to the refrigerator or freezer compartments. Modern refrigerators have more features and use newer technology. compartment. 15 ge.com Newer refrigerators sound different from the evaporator and flows into...
.... Do you may run faster and longer than HUMMM... These sounds are opened frequently or when a large amount of refrigerant through the freezer cooling coils may make a gurgling noise like boiling water. ■ Water dropping on the defrost heater can cause a...• Wait about 30 minutes for service... Refrigerator is operating. ■ You may cause a gurgling sound due to the refrigerator or freezer compartments. Modern refrigerators have more features and use newer technology. compartment. 15 ge.com Newer refrigerators sound different from the evaporator and flows into...
Use and Care Manual
Page 16
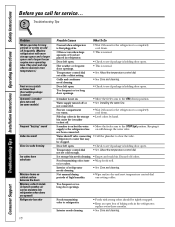
...the STOP (up cubes in . Piled up ) position. Foods transmitting odor to ice cubes. Door left open . Keeping it supply to the refrigerator has on . • Move the feeler arm to the ON (down) position. Icemaker is on but the water • Move the ... the doors Moisture collects inside (in humid weather, air carries moisture into refrigerator when doors are placed in the refrigerator; Water supply turned off . Freezer compartment too warm. • Wait 24 hours for the refrigerator to see if package is normal. • See About the temperature control...
...the STOP (up cubes in . Piled up ) position. Foods transmitting odor to ice cubes. Door left open . Keeping it supply to the refrigerator has on . • Move the feeler arm to the ON (down) position. Icemaker is on but the water • Move the ... the doors Moisture collects inside (in humid weather, air carries moisture into refrigerator when doors are placed in the refrigerator; Water supply turned off . Freezer compartment too warm. • Wait 24 hours for the refrigerator to see if package is normal. • See About the temperature control...

Use and Care Manual
Page 17
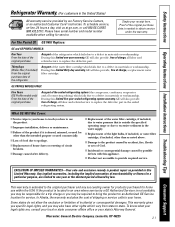
...calling for home use within 48 hours following the delivery of the appliance. • Damage to finish after delivery. • Improper installation-proper installation includes adequate air circulation to the refrigeration system, adequate electrical, plumbing and other connecting facilities. • ...Replace at Mabe's Option GE Profile: Ten (10) Years GE and All Other Brands: One (1) Year GE Profile: Five (5) Years GE and All Other Brands: One (1) Year One (1) Year Labour GE Profile: Five (5) Years GE and All Other Brands: One (1) Year GE Profile: Five (5) Years GE and All Other Brands...
...calling for home use within 48 hours following the delivery of the appliance. • Damage to finish after delivery. • Improper installation-proper installation includes adequate air circulation to the refrigeration system, adequate electrical, plumbing and other connecting facilities. • ...Replace at Mabe's Option GE Profile: Ten (10) Years GE and All Other Brands: One (1) Year GE Profile: Five (5) Years GE and All Other Brands: One (1) Year One (1) Year Labour GE Profile: Five (5) Years GE and All Other Brands: One (1) Year GE Profile: Five (5) Years GE and All Other Brands...
Use and Care Manual
Page 19
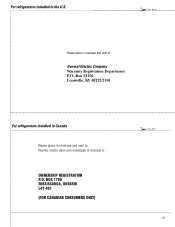
BOX 1780 MISSISSAUGA, ONTARIO L4Y 4G1 (FOR CANADIAN CONSUMERS ONLY) ✁ Cut here 19 For refrigerators installed in the U.S. ✁ Cut here Please place in envelope and mail to : General Electric Company Warranty Registration Department P.O. Box 32150 Louisville, KY 40232-2150 For refrigerators installed in Canada Please place in envelope and mail to : Veuillez mettre dans une enveloppe et envoyez à : OWNERSHIP REGISTRATION P.O.
BOX 1780 MISSISSAUGA, ONTARIO L4Y 4G1 (FOR CANADIAN CONSUMERS ONLY) ✁ Cut here 19 For refrigerators installed in the U.S. ✁ Cut here Please place in envelope and mail to : General Electric Company Warranty Registration Department P.O. Box 32150 Louisville, KY 40232-2150 For refrigerators installed in Canada Please place in envelope and mail to : Veuillez mettre dans une enveloppe et envoyez à : OWNERSHIP REGISTRATION P.O.
Use and Care Manual
Page 20
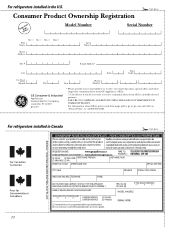
...refrigerators installed in Canada ✁ Cut here 20 Model Number Serial Number First Name Mr. ■ Ms. ■ Mrs. ■ Miss ■ Street Address Last Name Apt. # E-mail Address* Zip City State Code Date Placed In Use Month Day Year Phone _ _ Number GE Consumer & Industrial Appliances... General Electric Company Louisville, KY 40225 ge.com * Please provide your e-mail address to receive, via e-mail, discounts, special offers and...
...refrigerators installed in Canada ✁ Cut here 20 Model Number Serial Number First Name Mr. ■ Ms. ■ Mrs. ■ Miss ■ Street Address Last Name Apt. # E-mail Address* Zip City State Code Date Placed In Use Month Day Year Phone _ _ Number GE Consumer & Industrial Appliances... General Electric Company Louisville, KY 40225 ge.com * Please provide your e-mail address to receive, via e-mail, discounts, special offers and...
Use and Care Manual
Page 21
... period allowed by law. If the product is located in the sealed refrigerating system. To know what your legal rights are limited to one -year warranty, GE will also provide, free of charge, a replacement water filter cartridge. ... in this appliance. ■ Product not accessible to provide required service. What GE Will Not Cover: ■ Service trips to your state's Attorney General. Warrantor: General Electric Company. Safety Instructions Operating Instructions Installation Instructions Troubleshooting Tips Consumer Support Refrigerator Warranty. ...
... period allowed by law. If the product is located in the sealed refrigerating system. To know what your legal rights are limited to one -year warranty, GE will also provide, free of charge, a replacement water filter cartridge. ... in this appliance. ■ Product not accessible to provide required service. What GE Will Not Cover: ■ Service trips to your state's Attorney General. Warrantor: General Electric Company. Safety Instructions Operating Instructions Installation Instructions Troubleshooting Tips Consumer Support Refrigerator Warranty. ...


