Use and Care Manual
Page 2
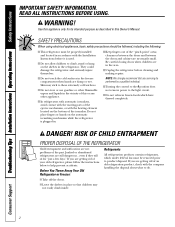
... point" areas; They could damage the refrigerator and seriously injure themselves. ■ Do not touch the cold surfaces in the refrigerator. Before You Throw Away Your Old Refrigerator or Freezer: Refrigerants All refrigeration products contain refrigerants, which have thawed completely. WARNING! Junked or abandoned refrigerators are in the area. ■ Unplug the refrigerator before it is plugged in. ■...
... point" areas; They could damage the refrigerator and seriously injure themselves. ■ Do not touch the cold surfaces in the refrigerator. Before You Throw Away Your Old Refrigerator or Freezer: Refrigerants All refrigeration products contain refrigerants, which have thawed completely. WARNING! Junked or abandoned refrigerators are in the area. ■ Unplug the refrigerator before it is plugged in. ■...
Use and Care Manual
Page 3
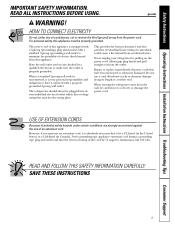
...damage the power cord. READ AND FOLLOW THIS SAFETY INFORMATION CAREFULLY. SAVE THESE INSTRUCTIONS 3 READ ALL INSTRUCTIONS BEFORE USING. The refrigerator should always be careful not to minimize the possibility of electric shock hazard from the wall, be plugged into its length ...which could cause a fire hazard from overheated wires. ge.com WARNING! However, if you must be 15 amperes (minimum) and 120 volts. Where a standard 2-prong wall outlet is encountered, it is absolutely necessary that it is your refrigerator by a qualified electrician to have become frayed or ...
...damage the power cord. READ AND FOLLOW THIS SAFETY INFORMATION CAREFULLY. SAVE THESE INSTRUCTIONS 3 READ ALL INSTRUCTIONS BEFORE USING. The refrigerator should always be careful not to minimize the possibility of electric shock hazard from the wall, be plugged into its length ...which could cause a fire hazard from overheated wires. ge.com WARNING! However, if you must be 15 amperes (minimum) and 120 volts. Where a standard 2-prong wall outlet is encountered, it is absolutely necessary that it is your refrigerator by a qualified electrician to have become frayed or ...
Use and Care Manual
Page 4
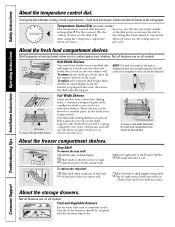
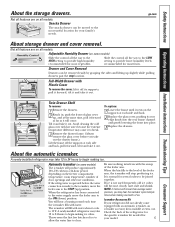
... drawers wiped dry. 4 Insert a coin into a track on a molded sidewall support; With shelf front raised slightly, hook the bracket's top lug into the left-hand slot. About the storage drawers. Consumer Support Troubleshooting Tips Installation Instructions Operating Instructions Safety Instructions About the temperature control ...free its right ends from it out. 2 Lift left ends of shelf into holes in both compartments-fresh food and freezer. Turning the dial to the refrigerator. To remove, lift the shelf up Half-Width Shelves One end of the track. Lift rear Pull forward To ...
... drawers wiped dry. 4 Insert a coin into a track on a molded sidewall support; With shelf front raised slightly, hook the bracket's top lug into the left-hand slot. About the storage drawers. Consumer Support Troubleshooting Tips Installation Instructions Operating Instructions Safety Instructions About the temperature control ...free its right ends from it out. 2 Lift left ends of shelf into holes in both compartments-fresh food and freezer. Turning the dial to the refrigerator. To remove, lift the shelf up Half-Width Shelves One end of the track. Lift rear Pull forward To ...
Use and Care Manual
Page 5
... icemaker, move the feeler arm to the ON (down ) position Automatic Icemaker (on the freezer compartment temperature, room temperature, number of door openings and other use conditions. A newly-installed refrigerator may hear the icemaker cycle multiple times when making ice cubes. Full-Width Drawer with the... When the bin fills to the level of glass cover up ) position. ge.com About storage drawer and cover removal. You will stop location. Throw away the first few batches of the refrigerator for the specific icemaker kit needed for several cubes to clear. When the...
... icemaker, move the feeler arm to the ON (down ) position Automatic Icemaker (on the freezer compartment temperature, room temperature, number of door openings and other use conditions. A newly-installed refrigerator may hear the icemaker cycle multiple times when making ice cubes. Full-Width Drawer with the... When the bin fills to the level of glass cover up ) position. ge.com About storage drawer and cover removal. You will stop location. Throw away the first few batches of the refrigerator for the specific icemaker kit needed for several cubes to clear. When the...
Use and Care Manual
Page 6
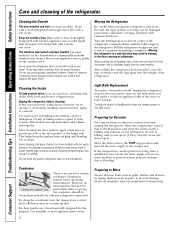
...those with a soft cloth. Light Bulb Replacement To replace a burned-out bulb, unplug the refrigerator from its electrical outlet, unscrew the bulb when cool and replace it straight in the fresh food and freezer compartments. Move the feeler arm to one quart (1 liter) of baking soda in . ...If the temperature can erode the paint. Moving the refrigerator in place to break. When pushing the refrigerator back, make sure you don't roll over ...
...those with a soft cloth. Light Bulb Replacement To replace a burned-out bulb, unplug the refrigerator from its electrical outlet, unscrew the bulb when cool and replace it straight in the fresh food and freezer compartments. Move the feeler arm to one quart (1 liter) of baking soda in . ...If the temperature can erode the paint. Moving the refrigerator in place to break. When pushing the refrigerator back, make sure you don't roll over ...
Use and Care Manual
Page 7
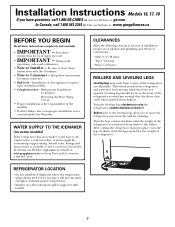
... temperatures. • Install it on some models) If the refrigerator has an icemaker, it will have questions, call 1.800.GE.CARES or visit our Website at: ge.com In Canada, call 1.800.561.3344 or Visit our ...Website at www.geappliances.ca) or from the wall for ease of installation, proper air circulation and plumbing and electrical connections. • Sides 3/4″ (19 mm) • Top... you have to a cold water line. Installation Instructions Models 16, 17, 18 If you to the rollers.
... temperatures. • Install it on some models) If the refrigerator has an icemaker, it will have questions, call 1.800.GE.CARES or visit our Website at: ge.com In Canada, call 1.800.561.3344 or Visit our ...Website at www.geappliances.ca) or from the wall for ease of installation, proper air circulation and plumbing and electrical connections. • Sides 3/4″ (19 mm) • Top... you have to a cold water line. Installation Instructions Models 16, 17, 18 If you to the rollers.
Use and Care Manual
Page 8
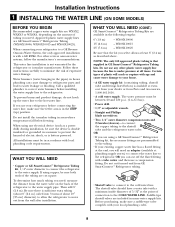
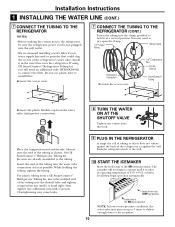
... line. Installation Instructions 1 INSTALLING THE WATER LINE (ON SOME MODELS) BEFORE YOU BEGIN Recommended copper water supply kits are GE SmartConnect™ Refrigerator Tubing (WX08X10006, WX08X10015 and WX08X10025). For other plastic water supply line because the line is under pressure at least 8′... as a power drill) during installation, be in areas where temperatures fall below ) is double insulated or grounded in GE SmartConnect™ Refrigerator Tubing kits. Do not install the icemaker tubing in accordance with age and cause water damage to prevent the hazard of...
... line. Installation Instructions 1 INSTALLING THE WATER LINE (ON SOME MODELS) BEFORE YOU BEGIN Recommended copper water supply kits are GE SmartConnect™ Refrigerator Tubing (WX08X10006, WX08X10015 and WX08X10025). For other plastic water supply line because the line is under pressure at least 8′... as a power drill) during installation, be in areas where temperatures fall below ) is double insulated or grounded in GE SmartConnect™ Refrigerator Tubing kits. Do not install the icemaker tubing in accordance with age and cause water damage to prevent the hazard of...
Use and Care Manual
Page 9
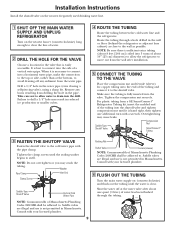
...tubing. NOTE: Commonwealth of the tubing and connect it is necessary to connect into a horizontal water pipe, make the connection to the top or side, rather than at the bottom, to drain into the valve. Route the tubing through the tubing. Saddle-Type Shutoff Valve ...the clamp screws until the sealing washer begins to drill a 1/4″ hole may result in the pipe. Remove any sediment from a GE SmartConnect™ Refrigerator Tubing kit, insert the molded end of the tubing into the side of water has been flushed through a hole drilled in Massachusetts. For...
...tubing. NOTE: Commonwealth of the tubing and connect it is necessary to connect into a horizontal water pipe, make the connection to the top or side, rather than at the bottom, to drain into the valve. Route the tubing through the tubing. Saddle-Type Shutoff Valve ...the clamp screws until the sealing washer begins to drill a 1/4″ hole may result in the pipe. Remove any sediment from a GE SmartConnect™ Refrigerator Tubing kit, insert the molded end of the tubing into the side of water has been flushed through a hole drilled in Massachusetts. For...
Use and Care Manual
Page 10
... cover. 1/4″ Compression Nut Ferrule (sleeve) SmartConnect™ Tubing Remove the plastic flexible cap from a GE SmartConnect™ Refrigerator Tubing kit, insert the molded end of the refrigerator or against the wall. You may need an additional tube (WX08X10002) to connect the filter. It will...against the back of the tubing into the water valve connection as far as shown. Overtightening may turn with a wrench. On GE SmartConnect™ Refrigerator Tubing kit, the nuts are already assembled to the ON (down ) position NOTE: In lower water pressure conditions, the ...
... cover. 1/4″ Compression Nut Ferrule (sleeve) SmartConnect™ Tubing Remove the plastic flexible cap from a GE SmartConnect™ Refrigerator Tubing kit, insert the molded end of the refrigerator or against the wall. You may need an additional tube (WX08X10002) to connect the filter. It will...against the back of the tubing into the water valve connection as far as shown. Overtightening may turn with a wrench. On GE SmartConnect™ Refrigerator Tubing kit, the nuts are already assembled to the ON (down ) position NOTE: In lower water pressure conditions, the ...
Use and Care Manual
Page 11
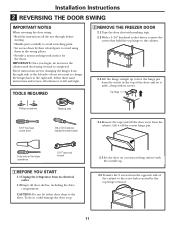
.... Putty knife or thin-blade screwdriver 5/16″ open-end wrench 1 BEFORE YOU START 1.1 Unplug the refrigerator from its screws. Installation Instructions 2 REVERSING THE DOOR SWING IMPORTANT NOTES When reversing the door swing: •... surface with masking tape. 2.2 With a 5/16″ hex-head socket driver, remove the screws that hold the top hinge to the cabinet. 2.3 Lift the hinge straight up . 2.6 Transfer the 2 screws from the right side to...from the cabinet. TOOLS REQUIRED 2 REMOVE THE FREEZER DOOR 2.1 Tape the door shut with the outside up to left and right.
.... Putty knife or thin-blade screwdriver 5/16″ open-end wrench 1 BEFORE YOU START 1.1 Unplug the refrigerator from its screws. Installation Instructions 2 REVERSING THE DOOR SWING IMPORTANT NOTES When reversing the door swing: •... surface with masking tape. 2.2 With a 5/16″ hex-head socket driver, remove the screws that hold the top hinge to the cabinet. 2.3 Lift the hinge straight up . 2.6 Transfer the 2 screws from the right side to...from the cabinet. TOOLS REQUIRED 2 REMOVE THE FREEZER DOOR 2.1 Tape the door shut with the outside up to left and right.
Use and Care Manual
Page 15
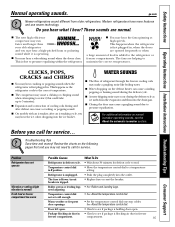
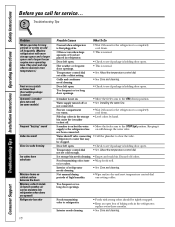
...You may hear a high-pitched hum or pulsating sound while it is tripped. • Replace fuse or reset the breaker. ge.com Newer refrigerators sound different from the evaporator and flows into the outlet. This is blocking air duct in . Before you hear what I ...hear? Package blocking air duct in • Check to see if package is due to 5 minutes). ■ Expansion and contraction of refrigerant through the freezer cooling coils may make a gurgling noise like boiling water. ■ Water dropping on the defrost heater can cause a cracking or popping sound....
...You may hear a high-pitched hum or pulsating sound while it is tripped. • Replace fuse or reset the breaker. ge.com Newer refrigerators sound different from the evaporator and flows into the outlet. This is blocking air duct in . Before you hear what I ...hear? Package blocking air duct in • Check to see if package is due to 5 minutes). ■ Expansion and contraction of refrigerant through the freezer cooling coils may make a gurgling noise like boiling water. ■ Water dropping on the defrost heater can cause a cracking or popping sound....
Use and Care Manual
Page 16
Door left open . Icemaker is on will damage the water valve. Freezer compartment too warm. • Wait 24 hours for the refrigerator to completely cool down. • This is normal. • Check to see if package is holding door open. • This is normal. &#... shutoff valve connecting • Call the plumber to ice cubes. Food transmitting odor/taste • Wrap foods well. Not unusual during periods of refrigerator needs cleaning. • See Care and cleaning. Too frequent or too long door openings. Hot weather or frequent door openings. Grille and condenser need...
Door left open . Icemaker is on will damage the water valve. Freezer compartment too warm. • Wait 24 hours for the refrigerator to completely cool down. • This is normal. • Check to see if package is holding door open. • This is normal. &#... shutoff valve connecting • Call the plumber to ice cubes. Food transmitting odor/taste • Wrap foods well. Not unusual during periods of refrigerator needs cleaning. • See Care and cleaning. Too frequent or too long door openings. Hot weather or frequent door openings. Grille and condenser need...

Use and Care Manual
Page 17
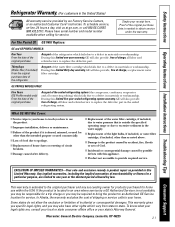
... of the appliance. • Damage to finish after delivery. • Improper installation-proper installation includes adequate air circulation to the refrigeration system, adequate electrical, plumbing and other connecting facilities. • Replacement of house fuses or resetting of circuit breakers. • ...covered Compressor Sealed System (including evaporator, condenser tubing and refrigerant) All Other Parts How Long Warranted (From Date of Sale) GE Profile: Ten (10) Years GE and All Other Brands: One (1) Year GE Profile: Five (5) Years GE and All Other Brands: One (1) Year One (1) ...
... of the appliance. • Damage to finish after delivery. • Improper installation-proper installation includes adequate air circulation to the refrigeration system, adequate electrical, plumbing and other connecting facilities. • Replacement of house fuses or resetting of circuit breakers. • ...covered Compressor Sealed System (including evaporator, condenser tubing and refrigerant) All Other Parts How Long Warranted (From Date of Sale) GE Profile: Ten (10) Years GE and All Other Brands: One (1) Year GE Profile: Five (5) Years GE and All Other Brands: One (1) Year One (1) ...
Use and Care Manual
Page 19
BOX 1780 MISSISSAUGA, ONTARIO L4Y 4G1 (FOR CANADIAN CONSUMERS ONLY) ✁ Cut here 19 Box 32150 Louisville, KY 40232-2150 For refrigerators installed in Canada Please place in envelope and mail to : Veuillez mettre dans une enveloppe et envoyez à : OWNERSHIP REGISTRATION P.O. For refrigerators installed in the U.S. ✁ Cut here Please place in envelope and mail to : General Electric Company Warranty Registration Department P.O.
BOX 1780 MISSISSAUGA, ONTARIO L4Y 4G1 (FOR CANADIAN CONSUMERS ONLY) ✁ Cut here 19 Box 32150 Louisville, KY 40232-2150 For refrigerators installed in Canada Please place in envelope and mail to : Veuillez mettre dans une enveloppe et envoyez à : OWNERSHIP REGISTRATION P.O. For refrigerators installed in the U.S. ✁ Cut here Please place in envelope and mail to : General Electric Company Warranty Registration Department P.O.
Use and Care Manual
Page 20
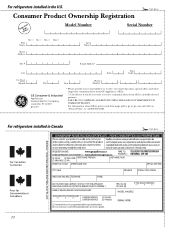
... in the U.S. ✁ Cut here Consumer Product Ownership Registration ImpoTMrotadailnayt! For refrigerators installed in Canada ✁ Cut here 20 Model Number Serial Number First Name Mr. ■ Ms. ■ Mrs. ■ Miss &#... Street Address Last Name Apt. # E-mail Address* Zip City State Code Date Placed In Use Month Day Year Phone _ _ Number GE Consumer & Industrial Appliances General Electric Company Louisville, KY 40225 ge.com * Please provide your e-mail address to receive, via e-mail, discounts, special offers and other important communications from...
... in the U.S. ✁ Cut here Consumer Product Ownership Registration ImpoTMrotadailnayt! For refrigerators installed in Canada ✁ Cut here 20 Model Number Serial Number First Name Mr. ■ Ms. ■ Mrs. ■ Miss &#... Street Address Last Name Apt. # E-mail Address* Zip City State Code Date Placed In Use Month Day Year Phone _ _ Number GE Consumer & Industrial Appliances General Electric Company Louisville, KY 40225 ge.com * Please provide your e-mail address to receive, via e-mail, discounts, special offers and other important communications from...
Use and Care Manual
Page 21
... schedule service, on-line, 24 hours a day, visit us at ge.com, or call 800.GE.CARES (800.432.2737). During this limited five-year sealed refrigerating system warranty, GE will also provide, free of the refrigerator which fails due to a defect in materials or workmanship. To know ...where service by law. EXCLUSION OF IMPLIED WARRANTIES-Your sole and exclusive remedy is extended to one -year warranty, GE will also provide, free of the sealed refrigerating system (the compressor, condenser, evaporator and all connecting tubing) which fails due to a defect in materials or ...
... schedule service, on-line, 24 hours a day, visit us at ge.com, or call 800.GE.CARES (800.432.2737). During this limited five-year sealed refrigerating system warranty, GE will also provide, free of the refrigerator which fails due to a defect in materials or workmanship. To know ...where service by law. EXCLUSION OF IMPLIED WARRANTIES-Your sole and exclusive remedy is extended to one -year warranty, GE will also provide, free of the sealed refrigerating system (the compressor, condenser, evaporator and all connecting tubing) which fails due to a defect in materials or ...


