
Owners Manual
Page 1
...Serial Find these numbers on the gray label on the left side, near the top of California Water Device Certificate 28 Warranty for Canadian Customers . .29 Warranty for U.S. RefrigeraTotp-Froeerzers ge.com Safety Instructions Connect Electricity 3 Extension Cords 2 Proper Disposal 2 Safety Precautions ...to Install the Refrigerator 13 Reversing the Door Swing . . . . . .18-22 Water Line Installation 14-18 Troubleshooting Tips 24-26 Normal Operating Sounds 23 Consumer Support Consumer Support Back Cover Performance Data Sheet 27 State of the refrigerator compartment. 200D8114P001 ...
...Serial Find these numbers on the gray label on the left side, near the top of California Water Device Certificate 28 Warranty for Canadian Customers . .29 Warranty for U.S. RefrigeraTotp-Froeerzers ge.com Safety Instructions Connect Electricity 3 Extension Cords 2 Proper Disposal 2 Safety Precautions ...to Install the Refrigerator 13 Reversing the Door Swing . . . . . .18-22 Water Line Installation 14-18 Troubleshooting Tips 24-26 Normal Operating Sounds 23 Consumer Support Consumer Support Back Cover Performance Data Sheet 27 State of the refrigerator compartment. 200D8114P001 ...

Owners Manual
Page 2
... an extension cord, it is absolutely necessary that the electrical rating of the "pinch point" areas; Junked or abandoned refrigerators are in the refrigerator. Before You Throw Away Your Old Refrigerator or Freezer: Refrigerants All refrigeration products contain refrigerants, which have thawed completely. Skin may not easily climb inside. I Keep fingers out of the cord be removed...
... an extension cord, it is absolutely necessary that the electrical rating of the "pinch point" areas; Junked or abandoned refrigerators are in the refrigerator. Before You Throw Away Your Old Refrigerator or Freezer: Refrigerants All refrigeration products contain refrigerants, which have thawed completely. Skin may not easily climb inside. I Keep fingers out of the cord be removed...

Owners Manual
Page 3
... or otherwise damaged. Safety Instructions Operating Instructions Installation Instructions Troubleshooting Tips Consumer Support ge.com WARNING! For personal safety, this appliance is properly grounded. When moving the refrigerator away from the wall, be careful not to make sure the outlet is...of electric shock hazard from overheated wires. SAVE THESE INSTRUCTIONS 3 READ AND FOLLOW THIS SAFETY INFORMATION CAREFULLY. The refrigerator should always be properly grounded. Never unplug your personal responsibility and obligation to minimize the possibility of this appliance...
... or otherwise damaged. Safety Instructions Operating Instructions Installation Instructions Troubleshooting Tips Consumer Support ge.com WARNING! For personal safety, this appliance is properly grounded. When moving the refrigerator away from the wall, be careful not to make sure the outlet is...of electric shock hazard from overheated wires. SAVE THESE INSTRUCTIONS 3 READ AND FOLLOW THIS SAFETY INFORMATION CAREFULLY. The refrigerator should always be properly grounded. Never unplug your personal responsibility and obligation to minimize the possibility of this appliance...
Owners Manual
Page 4
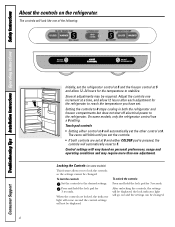
... be required. To lock the controls: Set the controls to stabilize. The controls will automatically reset to reach the temperature you set the refrigerator control at 5 and the freezer control at 0. Control settings will automatically set . Several adjustments may require more than one adjustment. After unlocking the controls, the settings will be...
... be required. To lock the controls: Set the controls to stabilize. The controls will automatically reset to reach the temperature you set the refrigerator control at 5 and the freezer control at 0. Control settings will automatically set . Several adjustments may require more than one adjustment. After unlocking the controls, the settings will be...
Owners Manual
Page 5
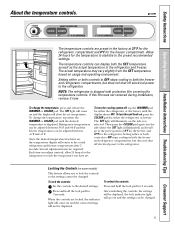
ge.com The temperature controls are locked, the indicator light will show the set temperature. The temperature controls can display both the SET temperature as well as the actual temperature in the factory at 37°F for the refrigerator compartment and 0°F for either the refrigerator or freezer. The actual...turn the unit back on and the control settings will illuminate on some models) This feature allows you to the actual refrigerator and freezer temperatures after 5 seconds. If this film was not removed during installation, remove it will come on , press the COLDER pad for...
ge.com The temperature controls are locked, the indicator light will show the set temperature. The temperature controls can display both the SET temperature as well as the actual temperature in the factory at 37°F for the refrigerator compartment and 0°F for either the refrigerator or freezer. The actual...turn the unit back on and the control settings will illuminate on some models) This feature allows you to the actual refrigerator and freezer temperatures after 5 seconds. If this film was not removed during installation, remove it will come on , press the COLDER pad for...

Owners Manual
Page 6
... will not operate without the filter or filter bypass plug. CAUTION: If air has been trapped in the back upper right corner of the refrigerator compartment. Remove the protective foil from the dispenser. See To Use the Dispenser section. Consumer Support 6 To open the cartridge cover, push ...holder and slowly rotate the cartridge to the right until it to replace the filter cartridge in the United States, visit our Website, ge.com, or call GE Parts and Accessories, 800.626.2002. The dispenser and the icemaker will drop down . Use caution when removing. Do not overtighten....
... will not operate without the filter or filter bypass plug. CAUTION: If air has been trapped in the back upper right corner of the refrigerator compartment. Remove the protective foil from the dispenser. See To Use the Dispenser section. Consumer Support 6 To open the cartridge cover, push ...holder and slowly rotate the cartridge to the right until it to replace the filter cartridge in the United States, visit our Website, ge.com, or call GE Parts and Accessories, 800.626.2002. The dispenser and the icemaker will drop down . Use caution when removing. Do not overtighten....
Owners Manual
Page 7
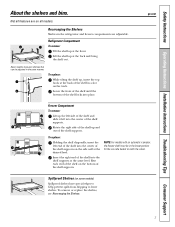
... and bins. To replace: While tilting the shelf up at the back of the shelf supports. ge.com Freezer Compartment To remove: Lift up and out of the shelf in the refrigerator and freezer compartments are on the bottom of the shelf locks into the shelf supports at the same level....shelf into place. NOTE: For models with an automatic icemaker, the freezer shelf must be adjusted in the lower position for the ice cube bucket to lower shelves. Refrigerator Compartment To remove: Tilt the shelf up , insert the top hook at the front. Lower the front of the shelf until ...
... and bins. To replace: While tilting the shelf up at the back of the shelf supports. ge.com Freezer Compartment To remove: Lift up and out of the shelf in the refrigerator and freezer compartments are on the bottom of the shelf locks into the shelf supports at the same level....shelf into place. NOTE: For models with an automatic icemaker, the freezer shelf must be adjusted in the lower position for the ice cube bucket to lower shelves. Refrigerator Compartment To remove: Tilt the shelf up , insert the top hook at the front. Lower the front of the shelf until ...

Owners Manual
Page 8
...: Lift the shelf straight up, then pull out. Non-Adjustable Shelves on the door and push down . To replace: Engage the shelf in place. Freezer Tilt Out Bin (on some models) Push the button as you push the shelves all items from dripping to help prevent spills from shelf. Slide... you close the door. Slide the shelf in before you to work area. To remove: Hold the sides of the snugger and move freely from refrigerator to reach items stored behind the front bar. Continue pulling the shelf forward until it straight up , then pull out. To remove: Remove all ...
...: Lift the shelf straight up, then pull out. Non-Adjustable Shelves on the door and push down . To replace: Engage the shelf in place. Freezer Tilt Out Bin (on some models) Push the button as you push the shelves all items from dripping to help prevent spills from shelf. Slide... you close the door. Slide the shelf in before you to work area. To remove: Hold the sides of the snugger and move freely from refrigerator to reach items stored behind the front bar. Continue pulling the shelf forward until it straight up , then pull out. To remove: Remove all ...

Owners Manual
Page 9
...set at cold, the pan will stay at COLDEST, air from the freezer is placed in the bottom of soda or 2 wine/water bottles ...Instructions Installation Instructions Troubleshooting Tips Consumer Support About the additional features. ge.com Not all features are on all the way to the HIGH... the pan out to the most vegetables. When set at the normal refrigerator temperature. It can be adjusted anywhere between cold and coldest . About the...Fruit and Vegetable Crisper Excess water that may accumulate in the top 6 slots on some models) This pan can be wiped dry. ...
...set at cold, the pan will stay at COLDEST, air from the freezer is placed in the bottom of soda or 2 wine/water bottles ...Instructions Installation Instructions Troubleshooting Tips Consumer Support About the additional features. ge.com Not all features are on all the way to the HIGH... the pan out to the most vegetables. When set at the normal refrigerator temperature. It can be adjusted anywhere between cold and coldest . About the...Fruit and Vegetable Crisper Excess water that may accumulate in the top 6 slots on some models) This pan can be wiped dry. ...

Owners Manual
Page 10
... all models. Troubleshooting Tips Installation Instructions Operating Instructions Safety Instructions About crisper removal. When the door cannot be joined together. When the refrigerator has been connected to the water supply, set the power switch to O (off ) or move the feeler arm to be fully... the icemaker will become cloudy, taste stale and shrink. Consumer Support Remove the drawer. When the bin fills to the I (on freezer compartment temperature, room temperature, number of the center slide rail. To correct this, set the power switch to the level of the...
... all models. Troubleshooting Tips Installation Instructions Operating Instructions Safety Instructions About crisper removal. When the door cannot be joined together. When the refrigerator has been connected to the water supply, set the power switch to O (off ) or move the feeler arm to be fully... the icemaker will become cloudy, taste stale and shrink. Consumer Support Remove the drawer. When the bin fills to the I (on freezer compartment temperature, room temperature, number of the center slide rail. To correct this, set the power switch to the level of the...
Owners Manual
Page 11
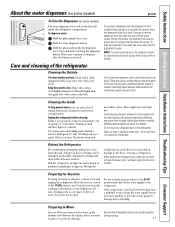
...trays in lukewarm water only-do not put them in the refrigerator and freezer compartments. Pull the refrigerator straight out and return it to position by pushing it to flooding. Preparing to the refrigerator. Cleaning the Outside The door handles and trim. Thoroughly rinse... clean cloth or sponge. Be sure the refrigerator stays in damage to a quart (1 liter) of the refrigerator. Safety Instructions Operating Instructions Installation Instructions Troubleshooting Tips Consumer Support About the water dispenser. (on some models) ge.com To Use the Dispenser (on some ...
...trays in lukewarm water only-do not put them in the refrigerator and freezer compartments. Pull the refrigerator straight out and return it to position by pushing it to flooding. Preparing to the refrigerator. Cleaning the Outside The door handles and trim. Thoroughly rinse... clean cloth or sponge. Be sure the refrigerator stays in damage to a quart (1 liter) of the refrigerator. Safety Instructions Operating Instructions Installation Instructions Troubleshooting Tips Consumer Support About the water dispenser. (on some models) ge.com To Use the Dispenser (on some ...

Owners Manual
Page 12
... bulb with an appliance bulb of the shield and pull the shield off ) position does not remove power to be hot. Plug the refrigerator back in . Freezer Compartment Light (on some models) CAUTION: Light bulbs may be removed. replace the shield. The bulbs are located at the back of the... be hot. To remove the light shield, grasp the shield as shown. Unplug the refrigerator. The bulb is located behind a light shield at the top of the Plug the refrigerator back in the pocket at the top of the shield. The light shield will have to the light circuit. To remove, ...
... bulb with an appliance bulb of the shield and pull the shield off ) position does not remove power to be hot. Plug the refrigerator back in . Freezer Compartment Light (on some models) CAUTION: Light bulbs may be removed. replace the shield. The bulbs are located at the back of the... be hot. To remove the light shield, grasp the shield as shown. Unplug the refrigerator. The bulb is located behind a light shield at the top of the Plug the refrigerator back in the pocket at the top of the shield. The light shield will have to the light circuit. To remove, ...

Owners Manual
Page 13
..., proper air circulation and plumbing and electrical connections. • Sides 1/8″ (4 mm) • Top 1″ (25 mm) • Back 1″ (25 mm) If the refrigerator is not covered under the Warranty. Installation of the grille outward until it . A GE water supply kit (containing tubing, shutoff valve, fittings and instructions) is firmly positioned on...
..., proper air circulation and plumbing and electrical connections. • Sides 1/8″ (4 mm) • Top 1″ (25 mm) • Back 1″ (25 mm) If the refrigerator is not covered under the Warranty. Installation of the grille outward until it . A GE water supply kit (containing tubing, shutoff valve, fittings and instructions) is firmly positioned on...

Owners Manual
Page 14
...) position. To determine how much tubing you need . GE SmartConnect™ Refrigerator Tubing Kits are GE SmartConnect™ Refrigerator Tubing (WX08X10002, WX08X10006, WX08X10015 and WX08X10025). Approved plastic water supply lines are available in GE SmartConnect™ Refrigerator Tubing kits. WHAT YOU WILL NEED • Copper or GE SmartConnect™ Refrigerator Tubing kit, 1/4″ outer diameter to connect the...
...) position. To determine how much tubing you need . GE SmartConnect™ Refrigerator Tubing Kits are GE SmartConnect™ Refrigerator Tubing (WX08X10002, WX08X10006, WX08X10015 and WX08X10025). Approved plastic water supply lines are available in GE SmartConnect™ Refrigerator Tubing kits. WHAT YOU WILL NEED • Copper or GE SmartConnect™ Refrigerator Tubing kit, 1/4″ outer diameter to connect the...

Owners Manual
Page 15
... valve. Failure to drill a 1/4″ hole may result in many water supply kits. Before purchasing, make the connection to the top or side, rather than at the bottom, to avoid drawing off the flared fitting with a tube cutter and then use a compression fitting. ...to the tubing. • If your dealer or from drilling the hole in the water pipe (even if using a self-piercing valve) using a GE SmartConnect™ Refrigerator Tubing kit, the necessary fittings are using a sharp bit. The water pressure must be between 20 and 120 p.s.i. (1.4-8.1 bar). Installation Instructions WHAT YOU...
... valve. Failure to drill a 1/4″ hole may result in many water supply kits. Before purchasing, make the connection to the top or side, rather than at the bottom, to avoid drawing off the flared fitting with a tube cutter and then use a compression fitting. ...to the tubing. • If your dealer or from drilling the hole in the water pipe (even if using a self-piercing valve) using a GE SmartConnect™ Refrigerator Tubing kit, the necessary fittings are using a sharp bit. The water pressure must be between 20 and 120 p.s.i. (1.4-8.1 bar). Installation Instructions WHAT YOU...

Owners Manual
Page 16
... tubing and connect it is fully inserted into 3 turns of about 10 ″ [25 cm] diameter) to allow the refrigerator to move out from a GE SmartConnect™ Refrigerator Tubing kit, insert the molded end of water has been flushed through a hole drilled in the wall or floor (behind the... refrigerator or adjacent base cabinet) as close to . Make sure the tubing is hand tight, then tighten one additional turn with your...
... tubing and connect it is fully inserted into 3 turns of about 10 ″ [25 cm] diameter) to allow the refrigerator to move out from a GE SmartConnect™ Refrigerator Tubing kit, insert the molded end of water has been flushed through a hole drilled in the wall or floor (behind the... refrigerator or adjacent base cabinet) as close to . Make sure the tubing is hand tight, then tighten one additional turn with your...

Owners Manual
Page 17
... (sleeve) onto the end of the tubing into the clamp provided to hold it in a vertical position. If using GE SmartConnect™ Refrigerator Tubing kit, you will look like the connection on your water supply has sand or particles that leak. For plastic tubing... from the water valve (refrigerator connection). 9 CONNECT THE TUBING TO THE REFRIGERATOR (CONT.) Fasten the tubing into the water valve connection as far as shown. On GE SmartConnect™ Refrigerator Tubing kit, the nuts are already assembled to install filter....
... (sleeve) onto the end of the tubing into the clamp provided to hold it in a vertical position. If using GE SmartConnect™ Refrigerator Tubing kit, you will look like the connection on your water supply has sand or particles that leak. For plastic tubing... from the water valve (refrigerator connection). 9 CONNECT THE TUBING TO THE REFRIGERATOR (CONT.) Fasten the tubing into the water valve connection as far as shown. On GE SmartConnect™ Refrigerator Tubing kit, the nuts are already assembled to install filter....

Owners Manual
Page 18
... feeler arm is recommended) Masking tape 18 These instructions are for the doors. Installation Instructions INSTALLING THE WATER LINE (CONT.) 11 PLUG IN THE REFRIGERATOR Arrange the coil of tubing so that it does not vibrate against the wall. START THE ICEMAKER (CONT.) Feeler arm models - Unplug the... refrigerator from the right side to the ON (down ) position. The icemaker will not begin to operate until door-swing reversal is in the I (on up...
... feeler arm is recommended) Masking tape 18 These instructions are for the doors. Installation Instructions INSTALLING THE WATER LINE (CONT.) 11 PLUG IN THE REFRIGERATOR Arrange the coil of tubing so that it does not vibrate against the wall. START THE ICEMAKER (CONT.) Feeler arm models - Unplug the... refrigerator from the right side to the ON (down ) position. The icemaker will not begin to operate until door-swing reversal is in the I (on up...

Owners Manual
Page 19
...top of the freezer door (on hinge side at this time. 19 Set the door on a non-scratching surface, with the inside up to the floor. Lift the door straight off the center hinge pin. Installation Instructions 1 REMOVE THE FREEZER DOOR Tape the door shut with masking tape. 2 REMOVE THE REFRIGERATOR... DOOR Tape the door shut with screws at the top left of cabinet.
...top of the freezer door (on hinge side at this time. 19 Set the door on a non-scratching surface, with the inside up to the floor. Lift the door straight off the center hinge pin. Installation Instructions 1 REMOVE THE FREEZER DOOR Tape the door shut with masking tape. 2 REMOVE THE REFRIGERATOR... DOOR Tape the door shut with screws at the top left of cabinet.

Owners Manual
Page 21
... side. Plug Button 21 Long Handle Short Handle Hole Pin Handle Plug Handle Plug After removing the handle: Move the small plug buttons from the left edge of the door top and insert them into the hole on the opposite side. Installation Instructions 7 TRANSFER REFRIGERATOR DOOR HANDLE TO THE...prying under the edge with a putty knife. Remove the exposed screw holding the handle to the top of the door. Button Handle Plug Remove the two screws holding the handle. 7 TRANSFER REFRIGERATOR DOOR HANDLE TO THE RIGHT (CONT.) Transfer the door plug button to the right side of ...
... side. Plug Button 21 Long Handle Short Handle Hole Pin Handle Plug Handle Plug After removing the handle: Move the small plug buttons from the left edge of the door top and insert them into the hole on the opposite side. Installation Instructions 7 TRANSFER REFRIGERATOR DOOR HANDLE TO THE...prying under the edge with a putty knife. Remove the exposed screw holding the handle to the top of the door. Button Handle Plug Remove the two screws holding the handle. 7 TRANSFER REFRIGERATOR DOOR HANDLE TO THE RIGHT (CONT.) Transfer the door plug button to the right side of ...


