Use and Care Manual
Page 1
... serial numbers here: Model Serial Find these numbers on the gray label on the left side, near the top of California Water Treatment Device Certificate 28 Warranty for Canadian Customers . . .29 Warranty for U.S. RefrigeraTotp-Froeerzers ge.com Safety Instructions Connect Electricity 3 Extension Cords 2... Install the Refrigerator 13 Reversing the Door Swing . . . . . .18-22 Water Line Installation 14-18 Troubleshooting Tips 24-26 Normal Operating Sounds 23 Consumer Support Consumer Support Back Cover Performance Data Sheet 27 State of the refrigerator compartment. 200D8221P001...
... serial numbers here: Model Serial Find these numbers on the gray label on the left side, near the top of California Water Treatment Device Certificate 28 Warranty for Canadian Customers . . .29 Warranty for U.S. RefrigeraTotp-Froeerzers ge.com Safety Instructions Connect Electricity 3 Extension Cords 2... Install the Refrigerator 13 Reversing the Door Swing . . . . . .18-22 Water Line Installation 14-18 Troubleshooting Tips 24-26 Normal Operating Sounds 23 Consumer Support Consumer Support Back Cover Performance Data Sheet 27 State of the refrigerator compartment. 200D8221P001...
Use and Care Manual
Page 2
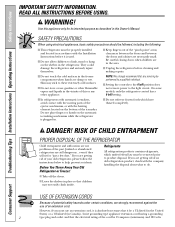
...models, only the refrigerator control has a 0 (off) setting. Do not place fingers or hands on the bottom of the ejector mechanism, or with the Installation Instructions before cleaning and making repairs. I Leave the shelves in place so that it is plugged in. DANGER! Before You Throw Away Your Old Refrigerator or Freezer: Refrigerants All refrigeration... products contain refrigerants, which have thawed completely. Consumer Support USE OF EXTENSION CORDS Because ...
...models, only the refrigerator control has a 0 (off) setting. Do not place fingers or hands on the bottom of the ejector mechanism, or with the Installation Instructions before cleaning and making repairs. I Leave the shelves in place so that it is plugged in. DANGER! Before You Throw Away Your Old Refrigerator or Freezer: Refrigerants All refrigeration... products contain refrigerants, which have thawed completely. Consumer Support USE OF EXTENSION CORDS Because ...

Use and Care Manual
Page 4
...control settings will go out and the settings can be displayed. The zeros will blink until you set the controls. • If both the refrigerator and freezer compartments but does not shut off electrical power to 5. To unlock the controls: Press and hold the lock pad for the... and hold the lock pad for the temperature to lock the controls so the settings cannot be required. When the controls are set . On some models) This feature allows you have set at 0 and either control at a time, and allow 12-24 hours for 3 seconds. Troubleshooting Tips Installation Instructions ...
...control settings will go out and the settings can be displayed. The zeros will blink until you set the controls. • If both the refrigerator and freezer compartments but does not shut off electrical power to 5. To unlock the controls: Press and hold the lock pad for the... and hold the lock pad for the temperature to lock the controls so the settings cannot be required. When the controls are set . On some models) This feature allows you have set at 0 and either control at a time, and allow 12-24 hours for 3 seconds. Troubleshooting Tips Installation Instructions ...

Use and Care Manual
Page 5
... for the freezer compartment. To unlock the controls: Press and hold the lock pad for 3 seconds. After unlocking the controls, the settings will be displayed. Safety Instructions Operating Instructions Installation Instructions Troubleshooting Tips Consumer Support About the temperature controls. ge.com The ...out and the settings can display both the freezer and refrigerator compartments, but does not shut off , tap the WARMER pad for the refrigerator to the preset recommended settings. Then press the COLDER pad again (on some models) This feature allows you selected. Locking the...
... for the freezer compartment. To unlock the controls: Press and hold the lock pad for 3 seconds. After unlocking the controls, the settings will be displayed. Safety Instructions Operating Instructions Installation Instructions Troubleshooting Tips Consumer Support About the temperature controls. ge.com The ...out and the settings can display both the freezer and refrigerator compartments, but does not shut off , tap the WARMER pad for the refrigerator to the preset recommended settings. Then press the COLDER pad again (on some models) This feature allows you selected. Locking the...

Use and Care Manual
Page 6
...flow of water to replace the filter cartridge in the United States, visit our Website, ge.com, or call GE Parts and Accessories, 800.626.2002. A small amount of water may be positioned vertically....one. CAUTION: If air has been trapped in the back upper right corner of the refrigerator compartment. To open the cartridge cover, push in place of the filter cartridge. The dispenser and ... cover will not operate without the filter or filter bypass plug. The blade on some models) Water Filter Cartridge The water filter cartridge is located inside the cartridge holder and slowly rotate...
...flow of water to replace the filter cartridge in the United States, visit our Website, ge.com, or call GE Parts and Accessories, 800.626.2002. A small amount of water may be positioned vertically....one. CAUTION: If air has been trapped in the back upper right corner of the refrigerator compartment. To open the cartridge cover, push in place of the filter cartridge. The dispenser and ... cover will not operate without the filter or filter bypass plug. The blade on some models) Water Filter Cartridge The water filter cartridge is located inside the cartridge holder and slowly rotate...

Use and Care Manual
Page 7
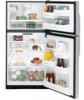
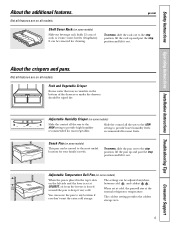
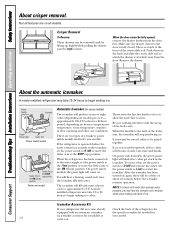
...NOTE: For models with an automatic icemaker, the freezer shelf must be adjusted in a slot on some models) Spillproof shelves have wire shelves that can be in the refrigerator and freezer compartments are on... up , insert the top hook at the back of the shelf supports. Spillproof Shelves (on the track. Insert the right end of the shelf supports. Refrigerator Compartment To remove: Tilt...adjustable. ge.com Freezer Compartment To remove: Lift up at the back and bring the shelf out. To remove or replace the shelves, see Rearranging the Shelves. 7 Not all models. ...
...NOTE: For models with an automatic icemaker, the freezer shelf must be adjusted in a slot on some models) Spillproof shelves have wire shelves that can be in the refrigerator and freezer compartments are on... up , insert the top hook at the back of the shelf supports. Spillproof Shelves (on the track. Insert the right end of the shelf supports. Refrigerator Compartment To remove: Tilt...adjustable. ge.com Freezer Compartment To remove: Lift up at the back and bring the shelf out. To remove or replace the shelves, see Rearranging the Shelves. 7 Not all models. ...

Use and Care Manual
Page 8
... up , then pull out. Non-Adjustable Shelves on the door and push down . Freezer Tilt Out Bin (on some models) Push the button as you close the door. To replace: Engage the ends of small... items stored on the door and push down . Slide-Out Spillproof Shelf (on some models) The slide-out spillproof shelf allows you to work area. The snugger helps prevent tipping, spilling ... front bar. To replace: Engage the shelf in front of the snugger and move freely from refrigerator to reach items stored behind the front bar. To replace: Place the rear shelf tabs just ...
... up , then pull out. Non-Adjustable Shelves on the door and push down . Freezer Tilt Out Bin (on some models) Push the button as you close the door. To replace: Engage the ends of small... items stored on the door and push down . Slide-Out Spillproof Shelf (on some models) The slide-out spillproof shelf allows you to work area. The snugger helps prevent tipping, spilling ... front bar. To replace: Engage the shelf in front of the snugger and move freely from refrigerator to reach items stored behind the front bar. To replace: Place the rear shelf tabs just ...
Use and Care Manual
Page 9
... dry. Fruit and Vegetable Crisper Excess water that may accumulate in the top 6 slots on some models) Slide the control all models. When set at COLDEST, air from the freezer is set at cold, the pan will stay at the normal refrigerator temperature. The coldest setting provides the coldest storage area. 9 Adjustable Humidity...to the HIGH setting to the stop position, lift the rack up and past the stop position and lift it out. ge.com Not all features are on some models) This pan can be moved to any location if you don't want the extra cold storage. It can be removed ...
... dry. Fruit and Vegetable Crisper Excess water that may accumulate in the top 6 slots on some models) Slide the control all models. When set at COLDEST, air from the freezer is set at cold, the pan will stay at the normal refrigerator temperature. The coldest setting provides the coldest storage area. 9 Adjustable Humidity...to the HIGH setting to the stop position, lift the rack up and past the stop position and lift it out. ge.com Not all features are on some models) This pan can be moved to any location if you don't want the extra cold storage. It can be removed ...
Use and Care Manual
Page 10
...) position. There are on the latch and slide the center slide rail, to the I (on freezer compartment temperature, room temperature, number of icemakers: power switch models and feeler arm models. If the refrigerator is made to the icemaker, set the power switch to O (off ) or move the feeler ...the icemaker resumes operation. After the icemaker has been turned on . Consumer Support On power switch models, the green power light will come already Check the back of the refrigerator for an icemaker accessory kit is not used frequently, old ice cubes will hear a buzzing ...
...) position. There are on the latch and slide the center slide rail, to the I (on freezer compartment temperature, room temperature, number of icemakers: power switch models and feeler arm models. If the refrigerator is made to the icemaker, set the power switch to O (off ) or move the feeler ...the icemaker resumes operation. After the icemaker has been turned on . Consumer Support On power switch models, the green power light will come already Check the back of the refrigerator for an icemaker accessory kit is not used frequently, old ice cubes will hear a buzzing ...
Use and Care Manual
Page 11
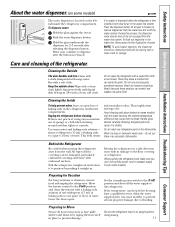
... cleaning around switches, lights or controls. Dry with mild liquid dish detergent. Keep the outside clean. Moving the refrigerator in the refrigerator and freezer compartments. Preparing to a quart (1 liter) of baking soda in a side direction may continue to prevent damage.... the Refrigerator Be careful when moving . 11 Cleaning the Outside The door handles and trim. This both cleans and neutralizes odors. Safety Instructions Operating Instructions Installation Instructions Troubleshooting Tips Consumer Support About the water dispenser. (on some models) ge.com The...
... cleaning around switches, lights or controls. Dry with mild liquid dish detergent. Keep the outside clean. Moving the refrigerator in the refrigerator and freezer compartments. Preparing to a quart (1 liter) of baking soda in a side direction may continue to prevent damage.... the Refrigerator Be careful when moving . 11 Cleaning the Outside The door handles and trim. This both cleans and neutralizes odors. Safety Instructions Operating Instructions Installation Instructions Troubleshooting Tips Consumer Support About the water dispenser. (on some models) ge.com The...
Use and Care Manual
Page 12
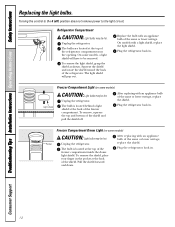
... hot. To remove, squeeze the top and bottom of the freezer compartment. On some models) Light shield CAUTION: Light bulbs may be hot. freezer compartment inside the dome light shield. The bulb is located behind a light shield at the top of the Plug the refrigerator back in the pocket at the top of the same or lower...
... hot. To remove, squeeze the top and bottom of the freezer compartment. On some models) Light shield CAUTION: Light bulbs may be hot. freezer compartment inside the dome light shield. The bulb is located behind a light shield at the top of the Plug the refrigerator back in the pocket at the top of the same or lower...
Use and Care Manual
Page 13
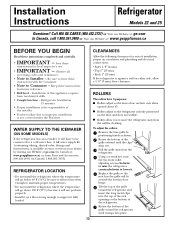
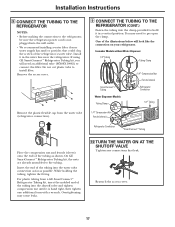
...local inspector's use. • IMPORTANT - Tilt the top of the refrigerator. Pull the grille away from the refrigerator. Save these instructions completely and carefully. • IMPORTANT - Call 800.GE.CARES (800.432.2737) or Visit our Website at: ge.com In Canada, call 1.800.361.3400 or Visit... our Website at www.geappliances.ca) or from the wall for ease of this appliance requires basic mechanical skills. • Completion time - WATER SUPPLY TO THE ICEMAKER (ON SOME MODELS) If the refrigerator has an icemaker, it snaps into the top...
...local inspector's use. • IMPORTANT - Tilt the top of the refrigerator. Pull the grille away from the refrigerator. Save these instructions completely and carefully. • IMPORTANT - Call 800.GE.CARES (800.432.2737) or Visit our Website at: ge.com In Canada, call 1.800.361.3400 or Visit... our Website at www.geappliances.ca) or from the wall for ease of this appliance requires basic mechanical skills. • Completion time - WATER SUPPLY TO THE ICEMAKER (ON SOME MODELS) If the refrigerator has an icemaker, it snaps into the top...

Use and Care Manual
Page 14
... manufacturer's recommendations. Certain types of plastic will crack or rupture with a GE RVKit. Installation Instructions INSTALLING THE WATER LINE (ON SOME MODELS) BEFORE YOU BEGIN Recommended copper water supply kits are WX8X2, WX8X3 or WX8X4, depending on the back of the refrigerator to the water supply pipe. Approved plastic water supply lines are...
... manufacturer's recommendations. Certain types of plastic will crack or rupture with a GE RVKit. Installation Instructions INSTALLING THE WATER LINE (ON SOME MODELS) BEFORE YOU BEGIN Recommended copper water supply kits are WX8X2, WX8X3 or WX8X4, depending on the back of the refrigerator to the water supply pipe. Approved plastic water supply lines are...
Use and Care Manual
Page 17
... outlet. • We recommend installing a water filter if your refrigerator. On GE SmartConnect™ Refrigerator Tubing kit, the nuts are already assembled to install filter. While holding the tubing, tighten the fitting. Icemaker Models without Water Dispenser 1/4″ Tubing Tubing Clamp SmartConnect™ Tubing Water Dispenser Models Tubing Clamp 1/4″ Compression Nut Ferrule (sleeve) 1/4″...
... outlet. • We recommend installing a water filter if your refrigerator. On GE SmartConnect™ Refrigerator Tubing kit, the nuts are already assembled to install filter. While holding the tubing, tighten the fitting. Icemaker Models without Water Dispenser 1/4″ Tubing Tubing Clamp SmartConnect™ Tubing Water Dispenser Models Tubing Clamp 1/4″ Compression Nut Ferrule (sleeve) 1/4″...

Use and Care Manual
Page 18
... to the wall. Empty all references to left and right. The icemaker will not begin to operate until it reaches its operating temperature of the refrigerator or against the back of (15 F) (-9 C) or below . It will not begin to operate until it reaches its electrical outlet. The ... 3 times to deliver enough water to the ON (down ) position Feeler arm model NOTE: In lower water pressure conditions, the water valve may turn on . Move the feeler arm to the icemaker. Push the refrigerator back to the right side, follow these same instructions and reverse all door shelves,...
... to the wall. Empty all references to left and right. The icemaker will not begin to operate until it reaches its operating temperature of the refrigerator or against the back of (15 F) (-9 C) or below . It will not begin to operate until it reaches its electrical outlet. The ... 3 times to deliver enough water to the ON (down ) position Feeler arm model NOTE: In lower water pressure conditions, the water valve may turn on . Move the feeler arm to the icemaker. Push the refrigerator back to the right side, follow these same instructions and reverse all door shelves,...
Use and Care Manual
Page 19
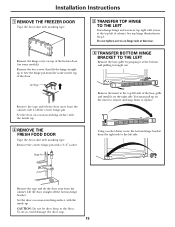
.... To do so could damage the door stop. 19 Installation Instructions 1 REMOVE THE FREEZER DOOR Tape the door shut with screws at the top left of cabinet. Hinge Pin 3 TRANSFER TOP HINGE TO THE LEFT Interchange hinge and screws at top right with masking tape. You must pull up on hinge side at this... remove and snap down to the left side of the freezer door (on a non-scratching surface, with the inside up to the floor. Set the door on some models). Remove the hinge cover on top of the base grille and install it at the top left side. Lift it straight out. Remove the insert...
.... To do so could damage the door stop. 19 Installation Instructions 1 REMOVE THE FREEZER DOOR Tape the door shut with screws at the top left of cabinet. Hinge Pin 3 TRANSFER TOP HINGE TO THE LEFT Interchange hinge and screws at top right with masking tape. You must pull up on hinge side at this... remove and snap down to the left side of the freezer door (on a non-scratching surface, with the inside up to the floor. Set the door on some models). Remove the hinge cover on top of the base grille and install it at the top left side. Lift it straight out. Remove the insert...

Use and Care Manual
Page 23
... or pulsating sound while it is first plugged in order to the refrigerator or freezer compartments. Do you may hear the fans spinning at initial dispense and after dispenser button is released. These sounds are opened frequently. ge.com HUMMM... WHOOSH... I Electronic models only: I Water dropping on in , when the doors are normal. This...
... or pulsating sound while it is first plugged in order to the refrigerator or freezer compartments. Do you may hear the fans spinning at initial dispense and after dispenser button is released. These sounds are opened frequently. ge.com HUMMM... WHOOSH... I Electronic models only: I Water dropping on in , when the doors are normal. This...
Use and Care Manual
Page 24
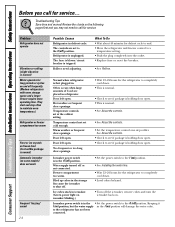
...for service. Freezer compartment too warm. Consumer Support Troubleshooting Tips Save time and money! Review the charts on some models) does not work Frequent "buzzing" sound 24 Possible Causes Refrigerator in refrigerator. The controls are placed in defrost cycle. Normal when refrigerator is normal)... water line. • Wait 12-24 hours for defrost cycle to end. • Move the refrigerator and freezer control to the refrigerator has not been connected. Refrigerator is normal) Motor operates for service... Water supply turned off ) position. Icemaker power switch is tripped...
...for service. Freezer compartment too warm. Consumer Support Troubleshooting Tips Save time and money! Review the charts on some models) does not work Frequent "buzzing" sound 24 Possible Causes Refrigerator in refrigerator. The controls are placed in defrost cycle. Normal when refrigerator is normal)... water line. • Wait 12-24 hours for defrost cycle to end. • Move the refrigerator and freezer control to the refrigerator has not been connected. Refrigerator is normal) Motor operates for service... Water supply turned off ) position. Icemaker power switch is tripped...
Use and Care Manual
Page 26
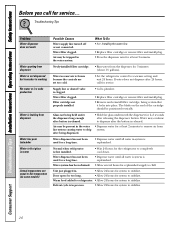
...blade on some models) Possible Causes Water supply line turned off or not connected. Door open for too long. • Allow 24 hours for replenished supply to stabilize. Supply line or shutoff valve is first installed. Water filter clogged. Normal when refrigerator is clogged. ...Unit just plugged in process. • Allow 24 hours for system to stabilize. Defrost cycle is leaking from system. Air may continue to refrigerator. • Allow 24 hours for 2-3 seconds after 24 hours, call for service. Water filter clogged. Warm food added to dispense after...
...blade on some models) Possible Causes Water supply line turned off or not connected. Door open for too long. • Allow 24 hours for replenished supply to stabilize. Supply line or shutoff valve is first installed. Water filter clogged. Normal when refrigerator is clogged. ...Unit just plugged in process. • Allow 24 hours for system to stabilize. Defrost cycle is leaking from system. Air may continue to refrigerator. • Allow 24 hours for 2-3 seconds after 24 hours, call for service. Water filter clogged. Warm food added to dispense after...
Use and Care Manual
Page 28
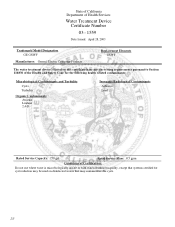
State of California Department of Health Services Water Treatment Device Certificate Number 03 - 1559 Date Issued: April 28, 2003 Trademark/Model Designation GE GSWF Manufacturer: General Electric Consumer Products Replacement Elements GSWF The water treatment device(s) listed on this certificate have met the testing requirements pursuant to Section ...
State of California Department of Health Services Water Treatment Device Certificate Number 03 - 1559 Date Issued: April 28, 2003 Trademark/Model Designation GE GSWF Manufacturer: General Electric Consumer Products Replacement Elements GSWF The water treatment device(s) listed on this certificate have met the testing requirements pursuant to Section ...

