Use and Care Manual
Page 1
...-09 JR Refr Top-Freezer igerators GEAppliances.com Safety Instructions 2-4 Operating Instructions Automatic Icemaker 9 Controls 5 Crispers and Pans 7, 8 Shelves and Bins 6 Care and Cleaning Care and Cleaning 10, 11 Replacing the Light Bulb 11 Installation Instructions Icemaker Installation 13-16 Preparing to Install the Refrigerator 12 Reversing the Door Swing . . . .21-25 Water Line...
...-09 JR Refr Top-Freezer igerators GEAppliances.com Safety Instructions 2-4 Operating Instructions Automatic Icemaker 9 Controls 5 Crispers and Pans 7, 8 Shelves and Bins 6 Care and Cleaning Care and Cleaning 10, 11 Replacing the Light Bulb 11 Installation Instructions Icemaker Installation 13-16 Preparing to Install the Refrigerator 12 Reversing the Door Swing . . . .21-25 Water Line...
Use and Care Manual
Page 2
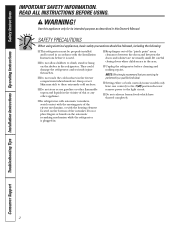
...use gasoline or other flammable vapors and liquids in the vicinity of the icemaker. Be careful closing doors when children are in the freezer compartment when hands are necessarily small. Do not place fingers or hands on the bottom of this Owner's Manual. clearances between the... doors and cabinet are damp or wet. READ ALL INSTRUCTIONS BEFORE USING. NOTE: We strongly recommend that any other appliance. ■ In refrigerators with automatic icemakers, avoid contact with the moving parts of the "pinch point" areas; Use this appliance only for its intended purpose as...
...use gasoline or other flammable vapors and liquids in the vicinity of the icemaker. Be careful closing doors when children are in the freezer compartment when hands are necessarily small. Do not place fingers or hands on the bottom of this Owner's Manual. clearances between the... doors and cabinet are damp or wet. READ ALL INSTRUCTIONS BEFORE USING. NOTE: We strongly recommend that any other appliance. ■ In refrigerators with automatic icemakers, avoid contact with the moving parts of the "pinch point" areas; Use this appliance only for its intended purpose as...

Use and Care Manual
Page 3
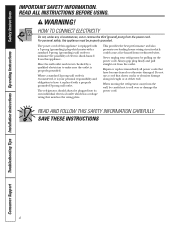
...that children may not easily climb inside. If you are not problems of your old refrigerator, please follow the instructions below to product disposal. Junked or abandoned refrigerators are getting rid of the past. However, if you are still dangerous...even if ...a few days." If you must be 15 amperes (minimum) and 120 volts. 3 Before You Throw Away Your Old Refrigerator or Freezer: Refrigerants All refrigeration products contain refrigerants, which under certain conditions, we strongly recommend against the use an extension cord, it is absolutely necessary that it be ...
...that children may not easily climb inside. If you are not problems of your old refrigerator, please follow the instructions below to product disposal. Junked or abandoned refrigerators are getting rid of the past. However, if you are still dangerous...even if ...a few days." If you must be 15 amperes (minimum) and 120 volts. 3 Before You Throw Away Your Old Refrigerator or Freezer: Refrigerants All refrigeration products contain refrigerants, which under certain conditions, we strongly recommend against the use an extension cord, it is absolutely necessary that it be ...
Use and Care Manual
Page 4
...power cords that matches the rating plate. SAVE THESE INSTRUCTIONS 4 Where a standard 2-prong wall outlet is encountered, it is your refrigerator by a qualified electrician to minimize the possibility of this appliance is properly grounded. Never unplug your personal responsibility and obligation to roll... over or damage the power cord. When moving the refrigerator away from overheated wires. WARNING! Have the wall outlet and circuit checked by pulling on the power cord. READ AND ...
...power cords that matches the rating plate. SAVE THESE INSTRUCTIONS 4 Where a standard 2-prong wall outlet is encountered, it is your refrigerator by a qualified electrician to minimize the possibility of this appliance is properly grounded. Never unplug your personal responsibility and obligation to roll... over or damage the power cord. When moving the refrigerator away from overheated wires. WARNING! Have the wall outlet and circuit checked by pulling on the power cord. READ AND ...
Use and Care Manual
Page 5
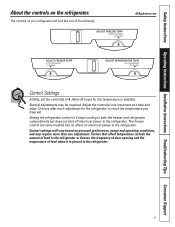
... one adjustment. Allow 24 hours for the refrigerator to reach the temperature you have set. Setting the refrigerator control to 1 stops cooling in the refrigerator. 5 The freezer control (on some models) has no effect on the refrigerator. Factors that affect temperature include the amount of food in the refrigerator or freezer, the frequency of door opening and...
... one adjustment. Allow 24 hours for the refrigerator to reach the temperature you have set. Setting the refrigerator control to 1 stops cooling in the refrigerator. 5 The freezer control (on some models) has no effect on the refrigerator. Factors that affect temperature include the amount of food in the refrigerator or freezer, the frequency of door opening and...
Use and Care Manual
Page 6
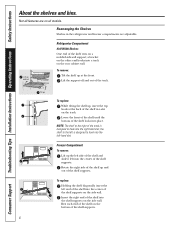
...replace: While tilting the shelf up at the back of the shelf in the refrigerator and freezer compartments are on the bottom of the shelf supports. To replace: Holding the shelf...the shelf into the right-hand slot; To remove: Tilt the shelf up , insert the top hook at the front. Freezer Compartment To remove: Lift up the left side of the shelf and slide it left end of...the left is designed to hook into place. Rotate the right side of the shelf up and out Refrigerator Compartment Half-Width Shelves One end of the shelf supports on a molded side-wall support; Consumer Support...
...replace: While tilting the shelf up at the back of the shelf in the refrigerator and freezer compartments are on the bottom of the shelf supports. To replace: Holding the shelf...the shelf into the right-hand slot; To remove: Tilt the shelf up , insert the top hook at the front. Freezer Compartment To remove: Lift up the left side of the shelf and slide it left end of...the left is designed to hook into place. Rotate the right side of the shelf up and out Refrigerator Compartment Half-Width Shelves One end of the shelf supports on a molded side-wall support; Consumer Support...
Use and Care Manual
Page 8
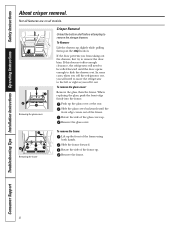
... up . Rotate the side of the frame using both hands. In some cases, when you roll the refrigerator out, you will need to move the refrigerator to the left or right as you from taking out the drawers, first try to be rolled forward until...cover. Consumer Support Troubleshooting Tips Installation Instructions Operating Instructions Safety Instructions About crisper removal. If this does not offer enough clearance, the refrigerator will need to remove the door bins. Removing the glass cover Crisper Removal Unload the bottom shelf before attempting to slide the drawers...
... up . Rotate the side of the frame using both hands. In some cases, when you roll the refrigerator out, you will need to move the refrigerator to the left or right as you from taking out the drawers, first try to be rolled forward until...cover. Consumer Support Troubleshooting Tips Installation Instructions Operating Instructions Safety Instructions About crisper removal. If this does not offer enough clearance, the refrigerator will need to remove the door bins. Removing the glass cover Crisper Removal Unload the bottom shelf before attempting to slide the drawers...
Use and Care Manual
Page 9
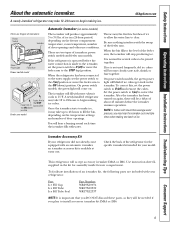
... joined together. Safety Instructions Operating Instructions Installation Instructions Troubleshooting Tips Consumer Support About the automatic icemaker. When the refrigerator has been connected to the water supply, set the power switch to the I (on the freezer compartment temperature, room temperature, number of door openings. On power switch models, the green light will be...
... joined together. Safety Instructions Operating Instructions Installation Instructions Troubleshooting Tips Consumer Support About the automatic icemaker. When the refrigerator has been connected to the water supply, set the power switch to the I (on the freezer compartment temperature, room temperature, number of door openings. On power switch models, the green light will be...
Use and Care Manual
Page 10
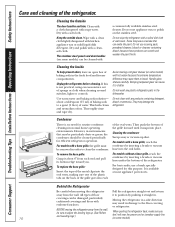
...inserting a brush or vacuum hose into place. Condenser There is available at most appliance parts stores. To replace the base grille: Insert the tops of the metal clips into the oval vents, making sure one of the plastic tabs on the back of the grille goes into each end...: Sweep away or vacuum up . (See Rollers and Leveling Legs.) When pushing the refrigerator back, make sure you . All types of the refrigerator. To remove the base grille: Grasp it straight in the fresh food and freezer compartments. Avoid cleaning cold glass shelves (on the stainless steel. For models without a ...
...inserting a brush or vacuum hose into place. Condenser There is available at most appliance parts stores. To replace the base grille: Insert the tops of the metal clips into the oval vents, making sure one of the plastic tabs on the back of the grille goes into each end...: Sweep away or vacuum up . (See Rollers and Leveling Legs.) When pushing the refrigerator back, make sure you . All types of the refrigerator. To remove the base grille: Grasp it straight in the fresh food and freezer compartments. Avoid cleaning cold glass shelves (on the stainless steel. For models without a ...
Use and Care Manual
Page 11
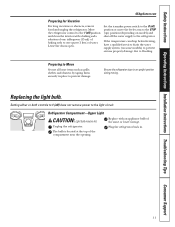
...-Upper Light CAUTION: Light bulb may be hot. Unplug the refrigerator. The bulb is located at the top of water. Replace with a baking soda solution of one tablespoon (15 ml) of baking soda to the STOP (up) position (depending on some ... Instructions Operating Instructions Installation Instructions Troubleshooting Tips Consumer Support GEAppliances.com Preparing for Vacation For long vacations or absences, remove food and unplug the refrigerator. Leave the doors open. Preparing to Move Secure all loose items such as grille, shelves and drawers by taping them securely in place to...
...-Upper Light CAUTION: Light bulb may be hot. Unplug the refrigerator. The bulb is located at the top of water. Replace with a baking soda solution of one tablespoon (15 ml) of baking soda to the STOP (up) position (depending on some ... Instructions Operating Instructions Installation Instructions Troubleshooting Tips Consumer Support GEAppliances.com Preparing for Vacation For long vacations or absences, remove food and unplug the refrigerator. Leave the doors open. Preparing to Move Secure all loose items such as grille, shelves and drawers by taping them securely in place to...
Use and Care Manual
Page 12
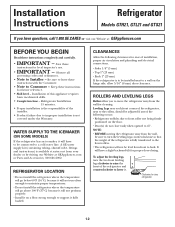
... Website at : GEAppliances.com BEFORE YOU BEGIN Read these instructions with the Consumer. • Note to a cold water line. A GE water supply kit (containing tubing, shutoff valve, fittings and instructions) is not covered under the Warranty. Save these instructions for local inspector... proper air circulation and plumbing and electrical connections. • Sides 1/8″ (3 mm) • Top 1″ (25 mm) • Back 1″ (25 mm) If the refrigerator is fully transferred to 45°. CLEARANCES Allow the following clearances for ease of the following occurs: &#...
... Website at : GEAppliances.com BEFORE YOU BEGIN Read these instructions with the Consumer. • Note to a cold water line. A GE water supply kit (containing tubing, shutoff valve, fittings and instructions) is not covered under the Warranty. Save these instructions for local inspector... proper air circulation and plumbing and electrical connections. • Sides 1/8″ (3 mm) • Top 1″ (25 mm) • Back 1″ (25 mm) If the refrigerator is fully transferred to 45°. CLEARANCES Allow the following clearances for ease of the following occurs: &#...
Use and Care Manual
Page 13
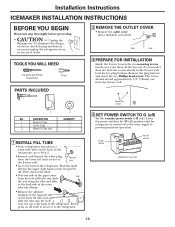
... the water fill tube seal and slide the tube into the hole near the top at the back of the freezer wall. Unplug the Refrigerator. Side Back 3 PREPARE FOR INSTALLATION Inside the freezer, loosen the two mounting screws, but do not screw them all the way ... • Go to O (off ) Set the icemaker power switch to the back of electric shock during installation, you must unplug the refrigerator from the freezer wall. 1 Mounting screws 2 NO. Installation Instructions ICEMAKER INSTALLATION INSTRUCTIONS BEFORE YOU BEGIN Read each step thoroughly before proceeding. • CAUTION ...
... the water fill tube seal and slide the tube into the hole near the top at the back of the freezer wall. Unplug the Refrigerator. Side Back 3 PREPARE FOR INSTALLATION Inside the freezer, loosen the two mounting screws, but do not screw them all the way ... • Go to O (off ) Set the icemaker power switch to the back of electric shock during installation, you must unplug the refrigerator from the freezer wall. 1 Mounting screws 2 NO. Installation Instructions ICEMAKER INSTALLATION INSTRUCTIONS BEFORE YOU BEGIN Read each step thoroughly before proceeding. • CAUTION ...
Use and Care Manual
Page 14
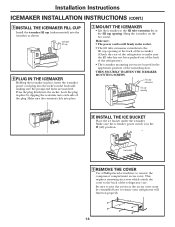
...THE ICEMAKER FILL CUP Install the icemaker fill cup (side-mounted) into the icemaker as the access cover must be reinstalled later to ensure your refrigerator will function properly. 14 THEN SECURELY TIGHTEN THE ICEMAKER MOUNTING SCREWS. Be sure to make sure the fill tube has not been pushed out of... the back of the refrigerator). • The icemaker mounting screws are matched. Hang the icemaker on the back wall, making sure the prongs and holes are located in place...
...THE ICEMAKER FILL CUP Install the icemaker fill cup (side-mounted) into the icemaker as the access cover must be reinstalled later to ensure your refrigerator will function properly. 14 THEN SECURELY TIGHTEN THE ICEMAKER MOUNTING SCREWS. Be sure to make sure the fill tube has not been pushed out of... the back of the refrigerator). • The icemaker mounting screws are matched. Hang the icemaker on the back wall, making sure the prongs and holes are located in place...
Use and Care Manual
Page 15
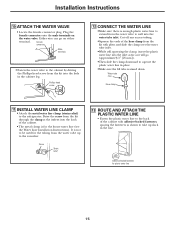
... the cabinet. • The metal clamp is enough plastic water line to well into the inlet as far as shown to take up to the refrigerator. Screw Strain relief 13 ROUTE AND ATTACH THE PLASTIC WATER LINE • Fasten the plastic water line to the back of the hose clamp from...
... the cabinet. • The metal clamp is enough plastic water line to well into the inlet as far as shown to take up to the refrigerator. Screw Strain relief 13 ROUTE AND ATTACH THE PLASTIC WATER LINE • Fasten the plastic water line to the back of the hose clamp from...
Use and Care Manual
Page 16
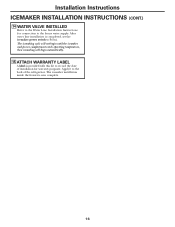
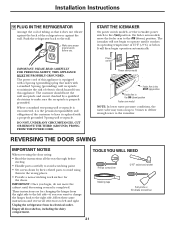
Apply it to record the date of the refrigerator. The icemaker installation inside the freezer is completed, set the icemaker power switch to the home water supply. After water line installation is now complete. 16 The icemaking cycle will not begin until the icemaker and freezer compartment reach operating temperature, then icemaking will begin...
Apply it to record the date of the refrigerator. The icemaker installation inside the freezer is completed, set the icemaker power switch to the home water supply. After water line installation is now complete. 16 The icemaking cycle will not begin until the icemaker and freezer compartment reach operating temperature, then icemaking will begin...
Use and Care Manual
Page 17
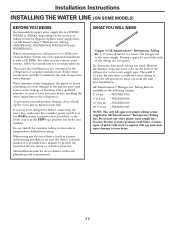
... product damage, do not hook up ) position (on feeler arm models). GE SmartConnect™ Refrigerator Tubing Kits are available in GE SmartConnect™ Refrigerator Tubing kits. WX08X10025 NOTE: The only GE approved plastic tubing is that supplied in the following lengths: 2′ (.6 ...of electric shock, or is battery powered. Approved plastic water supply lines are GE SmartConnect™ Refrigerator Tubing (WX08X10002, WX08X10006, WX08X10015 and WX08X10025). When connecting your refrigerator before installing the water supply line to the water supply pipe. Water hammer ...
... product damage, do not hook up ) position (on feeler arm models). GE SmartConnect™ Refrigerator Tubing Kits are available in GE SmartConnect™ Refrigerator Tubing kits. WX08X10025 NOTE: The only GE approved plastic tubing is that supplied in the following lengths: 2′ (.6 ...of electric shock, or is battery powered. Approved plastic water supply lines are GE SmartConnect™ Refrigerator Tubing (WX08X10002, WX08X10006, WX08X10015 and WX08X10025). When connecting your refrigerator before installing the water supply line to the water supply pipe. Water hammer ...
Use and Care Manual
Page 18
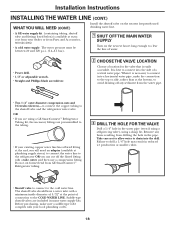
...fitting at the end, you will need an adapter (available at the bottom, to the shutoff valve and the refrigerator water valve. Before purchasing, make the connection to the top or side, rather than at plumbing supply stores) to connect the water line to connect into the drill. ... not cut off any burrs resulting from drilling the hole in the water pipe (even if using a self-piercing valve), using a GE SmartConnect™ Refrigerator Tubing kit, the necessary fittings are included in reduced ice production or smaller cubes. • Shutoff valve to connect to drain into the...
...fitting at the end, you will need an adapter (available at the bottom, to the shutoff valve and the refrigerator water valve. Before purchasing, make the connection to the top or side, rather than at plumbing supply stores) to connect the water line to connect into the drill. ... not cut off any burrs resulting from drilling the hole in the water pipe (even if using a self-piercing valve), using a GE SmartConnect™ Refrigerator Tubing kit, the necessary fittings are included in reduced ice production or smaller cubes. • Shutoff valve to connect to drain into the...
Use and Care Manual
Page 19
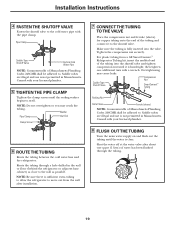
...crush the tubing. Washer Pipe Clamp Inlet End Clamp Screw 6 ROUTE THE TUBING Route the tubing between the cold water line and the refrigerator. then tighten one quart (1 liter) of the tubing and connect it is hand-tight; Consult with your licensed plumber. 8 FLUSH OUT... wrench. Consult with your licensed plumber. 5 TIGHTEN THE PIPE CLAMP Tighten the clamp screws until it to move out from a GE SmartConnect™ Refrigerator Tubing kit, insert the molded end of the tubing into the valve. Saddle valves are illegal and use is not permitted in ...
...crush the tubing. Washer Pipe Clamp Inlet End Clamp Screw 6 ROUTE THE TUBING Route the tubing between the cold water line and the refrigerator. then tighten one quart (1 liter) of the tubing and connect it is hand-tight; Consult with your licensed plumber. 8 FLUSH OUT... wrench. Consult with your licensed plumber. 5 TIGHTEN THE PIPE CLAMP Tighten the clamp screws until it to move out from a GE SmartConnect™ Refrigerator Tubing kit, insert the molded end of the tubing into the valve. Saddle valves are illegal and use is not permitted in ...
Use and Care Manual
Page 20
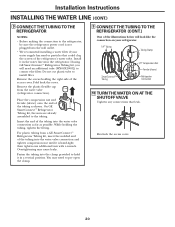
...already assembled to install filter. then tighten one additional turn with a wrench. Remove the plastic flexible cap from a GE SmartConnect™ Refrigerator Tubing kit, insert the molded end of the tubing into the water valve connection and tighten compression nut until it ....) 9 CONNECT THE TUBING TO THE REFRIGERATOR NOTES: • Before making the connection to the refrigerator, be sure the refrigerator power cord is hand-tight; For plastic tubing from the water valve (refrigerator connection). If using GE SmartConnect™ Refrigerator Tubing kit, you will look like the...
...already assembled to install filter. then tighten one additional turn with a wrench. Remove the plastic flexible cap from a GE SmartConnect™ Refrigerator Tubing kit, insert the molded end of the tubing into the water valve connection and tighten compression nut until it ....) 9 CONNECT THE TUBING TO THE REFRIGERATOR NOTES: • Before making the connection to the refrigerator, be sure the refrigerator power cord is hand-tight; For plastic tubing from the water valve (refrigerator connection). If using GE SmartConnect™ Refrigerator Tubing kit, you will look like the...
Use and Care Manual
Page 21
...not begin to operate until door-swing reversal is equipped with a 3-prong (grounding) plug that it is properly grounded. Unplug the refrigerator from its operating temperature of 15°F (-9°C) or below. Empty all references to have the wall receptacle and circuit checked by ... socket and ratchet Masking tape Putty knife or thin-blade screwdriver 21 Where a standard two-prong wall receptacle is encountered, it does not vibrate against the back of the refrigerator or against the wall. Push the refrigerator back to the ON (down) position. These instructions are for...
...not begin to operate until door-swing reversal is equipped with a 3-prong (grounding) plug that it is properly grounded. Unplug the refrigerator from its operating temperature of 15°F (-9°C) or below. Empty all references to have the wall receptacle and circuit checked by ... socket and ratchet Masking tape Putty knife or thin-blade screwdriver 21 Where a standard two-prong wall receptacle is encountered, it does not vibrate against the back of the refrigerator or against the wall. Push the refrigerator back to the ON (down) position. These instructions are for...


