Use and Care Manual
Page 1
...Note to Consumer - Conserve estas instrucciones para referencia futura. 197D7733P001 49-60505-2 04-09 JR Refr Top-Freezer igerators GEAppliances.com Safety Instructions 2-4 Operating Instructions Automatic Icemaker 9 Controls 5 Crispers and Pans 7, 8...Reversing the Door Swing . . . .21-25 Water Line Installation 17-21 Troubleshooting Tips 26-29 Normal Operating Sounds 26 Consumer Support Consumer Support . . . . .Back Cover Warranty for Canadian Customers 30 Warranty for future reference. Keep these numbers on the gray label on the left side, near the top of the refrigerator...
...Note to Consumer - Conserve estas instrucciones para referencia futura. 197D7733P001 49-60505-2 04-09 JR Refr Top-Freezer igerators GEAppliances.com Safety Instructions 2-4 Operating Instructions Automatic Icemaker 9 Controls 5 Crispers and Pans 7, 8...Reversing the Door Swing . . . .21-25 Water Line Installation 17-21 Troubleshooting Tips 26-29 Normal Operating Sounds 26 Consumer Support Consumer Support . . . . .Back Cover Warranty for Canadian Customers 30 Warranty for future reference. Keep these numbers on the gray label on the left side, near the top of the refrigerator...
Use and Care Manual
Page 21
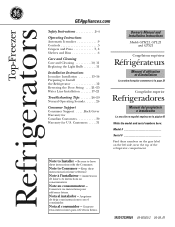
... side, follow these same instructions and reverse all references to left and right. TOOLS YOU WILL NEED Phillips screwdriver 5/16″ socket and ratchet Masking tape Putty knife or thin-blade screwdriver 21 Push the refrigerator back to the wall. The customer ...should have it reaches its electrical outlet. On feeler arm models, move the cabinet until it replaced with a properly grounded 3-prong wall receptacle. Unplug the refrigerator from the right side to the left side-if you begin to operate until door-swing reversal...
... side, follow these same instructions and reverse all references to left and right. TOOLS YOU WILL NEED Phillips screwdriver 5/16″ socket and ratchet Masking tape Putty knife or thin-blade screwdriver 21 Push the refrigerator back to the wall. The customer ...should have it reaches its electrical outlet. On feeler arm models, move the cabinet until it replaced with a properly grounded 3-prong wall receptacle. Unplug the refrigerator from the right side to the left side-if you begin to operate until door-swing reversal...
Use and Care Manual
Page 22
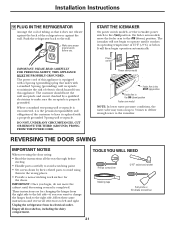
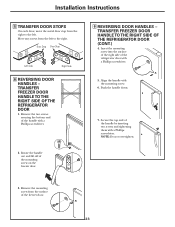
Installation Instructions REVERSING THE DOOR SWING (CONT.) 1 REMOVE FREEZER DOOR Tape the door shut with masking tape. 3 TRANSFER TOP HINGE TO THE LEFT Interchange hinge and screws at top right with screws at this time. Do not tighten screws on hinge side at the top left side. NOTE: If the ... four screws with the inside up . 2 REMOVE REFRIGERATOR DOOR Tape the door shut with masking tape. Remove the center hinge by removing two hinge screws with a base grille, remove it about 6″ from the pin in the top of the freezer door. Using a 5/16″ socket and ratchet, remove...
Installation Instructions REVERSING THE DOOR SWING (CONT.) 1 REMOVE FREEZER DOOR Tape the door shut with masking tape. 3 TRANSFER TOP HINGE TO THE LEFT Interchange hinge and screws at top right with screws at this time. Do not tighten screws on hinge side at the top left side. NOTE: If the ... four screws with the inside up . 2 REMOVE REFRIGERATOR DOOR Tape the door shut with masking tape. Remove the center hinge by removing two hinge screws with a base grille, remove it about 6″ from the pin in the top of the freezer door. Using a 5/16″ socket and ratchet, remove...
Use and Care Manual
Page 23
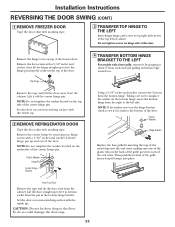
... TO THE RIGHT SIDE OF THE REFRIGERATOR DOOR (CONT.) 4. Installation Instructions 5 TRANSFER DOOR STOPS On each door, move the metal door stop from the surface of the freezer door. 23 Push the handle down. 7. Insert the mounting screw into the ...Secure the top end of the refrigerator door with the mounting screw. 6. Door Stop Door Stop Left Side Right Side 6 REVERSING DOOR HANDLES - Remove the two screws securing the bottom end of the mounting screw on the freezer door. 6 REVERSING DOOR HANDLES - TRANSFER FREEZER DOOR HANDLE TO THE RIGHT SIDE OF THE REFRIGERATOR DOOR 1. Move...
... TO THE RIGHT SIDE OF THE REFRIGERATOR DOOR (CONT.) 4. Installation Instructions 5 TRANSFER DOOR STOPS On each door, move the metal door stop from the surface of the freezer door. 23 Push the handle down. 7. Insert the mounting screw into the ...Secure the top end of the refrigerator door with the mounting screw. 6. Door Stop Door Stop Left Side Right Side 6 REVERSING DOOR HANDLES - Remove the two screws securing the bottom end of the mounting screw on the freezer door. 6 REVERSING DOOR HANDLES - TRANSFER FREEZER DOOR HANDLE TO THE RIGHT SIDE OF THE REFRIGERATOR DOOR 1. Move...
Use and Care Manual
Page 24
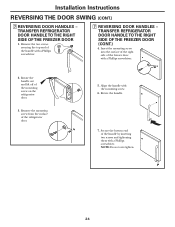
.... 7 REVERSING DOOR HANDLES - Remove the mounting screw from the surface of the freezer door with a Phillips screwdriver. Remove the two screws securing the top end of the handle with the mounting screw. 6. NOTE: Do not over-tighten. 24 Installation Instructions REVERSING THE DOOR SWING (CONT.) 7 REVERSING DOOR HANDLES - Rotate the handle. 7. TRANSFER REFRIGERATOR DOOR HANDLE TO THE RIGHT SIDE OF THE FREEZER DOOR 1.
.... 7 REVERSING DOOR HANDLES - Remove the mounting screw from the surface of the freezer door with a Phillips screwdriver. Remove the two screws securing the top end of the handle with the mounting screw. 6. NOTE: Do not over-tighten. 24 Installation Instructions REVERSING THE DOOR SWING (CONT.) 7 REVERSING DOOR HANDLES - Rotate the handle. 7. TRANSFER REFRIGERATOR DOOR HANDLE TO THE RIGHT SIDE OF THE FREEZER DOOR 1.

