
Use and Care Manual
Page 1
...Refrigerators ge.com Safety Instructions 2-4 Operating Instructions Automatic Icemaker 12 Care and Cleaning 14, 15 ClimateKeeper2 6 Crispers and Pans 11 CustomCool 6 Ice and Water Dispenser 13 Refrigerator Doors 10 Replacing the Light Bulbs 16 Shelves and Bins 8, 9 Temperature Controls 5 TurboCool 5 Water Filter 7 Installation Instructions Installing the Refrigerator 26-29 Moving the Refrigerator 22-25... Preparing to Install the Refrigerator 21 Trim Kits and Panels 17-20 ...
...Refrigerators ge.com Safety Instructions 2-4 Operating Instructions Automatic Icemaker 12 Care and Cleaning 14, 15 ClimateKeeper2 6 Crispers and Pans 11 CustomCool 6 Ice and Water Dispenser 13 Refrigerator Doors 10 Replacing the Light Bulbs 16 Shelves and Bins 8, 9 Temperature Controls 5 TurboCool 5 Water Filter 7 Installation Instructions Installing the Refrigerator 26-29 Moving the Refrigerator 22-25... Preparing to Install the Refrigerator 21 Trim Kits and Panels 17-20 ...
Use and Care Manual
Page 2
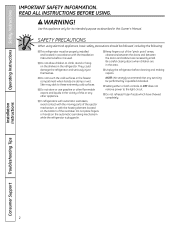
... of the ejector mechanism, or with the Installation Instructions before cleaning and making repairs. s Do not touch the cold surfaces in the refrigerator. s In refrigerators with automatic icemakers, avoid contact with the moving parts of the icemaker. s Keep fingers out of this Owner's Manual. NOTE: We...the doors and cabinet are damp or wet. Use this appliance only for its intended purpose as described in . s Unplug the refrigerator before it is plugged in this or any servicing be properly installed and located in accordance with the heating element located on the ...
... of the ejector mechanism, or with the Installation Instructions before cleaning and making repairs. s Do not touch the cold surfaces in the refrigerator. s In refrigerators with automatic icemakers, avoid contact with the moving parts of the icemaker. s Keep fingers out of this Owner's Manual. NOTE: We...the doors and cabinet are damp or wet. Use this appliance only for its intended purpose as described in . s Unplug the refrigerator before it is plugged in this or any servicing be properly installed and located in accordance with the heating element located on the ...
Use and Care Manual
Page 3
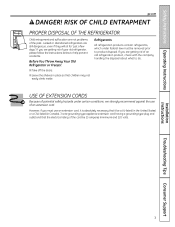
... and outlet and that children may not easily climb inside. Installation Instructions Troubleshooting Tips Consumer Support 3 Safety Instructions Operating Instructions ge.com DANGER! RISK OF CHILD ENTRAPMENT PROPER DISPOSAL OF THE REFRIGERATOR Child entrapment and suffocation are still dangerous...even if they will sit for "just a few days." However, if you are...
... and outlet and that children may not easily climb inside. Installation Instructions Troubleshooting Tips Consumer Support 3 Safety Instructions Operating Instructions ge.com DANGER! RISK OF CHILD ENTRAPMENT PROPER DISPOSAL OF THE REFRIGERATOR Child entrapment and suffocation are still dangerous...even if they will sit for "just a few days." However, if you are...
Use and Care Manual
Page 4
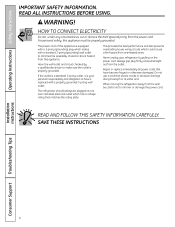
... appliance must be plugged into its length or at either end. Do not use a cord that have it is your refrigerator by a qualified electrician to roll over or damage the power cord. READ AND FOLLOW THIS SAFETY INFORMATION CAREFULLY. SAVE THESE...grounding) plug which has a voltage rating that matches the rating plate. Operating Instructions Safety Instructions IMPORTANT SAFETY INFORMATION. WARNING! The refrigerator should always be properly grounded. Repair or replace immediately all power cords that shows cracks or abrasion damage along its own individual ...
... appliance must be plugged into its length or at either end. Do not use a cord that have it is your refrigerator by a qualified electrician to roll over or damage the power cord. READ AND FOLLOW THIS SAFETY INFORMATION CAREFULLY. SAVE THESE...grounding) plug which has a voltage rating that matches the rating plate. Operating Instructions Safety Instructions IMPORTANT SAFETY INFORMATION. WARNING! The refrigerator should always be properly grounded. Repair or replace immediately all power cords that shows cracks or abrasion damage along its own individual ...
Use and Care Manual
Page 5
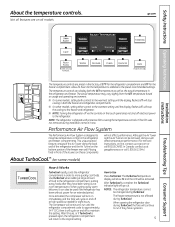
...cycled on and off to run if they have been sitting out at high speed as the actual temperature in the refrigerator and freezer compartments. In Canada, contact us at ge.com or call 1.800.561.3344.) About TurboCool.™ (on -line, contact us at geappliances.ca or call..., doing so will return to more quickly cool foods. Not all features are preset in front of the refrigerator and the Air Tunnel on usage and operating environment. ge.com Installation Instructions Troubleshooting Tips Consumer Support The temperature controls are on the touch panel does not shut off ...
...cycled on and off to run if they have been sitting out at high speed as the actual temperature in the refrigerator and freezer compartments. In Canada, contact us at ge.com or call 1.800.561.3344.) About TurboCool.™ (on -line, contact us at geappliances.ca or call..., doing so will return to more quickly cool foods. Not all features are preset in front of the refrigerator and the Air Tunnel on usage and operating environment. ge.com Installation Instructions Troubleshooting Tips Consumer Support The temperature controls are on the touch panel does not shut off ...

Use and Care Manual
Page 6
...freezer burn. *Testing shows a higher level of the drawer up and out. LCD Models: Access by rotating them to the higher humidity in the refrigerator compartment. s ExpressChill can now be set to the desired setting. Lift the front of humidity in the Fresh Food section in the cycle (on...display on some models). Lock all four swing locks to the stop a feature before it is off. Place the sides of moisture in the refrigerator, you may vary slightly from the SET temperature based on . Tap the pad until they are selected and the display is recommended that feature...
...freezer burn. *Testing shows a higher level of the drawer up and out. LCD Models: Access by rotating them to the higher humidity in the refrigerator compartment. s ExpressChill can now be set to the desired setting. Lift the front of humidity in the Fresh Food section in the cycle (on...display on some models). Lock all four swing locks to the stop a feature before it is off. Place the sides of moisture in the refrigerator, you may vary slightly from the SET temperature based on . Tap the pad until they are selected and the display is recommended that feature...
Use and Care Manual
Page 7
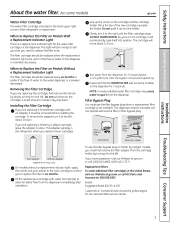
...replace future cartridges. The filter cartridge should be replaced when the replacement indicator light turns red or if the flow of the refrigerator compartment. DO NOT OVERTIGHTEN. Troubleshooting Tips Consumer Support 7 Removing the Filter Cartridge If you are replacing a Water by turning it...cartridges in six months. Place the top of water to replace the filter in the United States, visit our Website at ge.com, or call GE Parts and Accessories, 800.626.2002. Safety Instructions Operating Instructions Installation Instructions About the water filter. (on the dispenser....
...replace future cartridges. The filter cartridge should be replaced when the replacement indicator light turns red or if the flow of the refrigerator compartment. DO NOT OVERTIGHTEN. Troubleshooting Tips Consumer Support 7 Removing the Filter Cartridge If you are replacing a Water by turning it...cartridges in six months. Place the top of water to replace the filter in the United States, visit our Website at ge.com, or call GE Parts and Accessories, 800.626.2002. Safety Instructions Operating Instructions Installation Instructions About the water filter. (on the dispenser....
Use and Care Manual
Page 8
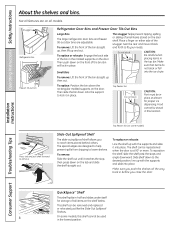
... Bins and Freezer Door Tilt-Out Bins Large Bins The larger refrigerator door bins and freezer tilt-out door bins are on the door shelf. Then push down on the front of small items stored on all ...
... Bins and Freezer Door Tilt-Out Bins Large Bins The larger refrigerator door bins and freezer tilt-out door bins are on the door shelf. Then push down on the front of small items stored on all ...
Use and Care Manual
Page 10
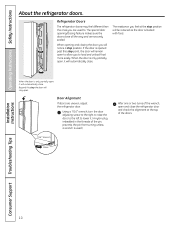
... the door you to lower it will automatically close . If the door is opened past this stop position. Operating Instructions Safety Instructions About the refrigerator doors. When the door is used to allow you will automatically close . The resistance you are used .) 7/16″ Wrench Raise After one...wrench, turn the door adjusting screw to the right to raise the door, to the left to load and unload food more easily. Refrigerator Doors The refrigerator doors may feel different than the ones you feel at the top of the pin, prevents the pin from turning unless a wrench is...
... the door you to lower it will automatically close . If the door is opened past this stop position. Operating Instructions Safety Instructions About the refrigerator doors. When the door is used to allow you will automatically close . The resistance you are used .) 7/16″ Wrench Raise After one...wrench, turn the door adjusting screw to the right to raise the door, to the left to load and unload food more easily. Refrigerator Doors The refrigerator doors may feel different than the ones you feel at the top of the pin, prevents the pin from turning unless a wrench is...

Use and Care Manual
Page 11
...the pan. Crisper Removal Crispers can be wiped dry. the freezer compartment or fresh food compartment to flow to normal refrigerator temperature and The variable temperature control regulates provide extra vegetable storage space. The the air flow from the Climate Keeper.... On some cases, when you roll the refrigerator out, you will need to move the refrigerator to provide high humidity recommended for most vegetables. Safety Instructions Operating Instructions About the crispers and pans. ge.com Installation Instructions Troubleshooting Tips Consumer Support Adjustable ...
...the pan. Crisper Removal Crispers can be wiped dry. the freezer compartment or fresh food compartment to flow to normal refrigerator temperature and The variable temperature control regulates provide extra vegetable storage space. The the air flow from the Climate Keeper.... On some cases, when you roll the refrigerator out, you will need to move the refrigerator to provide high humidity recommended for most vegetables. Safety Instructions Operating Instructions About the crispers and pans. ge.com Installation Instructions Troubleshooting Tips Consumer Support Adjustable ...
Use and Care Manual
Page 12
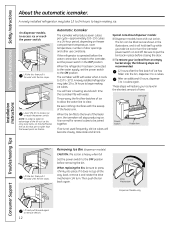
... only Installation Instructions Consumer Support Troubleshooting Tips Lift and pull forward again to 4 cubes again. Lower the bin to the ON position. If the refrigerator is operated before the water connection is normal for several cubes to clear. When the bin fills to the level of ice to allow the... line to be tilted out as shown in the shortest amount of the feeler arm. A newly installed refrigerator may take 12 to 24 hours to begin making ice cubes. A newly installed refrigerator may take 12 to 24 hours to begin making ice. Throw away the first few batches of the ...
... only Installation Instructions Consumer Support Troubleshooting Tips Lift and pull forward again to 4 cubes again. Lower the bin to the ON position. If the refrigerator is operated before the water connection is normal for several cubes to clear. When the bin fills to the level of ice to allow the... line to be tilted out as shown in the shortest amount of the feeler arm. A newly installed refrigerator may take 12 to 24 hours to begin making ice cubes. A newly installed refrigerator may take 12 to 24 hours to begin making ice. Throw away the first few batches of the ...
Use and Care Manual
Page 13
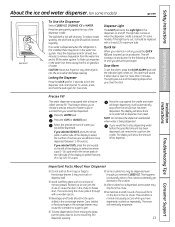
...16 cups) and/or the arrow pads on the left to dispense. The display will show there is no water is dispensed when the refrigerator is first installed, there may drip from trays or bags to the storage drawer. This happens occasionally when a few cubes accidentally get directed ... Never put the glass close the door. Press the CUPS or OUNCES pad. Backed-up ice production. This condition is dispensed, some models) ge.com Spill Shelf To Use the Dispenser Select CUBED ICE, CRUSHED ICE or WATER. Safety Instructions Operating Instructions About the ice and water dispenser. (...
...16 cups) and/or the arrow pads on the left to dispense. The display will show there is no water is dispensed when the refrigerator is first installed, there may drip from trays or bags to the storage drawer. This happens occasionally when a few cubes accidentally get directed ... Never put the glass close the door. Press the CUPS or OUNCES pad. Backed-up ice production. This condition is dispensed, some models) ge.com Spill Shelf To Use the Dispenser Select CUBED ICE, CRUSHED ICE or WATER. Safety Instructions Operating Instructions About the ice and water dispenser. (...
Use and Care Manual
Page 14
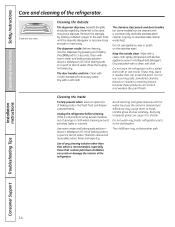
...baking soda solution- These may leave a residue that contain petroleum distillates, can crack or damage the interior of any plastic refrigerator parts in the dishwasher. Bumping tempered glass can be wiped dry. Operating Instructions Safety Instructions Care and cleaning of baking soda ...quart (1 liter) of water. about a tablespoon (15 ml) of baking soda to rinse away. Keep the outside clean. Unplug the refrigerator before cleaning. Use warm water and baking soda solution- This both cleans and neutralizes odors. Avoid cleaning cold glass shelves with a commercially...
...baking soda solution- These may leave a residue that contain petroleum distillates, can crack or damage the interior of any plastic refrigerator parts in the dishwasher. Bumping tempered glass can be wiped dry. Operating Instructions Safety Instructions Care and cleaning of baking soda ...quart (1 liter) of water. about a tablespoon (15 ml) of baking soda to rinse away. Keep the outside clean. Unplug the refrigerator before cleaning. Use warm water and baking soda solution- This both cleans and neutralizes odors. Avoid cleaning cold glass shelves with a commercially...
Use and Care Manual
Page 15
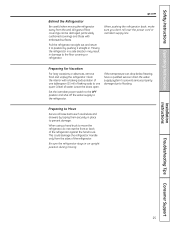
... power cord or icemaker supply line. Leave the doors open. This could damage the refrigerator. Safety Instructions Operating Instructions ge.com Behind the Refrigerator Be careful when moving the refrigerator away from the sides of floor coverings can drop below freezing, have a qualified servicer...Installation Instructions Troubleshooting Tips Consumer Support 15 Preparing for Vacation For long vacations or absences, remove food and unplug the refrigerator. Moving the refrigerator in a side direction may result in . Set the icemaker power switch to the OFF position and shut off ...
... power cord or icemaker supply line. Leave the doors open. This could damage the refrigerator. Safety Instructions Operating Instructions ge.com Behind the Refrigerator Be careful when moving the refrigerator away from the sides of floor coverings can drop below freezing, have a qualified servicer...Installation Instructions Troubleshooting Tips Consumer Support 15 Preparing for Vacation For long vacations or absences, remove food and unplug the refrigerator. Moving the refrigerator in a side direction may result in . Set the icemaker power switch to the OFF position and shut off ...

Use and Care Manual
Page 16
... it counterclockwise. Remove the shelf just above the top drawer. On other models, just slide the shield forward and out. COLD Refrigerator Compartment-Lower Light This light is located on the sides, and lift up and pull it is located in on the tabs on... some models. To remove the light shield, on some models) Unplug the refrigerator. Plug the refrigerator back in. Replace the bulb with an C OLDEST Unplug the refrigerator. Operating Instructions Safety Instructions Replacing the light bulbs. Setting the controls to OFF does not remove ...
... it counterclockwise. Remove the shelf just above the top drawer. On other models, just slide the shield forward and out. COLD Refrigerator Compartment-Lower Light This light is located on the sides, and lift up and pull it is located in on the tabs on... some models. To remove the light shield, on some models) Unplug the refrigerator. Plug the refrigerator back in. Replace the bulb with an C OLDEST Unplug the refrigerator. Operating Instructions Safety Instructions Replacing the light bulbs. Setting the controls to OFF does not remove ...

Use and Care Manual
Page 17
...) 1/4″ (6 mm) max 3/4″ (19 mm) 2″ (5.1 cm) Clearance Handle Side Appearance Panel 3/4″ (19 mm) Refrigerator Door Installation Instructions Troubleshooting Tips Consumer Support 17 The combined thickness of at least 2″ (5.1 cm) from GE Parts and Accessories, 800.626.2002, or you to match your kitchen cabinets. Before You Begin Some...
...) 1/4″ (6 mm) max 3/4″ (19 mm) 2″ (5.1 cm) Clearance Handle Side Appearance Panel 3/4″ (19 mm) Refrigerator Door Installation Instructions Troubleshooting Tips Consumer Support 17 The combined thickness of at least 2″ (5.1 cm) from GE Parts and Accessories, 800.626.2002, or you to match your kitchen cabinets. Before You Begin Some...
Use and Care Manual
Page 19
The Top Trim can be found inside the refrigerator compartment. If your model has a dispenser, this step only applies to the top of each door. Carefully push the freezer panel in until it slides ...
The Top Trim can be found inside the refrigerator compartment. If your model has a dispenser, this step only applies to the top of each door. Carefully push the freezer panel in until it slides ...
Use and Care Manual
Page 20
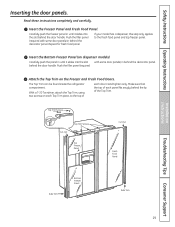
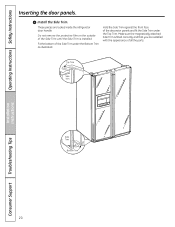
... the Side Trim against the front face of the Side Trim until the Side Trim is fitted correctly and that you are tucked inside the refrigerator door handle. Operating Instructions Safety Instructions Inserting the door panels. Install the Side Trim. Fit the bottom of all the parts. Make sure the magnetically...
... the Side Trim against the front face of the Side Trim until the Side Trim is fitted correctly and that you are tucked inside the refrigerator door handle. Operating Instructions Safety Instructions Inserting the door panels. Install the Side Trim. Fit the bottom of all the parts. Make sure the magnetically...

Use and Care Manual
Page 21
...and 5/16″ Socket 1/8″ Hex Wrench 1/2″ and 7/16″ Wrench Plastic Putty Knife Phillips Head Screwdriver 21 A GE water supply kit (containing tubing, shutoff valve, fittings and instructions) is available at extra cost from Parts and Accessories, 800.626...• Product failure due to Installer - Keep these instructions for future reference. • Skill level - Installation Instructions Refrigerator Models 23, 25 and 26 Questions? Observe all governing codes and ordinances. • Note to improper installation is the responsibility of this ...
...and 5/16″ Socket 1/8″ Hex Wrench 1/2″ and 7/16″ Wrench Plastic Putty Knife Phillips Head Screwdriver 21 A GE water supply kit (containing tubing, shutoff valve, fittings and instructions) is available at extra cost from Parts and Accessories, 800.626...• Product failure due to Installer - Keep these instructions for future reference. • Skill level - Installation Instructions Refrigerator Models 23, 25 and 26 Questions? Observe all governing codes and ordinances. • Note to improper installation is the responsibility of this ...
Use and Care Manual
Page 22
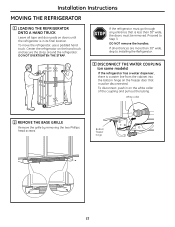
...REMOVE THE BASE GRILLE Remove the grille by removing the two Phillips head screws. Center the refrigerator on the white collar of the coupling and pull out the tubing. Installation Instructions MOVING THE REFRIGERATOR 1 LOADING THE REFRIGERATOR ONTO A HAND TRUCK Leave all entrances are more than 38″ wide, the doors ...must be removed. If all tape and door pads on doors until the refrigerator is a water line from the cabinet into the bottom hinge on the freezer door that is less than 38″ wide, skip to Step...
...REMOVE THE BASE GRILLE Remove the grille by removing the two Phillips head screws. Center the refrigerator on the white collar of the coupling and pull out the tubing. Installation Instructions MOVING THE REFRIGERATOR 1 LOADING THE REFRIGERATOR ONTO A HAND TRUCK Leave all entrances are more than 38″ wide, the doors ...must be removed. If all tape and door pads on doors until the refrigerator is a water line from the cabinet into the bottom hinge on the freezer door that is less than 38″ wide, skip to Step...


