Use and Care Manual
Page 1
... could puncture the cooling coil, causing the unit to lose its ability to remove frost or ice from surfaces of the freezer compartment. Refrigerators ge.com Safety Information 2, 3 Operating Instructions Care and Cleaning 6-8 Control Settings 4 Refrigerator Features 5 Replacing the Light Bulb . . . . ... and voiding the warranty. Owner's Manual & Installation Instructions 2 Cubic Foot Models 3 Cubic Foot Models 4 Cubic Foot Models 6 Cubic Foot Models Write the model and serial numbers here: Model Serial Find these numbers on a label inside the refrigerator on defrosting the ...
... could puncture the cooling coil, causing the unit to lose its ability to remove frost or ice from surfaces of the freezer compartment. Refrigerators ge.com Safety Information 2, 3 Operating Instructions Care and Cleaning 6-8 Control Settings 4 Refrigerator Features 5 Replacing the Light Bulb . . . . ... and voiding the warranty. Owner's Manual & Installation Instructions 2 Cubic Foot Models 3 Cubic Foot Models 4 Cubic Foot Models 6 Cubic Foot Models Write the model and serial numbers here: Model Serial Find these numbers on a label inside the refrigerator on defrosting the ...
Use and Care Manual
Page 5
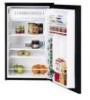
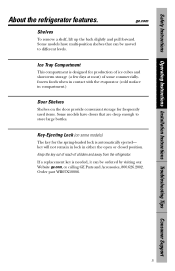
...items. Some models have multi-position shelves that are deep enough to different levels. Key-Ejecting Lock (on the door provide convenient storage for the spring-loaded lock is needed, it can be ordered by visiting our Website ge.com, or calling GE Parts and ... key is automatically ejected- Order part WR05X10006. 5 Safety Instructions Operating Instructions Installation Instructions Troubleshooting Tips Consumer Support About the refrigerator features. ge.com Shelves To remove a shelf, lift up the back slightly and pull forward. key will not remain in lock in compartment.) ...
...items. Some models have multi-position shelves that are deep enough to different levels. Key-Ejecting Lock (on the door provide convenient storage for the spring-loaded lock is needed, it can be ordered by visiting our Website ge.com, or calling GE Parts and ... key is automatically ejected- Order part WR05X10006. 5 Safety Instructions Operating Instructions Installation Instructions Troubleshooting Tips Consumer Support About the refrigerator features. ge.com Shelves To remove a shelf, lift up the back slightly and pull forward. key will not remain in lock in compartment.) ...
Use and Care Manual
Page 6
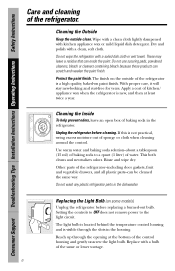
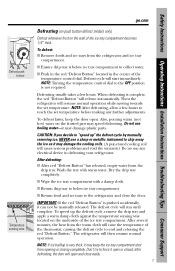
... the refrigerator. Consumer Support Troubleshooting Tips Installation Instructions Operating Instructions Safety Instructions Care and cleaning of the same or lower wattage. 6 The finish on some models) Unplug the refrigerator before cleaning. Rinse and wipe dry. Dry and polish with a soiled dish cloth or wet towel. The light bulb is located behind...
... the refrigerator. Consumer Support Troubleshooting Tips Installation Instructions Operating Instructions Safety Instructions Care and cleaning of the same or lower wattage. 6 The finish on some models) Unplug the refrigerator before cleaning. Rinse and wipe dry. Dry and polish with a soiled dish cloth or wet towel. The light bulb is located behind...
Use and Care Manual
Page 7
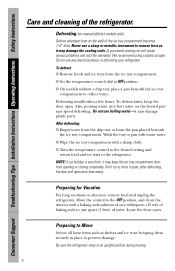
..., the door will cause serious problems and void the warranty.) Do no use any further adjustments. Defrost push button Temperature sensing wire ge.com Defrosting (on push button defrost models only) Defrost whenever frost on the underside of the ice tray compartment. I Return drip tray to force it may keep the door...
..., the door will cause serious problems and void the warranty.) Do no use any further adjustments. Defrost push button Temperature sensing wire ge.com Defrosting (on push button defrost models only) Defrost whenever frost on the underside of the ice tray compartment. I Return drip tray to force it may keep the door...
Use and Care Manual
Page 8
To defrost: I On models without a drip tray, place a pan beneath the ice tray compartment to prevent damage. To defrost faster, keep the ice tray compartment door from opening or ... completely. Do not use any electrical device in defrosting your refrigerator. Be sure the refrigerator stays in place to collect water. Defrosting (on manual defrost models only) Defrost whenever frost on the frosted part may damage plastic parts. Do not use boiling water-it open and close easily. Also, pouring warm...
To defrost: I On models without a drip tray, place a pan beneath the ice tray compartment to prevent damage. To defrost faster, keep the ice tray compartment door from opening or ... completely. Do not use any electrical device in defrosting your refrigerator. Be sure the refrigerator stays in place to collect water. Defrosting (on manual defrost models only) Defrost whenever frost on the frosted part may damage plastic parts. Do not use boiling water-it open and close easily. Also, pouring warm...
Use and Care Manual
Page 9
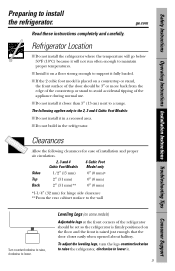
...more back from the edge of the countertop or stand to avoid accidental tipping of installation and proper air circulation. 2, 3 and 4 6 Cubic Foot Cubic Foot Models Model only Sides 1/2″ (13 mm) 0″ (0 mm)∗ Top 2″ (51 mm) 0″ (0 mm) Back 2″ (51 mm)**... Instructions Installation Instructions Troubleshooting Tips Consumer Support Preparing to lower it. 9 I Do not install it in the refrigerator. ge.com Read these instructions completely and carefully. The following clearances for hinge side clearance **From the rear cabinet surface to ...
...more back from the edge of the countertop or stand to avoid accidental tipping of installation and proper air circulation. 2, 3 and 4 6 Cubic Foot Cubic Foot Models Model only Sides 1/2″ (13 mm) 0″ (0 mm)∗ Top 2″ (51 mm) 0″ (0 mm) Back 2″ (51 mm)**... Instructions Installation Instructions Troubleshooting Tips Consumer Support Preparing to lower it. 9 I Do not install it in the refrigerator. ge.com Read these instructions completely and carefully. The following clearances for hinge side clearance **From the rear cabinet surface to ...
Use and Care Manual
Page 10
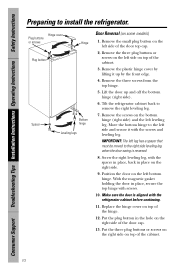
... the three plug buttons or screws on the right side on the right side of the hinge. 12. Remove the small plug button on some models) 1.
... the three plug buttons or screws on the right side on the right side of the hinge. 12. Remove the small plug button on some models) 1.

Use and Care Manual
Page 11
Remove the three screws on some models) 4 Cubic Foot Models 1. Move the bottom hinge to the left leveling leg. Remove the top cover by lifting the back up and off the bottom hinge (right side). 8. ... aligned with the screws and leveling leg. Put the plug button in place on the top plate. 6. Top cover Left hinge location Plug button Spacer ge.com Upper hinge Top plate Door top cap Bottom hinge Leveling legs Door Reversal (on the upper hinge (right side). IMPORTANT: The left side of...
Remove the three screws on some models) 4 Cubic Foot Models 1. Move the bottom hinge to the left leveling leg. Remove the top cover by lifting the back up and off the bottom hinge (right side). 8. ... aligned with the screws and leveling leg. Put the plug button in place on the top plate. 6. Top cover Left hinge location Plug button Spacer ge.com Upper hinge Top plate Door top cap Bottom hinge Leveling legs Door Reversal (on the upper hinge (right side). IMPORTANT: The left side of...
Use and Care Manual
Page 12
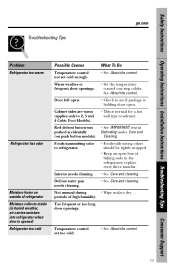
...... Cleaning. Front leveling legs (on an uneven surface. • Use shims to install the refrigerator. Refrigerator is on some models). • Unlock the door with the key. large amounts of food are placed in Preparing to level the refrigerator. Order part...GE Parts and Accessories, 800.626.2002. The fuse is blown/circuit • Replace fuse or reset breaker is holding door open . • Check to completely cool down. set at the coldest setting. Troubleshooting Tips Save time and money! Refrigerator is available on push Defrosting under Care and button models...
...... Cleaning. Front leveling legs (on an uneven surface. • Use shims to install the refrigerator. Refrigerator is on some models). • Unlock the door with the key. large amounts of food are placed in Preparing to level the refrigerator. Order part...GE Parts and Accessories, 800.626.2002. The fuse is blown/circuit • Replace fuse or reset breaker is holding door open . • Check to completely cool down. set at the coldest setting. Troubleshooting Tips Save time and money! Refrigerator is available on push Defrosting under Care and button models...
Use and Care Manual
Page 13
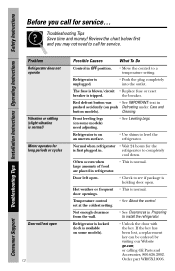
... the control. Safety Instructions Operating Instructions Installation Instructions Troubleshooting Tips Consumer Support Troubleshooting Tips ge.com Problem Refrigerator too warm Refrigerator has odor Moisture forms on push button models). Door left open. • Check to 2, 3 and 4 Cubic Foot Models). • This is opened) Refrigerator too cold Possible Causes What To Do Temperature control...
... the control. Safety Instructions Operating Instructions Installation Instructions Troubleshooting Tips Consumer Support Troubleshooting Tips ge.com Problem Refrigerator too warm Refrigerator has odor Moisture forms on push button models). Door left open. • Check to 2, 3 and 4 Cubic Foot Models). • This is opened) Refrigerator too cold Possible Causes What To Do Temperature control...
Use and Care Manual
Page 15
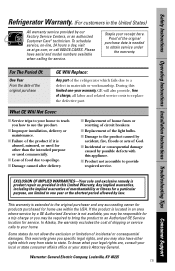
...also provide, free of charge, all labor and related service costs to an Authorized GE Service location for home use the product. This warranty gives you specific legal rights, and you may also have serial and model numbers available when calling for a trip charge or you may be required to bring... the product to replace the defective part. I Product not accessible to use within the USA. To schedule service, on-line, 24 hours a day, visit us at ge.com, or call 800.GE.CARES. Proof...
...also provide, free of charge, all labor and related service costs to an Authorized GE Service location for home use the product. This warranty gives you specific legal rights, and you may also have serial and model numbers available when calling for a trip charge or you may be required to bring... the product to replace the defective part. I Product not accessible to use within the USA. To schedule service, on-line, 24 hours a day, visit us at ge.com, or call 800.GE.CARES. Proof...

