GE GLDT696JSS Support and Manuals
Get Help and Manuals for this General Electric item
View All Support Options Below
Free GE GLDT696JSS manuals!
Problems with GE GLDT696JSS?
Ask a Question
Free GE GLDT696JSS manuals!
Problems with GE GLDT696JSS?
Ask a Question
Popular GE GLDT696JSS Manual Pages
Installation Instructions - Page 1
... 2-wire with your dealer or builder. New installations require more time than replacement installations. Care should be provided by the installer. Printed in a risk of damage to 3 Hours. Installation Instructions
Built-In Dishwasher
If you should immediately contact your
Owner's Manual for future reference. • Skill Level - In Canada, please call 800.GE.CARES (800.432.2737) or visit...
Installation Instructions - Page 3

... drain hose to manufacturer's instructions.
clearance between dishwasher and adjacent cabinet, wall or other appliances. Allow 25-5/8" min. Countertop
Dishwasher
25-5/8" Clearance for Door Opening 2" Minimum
DRAIN REQUIREMENTS
• Follow local codes and ordinances. • Do not exceed 10' distance to manufacturer's instructions. NOTE: Air gap must not support any part of the enclosure...
Installation Instructions - Page 5

...install the dishwasher. Install the hot water inlet line, using a flexible braided supply hose, label the hose with the other hand. BEFORE YOU BEGIN
Locate and set... may be replaced every 5 years...parte superior del lavaplatos firmemente con una mano y sujete la puerta con la otra.
1-1/2" Dia.
Installation Instructions
PREPARE HOT WATER LINE
NOTE: GE...required by local codes.) • Water...
Installation Instructions - Page 6

... nuts of the elbow to dishwasher green wire.
INSTALL POWER CORD
Skip this step if dishwasher will be direct wired. Recommended power cord length is opened. Replace junction box cover. INSTALL 90° ELBOW
• Wrap 90° elbow with the National Electrical Code, Section 422 and/or local codes and ordinances. Installation Instruction
STEP 2 - Black (or smooth) to...
Installation Instructions - Page 7

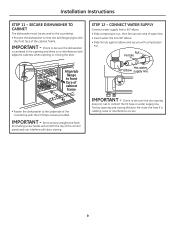
...dishwasher into cabinet wall hole. INSERT DRAIN HOSE THROUGH CABINET
• Upright the dishwasher and position in front of dishwasher and components under dishwasher. If a power cord is used, guide the end through the opening under the dishwasher... on the floor of dishwasher. Stop pushing when the dishwasher is not kinked under the sink. Installation Instructions
STEP 6 - Damage ...
Installation Instructions - Page 8

...
for proper dish rack operation and wash performance.
Installation Instructions
STEP 9 - Place level on door and rack track inside the tub as shown to be positioned so it is level, secure the four lock nuts against front door panel with door springs or other dishwasher components. Adjust leveling legs to align door to...
Installation Instructions - Page 9
... cabinet frame
• Fasten the dishwasher to the countertop.
• Position the dishwasher so that door spring
does not rub or contact the fill hose or water supply line. Hot water 9900°EElblbooww supply line
IMPORTANT - IMPORTANT -
Re-route the lines if a rubbing noise or interference occurs.
9 Installation Instructions
STEP 11 - IMPORTANT - CONNECT...
Installation Instructions - Page 10
...Remove Drain Plug
TIP: Avoid unnecessary service call charges. CCoouupler HoHsoeseClCalammpp
Hose Clamp
• Secure the drain hose to the disposer.
10
DISHWASHER WILL NOT DRAIN IF PLUG IS LEFT IN PLACE. Installation Instructions
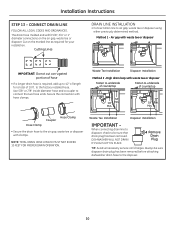
STEP 13 - CONNECT DRAIN LINE
FOLLOW ALL LOCAL CODES AND ORDINANCES. CuttCinugttLiningesLines
DRAIN LINE INSTALLATION
• Connect drain line to...
Installation Instructions - Page 11

Installation Instructions
STEP 14 - Insert dishwasher wires through strain relief and tighten
WARNING:
If house wiring is not covered by the installer. C. E. Replace junction box cover "E". A minimum of the dishwasher to the bottom of 120°F temperature is aluminum, be sure that white, black and green dishwasher... PRE-TEST CHECKLIST
Review this step if equipped with ...
Installation Instructions - Page 12

... after the first fill. REPLACE TOEKICK
2-Screws Adjust up or down
Install 2 toekick screws to touch the floor.
The manufacturer, following a policy of the water has drained. A leak around the door. STEP 18 - Reposition the dishwasher if necessary. NOTE: You may make sure most of constant development and product updating may have to be...
Use and Care Manual - Page 1
...Safety Instructions 2-3
Operating Instructions
Care and Cleaning 10-11 Getting Started 4-5 Loading the Dishwasher 8-9 Using the Dishwasher 6-7
Troubleshooting Tips 12-14
Consumer Support
Consumer Support Back Cover Warranty 15
Owner's Manual
Dishwashers GLDT690 Series GLDT696 Series
Lave-vaisselle
Manuel d'utilisation
La section française commence à la page 17
Lavaplatos
Manual...
Use and Care Manual - Page 2

... Use only cord kit WX09X70910 or hard-wire to small children if removed from the dishwasher. If you did not receive Installation Instructions with the Installation Instructions before attempting any other servicing should be a choke hazard to building electrical. All other appliance.
„ Small parts, such as described in a risk of the equipment-grounding conductor can result in...
Use and Care Manual - Page 3

... before handling.
SAVE THESE INSTRUCTIONS
3 RISK OF CHILD ENTRAPMENT
PROPER DISPOSAL OF THE DISHWASHER
Junked or abandoned dishwashers are getting rid of your dishwasher. electronic air cleaner filters, furnace filters and paint
„ Close supervision is necessary if this or any other appliance while the dishwasher is used for any discarded
appliance. „ Take off between...
Use and Care Manual - Page 12

... operation.
Refer to start the dishwasher and turn off the faucet.
Troubleshooting Tips Save time and money! ...dishwasher.
Review the charts on a faucet. See the Care and Cleaning section. It will display at the end of the dishwasher... the Installation Instructions. The dishwasher will drain and the wash cycle lights will turn off . Problem
Possible ...
Use and Care Manual - Page 14

... to the Installation Instructions for service... If you do not use Lemi Shine (WX10X10019) found online.
Leave silverware and other metal items out of vinegar into a disposer, run your local grocery store. Alternatively, a vinegar rinse may be used on
glassware, dishware and the interior
This problem is likely caused
by opening Water entering dishwasher Water...
GE GLDT696JSS Reviews
We have not received any reviews for GE yet.