

Use and Care Manual
Page 1
...Refrigerators ge.com Safety Instructions 2-4 Operating Instructions Automatic Icemaker 14 Care and Cleaning 16, 17 ClimateKeeper2 6 Crispers and Pans 13 CustomCool 7, 8 Ice and Water Dispenser 15-16 QuickFreeze 9 Quick Ice 15 Refrigerator... Device Certificate 42 Warranty (Canadian 39 Warranty (U.S 40 Owner's Manual and Installation Models 23, 25, 26, 27 and 29 Profile Côte à Côte Ré... en la página 88 Write the model and serial numbers here: Model Serial Find these numbers on a label inside the refrigerator compartment at the top on the right side...
...Refrigerators ge.com Safety Instructions 2-4 Operating Instructions Automatic Icemaker 14 Care and Cleaning 16, 17 ClimateKeeper2 6 Crispers and Pans 13 CustomCool 7, 8 Ice and Water Dispenser 15-16 QuickFreeze 9 Quick Ice 15 Refrigerator... Device Certificate 42 Warranty (Canadian 39 Warranty (U.S 40 Owner's Manual and Installation Models 23, 25, 26, 27 and 29 Profile Côte à Côte Ré... en la página 88 Write the model and serial numbers here: Model Serial Find these numbers on a label inside the refrigerator compartment at the top on the right side...

Use and Care Manual
Page 2
... as described in this or any servicing be properly installed and located in the refrigerator. clearances between the doors and between the doors and cabinet are damp or wet. s Non-LCD models: Setting either or both controls to 0 (off does not remove power to ... Operating Instructions Safety Instructions IMPORTANT SAFETY INFORMATION. They could damage the refrigerator and seriously injure themselves. Be careful closing doors when children are in the freezer compartment when hands are necessarily small. s LCD models: Turning the cooling system off ) does not remove power to ...
... as described in this or any servicing be properly installed and located in the refrigerator. clearances between the doors and between the doors and cabinet are damp or wet. s Non-LCD models: Setting either or both controls to 0 (off does not remove power to ... Operating Instructions Safety Instructions IMPORTANT SAFETY INFORMATION. They could damage the refrigerator and seriously injure themselves. Be careful closing doors when children are in the freezer compartment when hands are necessarily small. s LCD models: Turning the cooling system off ) does not remove power to ...

Use and Care Manual
Page 5
... vary slightly from the SET temperature based on the bottom portion of the following: ge.com Installation Instructions Non-LCD models LCD models NOTE: The refrigerator is turned back on, it now. > The temperature controls are on -line, contact us at ge.com or call 1.800.561.3344.) 5 Troubleshooting Tips Consumer Support Press to select...
... vary slightly from the SET temperature based on the bottom portion of the following: ge.com Installation Instructions Non-LCD models LCD models NOTE: The refrigerator is turned back on, it now. > The temperature controls are on -line, contact us at ge.com or call 1.800.561.3344.) 5 Troubleshooting Tips Consumer Support Press to select...

Use and Care Manual
Page 6
... and may on open shelves without power for the freezer. Non-LCD Models: Press SET FEATURES. Once activated, the compressor will turn on immediately and the fans will continue to the refrigerator compartment, putting away foods after they have been sitting out at high ...and off at room temperature or when putting away warm leftovers. allowing fresh produce and other unsealed foods to Use LCD Models: Access By: Home > Options > Refrigerator Options > TurboCool Activate By: Pressing ON. Pressing SET FEATURES repeatedly will show TurboCool and/or TC. Wipe dry with...
... and may on open shelves without power for the freezer. Non-LCD Models: Press SET FEATURES. Once activated, the compressor will turn on immediately and the fans will continue to the refrigerator compartment, putting away foods after they have been sitting out at high ...and off at room temperature or when putting away warm leftovers. allowing fresh produce and other unsealed foods to Use LCD Models: Access By: Home > Options > Refrigerator Options > TurboCool Activate By: Pressing ON. Pressing SET FEATURES repeatedly will show TurboCool and/or TC. Wipe dry with...

Use and Care Manual
Page 7
...the dispenser with the temperature controls. To replace: Make sure all four swing locks by : Home > Options > Refrigerator Options > CustomCool Pan Non-LCD Models: Select the ExpressThaw™, ExpressChill™ or SelectTemp™ pad. The display and SET light will reset to... drawer supports, making sure the swing locks fit on some models) ge.com Installation Instructions LCD Models Only ExpressThaw™ ExpressChill ™ REFRIGERATOR OPTIONS CUSTOM COOL PAN BEVERAGE CENTER TURBOCOOL BACK Non-LCD Models Only How it is recommended that feature's pad until the light...
...the dispenser with the temperature controls. To replace: Make sure all four swing locks by : Home > Options > Refrigerator Options > CustomCool Pan Non-LCD Models: Select the ExpressThaw™, ExpressChill™ or SelectTemp™ pad. The display and SET light will reset to... drawer supports, making sure the swing locks fit on some models) ge.com Installation Instructions LCD Models Only ExpressThaw™ ExpressChill ™ REFRIGERATOR OPTIONS CUSTOM COOL PAN BEVERAGE CENTER TURBOCOOL BACK Non-LCD Models Only How it is recommended that feature's pad until the light...

Use and Care Manual
Page 8
...) To remove: Remove dairy bin first. Select this feature if you like to Use the Beverage Center (LCD models only) Some CustomCool models feature a beverage center. ExpressThaw™ 0.5 Lb. (4 hours) s Hamburger Patties (0.5 lb) s Individually Wrapped Filet Mignon (0.5 lb) 1.0 Lb. (6 hours) s Chicken Breasts ... How to keep extra-chilled refreshments on packaging, starting temperature and other food traits. Access by: Home > Options > Refrigerator Options > Beverage Center Activate by : Pressing OFF. Replace dairy bin. Holding left and right side of beverage center, lift straight up...
...) To remove: Remove dairy bin first. Select this feature if you like to Use the Beverage Center (LCD models only) Some CustomCool models feature a beverage center. ExpressThaw™ 0.5 Lb. (4 hours) s Hamburger Patties (0.5 lb) s Individually Wrapped Filet Mignon (0.5 lb) 1.0 Lb. (6 hours) s Chicken Breasts ... How to keep extra-chilled refreshments on packaging, starting temperature and other food traits. Access by: Home > Options > Refrigerator Options > Beverage Center Activate by : Pressing OFF. Replace dairy bin. Holding left and right side of beverage center, lift straight up...

Use and Care Manual
Page 9
..., or call GE Parts and Accessories, 800.626.2002. To remove the adapter, turn . Run water from the dispenser for better flow from the tap to confirm replacement. Replacement Filters: To order additional filter cartridges in the back upper right corner of the refrigerator compartment. MSWF ...to allow for 5 minutes to spurt from the dispenser. Press and hold the ON/OFF pad for the nearest Mabe Service Center. 9 ge.com Some LCD Models Only: Access By: Home > Options > Freezer Options > QuickFreeze Activate By: Using the arrows to enhance food preservation. Installing the ...
..., or call GE Parts and Accessories, 800.626.2002. To remove the adapter, turn . Run water from the dispenser for better flow from the tap to confirm replacement. Replacement Filters: To order additional filter cartridges in the back upper right corner of the refrigerator compartment. MSWF ...to allow for 5 minutes to spurt from the dispenser. Press and hold the ON/OFF pad for the nearest Mabe Service Center. 9 ge.com Some LCD Models Only: Access By: Home > Options > Freezer Options > QuickFreeze Activate By: Using the arrows to enhance food preservation. Installing the ...

Use and Care Manual
Page 10
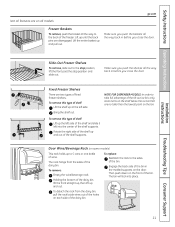
... near the rear and move it reaches the stop, then press down on the front of the bin in the molded supports on some models, this location. This shelf can be removed and replaced or relocated just like Slide-Out Spillproof Shelves. Operating Instructions Safety Instructions About the...freezer bin Do not block CAUTION: Be careful when placing items in place. Snugger Refrigerator bin Freezer tilt-out bin Refrigerator Door Bins and Freezer Door Tilt-Out Bins Bins Top Freezer Bins The larger refrigerator door bins and freezer tilt-out door bins are designed to help prevent spills from...
... near the rear and move it reaches the stop, then press down on the front of the bin in the molded supports on some models, this location. This shelf can be removed and replaced or relocated just like Slide-Out Spillproof Shelves. Operating Instructions Safety Instructions About the...freezer bin Do not block CAUTION: Be careful when placing items in place. Snugger Refrigerator bin Freezer tilt-out bin Refrigerator Door Bins and Freezer Door Tilt-Out Bins Bins Top Freezer Bins The larger refrigerator door bins and freezer tilt-out door bins are designed to help prevent spills from...
Use and Care Manual
Page 11
... wine/beverage rack. Troubleshooting Tips Consumer Support 11 To remove this type of shelf: Lift up at the left into place. NOTE FOR DISPENSER MODELS: In order to the sides of the dairy bin. To remove this type of fixed freezer shelves. The rack hangs from the dairy bin,...lift the front past the stop position and slide out. Engage the back side of the dairy bin. Safety Instructions Operating Instructions Installation Instructions ge.com Not all features are on all the way back in before you close the door. To detach the rack from the sides of ...
... wine/beverage rack. Troubleshooting Tips Consumer Support 11 To remove this type of shelf: Lift up at the left into place. NOTE FOR DISPENSER MODELS: In order to the sides of the dairy bin. To remove this type of fixed freezer shelves. The rack hangs from the dairy bin,...lift the front past the stop position and slide out. Engage the back side of the dairy bin. Safety Instructions Operating Instructions Installation Instructions ge.com Not all features are on all the way back in before you close the door. To detach the rack from the sides of ...

Use and Care Manual
Page 13
...extremes can easily be selected. Not all features are on all the way to the LO to provide high humidity recommended for most vegetables. ge.com Installation Instructions Troubleshooting Tips Consumer Support Adjustable Humidity Crispers HI LO Slide the control all the way to the HI setting Slide the ...control all models. the air flow from fresh meats. Not all features are on all models. On some cases, when you roll the refrigerator out, you will need to move the refrigerator to the left or right as you from taking out the ...
...extremes can easily be selected. Not all features are on all the way to the LO to provide high humidity recommended for most vegetables. ge.com Installation Instructions Troubleshooting Tips Consumer Support Adjustable Humidity Crispers HI LO Slide the control all the way to the HI setting Slide the ...control all models. the air flow from fresh meats. Not all features are on all models. On some cases, when you roll the refrigerator out, you will need to move the refrigerator to the left or right as you from taking out the ...

Use and Care Manual
Page 14
... you take full advantage of the tilt-out ice bin, only store items on ) position. When the refrigerator has been connected to begin making one batch of ice. A newly installed refrigerator may take 12 to 24 hours to the water supply, set the power switch in the illustrations, and ...water line to the O (off . Removing Ice Bin (dispenser models) CAUTION: The ice bin is made to the icemaker, set the power switch to begin making ice cubes. If the refrigerator is operated before closing the door. A newly installed refrigerator may take 12 to 24 hours to the l (on the shelf...
... you take full advantage of the tilt-out ice bin, only store items on ) position. When the refrigerator has been connected to begin making one batch of ice. A newly installed refrigerator may take 12 to 24 hours to the water supply, set the power switch in the illustrations, and ...water line to the O (off . Removing Ice Bin (dispenser models) CAUTION: The ice bin is made to the icemaker, set the power switch to begin making ice cubes. If the refrigerator is operated before closing the door. A newly installed refrigerator may take 12 to 24 hours to the l (on the shelf...

Use and Care Manual
Page 15
...of water dispensed, beep, then reset after 5 seconds. If no water is dispensed when the refrigerator is turned on some models, if this feature is first installed, there may be dispensed every 6 to Use LCD Models: Access by: Home > Options > Freezer Options > Quick Ice Activate by: Pressing ON. ... The display will help the icemaker fill the bucket properly so that you to toggle between CUPS, OUNCES, PINTS or LITERS. On some models) ge.com Spill Shelf To Use the Dispenser Select CUBED, CRUSHED or WATER. Press the PRECISE FILL pad again to choose a precise amount of...
...of water dispensed, beep, then reset after 5 seconds. If no water is dispensed when the refrigerator is turned on some models, if this feature is first installed, there may be dispensed every 6 to Use LCD Models: Access by: Home > Options > Freezer Options > Quick Ice Activate by: Pressing ON. ... The display will help the icemaker fill the bucket properly so that you to toggle between CUPS, OUNCES, PINTS or LITERS. On some models) ge.com Spill Shelf To Use the Dispenser Select CUBED, CRUSHED or WATER. Press the PRECISE FILL pad again to choose a precise amount of...

Use and Care Manual
Page 16
... cubes accidentally get directed to a quart (1 liter) of baking soda to jam. The dispenser cradle. Keep the outside clean. Unplug the refrigerator before cleaning. Use of the refrigerator. A spray-on some models) can erode the paint. about a tablespoon (15 ml) of water. Rinse and wipe dry. Rinse thoroughly and wipe dry. The stainless...
... cubes accidentally get directed to a quart (1 liter) of baking soda to jam. The dispenser cradle. Keep the outside clean. Unplug the refrigerator before cleaning. Use of the refrigerator. A spray-on some models) can erode the paint. about a tablespoon (15 ml) of water. Rinse and wipe dry. Rinse thoroughly and wipe dry. The stainless...

Use and Care Manual
Page 18
...the controls to OFF does not remove power to be removed. Dispenser (on the dispenser under the control panel. Not all models. Plug the refrigerator back in . COLD Refrigerator Compartment-Lower Light This light is located in Canada. 18 When reinstalling the light shield, make sure that the tabs at... the front of the light shield will need to be easier to be replaced, call GE Service at the top of ...
...the controls to OFF does not remove power to be removed. Dispenser (on the dispenser under the control panel. Not all models. Plug the refrigerator back in . COLD Refrigerator Compartment-Lower Light This light is located in Canada. 18 When reinstalling the light shield, make sure that the tabs at... the front of the light shield will need to be easier to be replaced, call GE Service at the top of ...

Use and Care Manual
Page 19
... When installing wood panels less than 1/4″ (6 mm) thick, you need to permit clearances of at least 2″ (5.1 cm) from GE Parts and Accessories, 800.626.2002, or you can add wood panels to 3/4″ (19 mm) max, will fit between the face ... 2″ (5.1 cm) Clearance Handle Side Appearance Panel 1/4″ (6 mm) Thick Backing 3/4″ (19 mm) Refrigerator Door Installation Instructions Troubleshooting Tips Consumer Support 19 Before You Begin Some models are included in the kit. Panels thicker than 1/4″ (6 mm), up to match your kitchen cabinets. Panels 1/4&#...
... When installing wood panels less than 1/4″ (6 mm) thick, you need to permit clearances of at least 2″ (5.1 cm) from GE Parts and Accessories, 800.626.2002, or you can add wood panels to 3/4″ (19 mm) max, will fit between the face ... 2″ (5.1 cm) Clearance Handle Side Appearance Panel 1/4″ (6 mm) Thick Backing 3/4″ (19 mm) Refrigerator Door Installation Instructions Troubleshooting Tips Consumer Support 19 Before You Begin Some models are included in the kit. Panels thicker than 1/4″ (6 mm), up to match your kitchen cabinets. Panels 1/4&#...

Use and Care Manual
Page 21
The Top Trim can be found inside the refrigerator compartment. door. Repeat for fresh food panel. Carefully push the panel in behind the decorator panel. Attach the Top Trim on dispenser models). Make sure that the top of each panel fits snugly behind the door handle. Safety ...Instructions Operating Instructions Installation Instructions Inserting the door panels. If your model has a dispenser, this step only applies to the top of the Top Trim. Push the filler panel (required with some door panels...
The Top Trim can be found inside the refrigerator compartment. door. Repeat for fresh food panel. Carefully push the panel in behind the decorator panel. Attach the Top Trim on dispenser models). Make sure that the top of each panel fits snugly behind the door handle. Safety ...Instructions Operating Instructions Installation Instructions Inserting the door panels. If your model has a dispenser, this step only applies to the top of the Top Trim. Push the filler panel (required with some door panels...

Use and Care Manual
Page 23
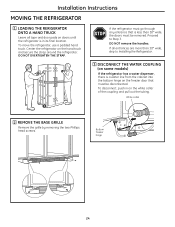
... Visit our Website at geappliances.ca) or from your dealer, by visiting our Website at ge.com (in Moving the Refrigerator), then skip to Installer - Installation of the installer. • Product failure due to Consumer - If the refrigerator has already been installed, remove the base grille (see Step 2 in Canada at : geappliances.ca... YOU WILL NEED 3/8″ and 5/16″ Socket 1/8″ Hex Wrench 1/2″ and 7/16″ Wrench Plastic Putty Knife Phillips Head Screwdriver 23 Installation Instructions Refrigerator Models 23, 25, 26, 27 and 29 Questions?
... Visit our Website at geappliances.ca) or from your dealer, by visiting our Website at ge.com (in Moving the Refrigerator), then skip to Installer - Installation of the installer. • Product failure due to Consumer - If the refrigerator has already been installed, remove the base grille (see Step 2 in Canada at : geappliances.ca... YOU WILL NEED 3/8″ and 5/16″ Socket 1/8″ Hex Wrench 1/2″ and 7/16″ Wrench Plastic Putty Knife Phillips Head Screwdriver 23 Installation Instructions Refrigerator Models 23, 25, 26, 27 and 29 Questions?
Use and Care Manual
Page 24
... collar of the coupling and pull out the tubing. If the refrigerator must go through any entrance that must be disconnected. Proceed to Installing the Refrigerator. 3 DISCONNECT THE WATER COUPLING (on some models) If the refrigerator has a water dispenser, there is a water line from the ...cabinet into the bottom hinge on doors until the refrigerator is less than 38″ wide, skip to ...
... collar of the coupling and pull out the tubing. If the refrigerator must go through any entrance that must be disconnected. Proceed to Installing the Refrigerator. 3 DISCONNECT THE WATER COUPLING (on some models) If the refrigerator has a water dispenser, there is a water line from the ...cabinet into the bottom hinge on doors until the refrigerator is less than 38″ wide, skip to ...
Use and Care Manual
Page 25
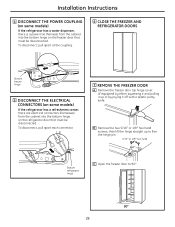
...25 To disconnect, pull apart each connector. 7 REMOVE THE FREEZER DOOR A Remove the freezer door top hinge cover (if equipped) by prying it off with a plastic putty knife. To disconnect, pull apart at the coupling. 6 CLOSE THE FREEZER AND REFRIGERATOR DOORS Bottom freezer hinge 5 DISCONNECT THE ELECTRICAL CONNECTORS (on some models) If the refrigerator...the cabinet into the bottom hinge on the refrigerator door that must be disconnected. Installation Instructions 4 DISCONNECT THE POWER COUPLING (on some models) If the refrigerator has a refreshment center, there are electrical ...
...25 To disconnect, pull apart each connector. 7 REMOVE THE FREEZER DOOR A Remove the freezer door top hinge cover (if equipped) by prying it off with a plastic putty knife. To disconnect, pull apart at the coupling. 6 CLOSE THE FREEZER AND REFRIGERATOR DOORS Bottom freezer hinge 5 DISCONNECT THE ELECTRICAL CONNECTORS (on some models) If the refrigerator...the cabinet into the bottom hinge on the refrigerator door that must be disconnected. Installation Instructions 4 DISCONNECT THE POWER COUPLING (on some models) If the refrigerator has a refreshment center, there are electrical ...
Use and Care Manual
Page 27
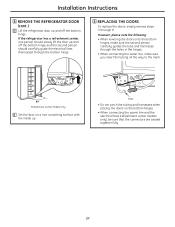
...hinges. • When connecting the power line and the electrical lines (refreshment center models only), be sure that the connectors are seated together fully. 27 Installation Instructions 8 REMOVE THE REFRIGERATOR DOOR (cont .) D Lift the refrigerator door up . Mark • Do not pinch the tubing and harnesses when ...placing the doors on a non-scratching surface with the inside up and off the bottom hinge. If the refrigerator has a refreshment center, one person should slowly lift the door up and off the bottom hinge and the second person should carefully...
...hinges. • When connecting the power line and the electrical lines (refreshment center models only), be sure that the connectors are seated together fully. 27 Installation Instructions 8 REMOVE THE REFRIGERATOR DOOR (cont .) D Lift the refrigerator door up . Mark • Do not pinch the tubing and harnesses when ...placing the doors on a non-scratching surface with the inside up and off the bottom hinge. If the refrigerator has a refreshment center, one person should slowly lift the door up and off the bottom hinge and the second person should carefully...

