
Use and Care Manual
Page 1
D 165D4700P328 49-55008-1 07-09 JR Disposall® Food Waste Disposer GEAppliances.com Safety Instructions Connecting Electricity 2, 3 Safety Precautions 2 Installation Instructions Attaching the Discharge Elbow 6 Components and Installation of Sink Flange 5 Connecting Disposer to Sink Flange 7 Dimensions/Typical Installations 8 Dishwasher Connection 6 Operating Instructions Batch Feed Models 9 Care and Maintenance 10 Continuous Feed Models 9 Troubleshooting Tips Before You Call for Service . . . . . .11 Consumer...
D 165D4700P328 49-55008-1 07-09 JR Disposall® Food Waste Disposer GEAppliances.com Safety Instructions Connecting Electricity 2, 3 Safety Precautions 2 Installation Instructions Attaching the Discharge Elbow 6 Components and Installation of Sink Flange 5 Connecting Disposer to Sink Flange 7 Dimensions/Typical Installations 8 Dishwasher Connection 6 Operating Instructions Batch Feed Models 9 Care and Maintenance 10 Continuous Feed Models 9 Troubleshooting Tips Before You Call for Service . . . . . .11 Consumer...
Use and Care Manual
Page 2
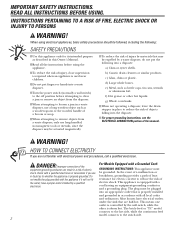
...provides a path of electric shock. I To reduce the risk of injury by a waste disposer, do not put fingers or hands into an appropriate outlet that is properly installed and grounded in doubt as described in a risk of injury, close supervision is required when...the hot side, while the continuous feed model connects to reduce the risk of the equipment-grounding conductor can result in this manual. IMPORTANT SAFETY INSTRUCTIONS. b) Caustic drain cleaners or similar products. WARNING! DANGER: Improper connection of objects falling into a disposer: a) Clam or oyster shells...
...provides a path of electric shock. I To reduce the risk of injury by a waste disposer, do not put fingers or hands into an appropriate outlet that is properly installed and grounded in doubt as described in a risk of injury, close supervision is required when...the hot side, while the continuous feed model connects to reduce the risk of the equipment-grounding conductor can result in this manual. IMPORTANT SAFETY INSTRUCTIONS. b) Caustic drain cleaners or similar products. WARNING! DANGER: Improper connection of objects falling into a disposer: a) Clam or oyster shells...
Use and Care Manual
Page 3
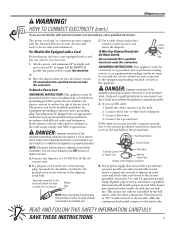
... you use a three-prong plug. GE Kit #PM3X115 provides the parts needed to whether the appliance is properly grounded. To Attach a Power Cord: GROUNDING INSTRUCTIONS: This appliance must be plugged into an appropriate outlet that is properly installed and grounded in the end bell for... Ground wire should install a proper ground. Trace lead connected to this connection. C. If you are halfhot. If your disposer does not come equipped with all local codes and ordinances. The batch-feed or "TC" model connects to the hot side, while the continuous feed model connects to exceed...
... you use a three-prong plug. GE Kit #PM3X115 provides the parts needed to whether the appliance is properly grounded. To Attach a Power Cord: GROUNDING INSTRUCTIONS: This appliance must be plugged into an appropriate outlet that is properly installed and grounded in the end bell for... Ground wire should install a proper ground. Trace lead connected to this connection. C. If you are halfhot. If your disposer does not come equipped with all local codes and ordinances. The batch-feed or "TC" model connects to the hot side, while the continuous feed model connects to exceed...
Use and Care Manual
Page 4
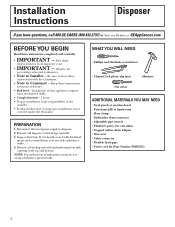
...out with the Consumer. • Note to leave these instructions for local inspector's use. • IMPORTANT - NOTE: Top and bottom of sink surfaces must be free of the installer. • Product failure due to disposer. 2. Keep these instructions completely and carefully. • IMPORTANT - PREPARATION 1. ...8226; Wire nuts • Cable connector • Flexible drain pipe • Power cord kit (Part Number PM3X215) 4 Installation Instructions Disposer If you have questions, call 800.GE.CARES (800.432.2737) or Visit our Website at: GEAppliances.com BEFORE YOU BEGIN Read these...
...out with the Consumer. • Note to leave these instructions for local inspector's use. • IMPORTANT - NOTE: Top and bottom of sink surfaces must be free of the installer. • Product failure due to disposer. 2. Keep these instructions completely and carefully. • IMPORTANT - PREPARATION 1. ...8226; Wire nuts • Cable connector • Flexible drain pipe • Power cord kit (Part Number PM3X215) 4 Installation Instructions Disposer If you have questions, call 800.GE.CARES (800.432.2737) or Visit our Website at: GEAppliances.com BEFORE YOU BEGIN Read these...
Use and Care Manual
Page 5
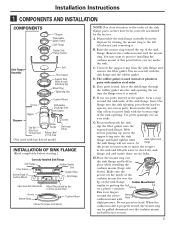
... flange and hold in the sink and fill with water to putting the lid Top on a plastic container. Installation Instructions 1 COMPONENTS AND INSTALLATION COMPONENTS *Stopper *Removable Splash Guard Sink Flange Rubber Sink Flange Gasket Sink Flange Assembly Sink Fiber Gasket Support Ring...Tightening Ears Cushion Mount Groove Hopper Dishwasher Discharge Inlet Elbow Gasket Disposer End Bell (Electrical Connections) Elbow Flange Rating Label in This Area *Not used with batch feed model Screws Discharge Elbow INSTALLATION OF SINK FLANGE (Read completely before you are under the...
... flange and hold in the sink and fill with water to putting the lid Top on a plastic container. Installation Instructions 1 COMPONENTS AND INSTALLATION COMPONENTS *Stopper *Removable Splash Guard Sink Flange Rubber Sink Flange Gasket Sink Flange Assembly Sink Fiber Gasket Support Ring...Tightening Ears Cushion Mount Groove Hopper Dishwasher Discharge Inlet Elbow Gasket Disposer End Bell (Electrical Connections) Elbow Flange Rating Label in This Area *Not used with batch feed model Screws Discharge Elbow INSTALLATION OF SINK FLANGE (Read completely before you are under the...

Use and Care Manual
Page 6
...knockout plug falls into disposer, you may remove it or simply grind it up when the disposer is not to be connected, go on to grind, over the course of a flexible drain pipe. Rubber Gasket Discharge Elbow 6 Do not use of several uses. Installation Instructions 2 DISHWASHER CONNECTION ...(IF REQUIRED) If you are tight. * Some installations (see page 8 for...
...knockout plug falls into disposer, you may remove it or simply grind it up when the disposer is not to be connected, go on to grind, over the course of a flexible drain pipe. Rubber Gasket Discharge Elbow 6 Do not use of several uses. Installation Instructions 2 DISHWASHER CONNECTION ...(IF REQUIRED) If you are tight. * Some installations (see page 8 for...

Use and Care Manual
Page 7
... the mount ring about 1/4″ to the extreme left of petroleum jelly or liquid soap to the right until the disposer discharge elbow lines up tight. Locking Detail Hopper Projection in "Supported" Position Discharge Elbow Outlet Pipe Hopper Projection in "... hopper projection. Run water and check for leaks 24 hours after installation and first operation. 7 If the mount ring is temporarily supported. Installation Instructions 4 CONNECTING DISPOSER TO SINK FLANGE 1 ATTACH TO SINK FLANGE Line up the disposer under the sink flange. Guide the hopper projections into the mount...
... the mount ring about 1/4″ to the extreme left of petroleum jelly or liquid soap to the right until the disposer discharge elbow lines up tight. Locking Detail Hopper Projection in "Supported" Position Discharge Elbow Outlet Pipe Hopper Projection in "... hopper projection. Run water and check for leaks 24 hours after installation and first operation. 7 If the mount ring is temporarily supported. Installation Instructions 4 CONNECTING DISPOSER TO SINK FLANGE 1 ATTACH TO SINK FLANGE Line up the disposer under the sink flange. Guide the hopper projections into the mount...
Use and Care Manual
Page 8
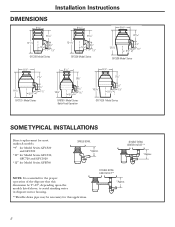
...disposer that this application. Installation Instructions DIMENSIONS 5 3/16" 6 3/16" 1211/16" 53/8" 41/2" 11/2" GFC320 Model Series 5 3/16" 6 3/16" 1211/16" 53/8" 41/2" 11/2" GFC520 Model Series 73/4" 615/16" 137/16" 53/8" 4 1/2" 11/2" GFC530 Model Series 8 1/2" 7 1/4" 141/2" 5 9/16" 4 1/2" 11/2" GFC720 Model Series 8 1/2" 93/8" 165/8" 5 9/16" 4 1/2" 11/2" GFB760 Model Series Batch Feed... Operation 8 1/2" 7 1/4" 161/16" 5 9/16" 4 1/2" 11/2" GFC1020 Model Series SOME TYPICAL INSTALLATIONS Direct replacement for most makes...
...disposer that this application. Installation Instructions DIMENSIONS 5 3/16" 6 3/16" 1211/16" 53/8" 41/2" 11/2" GFC320 Model Series 5 3/16" 6 3/16" 1211/16" 53/8" 41/2" 11/2" GFC520 Model Series 73/4" 615/16" 137/16" 53/8" 4 1/2" 11/2" GFC530 Model Series 8 1/2" 7 1/4" 141/2" 5 9/16" 4 1/2" 11/2" GFC720 Model Series 8 1/2" 93/8" 165/8" 5 9/16" 4 1/2" 11/2" GFB760 Model Series Batch Feed... Operation 8 1/2" 7 1/4" 161/16" 5 9/16" 4 1/2" 11/2" GFC1020 Model Series SOME TYPICAL INSTALLATIONS Direct replacement for most makes...


