
Quick Specs
Page 1
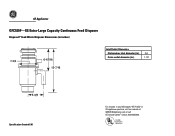
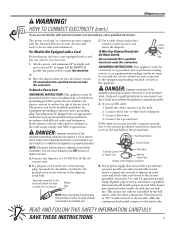
Listed by Underwriters R Laboratories GE Appliances GFC530F-GE Extra-Large Capacity Continuous Feed Disposer Disposall® Food Waste Disposer Dimensions (in inches) 7-3E/4 6-15D/16 1A3-7/16 Inlet/Outlet Diameters Dishwasher inlet diameter (in.) Drain outlet diameter (in.) 3/4 1-1/2 5-3B/8 Specification Created 1/01 For answers to your Monogram,® GE Profile™ or GE appliance questions, visit our website at WWW.GEAppliance.com or call GE Answer Center® service, 800.626.2000.
Listed by Underwriters R Laboratories GE Appliances GFC530F-GE Extra-Large Capacity Continuous Feed Disposer Disposall® Food Waste Disposer Dimensions (in inches) 7-3E/4 6-15D/16 1A3-7/16 Inlet/Outlet Diameters Dishwasher inlet diameter (in.) Drain outlet diameter (in.) 3/4 1-1/2 5-3B/8 Specification Created 1/01 For answers to your Monogram,® GE Profile™ or GE appliance questions, visit our website at WWW.GEAppliance.com or call GE Answer Center® service, 800.626.2000.
Quick Specs
Page 2
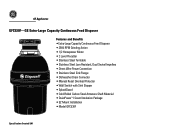
... Continuous Feed Disposer • 2600 RPM Grinding Action • 1/2 Horsepower Motor • 2 Level Precutter • Stainless Steel Turntable • Stainless Steel Jam Resistant, Dual Swivel Impellers • Direct Wire Power Connection • Stainless Steel Sink Flange • Dishwasher Drain Connector • Manual Reset Overload Protector • Wall Switch with Sink Stopper • SplashGuard • Cold-Rolled Carbon Steel Armature Shaft Material • QuietPower™ I Sound Insulation Package • EZ Mount Installation • Model GFC530F Specification...
... Continuous Feed Disposer • 2600 RPM Grinding Action • 1/2 Horsepower Motor • 2 Level Precutter • Stainless Steel Turntable • Stainless Steel Jam Resistant, Dual Swivel Impellers • Direct Wire Power Connection • Stainless Steel Sink Flange • Dishwasher Drain Connector • Manual Reset Overload Protector • Wall Switch with Sink Stopper • SplashGuard • Cold-Rolled Carbon Steel Armature Shaft Material • QuietPower™ I Sound Insulation Package • EZ Mount Installation • Model GFC530F Specification...
Use and Care Manual
Page 1
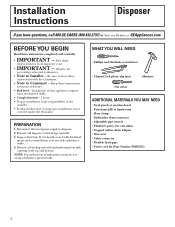
... Electricity 2, 3 Safety Precautions 2 Installation Instructions Attaching the Discharge Elbow 6 Components and Installation of Sink Flange 5 Connecting Disposer to Sink Flange 7 Dimensions/Typical Installations 8 Dishwasher Connection 6 Operating Instructions Batch Feed Models 9 Care and Maintenance 10 Continuous Feed Models 9 Troubleshooting Tips Before You Call for Service . . . . . .11 Consumer Support Warranty 12 Owner's Manual & Installation Instructions Model Line Series GFC320 GFC520 GFC530 GFC720 GFC1020 GFB760 Write the model and serial numbers for your disposall...
... Electricity 2, 3 Safety Precautions 2 Installation Instructions Attaching the Discharge Elbow 6 Components and Installation of Sink Flange 5 Connecting Disposer to Sink Flange 7 Dimensions/Typical Installations 8 Dishwasher Connection 6 Operating Instructions Batch Feed Models 9 Care and Maintenance 10 Continuous Feed Models 9 Troubleshooting Tips Before You Call for Service . . . . . .11 Consumer Support Warranty 12 Owner's Manual & Installation Instructions Model Line Series GFC320 GFC520 GFC530 GFC720 GFC1020 GFB760 Write the model and serial numbers for your disposall...
Use and Care Manual
Page 2
... intended purpose as to reduce the risk of electric shock. The batch-feed or "TC" model connects to the hot side, while the continuous feed model connects to clear a jam or remove an object from a waste disposer, only use a long wooden object such as bottle caps, tin cans, utensils or aluminum foil. I When not operating a disposer, leave the drain stopper in a waste disposer, use long-handled, non-magnetic tools or utensils...
... intended purpose as to reduce the risk of electric shock. The batch-feed or "TC" model connects to the hot side, while the continuous feed model connects to clear a jam or remove an object from a waste disposer, only use a long wooden object such as bottle caps, tin cans, utensils or aluminum foil. I When not operating a disposer, leave the drain stopper in a waste disposer, use long-handled, non-magnetic tools or utensils...
Use and Care Manual
Page 3
... in cord is connected to the identified wire. A. Connect bare ground wire. Use only UL approved ground clamp. The batch-feed or "TC" model connects to the hot side, while the continuous feed model connects to be connected to make this connection. Check with grounding pin at top, the larger left blade is used . Connect white wire to reduce the risk of the Disposer (end bell) B. Red Reset Button Ground Screw To House Current or Power Cord Wire Nuts Remove...
... in cord is connected to the identified wire. A. Connect bare ground wire. Use only UL approved ground clamp. The batch-feed or "TC" model connects to the hot side, while the continuous feed model connects to be connected to make this connection. Check with grounding pin at top, the larger left blade is used . Connect white wire to reduce the risk of the Disposer (end bell) B. Red Reset Button Ground Screw To House Current or Power Cord Wire Nuts Remove...
Use and Care Manual
Page 4
... drain pipe • Power cord kit (Part Number PM3X215) 4 Observe all governing codes and ordinances. • Note to disposer. 2. Be sure to leave these instructions for future reference. • Skill level - Installation of this appliance requires basic mechanical skills. • Completion time - 1 hour • Proper installation is the responsibility of any materials to Consumer - Remove old disposer or sink flange assembly. 3. Disconnect electrical power supply to Installer - Remove old sealing materials and gasketing...
... drain pipe • Power cord kit (Part Number PM3X215) 4 Observe all governing codes and ordinances. • Note to disposer. 2. Be sure to leave these instructions for future reference. • Skill level - Installation of this appliance requires basic mechanical skills. • Completion time - 1 hour • Proper installation is the responsibility of any materials to Consumer - Remove old disposer or sink flange assembly. 3. Disconnect electrical power supply to Installer - Remove old sealing materials and gasketing...
Use and Care Manual
Page 5
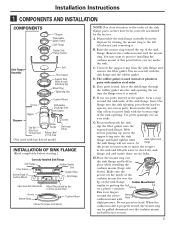
... of the sink flange. Installation Instructions 1 COMPONENTS AND INSTALLATION COMPONENTS *Stopper *Removable Splash Guard Sink Flange Rubber Sink Flange Gasket Sink Flange Assembly Sink Fiber Gasket Support Ring (Note Arrows Indicating Up) Mount Ring Tightening Ears Cushion Mount Groove Hopper Dishwasher Discharge Inlet Elbow Gasket Disposer End Bell (Electrical Connections) Elbow Flange Rating Label in This Area *Not used with batch feed model Screws Discharge Elbow INSTALLATION OF SINK FLANGE (Read completely before you use putty instead of the gasket, form a ring around the...
... of the sink flange. Installation Instructions 1 COMPONENTS AND INSTALLATION COMPONENTS *Stopper *Removable Splash Guard Sink Flange Rubber Sink Flange Gasket Sink Flange Assembly Sink Fiber Gasket Support Ring (Note Arrows Indicating Up) Mount Ring Tightening Ears Cushion Mount Groove Hopper Dishwasher Discharge Inlet Elbow Gasket Disposer End Bell (Electrical Connections) Elbow Flange Rating Label in This Area *Not used with batch feed model Screws Discharge Elbow INSTALLATION OF SINK FLANGE (Read completely before you use putty instead of the gasket, form a ring around the...

Use and Care Manual
Page 6
... THE DISCHARGE ELBOW CONNECT DISCHARGE ELBOW Connect the discharge elbow to "Attaching the Discharge Elbow" section. 1 KNOCK OUT PLUG Using a blunt instrument (steel punch or wooden dowel), knock out entire plug. When knockout plug falls into disposer, you may remove it or simply grind it up when the disposer is different, you are tight. * Some installations (see page 8 for examples) may take some time to a dishwasher, complete...
... THE DISCHARGE ELBOW CONNECT DISCHARGE ELBOW Connect the discharge elbow to "Attaching the Discharge Elbow" section. 1 KNOCK OUT PLUG Using a blunt instrument (steel punch or wooden dowel), knock out entire plug. When knockout plug falls into disposer, you may remove it or simply grind it up when the disposer is different, you are tight. * Some installations (see page 8 for examples) may take some time to a dishwasher, complete...

Use and Care Manual
Page 7
... in "Supported" Position Discharge Elbow Outlet Pipe Hopper Projection in "Locked" Position Mounting Slot Mount Ring 4 CHECK FOR LEAKS Check the unit for leaks. 2 LINE UP WITH OUTLET PIPE Turn the mount ring and the disposer until it locks up the disposer under the sink flange. Installation Instructions 4 CONNECTING DISPOSER TO SINK FLANGE 1 ATTACH TO SINK FLANGE Line up tight. If the mount ring is temporarily supported. Guide the hopper projections into the mount ring slots. Run water and...
... in "Supported" Position Discharge Elbow Outlet Pipe Hopper Projection in "Locked" Position Mounting Slot Mount Ring 4 CHECK FOR LEAKS Check the unit for leaks. 2 LINE UP WITH OUTLET PIPE Turn the mount ring and the disposer until it locks up the disposer under the sink flange. Installation Instructions 4 CONNECTING DISPOSER TO SINK FLANGE 1 ATTACH TO SINK FLANGE Line up tight. If the mount ring is temporarily supported. Guide the hopper projections into the mount ring slots. Run water and...
Use and Care Manual
Page 8
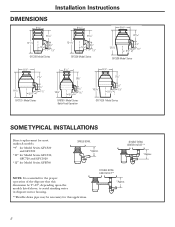
.../2" GFC720 Model Series 8 1/2" 93/8" 165/8" 5 9/16" 4 1/2" 11/2" GFB760 Model Series Batch Feed Operation 8 1/2" 7 1/4" 161/16" 5 9/16" 4 1/2" 11/2" GFC1020 Model Series SOME TYPICAL INSTALLATIONS Direct replacement for most makes & models. *9″ for Model Series GFC320 and GFC520 *10″ for Model Series GFC530, GFC720 and GFC1020 *12″ for this dimension be 9″-12″, depending upon the models listed above, to avoid standing water in disposer motor housing. **Flexible drain pipe may...
.../2" GFC720 Model Series 8 1/2" 93/8" 165/8" 5 9/16" 4 1/2" 11/2" GFB760 Model Series Batch Feed Operation 8 1/2" 7 1/4" 161/16" 5 9/16" 4 1/2" 11/2" GFC1020 Model Series SOME TYPICAL INSTALLATIONS Direct replacement for most makes & models. *9″ for Model Series GFC320 and GFC520 *10″ for Model Series GFC530, GFC720 and GFC1020 *12″ for this dimension be 9″-12″, depending upon the models listed above, to avoid standing water in disposer motor housing. **Flexible drain pipe may...
Use and Care Manual
Page 9
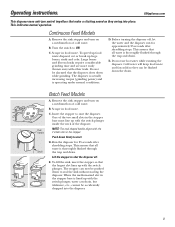
... shredding stops. Continuous Feed Models A. Before turning the disposer off . Remove the sink stopper and turn on a medium flow of the disposer. D. To speed up food waste disposal, cut or break up with the switch plunger, water can be accidentally dropped into place. Batch Feed Models A. When the medium-sized slot in Large Medium the stopper base is operating under normal conditions. C. Run the disposer for approximately 25 seconds after shredding stops. E. Operating instructions...
... shredding stops. Continuous Feed Models A. Before turning the disposer off . Remove the sink stopper and turn on a medium flow of the disposer. D. To speed up food waste disposal, cut or break up with the switch plunger, water can be accidentally dropped into place. Batch Feed Models A. When the medium-sized slot in Large Medium the stopper base is operating under normal conditions. C. Run the disposer for approximately 25 seconds after shredding stops. E. Operating instructions...
Use and Care Manual
Page 10
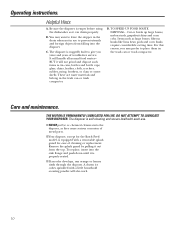
... the Batch Feed model, is empty before using the dishwasher so it will handle all normal food wastes--BUT it can or trash compactor. To replace, insert into the sink flange and push down until it out from falling into the disposer, as they cause serious corrosion of metal parts. Helpful Hints A. Be sure the disposer is equipped with a removable splash guard for ease of trouble-free service. B. For...
... the Batch Feed model, is empty before using the dishwasher so it will handle all normal food wastes--BUT it can or trash compactor. To replace, insert into the sink flange and push down until it out from falling into the disposer, as they cause serious corrosion of metal parts. Helpful Hints A. Be sure the disposer is equipped with a removable splash guard for ease of trouble-free service. B. For...

Use and Care Manual
Page 11
... motor will move freely using a broom handle. Replace the splash guard.* the disposer. Push the button in until it has been tripped. Dislodge the object by : 1. If the leak is at the top, it may be internal problems. Remove Splash Guard Turntable Disposer leaks If the leak is red and located opposite the discharge elbow, near the bottom of elbow flange screws. *Batch Feed does not include splash guard. 11 WARNING! Reset button has...
... motor will move freely using a broom handle. Replace the splash guard.* the disposer. Push the button in until it has been tripped. Dislodge the object by : 1. If the leak is at the top, it may be internal problems. Remove Splash Guard Turntable Disposer leaks If the leak is red and located opposite the discharge elbow, near the bottom of elbow flange screws. *Batch Feed does not include splash guard. 11 WARNING! Reset button has...
Use and Care Manual
Page 12
... or workmanship relating to replacing the original disposer along with this Limited Warranty. In Alaska, the warranty excludes the service calls to your home to teach you will also provide, free of the original purchase Model Line Series GFC1020: If there is extended to the original purchaser and any succeeding owner for products purchased for all installation charges relating to use within the first year...
... or workmanship relating to replacing the original disposer along with this Limited Warranty. In Alaska, the warranty excludes the service calls to your home to teach you will also provide, free of the original purchase Model Line Series GFC1020: If there is extended to the original purchaser and any succeeding owner for products purchased for all installation charges relating to use within the first year...


