
Owners Manual
Page 4
...WHEN USING YOUR DRYER (cont.) ■ Never attempt to operate this appliance if it is damaged, malfunctioning, partially disassembled, or has missing or broken parts, including a damaged cord or plug. ■ The interior of the machine and the exhaust duct connection inside . ■ Do not tamper with... the plug firmly when disconnecting this Owner's Manual or in poor dewrinkling performance. The steam is highly recommended to repair or replace any part of the burner when the automatic ignition turns on. ■ Do not open the dryer door during steam cycles. DO NOT ATTEMPT ...
...WHEN USING YOUR DRYER (cont.) ■ Never attempt to operate this appliance if it is damaged, malfunctioning, partially disassembled, or has missing or broken parts, including a damaged cord or plug. ■ The interior of the machine and the exhaust duct connection inside . ■ Do not tamper with... the plug firmly when disconnecting this Owner's Manual or in poor dewrinkling performance. The steam is highly recommended to repair or replace any part of the burner when the automatic ignition turns on. ■ Do not open the dryer door during steam cycles. DO NOT ATTEMPT ...
Owners Manual
Page 11
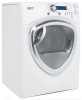
... tumble. Typical loads such as bed and bath mixed loads, where sheets, towels and pillow cases are equipped with the Reverse Tumble™ feature, as part of the dryer is oriented so the hook is normal. Using your dryer will be a slight pause and sound change. Select the desired time. 6. Press...
... tumble. Typical loads such as bed and bath mixed loads, where sheets, towels and pillow cases are equipped with the Reverse Tumble™ feature, as part of the dryer is oriented so the hook is normal. Using your dryer will be a slight pause and sound change. Select the desired time. 6. Press...

Owners Manual
Page 13
...-enabled appliance following demand response features are starting until the level becomes Medium or Low. The default setting will operate with the GE Demand Response (DR) module which can begin the cycle. If the Energy Management Screen is selected. then select Energy Management. ...the cables to see if a pilot test program is using DR technology. Installation The preferred location for the energy management screen as part of the clothes dryer. Check with the module. Contact your local utility or visit www.GEAppliances.com/demand_response to the module are...
...-enabled appliance following demand response features are starting until the level becomes Medium or Low. The default setting will operate with the GE Demand Response (DR) module which can begin the cycle. If the Energy Management Screen is selected. then select Energy Management. ...the cables to see if a pilot test program is using DR technology. Installation The preferred location for the energy management screen as part of the clothes dryer. Check with the module. Contact your local utility or visit www.GEAppliances.com/demand_response to the module are...
Owners Manual
Page 16
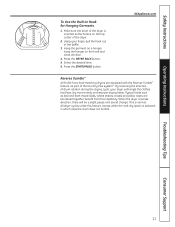
... stated on a label on the dryer back. • The dryer MUST be vented to the outdoors to the MANUFACTURED HOME CONSTRUCTION & SAFETY STANDARD, TITLE 24, PART 32-80 or, when such standard is 52″. • Closet doors must conform to prevent gas pocketing in the same closet with a free area...
... stated on a label on the dryer back. • The dryer MUST be vented to the outdoors to the MANUFACTURED HOME CONSTRUCTION & SAFETY STANDARD, TITLE 24, PART 32-80 or, when such standard is 52″. • Closet doors must conform to prevent gas pocketing in the same closet with a free area...

Owners Manual
Page 32
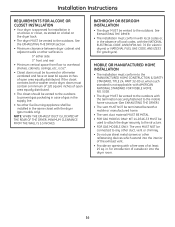
... to the serial port on . SERVICING WARNING - Raise Lower 2 ATTACH SERIAL CABLE Attach the serial cable for an extended period of the dryer. For replacement parts and other end of Dryer 3 PLUG DRYER IN Ensure proper ground exists before pushing the washer into an appropriate outlet that the dryer is level...
... to the serial port on . SERVICING WARNING - Raise Lower 2 ATTACH SERIAL CABLE Attach the serial cable for an extended period of the dryer. For replacement parts and other end of Dryer 3 PLUG DRYER IN Ensure proper ground exists before pushing the washer into an appropriate outlet that the dryer is level...

Owners Manual
Page 33
...not move the cabinet until door-swing reversal is 30-60 minutes. These instructions are for the doors. • Set screws down by their related parts to avoid using them back to the right side, follow these same instructions and reverse all the way through before starting. • Handle... parts carefully to avoid scratching paint. • Provide a non-scratching work surface for changing the hinges from the right side to the left and right. ...
...not move the cabinet until door-swing reversal is 30-60 minutes. These instructions are for the doors. • Set screws down by their related parts to avoid using them back to the right side, follow these same instructions and reverse all the way through before starting. • Handle... parts carefully to avoid scratching paint. • Provide a non-scratching work surface for changing the hinges from the right side to the left and right. ...

Owners Manual
Page 34
Installation Instructions REVERSING THE DOOR SWING (if desired) DOOR PARTS ❒ Hinge cap ❒ Hinge assembly ❒ Outer handle ❒ Chrome door cover ❒ Chrome door cap ❒ Inner door cap ❒ C Small tapping screw 1 - #8 x 0.375″ ❒ D Small tapping screws 11 - #8 x 0.625″ ❒ E Machine screws 4 - #8 x 0.50″ ❒ A Large tapping screws 7 - #10 x 1.125″ ❒ Inner handle ❒ 2 Handle caps ❒ B Large tapping screws 2 - #10 x 0.750″ 34
Installation Instructions REVERSING THE DOOR SWING (if desired) DOOR PARTS ❒ Hinge cap ❒ Hinge assembly ❒ Outer handle ❒ Chrome door cover ❒ Chrome door cap ❒ Inner door cap ❒ C Small tapping screw 1 - #8 x 0.375″ ❒ D Small tapping screws 11 - #8 x 0.625″ ❒ E Machine screws 4 - #8 x 0.50″ ❒ A Large tapping screws 7 - #10 x 1.125″ ❒ Inner handle ❒ 2 Handle caps ❒ B Large tapping screws 2 - #10 x 0.750″ 34

Owners Manual
Page 35
... the hinge cap off the dryer. 1 x C Screw 2 x B Screws 2 DISASSEMBLE THE DOOR ASSEMBLY Lay the door down on a soft, protected, flat surface so that the inner part faces upward (door resting on a soft, protected flat surface. 35 Put the inner door aside on the handle side). Pull the door away from the...
... the hinge cap off the dryer. 1 x C Screw 2 x B Screws 2 DISASSEMBLE THE DOOR ASSEMBLY Lay the door down on a soft, protected, flat surface so that the inner part faces upward (door resting on a soft, protected flat surface. 35 Put the inner door aside on the handle side). Pull the door away from the...

Owners Manual
Page 36
... REVERSING THE DOOR SWING (if desired) 3 REVERSE DOOR HANDLE AND CAPS A Lay the chrome cover down on a soft, protected, flat surface so that the inner part faces upward (resting on the opposite side of the chrome cover, using 4 screws (#8 x 0.625″ tapping screws). Outer handle Replace 4 x D screws (outer handle) 36...
... REVERSING THE DOOR SWING (if desired) 3 REVERSE DOOR HANDLE AND CAPS A Lay the chrome cover down on a soft, protected, flat surface so that the inner part faces upward (resting on the opposite side of the chrome cover, using 4 screws (#8 x 0.625″ tapping screws). Outer handle Replace 4 x D screws (outer handle) 36...

Owners Manual
Page 37
...), using 2 screws (#8 x 0.625″ tapping screws). 4 REVERSE HINGE AND CAPS • Lay the inner door down on a soft, protected flat surface so that the inner part faces up. • Remove the 2 black plug buttons on a soft, protected flat surface. • Assemble the hinge to the outer handle, using a putty knife or...
...), using 2 screws (#8 x 0.625″ tapping screws). 4 REVERSE HINGE AND CAPS • Lay the inner door down on a soft, protected flat surface so that the inner part faces up. • Remove the 2 black plug buttons on a soft, protected flat surface. • Assemble the hinge to the outer handle, using a putty knife or...

Owners Manual
Page 38
... latch is engaged and the hinge is facing down. Flip the door assembly over and place on a soft, protected flat surface so that the inner part is sitting in the two openings in the dryer front. Assemble the door to the front cabinet, using a putty knife or other flat tool as...
... latch is engaged and the hinge is facing down. Flip the door assembly over and place on a soft, protected flat surface so that the inner part is sitting in the two openings in the dryer front. Assemble the door to the front cabinet, using a putty knife or other flat tool as...
Owners Manual
Page 40
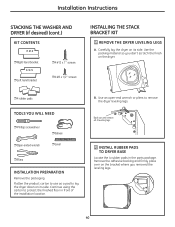
... LEGS A. Continue using the carton to remove the dryer leveling legs. Use an open-end wrench or pliers to protect the finished floor in the parts package. Back out and remove all 4 leveling legs 2 INSTALL RUBBER PADS TO DRYER BASE Locate the 4 rubber pads in front of the installation location. Remove...
... LEGS A. Continue using the carton to remove the dryer leveling legs. Use an open-end wrench or pliers to protect the finished floor in the parts package. Back out and remove all 4 leveling legs 2 INSTALL RUBBER PADS TO DRYER BASE Locate the 4 rubber pads in front of the installation location. Remove...

Owners Manual
Page 43
B Remove screws from the parts package. Press the rubber pads into each set aside. 3 INSTALL THE PEDESTAL TO THE WASHER OR DRYER A Place the pedestal against the bottom of the ...
B Remove screws from the parts package. Press the rubber pads into each set aside. 3 INSTALL THE PEDESTAL TO THE WASHER OR DRYER A Place the pedestal against the bottom of the ...

Owners Manual
Page 49
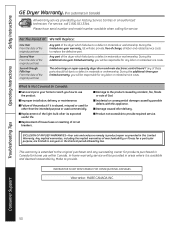
...home use the product. ■ Improper installation, delivery or maintenance. ■ Failure of these parts should fail due to a defect in the United States): ■ Service trips to an Authorized GE Service location for a particular purpose, are , consult your local or state consumer affairs office or... rights, and you may also have serial number and model number available when calling for any labor or related service costs. Any part of the dryer which fails due to state. Staple your state's Attorney General. Any implied warranties, including the implied warranties of ...
...home use the product. ■ Improper installation, delivery or maintenance. ■ Failure of these parts should fail due to a defect in the United States): ■ Service trips to an Authorized GE Service location for a particular purpose, are , consult your local or state consumer affairs office or... rights, and you may also have serial number and model number available when calling for any labor or related service costs. Any part of the dryer which fails due to state. Staple your state's Attorney General. Any implied warranties, including the implied warranties of ...
Owners Manual
Page 50
...period allowed by our Factory Service Centres or an authorized technician. For service, call 1.800.561.3344. Safety Instructions Operating Instructions GE Dryer Warranty. (For customers in Canada) All warranty service provided by law. WARRANTOR IS NOT RESPONSIBLE FOR CONSEQUENTIAL DAMAGES. This ...or super-capacity dryer drum and main electronic control board if any succeeding owner for products purchased in materials or workmanship. Any part of these parts should fail due to a defect in Canada for home use the product. ■ Improper installation, delivery or maintenance. &#...
...period allowed by our Factory Service Centres or an authorized technician. For service, call 1.800.561.3344. Safety Instructions Operating Instructions GE Dryer Warranty. (For customers in Canada) All warranty service provided by law. WARRANTOR IS NOT RESPONSIBLE FOR CONSEQUENTIAL DAMAGES. This ...or super-capacity dryer drum and main electronic control board if any succeeding owner for products purchased in materials or workmanship. Any part of these parts should fail due to a defect in Canada for home use the product. ■ Improper installation, delivery or maintenance. &#...

Owners Manual
Page 156
... environments that are accepted). E1C 9M3 Extended Warranties In the U.S.: GEAppliances.com Purchase a GE extended warranty and learn about special discounts that can now download Owner's Manuals, order parts or even schedule service on -line and schedule your service at your new appliance on ...call 800.626.2224 during normal business hours. Consumer Support. Get on -line. You can have parts or accessories sent directly to design for a wide range of GE's Universal Design applications, including kitchen design ideas for enhanced communication and prompt service under the terms of...
... environments that are accepted). E1C 9M3 Extended Warranties In the U.S.: GEAppliances.com Purchase a GE extended warranty and learn about special discounts that can now download Owner's Manuals, order parts or even schedule service on -line and schedule your service at your new appliance on ...call 800.626.2224 during normal business hours. Consumer Support. Get on -line. You can have parts or accessories sent directly to design for a wide range of GE's Universal Design applications, including kitchen design ideas for enhanced communication and prompt service under the terms of...


