
Owners Manual
Page 2
... not touch any electrical switch; 5 If you cannot reach your gas supplier, do not use any phone in this or any gas or electrical appliance. 4 Immediately call the fire department. 3 Clear the room, building or area of all occupants. Exhaust/Ducting 1 Dryers MUST be followed to ...fire or explosion, electric shock, or to prevent property damage, personal injury, or death. ■ Do not store or use plastic or other appliance. ■ Installation and service must be exposed to temperatures below freezing or exposed to water or weather. ■ Connect to a properly rated,...
... not touch any electrical switch; 5 If you cannot reach your gas supplier, do not use any phone in this or any gas or electrical appliance. 4 Immediately call the fire department. 3 Clear the room, building or area of all occupants. Exhaust/Ducting 1 Dryers MUST be followed to ...fire or explosion, electric shock, or to prevent property damage, personal injury, or death. ■ Do not store or use plastic or other appliance. ■ Installation and service must be exposed to temperatures below freezing or exposed to water or weather. ■ Connect to a properly rated,...

Owners Manual
Page 3
... plastic or similar materials such as detergents, bleaches, etc.) out of the reach of slipping. ■ Close supervision is necessary if this appliance from the accumulation of lint, dust and dirt. ■ Keep all warnings on container labels to reduce the possibility of children, preferably in...cause a clothes load to play on top of the dryer during subsequent dryer uses. ■ To minimize the possibility of electric shock, unplug this appliance is moving. Observe all laundry aids (such as padded bras, tennis shoes, galoshes, bath mats, rugs, bibs, baby pants, plastic bags, ...
... plastic or similar materials such as detergents, bleaches, etc.) out of the reach of slipping. ■ Close supervision is necessary if this appliance from the accumulation of lint, dust and dirt. ■ Keep all warnings on container labels to reduce the possibility of children, preferably in...cause a clothes load to play on top of the dryer during subsequent dryer uses. ■ To minimize the possibility of electric shock, unplug this appliance is moving. Observe all laundry aids (such as padded bras, tennis shoes, galoshes, bath mats, rugs, bibs, baby pants, plastic bags, ...

Owners Manual
Page 4
...dryer-applied fabric softener or an anti-static conditioner. Additionally, it is highly recommended to repair or replace any part of this appliance or attempt any servicing unless specifically recommended in published user-repair instructions that their product can be stepped on, tripped over or subjected...steam cycles. WARNING! DO NOT ATTEMPT TO LIGHT WITH A MATCH. WHEN USING YOUR DRYER (cont.) ■ Never attempt to operate this appliance. ■ Never attempt to use of these products are the responsibility of the manufacturers of those products, or try a dryer-added product for...
...dryer-applied fabric softener or an anti-static conditioner. Additionally, it is highly recommended to repair or replace any part of this appliance or attempt any servicing unless specifically recommended in published user-repair instructions that their product can be stepped on, tripped over or subjected...steam cycles. WARNING! DO NOT ATTEMPT TO LIGHT WITH A MATCH. WHEN USING YOUR DRYER (cont.) ■ Never attempt to operate this appliance. ■ Never attempt to use of these products are the responsibility of the manufacturers of those products, or try a dryer-added product for...

Owners Manual
Page 5
...1 Power Press to persons, read the IMPORTANT SAFETY INSTRUCTIONS before operating this manual, features and appearance may vary from the power supply. 5 Throughout this appliance. GEAppliances.com WARNING! If the display is dark, press the POWER button to "wake up " the display. To reduce the risk of time you... electric shock, or injury to "wake up " the display. 1 Press the POWER button. NOTE: Pressing POWER does not disconnect the appliance from your items to turn the dryer off. just press the START/PAUSE button. Then press the START/PAUSE button. 2 Select a ...
...1 Power Press to persons, read the IMPORTANT SAFETY INSTRUCTIONS before operating this manual, features and appearance may vary from the power supply. 5 Throughout this appliance. GEAppliances.com WARNING! If the display is dark, press the POWER button to "wake up " the display. To reduce the risk of time you... electric shock, or injury to "wake up " the display. 1 Press the POWER button. NOTE: Pressing POWER does not disconnect the appliance from your items to turn the dryer off. just press the START/PAUSE button. Then press the START/PAUSE button. 2 Select a ...

Owners Manual
Page 12
... shade Troubleshooting Tips Consumer Support Care and Cleaning of the Dryer Dryer Interior and Duct: The interior of the appliance and exhaust duct should be scratched or dented during normal use in a GE dryer. For example, do not wash) Heat setting High Medium Low No heat/air Special instructions Line dry/ hang...
... shade Troubleshooting Tips Consumer Support Care and Cleaning of the Dryer Dryer Interior and Duct: The interior of the appliance and exhaust duct should be scratched or dented during normal use in a GE dryer. For example, do not wash) Heat setting High Medium Low No heat/air Special instructions Line dry/ hang...

Owners Manual
Page 13
... of the clothes dryer. Settings Menu Press SETTINGS; If the Energy Management Screen is selected, the unit will operate with the GE Demand Response (DR) module which can begin the cycle. If NO is not available, refer to help consumers reduce peak electricity...deactivated or disconnected. 13 Consumer Support Safety Instructions Demand Response. (on some models) GEAppliances.com Model DPVH891 is YES. Details on the appliance to the module are 4 power levels available: Critical, High, Medium and Low. Default setting is compatible with less energy than normal...
... of the clothes dryer. Settings Menu Press SETTINGS; If the Energy Management Screen is selected, the unit will operate with the GE Demand Response (DR) module which can begin the cycle. If NO is not available, refer to help consumers reduce peak electricity...deactivated or disconnected. 13 Consumer Support Safety Instructions Demand Response. (on some models) GEAppliances.com Model DPVH891 is YES. Details on the appliance to the module are 4 power levels available: Critical, High, Medium and Low. Default setting is compatible with less energy than normal...

Owners Manual
Page 14
...• IMPORTANT - If flexible metal (semi-rigid or foil-type) duct is above 50°F for satisfactory operation of children is necessary when the appliance is used , must be performed by a qualified installer. • Install the clothes dryer according to these substances, namely benzene, carbon monoxide, formaldehyde ... the incomplete combustion of these instructions and in accordance with local codes. • This dryer must not exceed 3 feet. 14 Call 800.GE.CARES (800.432.2737) or visit our Web site at: GEAppliances.com In Canada, call 1.800.561.3344 or visit www.GEAppliances.ca...
...• IMPORTANT - If flexible metal (semi-rigid or foil-type) duct is above 50°F for satisfactory operation of children is necessary when the appliance is used , must be performed by a qualified installer. • Install the clothes dryer according to these substances, namely benzene, carbon monoxide, formaldehyde ... the incomplete combustion of these instructions and in accordance with local codes. • This dryer must not exceed 3 feet. 14 Call 800.GE.CARES (800.432.2737) or visit our Web site at: GEAppliances.com In Canada, call 1.800.561.3344 or visit www.GEAppliances.ca...
Owners Manual
Page 16
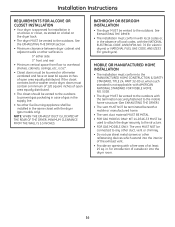
... CLEARANCE FROM THE WALL IS 5.5 INCHES. for introduction of at least 60 square inches of gas in the supply line. • No other fuel-burning appliance shall be vented to the outdoors to prevent gas pocketing in case of open area equally distributed. • The closet should be installed in the...
... CLEARANCE FROM THE WALL IS 5.5 INCHES. for introduction of at least 60 square inches of gas in the supply line. • No other fuel-burning appliance shall be vented to the outdoors to prevent gas pocketing in case of open area equally distributed. • The closet should be installed in the...

Owners Manual
Page 21
... solution or equivalent. ELECTRICAL CONNECTION INFORMATION FOR GAS DRYERS WARNING - WARNING - Do not cut or remove the grounding terminal from this appliance. • The dryer must be supplied with the NATIONAL ELECTRICAL CODE, ANSI/NFPA NO. 70. Ensure proper ground exists before use... rear of fire, electrical shock and personal injury: • Do not use . Open Gas Valve ELECTRICAL REQUIREMENTS FOR GAS DRYERS This appliance must not contain ammonia, which meets local codes, may be plugged directly into a properly grounded threeprong receptacle. This dryer is recommended that...
... solution or equivalent. ELECTRICAL CONNECTION INFORMATION FOR GAS DRYERS WARNING - WARNING - Do not cut or remove the grounding terminal from this appliance. • The dryer must be supplied with the NATIONAL ELECTRICAL CODE, ANSI/NFPA NO. 70. Ensure proper ground exists before use... rear of fire, electrical shock and personal injury: • Do not use . Open Gas Valve ELECTRICAL REQUIREMENTS FOR GAS DRYERS This appliance must not contain ammonia, which meets local codes, may be plugged directly into a properly grounded threeprong receptacle. This dryer is recommended that...

Owners Manual
Page 22
... wall. To reduce the risk of fire, electrical shock and personal injury: • Do not use an extension cord or an adapter plug with this appliance. • The dryer must be electrically grounded in accordance with local codes and ordinances or, in the absence of local codes, in accordance with 3 or...
... wall. To reduce the risk of fire, electrical shock and personal injury: • Do not use an extension cord or an adapter plug with this appliance. • The dryer must be electrically grounded in accordance with local codes and ordinances or, in the absence of local codes, in accordance with 3 or...

Owners Manual
Page 23
... amp) or remove the dryer's circuit fuse at the lower back. 4. Bring power cord through the neutral. 3-wire connection is NOT for use on the appliance. Remove ground strap and discard. Install 3/4 in. NEVER LEAVE THE COVER OFF OF THE TERMINAL BLOCK. 23 Installation Instructions ELECTRICAL REQUIREMENTS FOR ELECTRIC DRYERS This...
... amp) or remove the dryer's circuit fuse at the lower back. 4. Bring power cord through the neutral. 3-wire connection is NOT for use on the appliance. Remove ground strap and discard. Install 3/4 in. NEVER LEAVE THE COVER OFF OF THE TERMINAL BLOCK. 23 Installation Instructions ELECTRICAL REQUIREMENTS FOR ELECTRIC DRYERS This...

Owners Manual
Page 29
... screw saved previously to the dryer internal duct. Remove Right screw and save . Pull the duct out of the appliance base. Side opening • Insert the 4″ duct through the tab on the appliance base. Fixing hole A 133⁄8″ Cut the duct as desired. Installation Instructions SIDE VENTING: Dryer Exhaust to...
... screw saved previously to the dryer internal duct. Remove Right screw and save . Pull the duct out of the appliance base. Side opening • Insert the 4″ duct through the tab on the appliance base. Fixing hole A 133⁄8″ Cut the duct as desired. Installation Instructions SIDE VENTING: Dryer Exhaust to...

Owners Manual
Page 32
... the dryer. In the event of malfunction or breakdown, grounding will not come on the back of least resistance for electric current. This appliance is equipped with all wires prior to disconnection when servicing controls. Serial Port Rear of the cable to the washer before use . For ...pushing the washer into an appropriate outlet that the dryer is level from side to side and front to rear. 4 GROUNDING INSTRUCTIONS This appliance must be grounded. FINAL SETUP Installation Instructions 1 LEVEL THE DRYER Stand the dryer upright near the final location and adjust the four ...
... the dryer. In the event of malfunction or breakdown, grounding will not come on the back of least resistance for electric current. This appliance is equipped with all wires prior to disconnection when servicing controls. Serial Port Rear of the cable to the washer before use . For ...pushing the washer into an appropriate outlet that the dryer is level from side to side and front to rear. 4 GROUNDING INSTRUCTIONS This appliance must be grounded. FINAL SETUP Installation Instructions 1 LEVEL THE DRYER Stand the dryer upright near the final location and adjust the four ...

Owners Manual
Page 39
... should be given to the outdoors. See the EXHAUSTING THE DRYER section. • Minimum clearance between dryer cabinet and adjacent walls or other fuel-burning appliance shall be vented to provide adequate clearance for installation and service. Observe all governing codes and ordinances. • Note to do so could result in...
... should be given to the outdoors. See the EXHAUSTING THE DRYER section. • Minimum clearance between dryer cabinet and adjacent walls or other fuel-burning appliance shall be vented to provide adequate clearance for installation and service. Observe all governing codes and ordinances. • Note to do so could result in...

Owners Manual
Page 42
... Back out and remove all 4 leveling legs 42 B Use an open-end wrench to an upright position. The bolts must remain in front of the appliance. Continue using the carton to protect the finished floor in place until the washer is taped at the top of the washer. KIT CONTENTS INSTALLATION...
... Back out and remove all 4 leveling legs 42 B Use an open-end wrench to an upright position. The bolts must remain in front of the appliance. Continue using the carton to protect the finished floor in place until the washer is taped at the top of the washer. KIT CONTENTS INSTALLATION...

Owners Manual
Page 49
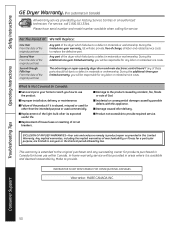
... affairs office or your receipt here. This warranty is extended to one year or the shortest period allowed by possible defects with this appliance. ■ Damage caused after delivery. ■ Product not accessible to provide required service. During this Limited Warranty. If the product... is located in this additional one -year warranty, GE will be responsible for any labor or related service costs. In Alaska, the warranty excludes the cost of shipping or service calls to...
... affairs office or your receipt here. This warranty is extended to one year or the shortest period allowed by possible defects with this appliance. ■ Damage caused after delivery. ■ Product not accessible to provide required service. During this Limited Warranty. If the product... is located in this additional one -year warranty, GE will be responsible for any labor or related service costs. In Alaska, the warranty excludes the cost of shipping or service calls to...
Owners Manual
Page 50
Safety Instructions Operating Instructions GE Dryer Warranty. (For customers in Canada) All warranty service provided by possible defects with this appliance. ■ Damage caused after its expected useful life. ■ Replacement of house fuses or resetting of circuit breakers. ■ ...of the dryer which fails due to a defect in materials or workmanship. Warrantor: MABE CANADA INC. During this additional one -year warranty, GE will be responsible for other than the intended purpose or used commercially. ■ Replacement of the light bulb after delivery. ■ Product ...
Safety Instructions Operating Instructions GE Dryer Warranty. (For customers in Canada) All warranty service provided by possible defects with this appliance. ■ Damage caused after its expected useful life. ■ Replacement of house fuses or resetting of circuit breakers. ■ ...of the dryer which fails due to a defect in materials or workmanship. Warrantor: MABE CANADA INC. During this additional one -year warranty, GE will be responsible for other than the intended purpose or used commercially. ■ Replacement of the light bulb after delivery. ■ Product ...

Owners Manual
Page 156
... business hours. Order on -line and schedule your service at your phone number, or write to: General Manager, Customer Relations GE Appliances, Appliance Park Louisville, KY 40225 In Canada: www.GEAppliances.ca, or write to: Director, Consumer Relations, Mabe Canada Inc. Instructions..., services and environments that are accepted). E1C 9M3 Register Your Appliance In the U.S.: GEAppliances.com Register your convenience! In Canada: www.GEAppliances.ca Printed in Canada should the need arise. GE Appliances Website In the U.S.: GEAppliances.com Have a question or need ...
... business hours. Order on -line and schedule your service at your phone number, or write to: General Manager, Customer Relations GE Appliances, Appliance Park Louisville, KY 40225 In Canada: www.GEAppliances.ca, or write to: Director, Consumer Relations, Mabe Canada Inc. Instructions..., services and environments that are accepted). E1C 9M3 Register Your Appliance In the U.S.: GEAppliances.com Register your convenience! In Canada: www.GEAppliances.ca Printed in Canada should the need arise. GE Appliances Website In the U.S.: GEAppliances.com Have a question or need ...