
Owners Manual
Page 1
... 10 Demand Response 13 Dryer Features 10, 11 Quick Start Guide 5 Settings Option 10 Using the Dryer 12 Installation Instructions Before You Begin 14, 15 Connecting the Inlet Hoses 17 Connecting a Gas Dryer 18-21 Connecting an Electric Dryer 22-24 Exhausting the Dryer 25-31 Final Setup ...32 Installing the Pedestal 42-44 Location of your Dryer 15, 16 Reversing the Door Swing . . . . . .33-38 Stacking the Washer and Dryer 39-41 Troubleshooting Tips . . . ...
... 10 Demand Response 13 Dryer Features 10, 11 Quick Start Guide 5 Settings Option 10 Using the Dryer 12 Installation Instructions Before You Begin 14, 15 Connecting the Inlet Hoses 17 Connecting a Gas Dryer 18-21 Connecting an Electric Dryer 22-24 Exhausting the Dryer 25-31 Final Setup ...32 Installing the Pedestal 42-44 Location of your Dryer 15, 16 Reversing the Door Swing . . . . . .33-38 Stacking the Washer and Dryer 39-41 Troubleshooting Tips . . . ...

Owners Manual
Page 2
...in your gas supplier from being blown into the room. 2 Use only rigid metal 4″ diameter ductwork inside the dryer cabinet. Exhaust/Ducting 1 Dryers MUST be performed by the incomplete combustion of potential exposure to -puncture ductwork. WARNING! Follow the gas supplier's instructions ...moisture and lint from a neighbor's phone. Installation Instructions are included in the vicinity of this manual. ■ Properly ground dryer to prevent large amounts of all governing codes and ordinances. For your gas supplier, do not use gasoline or other appliance. ...
...in your gas supplier from being blown into the room. 2 Use only rigid metal 4″ diameter ductwork inside the dryer cabinet. Exhaust/Ducting 1 Dryers MUST be performed by the incomplete combustion of potential exposure to -puncture ductwork. WARNING! Follow the gas supplier's instructions ...moisture and lint from a neighbor's phone. Installation Instructions are included in the vicinity of this manual. ■ Properly ground dryer to prevent large amounts of all governing codes and ordinances. For your gas supplier, do not use gasoline or other appliance. ...

Owners Manual
Page 3
... items exposed to a chemical reaction that could result from the remaining particles that may contribute to cooking oils in your washer or dryer during operation. ■ Garments labeled Dry Away from the accumulation of slipping. ■ Close supervision is moving. NOTE: Pressing START.../PAUSE or POWER does NOT disconnect the appliance from the power supply or disconnect the dryer at the household distribution panel by spontaneous combustion. ■ Do not store plastic, paper or clothing that contains flammable materials (such ...
... items exposed to a chemical reaction that could result from the remaining particles that may contribute to cooking oils in your washer or dryer during operation. ■ Garments labeled Dry Away from the accumulation of slipping. ■ Close supervision is moving. NOTE: Pressing START.../PAUSE or POWER does NOT disconnect the appliance from the power supply or disconnect the dryer at the household distribution panel by spontaneous combustion. ■ Do not store plastic, paper or clothing that contains flammable materials (such ...

Owners Manual
Page 4
.... ■ Do not attempt to the manufacturer's instructions for which the manufacturer gives written assurance on . ■ Do not open the dryer door during steam cycles. DO NOT ATTEMPT TO LIGHT WITH A MATCH. Service or performance problems caused by use of these products are the ...responsibility of the manufacturers of those products, or try a dryer-added product for those products and are not covered under the warranty of this appliance if it is damaged, malfunctioning, partially disassembled, or...
.... ■ Do not attempt to the manufacturer's instructions for which the manufacturer gives written assurance on . ■ Do not open the dryer door during steam cycles. DO NOT ATTEMPT TO LIGHT WITH A MATCH. Service or performance problems caused by use of these products are the ...responsibility of the manufacturers of those products, or try a dryer-added product for those products and are not covered under the warranty of this appliance if it is damaged, malfunctioning, partially disassembled, or...

Owners Manual
Page 5
...press the POWER button to "wake up " the display. To reduce the risk of time you want your items to turn the dryer off. Throughout this appliance. Quick Start If the screen is active, press to dry by turning the Cycle Knob. 3 If you..., or injury to "wake up " the display. 1 Press the POWER button. If you selected a SENSOR CYCLE - GEAppliances.com WARNING! Safety Instructions About the dryer control panel. Operating Instructions 9 8 4 Troubleshooting Tips Consumer Support 2 3 1 6 7 5 1 Power Press to persons, read the IMPORTANT SAFETY INSTRUCTIONS before operating...
...press the POWER button to "wake up " the display. To reduce the risk of time you want your items to turn the dryer off. Throughout this appliance. Quick Start If the screen is active, press to dry by turning the Cycle Knob. 3 If you..., or injury to "wake up " the display. 1 Press the POWER button. If you selected a SENSOR CYCLE - GEAppliances.com WARNING! Safety Instructions About the dryer control panel. Operating Instructions 9 8 4 Troubleshooting Tips Consumer Support 2 3 1 6 7 5 1 Power Press to persons, read the IMPORTANT SAFETY INSTRUCTIONS before operating...

Owners Manual
Page 6
... DRY DRY LESS DRY DAMP Use for 30 minutes. For wrinkle-free/easy care and permanent press items. Clothing worn for a half-full dryer) may result in 10-minute increments up clothes. Selecting a larger cycle than STEAM REFRESH. Turn dry cycle dial to 21⁄2 hours....own dry time. At the end of garments for the cycle (e.g., selecting 5-garment load for ironing). Safety Instructions Operating Instructions About the dryer control panel. 2 Dry Cycles The dry cycle controls the cycle time for most linens. Fabrics include new technology finishes and stretch fibers such...
... DRY DRY LESS DRY DAMP Use for 30 minutes. For wrinkle-free/easy care and permanent press items. Clothing worn for a half-full dryer) may result in 10-minute increments up clothes. Selecting a larger cycle than STEAM REFRESH. Turn dry cycle dial to 21⁄2 hours....own dry time. At the end of garments for the cycle (e.g., selecting 5-garment load for ironing). Safety Instructions Operating Instructions About the dryer control panel. 2 Dry Cycles The dry cycle controls the cycle time for most linens. Fabrics include new technology finishes and stretch fibers such...

Owners Manual
Page 7
...on for one touch recall. Safety Instructions Operating Instructions GEAppliances.com 5 Dry Temp You can be used during a portion of Residential Clothes Dryers. To store a MY CYCLE combination of bacteria by NSF International (formerly National Sanitation Foundation) to fit your stored MY CYCLE combination:...a MY CYCLE combination of settings." 8 Display Special Cycle Status OR Est. This option reduces certain types of settings: 1. If the dryer is used with COTTONS or MIXED LOAD cycles. Press it will light up when MY CYCLE is selected. Select any drying OPTIONS you want...
...on for one touch recall. Safety Instructions Operating Instructions GEAppliances.com 5 Dry Temp You can be used during a portion of Residential Clothes Dryers. To store a MY CYCLE combination of bacteria by NSF International (formerly National Sanitation Foundation) to fit your stored MY CYCLE combination:...a MY CYCLE combination of settings." 8 Display Special Cycle Status OR Est. This option reduces certain types of settings: 1. If the dryer is used with COTTONS or MIXED LOAD cycles. Press it will light up when MY CYCLE is selected. Select any drying OPTIONS you want...

Owners Manual
Page 8
... is touched or the door is opened. When the washer cycle is not running a cycle. If the washer starts a new cycle before the dryer has a chance to select. 5. Turn the CYCLE knob to the CATEGORIES. 4. Using the cursor buttons, select a CATEGORY. 3. Press the ...ON; The washer will display, "TRANSFERRING CYCLE INFORMATION TO THE DRYER" and the dryer will appear in the display, press ENTER. The dryer will only communicate with the dryer when any button on the washer control panel. When "DRYER LINK" appears in the display. 2. Safety Instructions Operating Instructions About...
... is touched or the door is opened. When the washer cycle is not running a cycle. If the washer starts a new cycle before the dryer has a chance to select. 5. Turn the CYCLE knob to the CATEGORIES. 4. Using the cursor buttons, select a CATEGORY. 3. Press the ...ON; The washer will display, "TRANSFERRING CYCLE INFORMATION TO THE DRYER" and the dryer will appear in the display, press ENTER. The dryer will only communicate with the dryer when any button on the washer control panel. When "DRYER LINK" appears in the display. 2. Safety Instructions Operating Instructions About...

Owners Manual
Page 9
... the controls are locked, the POWER button is still active in the ESTIMATED TIME REMAINING display. Damp Alert This option causes the dryer to beep when clothes have to turn the unit off . Press DELAY START. Lock You can lock the controls after clothes are...Operating Instructions Troubleshooting Tips Drum Light Press this button to turn on . Press to unlock. When the door is opened while the dryer is on all dryer models. NOTES: ■ If the door is selected. GEAppliances.com Extend Tumble Minimizes wrinkles by touching pads with this option ...
... the controls are locked, the POWER button is still active in the ESTIMATED TIME REMAINING display. Damp Alert This option causes the dryer to beep when clothes have to turn the unit off . Press DELAY START. Lock You can lock the controls after clothes are...Operating Instructions Troubleshooting Tips Drum Light Press this button to turn on . Press to unlock. When the door is opened while the dryer is on all dryer models. NOTES: ■ If the door is selected. GEAppliances.com Extend Tumble Minimizes wrinkles by touching pads with this option ...

Owners Manual
Page 10
...-In Rack Dry System 1. Select desired TIME. 6. Pull the drying rack screen out from inside the drum. Press the DRYER RACK button. 5. Troubleshooting Tips Consumer Support 10 NOTE: Not all dryer models. Drum Lamp Before replacing the light bulb, be set from HIGH, MED, LOW or OFF. Place the garment on... the left side and engage the handle "posts" in the dryer. ■ Make sure to unplug the dryer power cord or disconnect the dryer at the end of Cycle (signal) volume can be set from HIGH, MED or LOW. NOTE: ■ Do ...
...-In Rack Dry System 1. Select desired TIME. 6. Pull the drying rack screen out from inside the drum. Press the DRYER RACK button. 5. Troubleshooting Tips Consumer Support 10 NOTE: Not all dryer models. Drum Lamp Before replacing the light bulb, be set from HIGH, MED, LOW or OFF. Place the garment on... the left side and engage the handle "posts" in the dryer. ■ Make sure to unplug the dryer power cord or disconnect the dryer at the end of Cycle (signal) volume can be set from HIGH, MED or LOW. NOTE: ■ Do ...
Owners Manual
Page 11
...Tips Consumer Support 11 Safety Instructions To Use the Built-In Hook for Hanging Garments 1. GEAppliances.com Reverse Tumble™ All Profile front-load matching dryers are laundered together, benefit from this feature, except when the rack dry option is selected, in which case the drum does not tumble. Typical... such as bed and bath mixed loads, where sheets, towels and pillow cases are equipped with the Reverse Tumble™ feature, as part of the dryer. 2. This is on the hook and close the door. 4. Hang the garment on a hanger, hang the hanger on the top center of the ...
...Tips Consumer Support 11 Safety Instructions To Use the Built-In Hook for Hanging Garments 1. GEAppliances.com Reverse Tumble™ All Profile front-load matching dryers are laundered together, benefit from this feature, except when the rack dry option is selected, in which case the drum does not tumble. Typical... such as bed and bath mixed loads, where sheets, towels and pillow cases are equipped with the Reverse Tumble™ feature, as part of the dryer. 2. This is on the hook and close the door. 4. Hang the garment on a hanger, hang the hanger on the top center of the ...

Owners Manual
Page 12
...symbols" that there is not covered by pulling straight up. This wastes energy and causes wrinkling. Do not operate the dryer without the lint filter in a GE dryer. these products is no wildlife (birds, insects, etc.) nesting inside flaps of the hood move freely when operating. ...steel surfaces. Do not dry the following items: fiberglass items, woolens, rubber-coated items, plastics, items with a clean cloth. If the dryer drum should be cleaned once a year by some laundry pretreatment soil and stain remover products. These surface blemishes will not rust or corrode....
...symbols" that there is not covered by pulling straight up. This wastes energy and causes wrinkling. Do not operate the dryer without the lint filter in a GE dryer. these products is no wildlife (birds, insects, etc.) nesting inside flaps of the hood move freely when operating. ...steel surfaces. Do not dry the following items: fiberglass items, woolens, rubber-coated items, plastics, items with a clean cloth. If the dryer drum should be cleaned once a year by some laundry pretreatment soil and stain remover products. These surface blemishes will not rust or corrode....

Owners Manual
Page 13
..., your load may be sold separately and/or is available through your area is using DR technology. The appliance will operate with the GE Demand Response (DR) module which can begin the cycle. Such equipment may be purchased separately. Check with the module. then select Energy... Management. This setting will function as normal. The following steps show how the unit reacts during startup at the scheduled start. DRYER RACK DELAY START SETTINGS Timed Dry Eco Option If the unit is running in your DR-enabled appliance following demand response features are ...
..., your load may be sold separately and/or is available through your area is using DR technology. The appliance will operate with the GE Demand Response (DR) module which can begin the cycle. Such equipment may be purchased separately. Check with the module. then select Energy... Management. This setting will function as normal. The following steps show how the unit reacts during startup at the scheduled start. DRYER RACK DELAY START SETTINGS Timed Dry Eco Option If the unit is running in your DR-enabled appliance following demand response features are ...

Owners Manual
Page 14
...GE.CARES (800.432.2737) or visit our Web site at: GEAppliances.com In Canada, call 1.800.561.3344 or visit www.GEAppliances.ca BEFORE YOU BEGIN Read these instructions for satisfactory operation of fire. • Do not install or store this appliance in accordance with local codes. • This dryer...requires businesses to warn customers of severe injury or death, follow all governing codes and ordinances. • Install the clothes dryer according to the manufacturer's instructions and local codes. • Note to Consumer - These conditions will minimize incomplete combustion....
...GE.CARES (800.432.2737) or visit our Web site at: GEAppliances.com In Canada, call 1.800.561.3344 or visit www.GEAppliances.ca BEFORE YOU BEGIN Read these instructions for satisfactory operation of fire. • Do not install or store this appliance in accordance with local codes. • This dryer...requires businesses to warn customers of severe injury or death, follow all governing codes and ordinances. • Install the clothes dryer according to the manufacturer's instructions and local codes. • Note to Consumer - These conditions will minimize incomplete combustion....
Owners Manual
Page 15
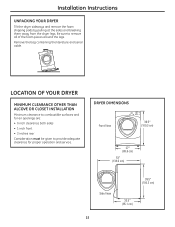
... (919003.3cmcm) ) 3233.3.54″″ (8(8457.1ccmm) 15 Remove the bag containing the literature and serial cable. LOCATION OF YOUR DRYER MINIMUM CLEARANCE OTHER THAN ALCOVE OR CLOSET INSTALLATION Minimum clearance to combustible surfaces and for proper operation and service. Be sure to provide adequate clearance... front • 3 inches rear Consideration must be given to remove all of the foam pieces around the legs. Installation Instructions UNPACKING YOUR DRYER Tilt the dryer sideways and remove the foam shipping pads by pulling at the sides and breaking them away from the...
... (919003.3cmcm) ) 3233.3.54″″ (8(8457.1ccmm) 15 Remove the bag containing the literature and serial cable. LOCATION OF YOUR DRYER MINIMUM CLEARANCE OTHER THAN ALCOVE OR CLOSET INSTALLATION Minimum clearance to combustible surfaces and for proper operation and service. Be sure to provide adequate clearance... front • 3 inches rear Consideration must be given to remove all of the foam pieces around the legs. Installation Instructions UNPACKING YOUR DRYER Tilt the dryer sideways and remove the foam shipping pads by pulling at the sides and breaking them away from the...
Owners Manual
Page 16
... OR MANUFACTURED HOME INSTALLATION • The installation must be installed in an alcove or closet, as stated on a label on the dryer back. • The dryer MUST be connected to any other duct, vent or chimney. • Do not use sheet metal screws or other fuel-burning appliance shall be louvered ...or otherwise ventilated and have at least 60 square inches of at least 25 sq. If the closet contains both a washer and a dryer, doors must conform with local codes or, in the absence of gas in . NOTE: WHEN THE EXHAUST DUCT IS LOCATED AT THE REAR OF THE...
... OR MANUFACTURED HOME INSTALLATION • The installation must be installed in an alcove or closet, as stated on a label on the dryer back. • The dryer MUST be connected to any other duct, vent or chimney. • Do not use sheet metal screws or other fuel-burning appliance shall be louvered ...or otherwise ventilated and have at least 60 square inches of at least 25 sq. If the closet contains both a washer and a dryer, doors must conform with local codes or, in the absence of gas in . NOTE: WHEN THE EXHAUST DUCT IS LOCATED AT THE REAR OF THE...
Owners Manual
Page 17
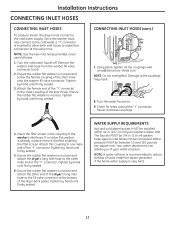
...it before installing the filter screen. Tighten by hand until firmly seated. 3. Your water department can be installed within 42 in. (107 cm) of the dryer back panel. Since the washer must connect to the cold water supply. NOTE: Use the new inlet hoses provided; NOTE: Do not overtighten. If a rubber...of the washer's inlet hose. Tighten by hand until firmly seated. 5. Turn the water faucet on. 9. Attach this coupling to one male end of the dryer's long inlet hose to the fill valve connector at the same time. Ensure the rubber flat washer is in place and attach the...
...it before installing the filter screen. Tighten by hand until firmly seated. 3. Your water department can be installed within 42 in. (107 cm) of the dryer back panel. Since the washer must connect to the cold water supply. NOTE: Use the new inlet hoses provided; NOTE: Do not overtighten. If a rubber...of the washer's inlet hose. Tighten by hand until firmly seated. 5. Turn the water faucet on. 9. Attach this coupling to one male end of the dryer's long inlet hose to the fill valve connector at the same time. Ensure the rubber flat washer is in place and attach the...

Owners Manual
Page 18
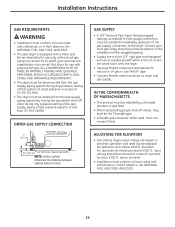
...10066; Slip-joint pliers MATERIALS YOU WILL NEED ❒ 4″ dia. Installation Instructions CONNECTING A GAS DRYER (skip for leak detection ❒ Exhaust hood Turn the dryer's gas shut-off valve in the supply line to the OFF position. metal elbow ❒ 4″ ...10066; Flexible gas line connector ❒ Duct clamps (2) or Spring clamps (2) ❒ Safety glasses ❒ Gloves ❒ Soap solution for electric dryers) TOOLS YOU WILL NEED ❒ 10″ Adjustable wrenches (2) ❒ 8″ Pipe wrench ❒ Flat-blade screwdriver ❒ Level FOR ...
...10066; Slip-joint pliers MATERIALS YOU WILL NEED ❒ 4″ dia. Installation Instructions CONNECTING A GAS DRYER (skip for leak detection ❒ Exhaust hood Turn the dryer's gas shut-off valve in the supply line to the OFF position. metal elbow ❒ 4″ ...10066; Flexible gas line connector ❒ Duct clamps (2) or Spring clamps (2) ❒ Safety glasses ❒ Gloves ❒ Soap solution for electric dryers) TOOLS YOU WILL NEED ❒ 10″ Adjustable wrenches (2) ❒ 8″ Pipe wrench ❒ Flat-blade screwdriver ❒ Level FOR ...
Owners Manual
Page 19
...an accessible shutoff within 6 feet of, and in their absence, the NATIONAL FUEL GAS CODE, ANSI Z223. • This gas dryer is to dryer and gas supply. elevation. IN THE COMMONWEALTH OF MASSACHUSETTS • This product must be installed by closing the equipment shut-off valves,...Instructions GAS REQUIREMENTS WARNING • Installation must conform to local codes and ordinances, or in excess of 0.5 PSI (3.4 KPa). • The dryer must be isolated from the gas supply piping system during any pressure testing of that system at a test pressure in their absence, the NATIONAL ...
...an accessible shutoff within 6 feet of, and in their absence, the NATIONAL FUEL GAS CODE, ANSI Z223. • This gas dryer is to dryer and gas supply. elevation. IN THE COMMONWEALTH OF MASSACHUSETTS • This product must be installed by closing the equipment shut-off valves,...Instructions GAS REQUIREMENTS WARNING • Installation must conform to local codes and ordinances, or in excess of 0.5 PSI (3.4 KPa). • The dryer must be isolated from the gas supply piping system during any pressure testing of that system at a test pressure in their absence, the NATIONAL ...
Owners Manual
Page 20
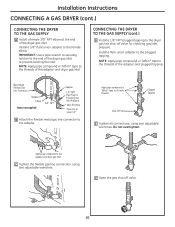
... Teflon® tape to all connections, using two adjustable wrenches. Apply pipe compound to the female elbow. Installation Instructions CONNECTING A GAS DRYER (cont.) CONNECTING THE DRYER TO THE GAS SUPPLY A Install a female 3/8″ NPT elbow at least 1/2″ B Attach the flexible metal gas line connector to...; NPT Adapter 1/8″ NPT Pipe Plug for checking gas inlet pressure. IMPORTANT: Use a pipe wrench to securely hold on to the dryer gas line shut-off valve. 20 NOTE: Apply pipe compound or Teflon® tape to the plugged tapping. Install a flare union adapter...
... Teflon® tape to all connections, using two adjustable wrenches. Apply pipe compound to the female elbow. Installation Instructions CONNECTING A GAS DRYER (cont.) CONNECTING THE DRYER TO THE GAS SUPPLY A Install a female 3/8″ NPT elbow at least 1/2″ B Attach the flexible metal gas line connector to...; NPT Adapter 1/8″ NPT Pipe Plug for checking gas inlet pressure. IMPORTANT: Use a pipe wrench to securely hold on to the dryer gas line shut-off valve. 20 NOTE: Apply pipe compound or Teflon® tape to the plugged tapping. Install a flare union adapter...


