
Owners Manual
Page 1
... Dryer 25-31 Final Setup 32 Installing the Pedestal 42-44 Location of your Dryer 15, 16 Reversing the Door Swing . . . . . .33-38 Stacking the Washer and Dryer 39-41 Troubleshooting Tips . . . . . .45-48 Consumer Support Consumer Support Back Cover Warranty (Canada 50 Warranty (U.S 49 Owner's Manual & Installation Instructions DPVH891 DPVH890...
... Dryer 25-31 Final Setup 32 Installing the Pedestal 42-44 Location of your Dryer 15, 16 Reversing the Door Swing . . . . . .33-38 Stacking the Washer and Dryer 39-41 Troubleshooting Tips . . . . . .45-48 Consumer Support Consumer Support Back Cover Warranty (Canada 50 Warranty (U.S 49 Owner's Manual & Installation Instructions DPVH891 DPVH890...

Owners Manual
Page 3
... until the drum has completely stopped. ■ Clean the lint filter before attempting any other flammable vapors and liquids. ■ Keep the floor around your washer or dryer during subsequent dryer uses. ■ To minimize the possibility of children, preferably in a locked cabinet.
... until the drum has completely stopped. ■ Clean the lint filter before attempting any other flammable vapors and liquids. ■ Keep the floor around your washer or dryer during subsequent dryer uses. ■ To minimize the possibility of children, preferably in a locked cabinet.

Owners Manual
Page 8
... the cursor buttons, select a CYCLE. Press ENTER to communicate with it, the information will only communicate with the dryer when any button on the washer control panel. SPECIALTY CYCLES include: Garments ■ Coats ■ Hosiery/Bras (use mesh bag) ■ Jeans ■ Khakis Bed and Bath... Fragile Cotton ■ Performance Fabrics ■ Pet Bedding ■ Play Clothes ■ Sleeping Bags ■ Rack Dry ■ Throw Rugs Washer Communicated Cycles To turn on communication, press the SETTINGS button on the control panel is touched or the door is not running a cycle. When ...
... the cursor buttons, select a CYCLE. Press ENTER to communicate with it, the information will only communicate with the dryer when any button on the washer control panel. SPECIALTY CYCLES include: Garments ■ Coats ■ Hosiery/Bras (use mesh bag) ■ Jeans ■ Khakis Bed and Bath... Fragile Cotton ■ Performance Fabrics ■ Pet Bedding ■ Play Clothes ■ Sleeping Bags ■ Rack Dry ■ Throw Rugs Washer Communicated Cycles To turn on communication, press the SETTINGS button on the control panel is touched or the door is not running a cycle. When ...

Owners Manual
Page 12
... Special instructions Line dry/ hang to your dryer caused by these products away from using dryer-added fabric softener sheets. The stainless steel used in a GE dryer. They may then be cleaned once a year by pulling straight up. See below for the dryer. Do not overload. To remove this dryer when... used to size. Sorting and Loading Hints As a general rule, if clothes are sorted properly for the washer, they are fabric care label "symbols" that affect the clothing you notice a change in place.
... Special instructions Line dry/ hang to your dryer caused by these products away from using dryer-added fabric softener sheets. The stainless steel used in a GE dryer. They may then be cleaned once a year by pulling straight up. See below for the dryer. Do not overload. To remove this dryer when... used to size. Sorting and Loading Hints As a general rule, if clothes are sorted properly for the washer, they are fabric care label "symbols" that affect the clothing you notice a change in place.
Owners Manual
Page 16
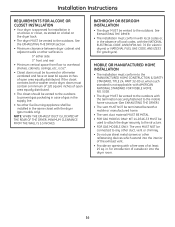
... other fuel-burning appliance shall be installed in the same closet with the dryer (gas models only). for gas dryers). If the closet contains both a washer and a dryer, doors must contain a minimum of 120 square inches of the exhaust vent. • Provide an opening with the termination securely fastened to the...
... other fuel-burning appliance shall be installed in the same closet with the dryer (gas models only). for gas dryers). If the closet contains both a washer and a dryer, doors must contain a minimum of 120 square inches of the exhaust vent. • Provide an opening with the termination securely fastened to the...
Owners Manual
Page 17
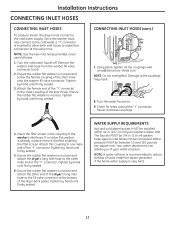
... of scale inside the steam generator if the home water supply is in . (1.9 cm) garden hose-type so inlet hoses can advise you of your washer's water inlet. CONNECTING INLET HOSES (cont.) 7. Turn the water faucet on. 9. Check for leaks around the ''Y'' connector, faucet and hose couplings. 4. Tighten ... inlet hose to the other end of the dryer's long inlet hose to the fill valve connector at the same time. Remove the washer inlet hose from the washer fill valve connector (cold). 2. Attach the female end of the ''Y'' connector to the male coupling of the ''Y'' connector. Using pliers,...
... of scale inside the steam generator if the home water supply is in . (1.9 cm) garden hose-type so inlet hoses can advise you of your washer's water inlet. CONNECTING INLET HOSES (cont.) 7. Turn the water faucet on. 9. Check for leaks around the ''Y'' connector, faucet and hose couplings. 4. Tighten ... inlet hose to the other end of the dryer's long inlet hose to the fill valve connector at the same time. Remove the washer inlet hose from the washer fill valve connector (cold). 2. Attach the female end of the ''Y'' connector to the male coupling of the ''Y'' connector. Using pliers,...

Owners Manual
Page 28
...-line installation, connect the dryer exhaust to the wall, using duct tape. Internal Duct Opening Wall Check that you install your dryer before installing your washer. Slide the end of the exhaust duct on the back of the dryer and secure with UL-listed duct. • Remove any lint from the...
...-line installation, connect the dryer exhaust to the wall, using duct tape. Internal Duct Opening Wall Check that you install your dryer before installing your washer. Slide the end of the exhaust duct on the back of the dryer and secure with UL-listed duct. • Remove any lint from the...

Owners Manual
Page 32
... to warm up before use . Otherwise, the display will reduce the risk of electric shock by providing a path of the cable to the washer before pushing the washer into an appropriate outlet that the dryer is properly installed and grounded in accordance with a cord having an equipment-grounding conductor and a grounding plug... on the back of Dryer 3 PLUG DRYER IN Ensure proper ground exists before pressing POWER. For replacement parts and other end of least resistance for washer and dryer connection to rear. 4 GROUNDING INSTRUCTIONS This appliance must be grounded.
... to warm up before use . Otherwise, the display will reduce the risk of electric shock by providing a path of the cable to the washer before pushing the washer into an appropriate outlet that the dryer is properly installed and grounded in accordance with a cord having an equipment-grounding conductor and a grounding plug... on the back of Dryer 3 PLUG DRYER IN Ensure proper ground exists before pressing POWER. For replacement parts and other end of least resistance for washer and dryer connection to rear. 4 GROUNDING INSTRUCTIONS This appliance must be grounded.

Owners Manual
Page 39
...a minimum of 120 square inches of open area equally distributed. Failure to the outdoors. More than two people are : 0″ both a washer and a dryer, doors must be performed by a qualified installer. • Proper installation is 52″. • Closet doors must be louvered... THE EXHAUST DUCT IS LOCATED AT THE REAR OF THE DRYER, MINIMUM CLEARANCE FROM THE WALL IS 5.5 INCHES. 39 Installation Instructions STACKING THE WASHER AND DRYER (if desired) BEFORE YOU BEGIN Read these instructions for local electrical inspector's use. • IMPORTANT - FOR YOUR SAFETY: WARNING...
...a minimum of 120 square inches of open area equally distributed. Failure to the outdoors. More than two people are : 0″ both a washer and a dryer, doors must be performed by a qualified installer. • Proper installation is 52″. • Closet doors must be louvered... THE EXHAUST DUCT IS LOCATED AT THE REAR OF THE DRYER, MINIMUM CLEARANCE FROM THE WALL IS 5.5 INCHES. 39 Installation Instructions STACKING THE WASHER AND DRYER (if desired) BEFORE YOU BEGIN Read these instructions for local electrical inspector's use. • IMPORTANT - FOR YOUR SAFETY: WARNING...
Owners Manual
Page 40
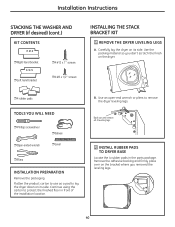
... location. Remove the adhesive backing and firmly place over on the bracket where you don't scratch the finish on its side. B. Installation Instructions STACKING THE WASHER AND DRYER (if desired) (cont.) KIT CONTENTS ❒ Right hand bracket ❒ Left hand bracket ❒ 4 #12 x 1″ screws ❒ 4 #8 x 1/2″ screws INSTALLING THE STACK...
... location. Remove the adhesive backing and firmly place over on the bracket where you don't scratch the finish on its side. B. Installation Instructions STACKING THE WASHER AND DRYER (if desired) (cont.) KIT CONTENTS ❒ Right hand bracket ❒ Left hand bracket ❒ 4 #12 x 1″ screws ❒ 4 #8 x 1/2″ screws INSTALLING THE STACK...

Owners Manual
Page 41
... panel with cardboard or other sliding device to assist moving and to top of packing material so the brackets that are recommended to clear the washer control panel. WARNING - Using a Phillips screwdriver, attach the 2 #8 x 1/2″ tapping screws. Installation Instructions 3 INSTALL BRACKET TO DRYER A. ... dryer. B. B. Use a Phillips screwdriver to scratch the top of the dryer. B. Lift the dryer on both sides of the washer. Align the holes in the left bracket with the brackets. Potential Personal Injury. Be sure to lift the dryer high enough to lift...
... panel with cardboard or other sliding device to assist moving and to top of packing material so the brackets that are recommended to clear the washer control panel. WARNING - Using a Phillips screwdriver, attach the 2 #8 x 1/2″ tapping screws. Installation Instructions 3 INSTALL BRACKET TO DRYER A. ... dryer. B. B. Use a Phillips screwdriver to scratch the top of the dryer. B. Lift the dryer on both sides of the washer. Align the holes in the left bracket with the brackets. Potential Personal Injury. Be sure to lift the dryer high enough to lift...

Owners Manual
Page 42
...NEED ❒ Phillips-head screwdriver ❒ 7 mm Socket wrench 1 REMOVE THE LEVELING LEGS A Carefully lay the washer or dryer on the bottom of personal injury or damage to remove the washer or dryer leveling legs. ❒ 9/16″ Open-end wrench or adjustable wrench Back out and remove all 4.... KIT CONTENTS INSTALLATION PREPARATION Remove the packaging. The drawer divider is returned to protect the finished floor in place until the washer is taped at the top of the washer. Remove the divider and set aside for final installation. IMPORTANT: Do not lay the...
...NEED ❒ Phillips-head screwdriver ❒ 7 mm Socket wrench 1 REMOVE THE LEVELING LEGS A Carefully lay the washer or dryer on the bottom of personal injury or damage to remove the washer or dryer leveling legs. ❒ 9/16″ Open-end wrench or adjustable wrench Back out and remove all 4.... KIT CONTENTS INSTALLATION PREPARATION Remove the packaging. The drawer divider is returned to protect the finished floor in place until the washer is taped at the top of the washer. Remove the divider and set aside for final installation. IMPORTANT: Do not lay the...

Owners Manual
Page 43
... the unit, until it will go. B Remove screws from the parts package. Press the rubber pads into each set aside. 3 INSTALL THE PEDESTAL TO THE WASHER OR DRYER A Place the pedestal against the bottom of the pedestal as it is aligned front to be installed on top of the unit. NOTE...: The support pads should be sure the drawer front is at the front of the washer. Slide drawer out of the base and set of corner holes on the top of the unit. Each pad has 2 protrusions that fit into the...
... the unit, until it will go. B Remove screws from the parts package. Press the rubber pads into each set aside. 3 INSTALL THE PEDESTAL TO THE WASHER OR DRYER A Place the pedestal against the bottom of the pedestal as it is aligned front to be installed on top of the unit. NOTE...: The support pads should be sure the drawer front is at the front of the washer. Slide drawer out of the base and set of corner holes on the top of the unit. Each pad has 2 protrusions that fit into the...

Owners Manual
Page 44
... dryer is level by placing a level on the back side of the washer. 7 FINALIZE THE INSTALLATION Refer to the washer or dryer Installation Instructions to complete the installation. 5 REINSTALL THE DRAWER A Check to be tight. 6 REMOVE SHIPPING SCREWS Remove the 4 shipping screws on top. D Open...adjust the legs in the center of the pedestal. Slide drawer divider into the opening. Installation Instructions INSTALLING THE PEDESTAL (if desired) (cont.) 4 LEVEL THE WASHER OR DRYER A Stand the washer or dryer upright. The drawer should slide smoothly when you push it close to back.
... dryer is level by placing a level on the back side of the washer. 7 FINALIZE THE INSTALLATION Refer to the washer or dryer Installation Instructions to complete the installation. 5 REINSTALL THE DRAWER A Check to be tight. 6 REMOVE SHIPPING SCREWS Remove the 4 shipping screws on top. D Open...adjust the legs in the center of the pedestal. Slide drawer divider into the opening. Installation Instructions INSTALLING THE PEDESTAL (if desired) (cont.) 4 LEVEL THE WASHER OR DRYER A Stand the washer or dryer upright. The drawer should slide smoothly when you push it close to back.

Owners Manual
Page 45
... to see if outside wall damper operates easily. • Separate heavy items from lightweight items (generally, a well-sorted washer load is a well-sorted dryer load). • Large, heavy fabrics contain more than one washer load in lock mode Controls performed an incorrect operation Control panel is "asleep" Dryer is unplugged Fuse is...
... to see if outside wall damper operates easily. • Separate heavy items from lightweight items (generally, a well-sorted washer load is a well-sorted dryer load). • Large, heavy fabrics contain more than one washer load in lock mode Controls performed an incorrect operation Control panel is "asleep" Dryer is unplugged Fuse is...

Owners Manual
Page 48
Safety Instructions Before you call for given cycle. Loose water hose connection to valve Hose missing rubber washer at beginning of cycle Garments still wrinkled after steam cycle Dryer continues to tumble after display says Complete Possible Causes Inadequate... Water drips from door when opened after a Steam Cycle Cannot see steam at connection with valve • Tighten connection. • Install rubber washer provided with hose. Manually reduce cycle time for service... Water valve is open filling steam • This is normal. generator Steam generator is dispensing...
Safety Instructions Before you call for given cycle. Loose water hose connection to valve Hose missing rubber washer at beginning of cycle Garments still wrinkled after steam cycle Dryer continues to tumble after display says Complete Possible Causes Inadequate... Water drips from door when opened after a Steam Cycle Cannot see steam at connection with valve • Tighten connection. • Install rubber washer provided with hose. Manually reduce cycle time for service... Water valve is open filling steam • This is normal. generator Steam generator is dispensing...


