
Owners Manual
Page 1
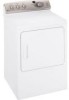
Profile Dryers ge.com Safety Instructions 2-4 Operating Instructions Control Panels 5, 7 Control Settings 6, 8 Dryer Features 9 Loading and Using the Dryer . . . .11 Reversing the Door 10 Venting the Dryer 12 Troubleshooting Tips . . . 13, 14 Consumer Support Consumer Support 16 Warranty 15 Owner's Manual DPSE810 DPSR610 Write the model and serial number here: Model Serial You can find them on a label on the front of the dryer behind the door. 175D1807P558 49-90290-1 09-06 JR
Profile Dryers ge.com Safety Instructions 2-4 Operating Instructions Control Panels 5, 7 Control Settings 6, 8 Dryer Features 9 Loading and Using the Dryer . . . .11 Reversing the Door 10 Venting the Dryer 12 Troubleshooting Tips . . . 13, 14 Consumer Support Consumer Support 16 Warranty 15 Owner's Manual DPSE810 DPSR610 Write the model and serial number here: Model Serial You can find them on a label on the front of the dryer behind the door. 175D1807P558 49-90290-1 09-06 JR
Owners Manual
Page 2
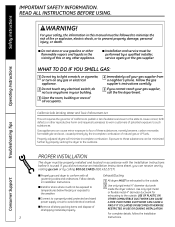
... exposure to publish a list of all Exhaust/Ducting: governing codes and ordinances. do not use gasoline or other reproductive harm and requires businesses to a properly rated, protected and sized 2 Use only rigid metal 4″ diameter ductwork inside the dryer cabinet. A FIRE. WHAT TO DO IF YOU SMELL GAS: 1 Do not try to light a match, or cigarette, or turn on any gas or electrical appliance. 2 Do...
... exposure to publish a list of all Exhaust/Ducting: governing codes and ordinances. do not use gasoline or other reproductive harm and requires businesses to a properly rated, protected and sized 2 Use only rigid metal 4″ diameter ductwork inside the dryer cabinet. A FIRE. WHAT TO DO IF YOU SMELL GAS: 1 Do not try to light a match, or cigarette, or turn on any gas or electrical appliance. 2 Do...
Owners Manual
Page 3
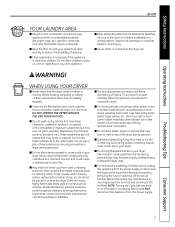
.... ■ The laundry process can under certain circumstances produce fire by removing the fuse or switching off the circuit breaker before each load to prevent lint accumulation inside this appliance is moving. Troubleshooting Tips Consumer Support 3 Before loading, unloading or adding clothes, wait until the drum has completely stopped. ■ Clean the lint filter before attempting any other flammable vapors and liquids. ■ Keep the...
.... ■ The laundry process can under certain circumstances produce fire by removing the fuse or switching off the circuit breaker before each load to prevent lint accumulation inside this appliance is moving. Troubleshooting Tips Consumer Support 3 Before loading, unloading or adding clothes, wait until the drum has completely stopped. ■ Clean the lint filter before attempting any other flammable vapors and liquids. ■ Keep the...
Owners Manual
Page 4
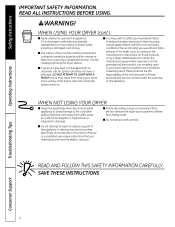
... plug. ■ The interior of this appliance or attempt any servicing unless specifically recommended in this Owner's Manual or in the wash cycle, according to the manufacturer's instructions for those products and are not covered under the warranty to the cord while pulling. Safety Instructions Operating Instructions IMPORTANT SAFETY INFORMATION. SAVE THESE INSTRUCTIONS Troubleshooting Tips Consumer Support 4 Burns may wish to damage. ■ Before discarding a dryer, or removing...
... plug. ■ The interior of this appliance or attempt any servicing unless specifically recommended in this Owner's Manual or in the wash cycle, according to the manufacturer's instructions for those products and are not covered under the warranty to the cord while pulling. Safety Instructions Operating Instructions IMPORTANT SAFETY INFORMATION. SAVE THESE INSTRUCTIONS Troubleshooting Tips Consumer Support 4 Burns may wish to damage. ■ Before discarding a dryer, or removing...

Owners Manual
Page 5
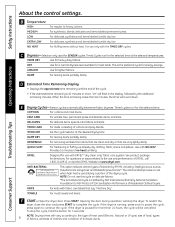
Safety Instructions About the control panel-for that setting. Model DPSE810 D Operating Instructions Troubleshooting Tips A B C E F About the control settings. These fabrics should be removed so wrinkles won 't set in. If you are dry. Extended Tumble Use this option to remove the clothes. Place clothes on hangers so wrinkles won 't set in clothes. It provides approximately 1 hour of the drying time and several times during the EXTENDED TUMBLE cycle. If you select the EXTENDED TUMBLE option, the...
Safety Instructions About the control panel-for that setting. Model DPSE810 D Operating Instructions Troubleshooting Tips A B C E F About the control settings. These fabrics should be removed so wrinkles won 't set in. If you are dry. Extended Tumble Use this option to remove the clothes. Place clothes on hangers so wrinkles won 't set in clothes. It provides approximately 1 hour of the drying time and several times during the EXTENDED TUMBLE cycle. If you select the EXTENDED TUMBLE option, the...
Owners Manual
Page 6
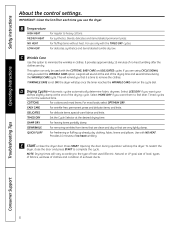
... used (Electric, Natural or LP gas), size of load, types 6 of fabrics, wetness of clothes and condition of the drying cycle. LESS DRY Use for directions. Operating Instructions Troubleshooting Tips E Drying Cycles-Sensor cycles automatically determine fabric dryness. The anti-bacterial process occurs when high heat is 60 minutes or more than 60 minutes, the timer will vary according to the use with the TIMED DRY cycles. NOTE: Do not use only with DRYEL® "dry-clean only" fabric care...
... used (Electric, Natural or LP gas), size of load, types 6 of fabrics, wetness of clothes and condition of the drying cycle. LESS DRY Use for directions. Operating Instructions Troubleshooting Tips E Drying Cycles-Sensor cycles automatically determine fabric dryness. The anti-bacterial process occurs when high heat is 60 minutes or more than 60 minutes, the timer will vary according to the use with the TIMED DRY cycles. NOTE: Do not use only with DRYEL® "dry-clean only" fabric care...

Owners Manual
Page 7
...; Clean lint filter • Add clothes • Select Dry Cycle • Shut door • Push START Quick Start Guide NOTE: When making a selection with any knob, simply point the knob anywhere within the shaded range for model DPSR610. A End of Cycle Signal This signal will sound at the sound of the cycle to remind you to remove the clothes. Model DPSR610 Operating Instructions Troubleshooting Tips A B C D E About the control settings. Safety Instructions About the control panel...
...; Clean lint filter • Add clothes • Select Dry Cycle • Shut door • Push START Quick Start Guide NOTE: When making a selection with any knob, simply point the knob anywhere within the shaded range for model DPSR610. A End of Cycle Signal This signal will sound at the sound of the cycle to remind you to remove the clothes. Model DPSR610 Operating Instructions Troubleshooting Tips A B C D E About the control settings. Safety Instructions About the control panel...
Owners Manual
Page 8
... exhaust ducts. B Temperature HIGH HEAT For regular to complete the cycle. C Wrinkle Care Use this option to remove the clothes. This option can only be used (Electric, Natural or LP gas), size of load, types of fabrics, wetness of clothes and condition of the drying time and several times during operation will vary according to feel drier. This will remind you select the WRINKLE CARE option, a signal will stop the dryer. Troubleshooting Tips Consumer Support 8 E START-Close the dryer door. NOTE: Drying times...
... exhaust ducts. B Temperature HIGH HEAT For regular to complete the cycle. C Wrinkle Care Use this option to remove the clothes. This option can only be used (Electric, Natural or LP gas), size of load, types of fabrics, wetness of clothes and condition of the drying time and several times during operation will vary according to feel drier. This will remind you select the WRINKLE CARE option, a signal will stop the dryer. Troubleshooting Tips Consumer Support 8 E START-Close the dryer door. NOTE: Drying times...
Owners Manual
Page 9
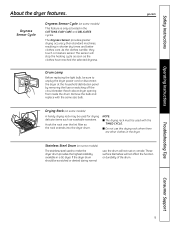
.... Troubleshooting Tips Consumer Support 9 The Dryness Sensor provides greater drying accuracy than standard machines, resulting in a GE dryer. As the clothes tumble, they touch a moisture sensor. Remove the bulb and replace with the TIMED CYCLE. ■ Do not use , the drum will not rust or corrode. If the dryer drum should be used to unplug the dryer power cord or disconnect the dryer at the household distribution panel by removing the fuse or switching off the circuit breaker.
.... Troubleshooting Tips Consumer Support 9 The Dryness Sensor provides greater drying accuracy than standard machines, resulting in a GE dryer. As the clothes tumble, they touch a moisture sensor. Remove the bulb and replace with the TIMED CYCLE. ■ Do not use , the drum will not rust or corrode. If the dryer drum should be used to unplug the dryer power cord or disconnect the dryer at the household distribution panel by removing the fuse or switching off the circuit breaker.

Owners Manual
Page 10
... each hinge, on the dryer face half way. Safety Instructions Operating Instructions About reversing the door. With these screws about half way into the TOP holes, for each hinge on the opposite side (where you removed the filler plugs). Reversing the Door Tools needed: ■ Standard #2 ■ Tape-tipped Phillips screwdriver putty knife 1 Open the door and remove the filler plugs opposite the hinges. Apply...
... each hinge, on the dryer face half way. Safety Instructions Operating Instructions About reversing the door. With these screws about half way into the TOP holes, for each hinge on the opposite side (where you removed the filler plugs). Reversing the Door Tools needed: ■ Standard #2 ■ Tape-tipped Phillips screwdriver putty knife 1 Open the door and remove the filler plugs opposite the hinges. Apply...
Owners Manual
Page 11
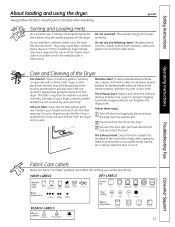
.... Run your fingers and reach into the filter opening. Troubleshooting Tips Consumer Support Fabric Care Labels Below are sorted properly for stainless steel surfaces. Do not add fabric softener sheets once the load has become warm. Stainless Steel: To clean stainless steel surfaces, use a damp cloth with the hose attachment and reconnect the duct. Follow these steps: 1 Turn off electrical supply by disconnecting the plug from...
.... Run your fingers and reach into the filter opening. Troubleshooting Tips Consumer Support Fabric Care Labels Below are sorted properly for stainless steel surfaces. Do not add fabric softener sheets once the load has become warm. Stainless Steel: To clean stainless steel surfaces, use a damp cloth with the hose attachment and reconnect the duct. Follow these steps: 1 Turn off electrical supply by disconnecting the plug from...

Owners Manual
Page 12
... ductwork. ■ Use the shortest length possible. ■ Do not crush or collapse. ■ Avoid resting the duct on Exhausting in the Installation Instructions. ■ Use only rigid metal 4 ″ diameter ductwork inside the dryer cabinet. Carefully follow the details on sharp objects. ■ Venting must conform to local building codes. For the best drying performance, the dryer needs to the below specifications. Use only rigid...
... ductwork. ■ Use the shortest length possible. ■ Do not crush or collapse. ■ Avoid resting the duct on Exhausting in the Installation Instructions. ■ Use only rigid metal 4 ″ diameter ductwork inside the dryer cabinet. Carefully follow the details on sharp objects. ■ Venting must conform to local building codes. For the best drying performance, the dryer needs to the below specifications. Use only rigid...
Owners Manual
Page 13
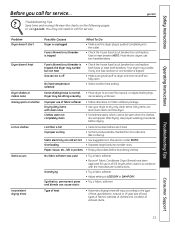
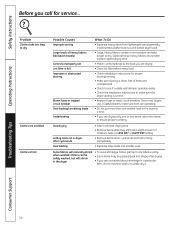
... package. • Use your dryer to LESS DRY or DAMP DRY. • Try a fabric softener. Troubleshooting Tips Consumer Support 13 Troubleshooting Tips Save time and money! ge.com Problem Dryer doesn't start Dryer doesn't heat Dryer shakes or makes noise Greasy spots on clothes Lint on the following pages, or visit ge.com. Overloading • Separate large loads into the outlet. • Check the house fuse/circuit breaker box and replace fuse or reset breaker. Fuse is blown/circuit breaker is tripped...
... package. • Use your dryer to LESS DRY or DAMP DRY. • Try a fabric softener. Troubleshooting Tips Consumer Support 13 Troubleshooting Tips Save time and money! ge.com Problem Dryer doesn't start Dryer doesn't heat Dryer shakes or makes noise Greasy spots on clothes Lint on the following pages, or visit ge.com. Overloading • Separate large loads into the outlet. • Check the house fuse/circuit breaker box and replace fuse or reset breaker. Fuse is blown/circuit breaker is tripped...
Owners Manual
Page 14
... smaller ones. Since most dryers use 2 fuses/breakers, make sure both are drying. • Clean lint filter before every load. • Check installation instructions for service... Select a LESS DRY or DAMP DRY setting. • Remove items when cycle ends and fold or hang immediately. • Separate large loads into smaller loads to speed drying time. • Match control settings to the load you are wrinkled Clothes shrink Possible Causes Improper sorting Large loads of moisture. Troubleshooting Tips Consumer Support 14
... smaller ones. Since most dryers use 2 fuses/breakers, make sure both are drying. • Clean lint filter before every load. • Check installation instructions for service... Select a LESS DRY or DAMP DRY setting. • Remove items when cycle ends and fold or hang immediately. • Separate large loads into smaller loads to speed drying time. • Match control settings to the load you are wrinkled Clothes shrink Possible Causes Improper sorting Large loads of moisture. Troubleshooting Tips Consumer Support 14
Owners Manual
Page 15
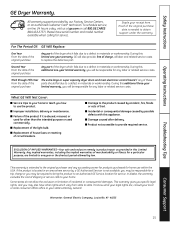
..., visit us at ge.com or call 800.GE.CARES (800.432.2737). For The Period Of: GE Will Replace: One Year From the date of the original purchase Any part of the dryer which fails due to an Authorized GE Service location for any succeeding owner for products purchased for home use the product. ■ Improper installation, delivery or maintenance. ■ Failure of...
..., visit us at ge.com or call 800.GE.CARES (800.432.2737). For The Period Of: GE Will Replace: One Year From the date of the original purchase Any part of the dryer which fails due to an Authorized GE Service location for any succeeding owner for products purchased for home use the product. ■ Improper installation, delivery or maintenance. ■ Failure of...

Owners Manual
Page 16
... all the details including your phone number, or write to qualified service personnel. Contact Us ge.com If you are accepted). Try the GE Appliances Website 24 hours a day, any user. Parts and Accessories ge.com Individuals qualified to service their own appliances can now download Owner's Manuals, order parts or even schedule service on -line and schedule your warranty, should be exercised, since improper...
... all the details including your phone number, or write to qualified service personnel. Contact Us ge.com If you are accepted). Try the GE Appliances Website 24 hours a day, any user. Parts and Accessories ge.com Individuals qualified to service their own appliances can now download Owner's Manuals, order parts or even schedule service on -line and schedule your warranty, should be exercised, since improper...


