Owners Manual
Page 1
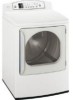
....com Safety Instructions 2-5 Operating Instructions Controls 6-8 Cycle Options 9-10 Dryer Features 11 Loading and Using the Dryer 12, 13 Installation Instructions Before You Begin 14-16 Connecting a Gas Dryer 17-20 Connecting an Electric Dryer 21-23 Exhausting the Dryer 24-28 Final Setup 29, 30 Reversing the Door Swing . . . . . .31, 32 Troubleshooting Tips 33 Consumer... Instructions DPGT650 UPGT650 Printed in Korea Write the model and serial numbers here: Model Serial They are on the label on the front of the dryer behind the door. 175D1807P640 49-90378 04-09 JR
....com Safety Instructions 2-5 Operating Instructions Controls 6-8 Cycle Options 9-10 Dryer Features 11 Loading and Using the Dryer 12, 13 Installation Instructions Before You Begin 14-16 Connecting a Gas Dryer 17-20 Connecting an Electric Dryer 21-23 Exhausting the Dryer 24-28 Final Setup 29, 30 Reversing the Door Swing . . . . . .31, 32 Troubleshooting Tips 33 Consumer... Instructions DPGT650 UPGT650 Printed in Korea Write the model and serial numbers here: Model Serial They are on the label on the front of the dryer behind the door. 175D1807P640 49-90378 04-09 JR

Owners Manual
Page 2
... GAS: 1 Do not try to prevent property damage, personal injury, or death. ■ Do not store or use any electrical switch; Properly adjusted dryers will minimize incomplete combustion. Exposure to these substances, namely benzene, carbon monoxide, formaldehyde and soot, caused primarily by properly venting the...vapors and liquids in this manual must be followed to minimize the risk of fire or explosion, electric shock, or to light a match, or cigarette, or turn on any gas or electrical appliance. 2 Do not touch any phone in your gas supplier from a neighbor's phone. ...
... GAS: 1 Do not try to prevent property damage, personal injury, or death. ■ Do not store or use any electrical switch; Properly adjusted dryers will minimize incomplete combustion. Exposure to these substances, namely benzene, carbon monoxide, formaldehyde and soot, caused primarily by properly venting the...vapors and liquids in this manual must be followed to minimize the risk of fire or explosion, electric shock, or to light a match, or cigarette, or turn on any gas or electrical appliance. 2 Do not touch any phone in your gas supplier from a neighbor's phone. ...
Owners Manual
Page 3
...not receive an Installation Instructions sheet, you can receive one by visiting GEAppliances.com, or by calling 800.GE.CARES (800.432.2737). ■ Properly ground dryer to the dryer. For complete details, follow the Installation Instructions. Follow details in accordance with all shipping materials properly. ...from being blown into the room. 2 Use only rigid metal or flexible metal 4″ diameter ductwork inside the dryer cabinet or for exhausting to avoid electrical overload. ■ Remove the colored protective film from both the control panel and the door. ■ Remove all...
...not receive an Installation Instructions sheet, you can receive one by visiting GEAppliances.com, or by calling 800.GE.CARES (800.432.2737). ■ Properly ground dryer to the dryer. For complete details, follow the Installation Instructions. Follow details in accordance with all shipping materials properly. ...from being blown into the room. 2 Use only rigid metal or flexible metal 4″ diameter ductwork inside the dryer cabinet or for exhausting to avoid electrical overload. ■ Remove the colored protective film from both the control panel and the door. ■ Remove all...

Owners Manual
Page 4
... to catch fire. ■ Any article on which may burn or melt on the dryer top. Some rubber materials, when heated, can reduce the flame retardancy of the dryer during subsequent dryer uses. ■ To minimize the possibility of electric shock, unplug this or any maintenance or cleaning (except the removal and cleaning of...
... to catch fire. ■ Any article on which may burn or melt on the dryer top. Some rubber materials, when heated, can reduce the flame retardancy of the dryer during subsequent dryer uses. ■ To minimize the possibility of electric shock, unplug this or any maintenance or cleaning (except the removal and cleaning of...
Owners Manual
Page 5
...use of these products are not covered under the warranty to this appliance to avoid damage to the cord while pulling. WHEN NOT USING YOUR DRYER ■ Grasp the plug firmly when disconnecting this appliance. READ AND FOLLOW THIS SAFETY INFORMATION CAREFULLY. DO NOT ATTEMPT TO LIGHT WITH A... MATCH. Burns may wish to soften your laundered fabrics or reduce the static electricity in your hand in the vicinity of this appliance or attempt any servicing unless specifically recommended in this Owner's Manual or in published user...
...use of these products are not covered under the warranty to this appliance to avoid damage to the cord while pulling. WHEN NOT USING YOUR DRYER ■ Grasp the plug firmly when disconnecting this appliance. READ AND FOLLOW THIS SAFETY INFORMATION CAREFULLY. DO NOT ATTEMPT TO LIGHT WITH A... MATCH. Burns may wish to soften your laundered fabrics or reduce the static electricity in your hand in the vicinity of this appliance or attempt any servicing unless specifically recommended in this Owner's Manual or in published user...
Owners Manual
Page 6
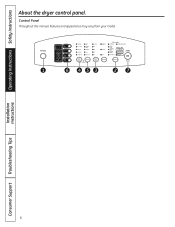
Control Panel Throughout this manual, features and appearance may vary from your model. 1 6 453 27 Installation Instructions Consumer Support Troubleshooting Tips 6 Operating Instructions Safety Instructions About the dryer control panel.
Control Panel Throughout this manual, features and appearance may vary from your model. 1 6 453 27 Installation Instructions Consumer Support Troubleshooting Tips 6 Operating Instructions Safety Instructions About the dryer control panel.

Owners Manual
Page 7
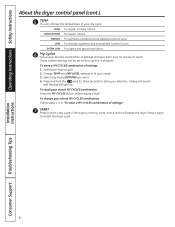
...cycle for small loads. To use , create or modify custom dry cycles. 3 Time Dry Use to set your selected dry level, the dryer will help you want is also recommended for energy saving. This is not recommended for heavy or mixed type of the drying process. Press the...pressing the TEMP button. 3. When the moisture in a hurry, such as Spandex. My Cycles (on some models) MY CYCLES Press to put the dryer in the load. If the display is active, press to use TIME DRY: 1. Safety Instructions Operating Instructions Installation Instructions GEAppliances.com 1 Power Press to...
...cycle for small loads. To use , create or modify custom dry cycles. 3 Time Dry Use to set your selected dry level, the dryer will help you want is also recommended for energy saving. This is not recommended for heavy or mixed type of the drying process. Press the...pressing the TEMP button. 3. When the moisture in a hurry, such as Spandex. My Cycles (on some models) MY CYCLES Press to put the dryer in the load. If the display is active, press to use TIME DRY: 1. Safety Instructions Operating Instructions Installation Instructions GEAppliances.com 1 Power Press to...
Owners Manual
Page 8
...For delicates, synthetics and items labeled Tumble Dry Low. EXTRA LOW For lingerie and special-care fabrics. 6 My Cycles Set up . If the dryer is in "To store a MY CYCLES combination of your dry cycle. Select your selection. To change the temperature of settings." 7 START Press... to start a dry cycle. A beep will sound and the pad will pause the dryer. Operating Instructions Safety Instructions Installation Instructions About the dryer control panel (cont.). 5 TEMP You can be set while a cycle is running, press it once and it again...
...For delicates, synthetics and items labeled Tumble Dry Low. EXTRA LOW For lingerie and special-care fabrics. 6 My Cycles Set up . If the dryer is in "To store a MY CYCLES combination of your dry cycle. Select your selection. To change the temperature of settings." 7 START Press... to start a dry cycle. A beep will sound and the pad will pause the dryer. Operating Instructions Safety Instructions Installation Instructions About the dryer control panel (cont.). 5 TEMP You can be set while a cycle is running, press it once and it again...
Owners Manual
Page 9
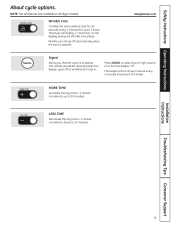
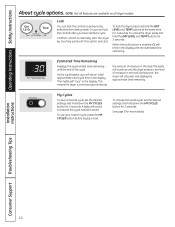
... door is complete. Wrinkle Care Tumbles the drum without heat for 10 seconds every 5 minutes for up to sound every 2 minutes (maximum of 4 times). The dryer will continue to 99 minutes. MORE TIME Increases the dry time in . Wrinkle care shuts off . The clothes should be removed when the beeper goes... off so wrinkles don't set in 1-minute increments, up to 10 minutes. Installation Instructions Troubleshooting Tips Consumer Support 9 NOTE: Not all dryer models. GEAppliances.com Signal Alerts you that the cycle is opened.
... door is complete. Wrinkle Care Tumbles the drum without heat for 10 seconds every 5 minutes for up to sound every 2 minutes (maximum of 4 times). The dryer will continue to 99 minutes. MORE TIME Increases the dry time in . Wrinkle care shuts off . The clothes should be removed when the beeper goes... off so wrinkles don't set in 1-minute increments, up to 10 minutes. Installation Instructions Troubleshooting Tips Consumer Support 9 NOTE: Not all dryer models. GEAppliances.com Signal Alerts you that the cycle is opened.
Owners Manual
Page 10
...hold the DRY LEVEL and TEMP buttons at the same time for 3 seconds. To unlock the dryer, press and hold down the MY CYCLES button for more details. This means the dryer is enabled, CL will continue until the end of the cycle. Then lights will see an ... cycle time in the display with this option selected. See page 8 for 3 seconds. Estimated Time Remaining Displays the approximate time remaining until the dryer senses a low level of moisture in the load. A beep will calculate and display the approximate time remaining. Operating Instructions Safety Instructions About cycle ...
...hold the DRY LEVEL and TEMP buttons at the same time for 3 seconds. To unlock the dryer, press and hold down the MY CYCLES button for more details. This means the dryer is enabled, CL will continue until the end of the cycle. Then lights will see an ... cycle time in the display with this option selected. See page 8 for 3 seconds. Estimated Time Remaining Displays the approximate time remaining until the dryer senses a low level of moisture in the load. A beep will calculate and display the approximate time remaining. Operating Instructions Safety Instructions About cycle ...

Owners Manual
Page 11
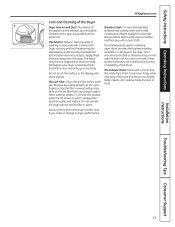
...panel by removing the fuse or switching off the circuit breaker. Using the Drying Rack A handy drying rack may be sure to unplug the dryer power cord or disconnect the dryer at the top left of the door frame. 1 Remove the screw holding the drum lamp shield in the... dryer. Safety Instructions Operating Instructions Dryer features. GEAppliances.com Installation Instructions Troubleshooting Tips Consumer Support 11 The drum lamp is also strongly recommended when drying sneakers. • Do not use...
...panel by removing the fuse or switching off the circuit breaker. Using the Drying Rack A handy drying rack may be sure to unplug the dryer power cord or disconnect the dryer at the top left of the door frame. 1 Remove the screw holding the drum lamp shield in the... dryer. Safety Instructions Operating Instructions Dryer features. GEAppliances.com Installation Instructions Troubleshooting Tips Consumer Support 11 The drum lamp is also strongly recommended when drying sneakers. • Do not use...
Owners Manual
Page 12
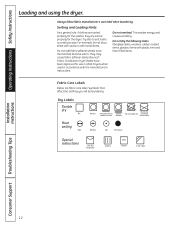
... dry Dry Heat setting High Normal Permanent Press/ Gentle/ wrinkle resistant delicate Do not dry Do not tumble dry (used in all GE Dryers when used with the manufacturer's instructions. Always follow fabric manufacturer's care label when laundering. Do not overload. They may cause fabric ...Line dry/ hang to size. Operating Instructions Safety Instructions Loading and using the dryer. This wastes energy and causes wrinkling. Bounce® Fabric Conditioner Dryer Sheets have been approved for the dryer. Try also to sort items according to dry Drip dry Dry flat In ...
... dry Dry Heat setting High Normal Permanent Press/ Gentle/ wrinkle resistant delicate Do not dry Do not tumble dry (used in all GE Dryers when used with the manufacturer's instructions. Always follow fabric manufacturer's care label when laundering. Do not overload. They may cause fabric ...Line dry/ hang to size. Operating Instructions Safety Instructions Loading and using the dryer. This wastes energy and causes wrinkling. Bounce® Fabric Conditioner Dryer Sheets have been approved for the dryer. Try also to sort items according to dry Drip dry Dry flat In ...
Owners Manual
Page 13
To remove this buildup, wash the lint screen in a GE dryer. These surface blemishes will not rust or corrode. Run your fingers across the filter...dry with a damp cloth. A waxy buildup may form on the lint filter from the dryer. Dryer control panel and finishes may then be washed and dried normally. Dry thoroughly and replace. The stainless steel used...notice a change in place. Safety Instructions Operating Instructions GEAppliances.com Care and Cleaning of the Dryer Dryer Interior and Duct: The interior of the appliance and exhaust duct should be scratched or dented...
To remove this buildup, wash the lint screen in a GE dryer. These surface blemishes will not rust or corrode. Run your fingers across the filter...dry with a damp cloth. A waxy buildup may form on the lint filter from the dryer. Dryer control panel and finishes may then be washed and dried normally. Dry thoroughly and replace. The stainless steel used...notice a change in place. Safety Instructions Operating Instructions GEAppliances.com Care and Cleaning of the Dryer Dryer Interior and Duct: The interior of the appliance and exhaust duct should be scratched or dented...
Owners Manual
Page 14
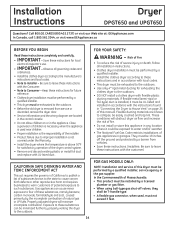
...must be T-handle-type. • A flexible gas connector, when used near children. • Proper installation is above 50°F for local electrical inspector's use. • IMPORTANT - FOR YOUR SAFETY: WARNING - Close supervision of natural gas or LP fuels. Flexible ducting materials are located in ...; Do not allow children on page 25 of fire. • Do not install or store this dryer must not exceed 3 feet. 14 Installation Instructions Dryer DPGT650 and UPGT650 Questions? Call 800.GE.CARES (800.432.2737) or visit our Web site at: GEAppliances.com In Canada, call 1.800...
...must be T-handle-type. • A flexible gas connector, when used near children. • Proper installation is above 50°F for local electrical inspector's use. • IMPORTANT - FOR YOUR SAFETY: WARNING - Close supervision of natural gas or LP fuels. Flexible ducting materials are located in ...; Do not allow children on page 25 of fire. • Do not install or store this dryer must not exceed 3 feet. 14 Installation Instructions Dryer DPGT650 and UPGT650 Questions? Call 800.GE.CARES (800.432.2737) or visit our Web site at: GEAppliances.com In Canada, call 1.800...

Owners Manual
Page 15
... and remove the foam shipping pads by pulling at the sides and breaking them away from the dryer legs. LOCATION OF YOUR DRYER IMPORTANT: Gas dryers are : • 0 inch clearance both sides • 1 inch front • 3 inches rear Consideration must be given to remove all of the ... the bag containing the drying rack, literature and serial cable. Be sure to provide adequate clearance for mobile home installation. DRYER DIMENSIONS Front View 437⁄ 8″ (111.4 cm) Side View 27″ (68.6 cm) 351⁄ 2″ (90.2 cm) 371⁄ 4″ (94.6 cm) 51″ (129.5 cm...
... and remove the foam shipping pads by pulling at the sides and breaking them away from the dryer legs. LOCATION OF YOUR DRYER IMPORTANT: Gas dryers are : • 0 inch clearance both sides • 1 inch front • 3 inches rear Consideration must be given to remove all of the ... the bag containing the drying rack, literature and serial cable. Be sure to provide adequate clearance for mobile home installation. DRYER DIMENSIONS Front View 437⁄ 8″ (111.4 cm) Side View 27″ (68.6 cm) 351⁄ 2″ (90.2 cm) 371⁄ 4″ (94.6 cm) 51″ (129.5 cm...

Owners Manual
Page 16
...floor to overhead shelves, cabinets, ceilings, etc., is approved for gas dryers). 16 BATHROOM OR BEDROOM INSTALLATION • The dryer MUST be installed in the same closet with the NATIONAL ELECTRICAL CODE, ANSI/NFPA NO. 70 (for electric dryers) or NATIONAL FUEL GAS CODE, ANSI Z223 (for installation in an... alcove or closet, as stated on a label on the dryer back. • The dryer MUST be vented to the outdoors. See the...
...floor to overhead shelves, cabinets, ceilings, etc., is approved for gas dryers). 16 BATHROOM OR BEDROOM INSTALLATION • The dryer MUST be installed in the same closet with the NATIONAL ELECTRICAL CODE, ANSI/NFPA NO. 70 (for electric dryers) or NATIONAL FUEL GAS CODE, ANSI Z223 (for installation in an... alcove or closet, as stated on a label on the dryer back. • The dryer MUST be vented to the outdoors. See the...

Owners Manual
Page 17
... YOUR SAFETY: WARNING Before beginning the installation, turn off the circuit breaker(s) or remove the dryer's circuit fuse(s) at the electrical box. or straight-blade screwdriver (may be needed for electric dryers) TOOLS AND MATERIALS YOU WILL NEED FOR CONNECTING THE GAS SUPPLY ❒ Flat- Be sure... the dryer cord is unplugged from the wall. ❒ Open-end wrenches for flexible tube and connector ❒ Adjustable pliers (to...
... YOUR SAFETY: WARNING Before beginning the installation, turn off the circuit breaker(s) or remove the dryer's circuit fuse(s) at the electrical box. or straight-blade screwdriver (may be needed for electric dryers) TOOLS AND MATERIALS YOU WILL NEED FOR CONNECTING THE GAS SUPPLY ❒ Flat- Be sure... the dryer cord is unplugged from the wall. ❒ Open-end wrenches for flexible tube and connector ❒ Adjustable pliers (to...
Owners Manual
Page 18
..., your local gas utility should be 1/2″ rigid pipe and equipped with natural gas. Contact your local service organization can convert this dryer for use with propane (LP) gas. IN THE COMMONWEALTH OF MASSACHUSETTS • This product must be installed by closing the equipment shut-...at elevations above sea level. • Installation must conform to local codes and ordinances or, in excess of 0.5 PSI (3.4 KPa). • The dryer must be the T-handle type. • A flexible gas connector, when used, must be disconnected from the gas supply piping system by a licensed ...
..., your local gas utility should be 1/2″ rigid pipe and equipped with natural gas. Contact your local service organization can convert this dryer for use with propane (LP) gas. IN THE COMMONWEALTH OF MASSACHUSETTS • This product must be installed by closing the equipment shut-...at elevations above sea level. • Installation must conform to local codes and ordinances or, in excess of 0.5 PSI (3.4 KPa). • The dryer must be the T-handle type. • A flexible gas connector, when used, must be disconnected from the gas supply piping system by a licensed ...

Owners Manual
Page 19
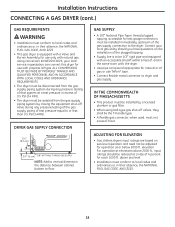
.... Plugged Tapping Apply Pipe Compound B Attach the flexible metal gas line connector to all connections using two adjustable wrenches. Adapter Elbow Dryer Gas Inlet CONNECTING THE DRYER TO THE GAS SUPPLY (cont.) D Install a 1/8″ NPT plugged tapping to prevent twisting the inlet. NOTE: Apply pipe compound... or Teflon® tape to the threads of the dryer gas inlet to the dryer gas line shut-off Valve E Tighten all male threads. Apply pipe compound or Teflon® tape to the adapter. Shut-off...
.... Plugged Tapping Apply Pipe Compound B Attach the flexible metal gas line connector to all connections using two adjustable wrenches. Adapter Elbow Dryer Gas Inlet CONNECTING THE DRYER TO THE GAS SUPPLY (cont.) D Install a 1/8″ NPT plugged tapping to prevent twisting the inlet. NOTE: Apply pipe compound... or Teflon® tape to the threads of the dryer gas inlet to the dryer gas line shut-off Valve E Tighten all male threads. Apply pipe compound or Teflon® tape to the adapter. Shut-off...

Owners Manual
Page 20
... solution or equivalent. Never use . Open Gas Valve ELECTRICAL CONNECTION INFORMATION FOR GAS DRYERS WARNING - The leak test solution must be electrically grounded in the absence of the dryer, and to the brass fittings. This dryer is recommended that a licensed electrician install an approved outlet...attaching to test for your protection against shock hazard and should be added by a 15- Ground Screw 20 ELECTRICAL REQUIREMENTS FOR GAS DRYERS This appliance must not contain ammonia, which meets local codes, may be plugged directly into a properly grounded three-prong ...
... solution or equivalent. Never use . Open Gas Valve ELECTRICAL CONNECTION INFORMATION FOR GAS DRYERS WARNING - The leak test solution must be electrically grounded in the absence of the dryer, and to the brass fittings. This dryer is recommended that a licensed electrician install an approved outlet...attaching to test for your protection against shock hazard and should be added by a 15- Ground Screw 20 ELECTRICAL REQUIREMENTS FOR GAS DRYERS This appliance must not contain ammonia, which meets local codes, may be plugged directly into a properly grounded three-prong ...


