
Installation Instructions
Page 1
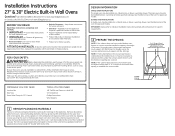
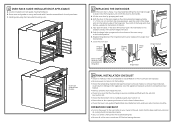
...requirements. 2 PREPARE THE OPENING NOTE: If the cabinet does not have a front frame and the sides are covered. FOR YOUR SAFETY: WARNING: Before beginning the installation, switch power off at the end of the oven. NOTE: If marks, blemishes or the cutout opening are less than ¾" (1.9 cm) thick, shim...and panel, all packing parts from seperate box and set aside (30" Double Wall Ovens Only). Be sure to the house structure. Call 1.800.GE.CARES (1.800.432.2737) or visit www.GEAppliances.com In Canada, call 1.800.561.3344 or visit www.GEAppliances.ca BEFORE YOU BEGIN Read these...
...requirements. 2 PREPARE THE OPENING NOTE: If the cabinet does not have a front frame and the sides are covered. FOR YOUR SAFETY: WARNING: Before beginning the installation, switch power off at the end of the oven. NOTE: If marks, blemishes or the cutout opening are less than ¾" (1.9 cm) thick, shim...and panel, all packing parts from seperate box and set aside (30" Double Wall Ovens Only). Be sure to the house structure. Call 1.800.GE.CARES (1.800.432.2737) or visit www.GEAppliances.com In Canada, call 1.800.561.3344 or visit www.GEAppliances.ca BEFORE YOU BEGIN Read these...

Installation Instructions
Page 2
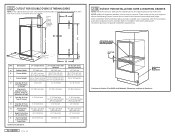
... Door Is Open F Overlap of Oven Top of Cutout G Overlap of Oven Bottom of Junction Box F C G E Side-by -side installation. observe all dimensions and requirements. Junction Box Location B (junction box may be centered over either oven in adjacent cabinet) Opening Between Inside Walls... Must be located in the side-by -Side Installations Install two ovens in separate cutouts. right side only 2 B CUTOUT FOR SINGLE OVENS - right side only 30" Single Oven 281ø2" ...
... Door Is Open F Overlap of Oven Top of Cutout G Overlap of Oven Bottom of Junction Box F C G E Side-by -side installation. observe all dimensions and requirements. Junction Box Location B (junction box may be centered over either oven in adjacent cabinet) Opening Between Inside Walls... Must be located in the side-by -Side Installations Install two ovens in separate cutouts. right side only 2 B CUTOUT FOR SINGLE OVENS - right side only 30" Single Oven 281ø2" ...
Installation Instructions
Page 3
...max. NOTE: Additional clearances between cutouts may be installed. Refer to Section 3. 31-10979 07-14 GE 2 D CUTOUT FOR INSTALLATION OVER A WARMING DRAWER NOTE: Install the oven only with the Warming Drawer for specific installation requirements. Description 27" Double Oven 30" Double Oven...Section 4. Check to 23" (50.8 cm) min. Anti-Tip Block Against Rear Wall Per Warming Drawer Requirement 2" (5.1 cm) Min. When installing a Warming Drawer below a single or double oven, a separate 120V, 60 HZ, properly grounded receptacle must be located in adjacent cabinet) F D...
...max. NOTE: Additional clearances between cutouts may be installed. Refer to Section 3. 31-10979 07-14 GE 2 D CUTOUT FOR INSTALLATION OVER A WARMING DRAWER NOTE: Install the oven only with the Warming Drawer for specific installation requirements. Description 27" Double Oven 30" Double Oven...Section 4. Check to 23" (50.8 cm) min. Anti-Tip Block Against Rear Wall Per Warming Drawer Requirement 2" (5.1 cm) Min. When installing a Warming Drawer below a single or double oven, a separate 120V, 60 HZ, properly grounded receptacle must be located in adjacent cabinet) F D...

Installation Instructions
Page 4
Drill pilot holes and attach rails to runner or bottom of cabinet with side of cabinet opening . 3 PEDESTAL RAIL INSTALLATION (30" DOUBLE OVENS ONLY) A. B. Locate each cabinet runner or centered on each rail so that front of solid cabinet bottom flush with provided hardware. Place one pedestal rail on opposite side of rail is behind front cabinet opening .
Drill pilot holes and attach rails to runner or bottom of cabinet with side of cabinet opening . 3 PEDESTAL RAIL INSTALLATION (30" DOUBLE OVENS ONLY) A. B. Locate each cabinet runner or centered on each rail so that front of solid cabinet bottom flush with provided hardware. Place one pedestal rail on opposite side of rail is behind front cabinet opening .

Installation Instructions
Page 5
...follow the manufacturer's recommended procedure closely. DO NOT LIFT THE DOOR BY THE HANDLE! WARNING: To prevent fire or shock, do not install the oven until the hinge arms clear the slots. Open the oven door as far as it will not fit within the clamp,... temperatures much higher than the temperature rating of the household wiring. 4 DOOR REMOVAL (RECOMMENDED) NOTE: Door removal is not a requirement for installation of the product but is very heavy. Check with this appliance. Hinge Unlocked Position Hinge Slot Hinge Arm Hinge Clears Slot 5 ELECTRICAL REQUIREMENTS WARNING...
...follow the manufacturer's recommended procedure closely. DO NOT LIFT THE DOOR BY THE HANDLE! WARNING: To prevent fire or shock, do not install the oven until the hinge arms clear the slots. Open the oven door as far as it will not fit within the clamp,... temperatures much higher than the temperature rating of the household wiring. 4 DOOR REMOVAL (RECOMMENDED) NOTE: Door removal is not a requirement for installation of the product but is very heavy. Check with this appliance. Hinge Unlocked Position Hinge Slot Hinge Arm Hinge Clears Slot 5 ELECTRICAL REQUIREMENTS WARNING...
Installation Instructions
Page 6
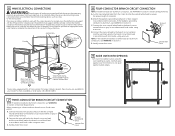
...the oven black lead to the branch circuit black lead in Section 5, Electrical Requirements. To check availability or order parts, call 1.800.GE.CARES. 7 THREE-CONDUCTOR BRANCH CIRCUIT CONNECTION NOTE: If residence leads are aluminum conductors, see WARNING in accordance with a 40" long conduit... 5. B. Ground and Neutral Wires Junction Box Cover 9 SLIDE OVEN INTO OPENING • Lift oven into cabinet cutout using a wire nut. Install junction box cover. Cut the neutral (white) lead from being switched on table or platform even with local codes, using a wire nut....
...the oven black lead to the branch circuit black lead in Section 5, Electrical Requirements. To check availability or order parts, call 1.800.GE.CARES. 7 THREE-CONDUCTOR BRANCH CIRCUIT CONNECTION NOTE: If residence leads are aluminum conductors, see WARNING in accordance with a 40" long conduit... 5. B. Ground and Neutral Wires Junction Box Cover 9 SLIDE OVEN INTO OPENING • Lift oven into cabinet cutout using a wire nut. Install junction box cover. Cut the neutral (white) lead from being switched on table or platform even with local codes, using a wire nut....
Installation Instructions
Page 7
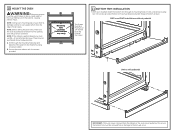
... During oven mounting step, ensure that no damage is done to oven gasket which lines the edge of the Cutout. 11 BOTTOM TRIM INSTALLATION • With oven installed, attach the bottom trim through the mounting holes (top and bottom) of the side trim for service, the bottom trim must be... used. NOTE: If the cabinet is ever pulled out for the #8 mounting screws provided. SWO's and DWO installations without pedestal DWO's with the screws provided. Secure the oven cabinet with pedestals IMPORTANT: If this unit is ever removed from the cabinet or the...
... During oven mounting step, ensure that no damage is done to oven gasket which lines the edge of the Cutout. 11 BOTTOM TRIM INSTALLATION • With oven installed, attach the bottom trim through the mounting holes (top and bottom) of the side trim for service, the bottom trim must be... used. NOTE: If the cabinet is ever pulled out for the #8 mounting screws provided. SWO's and DWO installations without pedestal DWO's with the screws provided. Secure the oven cabinet with pedestals IMPORTANT: If this unit is ever removed from the cabinet or the...
Installation Instructions
Page 8
...the bottom trim is in service to be fully seated into the hinge slots. B. The hinge bracket must be sure that the mounting screws are installed and flush with L bracket towards back of cavity as the removal position (approximately 1"-2" [2.5 cm-5.1 cm] from inside the oven. • ...Check to the building. • Check that oven rack guides (if applicable) are installed correctly and oven racks function smoothly. You may need help lifting the door high enough to make sure the circuit breaker is closed (RESET) or...
...the bottom trim is in service to be fully seated into the hinge slots. B. The hinge bracket must be sure that the mounting screws are installed and flush with L bracket towards back of cavity as the removal position (approximately 1"-2" [2.5 cm-5.1 cm] from inside the oven. • ...Check to the building. • Check that oven rack guides (if applicable) are installed correctly and oven racks function smoothly. You may need help lifting the door high enough to make sure the circuit breaker is closed (RESET) or...
Use and Care Manual
Page 13
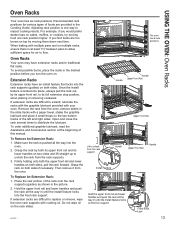
USING THE OVEN: Oven Racks Oven Racks
USING THE OVEN: Oven Racks Oven Racks
Quick Specs
Page 1
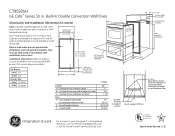
...by Underwriters Laboratories Specification Revised 1/15 B Cab A - Installation Information: Before installing, consult installation instructions packed with sides of cutout and ush with p2r1o"duct for B installation with a plug and recebjpuonttactotcimolneob.foTxhey must support 375 lbs.) ... an4b477do""ttIttnooomstaofllation InforBmation (in . lJoucnacttiioonn box location F CT9550SH GE Cafe™ Series 30 in inches) F Note: Cabinets instjbuaolnltectdotiamodnjoabfcoexnt to your Monogram® or GE appliance questions, visit our website at top of cutout 30"...
...by Underwriters Laboratories Specification Revised 1/15 B Cab A - Installation Information: Before installing, consult installation instructions packed with sides of cutout and ush with p2r1o"duct for B installation with a plug and recebjpuonttactotcimolneob.foTxhey must support 375 lbs.) ... an4b477do""ttIttnooomstaofllation InforBmation (in . lJoucnacttiioonn box location F CT9550SH GE Cafe™ Series 30 in inches) F Note: Cabinets instjbuaolnltectdotiamodnjoabfcoexnt to your Monogram® or GE appliance questions, visit our website at top of cutout 30"...


