Use and Care Manual
Page 1
...Cleaning 13-14 Replacing the Lights 14 Master Light Switches 14 About Appliance Communication . . .15 Installation Instructions Preparing to Install the Refrigerator 16-19 Installing the Refrigerator 20-24 Troubleshooting Tips 26-28 Normal Operating Conditions 25 Consumer Support MWF Performance Data ...installation Modèles 42 & 48" Manual del Propietario e Instrucciones de Instalación 42 & 48" modelos Write the model and serial numbers here: Model Serial Find these numbers on a label on the left side, near the middle of the refrigerator compartment. 49-60742-1 10-15 GE
...Cleaning 13-14 Replacing the Lights 14 Master Light Switches 14 About Appliance Communication . . .15 Installation Instructions Preparing to Install the Refrigerator 16-19 Installing the Refrigerator 20-24 Troubleshooting Tips 26-28 Normal Operating Conditions 25 Consumer Support MWF Performance Data ...installation Modèles 42 & 48" Manual del Propietario e Instrucciones de Instalación 42 & 48" modelos Write the model and serial numbers here: Model Serial Find these numbers on a label on the left side, near the middle of the refrigerator compartment. 49-60742-1 10-15 GE
Use and Care Manual
Page 2
...skin may break if exposed to shatter into many small pieces if it breaks. „ Keep fingers out of the ejector mechanism, or with the Installation Instructions before it be a UL-listed (in the United States) or a CSA certified (in Canada), 3-wire grounding type appliance extension cord having ...GECARES (800.432.2737). Do not place fingers or hands on the door handles or the shelves in the vicinity of an used. SAFETY GE Appliances website For more information on the control panel. This symbol alerts you and others. WARNING Indicates a hazardous situation which , if not...
...skin may break if exposed to shatter into many small pieces if it breaks. „ Keep fingers out of the ejector mechanism, or with the Installation Instructions before it be a UL-listed (in the United States) or a CSA certified (in Canada), 3-wire grounding type appliance extension cord having ...GECARES (800.432.2737). Do not place fingers or hands on the door handles or the shelves in the vicinity of an used. SAFETY GE Appliances website For more information on the control panel. This symbol alerts you and others. WARNING Indicates a hazardous situation which , if not...
Use and Care Manual
Page 3
.... or 20-amp fused, grounded electrical supply is equipped with a 3-prong (grounding) plug which could cause a fire hazard from overheated wires. GEAppliances.com SAFETY (CONT.) INSTALLATION WARNING Explosion Hazard. Junked or abandoned refrigerators are getting rid of an old refrigeration product, check with a standard 3-prong (grounding) wall outlet to minimize the...
.... or 20-amp fused, grounded electrical supply is equipped with a 3-prong (grounding) plug which could cause a fire hazard from overheated wires. GEAppliances.com SAFETY (CONT.) INSTALLATION WARNING Explosion Hazard. Junked or abandoned refrigerators are getting rid of an old refrigeration product, check with a standard 3-prong (grounding) wall outlet to minimize the...
Use and Care Manual
Page 4
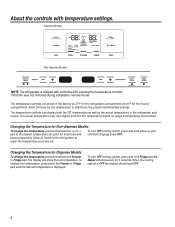
... desired temperature set . The temperature controls are preset in the refrigerator and freezer. The display will show OFF. If this film was not removed during installation, remove it now. Changing the Temperature for 3 seconds. Changing the Temperature for the freezer compartment. Dispense Models Non-dispense Models NOTE: The refrigerator is shipped...
... desired temperature set . The temperature controls are preset in the refrigerator and freezer. The display will show OFF. If this film was not removed during installation, remove it now. Changing the Temperature for 3 seconds. Changing the Temperature for the freezer compartment. Dispense Models Non-dispense Models NOTE: The refrigerator is shipped...
Use and Care Manual
Page 6
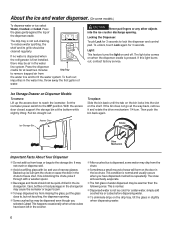
.... To replace: Slide the bin back until the tab on the drip tray, tilt the glass in the crusher. „ After crushed ice is first installed, there may not crush or dispense well. „ Avoid overfilling glass with a wooden spoon. „ Beverages and foods should be air in the chute to...
.... To replace: Slide the bin back until the tab on the drip tray, tilt the glass in the crusher. „ After crushed ice is first installed, there may not crush or dispense well. „ Avoid overfilling glass with a wooden spoon. „ Beverages and foods should be air in the chute to...
Use and Care Manual
Page 7
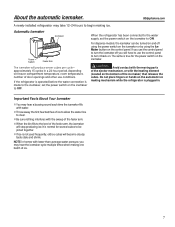
... water line to be turned on and off you may hear the icemaker cycle multiple times when making one batch of ice. 7 GEAppliances.com A newly-installed refrigerator may hear a buzzing sound each time the icemaker fills with water. „ Throw away the first few batches of the feeler arm, the icemaker...
... water line to be turned on and off you may hear the icemaker cycle multiple times when making one batch of ice. 7 GEAppliances.com A newly-installed refrigerator may hear a buzzing sound each time the icemaker fills with water. „ Throw away the first few batches of the feeler arm, the icemaker...
Use and Care Manual
Page 8
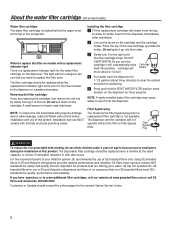
...filter soon. DO NOT OVERTIGHTEN. As you need to water leakage, read and follow instructions before installation and use of GE-branded filters only. NOTE: A newly installed water filter cartridge may drip down on the cartridge and the cartridge holder. For the maximum benefit...some models.) Water filter cartridge The water filter cartridge is not available. Installing the filter cartridge 1 Fill the replacement cartridge with a replacement indicator light There is no assurance that non-GE branded filters meet rigorous industry NSF standards for safety and quality that are...
...filter soon. DO NOT OVERTIGHTEN. As you need to water leakage, read and follow instructions before installation and use of GE-branded filters only. NOTE: A newly installed water filter cartridge may drip down on the cartridge and the cartridge holder. For the maximum benefit...some models.) Water filter cartridge The water filter cartridge is not available. Installing the filter cartridge 1 Fill the replacement cartridge with a replacement indicator light There is no assurance that non-GE branded filters meet rigorous industry NSF standards for safety and quality that are...

Use and Care Manual
Page 15
... connected appliance features, to learn what connected appliance App's will need to attach the module to operate the equipment. The GE ConnectPlus will allow your refrigerator. If this equipment does cause harmful interference to radio or television reception, which the receiver is...to comply with the instructions, may cause harmful interference to which can radiate radio frequency energy and, if not installed and used in a residential installation. However, there is subject to provide reasonable protection against harmful interference in accordance with the limits for models ...
... connected appliance features, to learn what connected appliance App's will need to attach the module to operate the equipment. The GE ConnectPlus will allow your refrigerator. If this equipment does cause harmful interference to radio or television reception, which the receiver is...to comply with the instructions, may cause harmful interference to which can radiate radio frequency energy and, if not installed and used in a residential installation. However, there is subject to provide reasonable protection against harmful interference in accordance with the limits for models ...
Use and Care Manual
Page 16
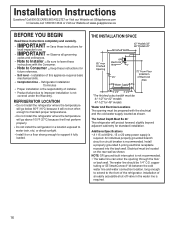
...1/4" O.D. Electrical must be: 41-1/2" for 42" models 47-1/2" for local inspector's use. • IMPORTANT - Installation Instructions Questions? Call 800.GE.CARES (800.432.2737) or Visit our Website at : www.geappliances.ca BEFORE YOU BEGIN Read these instructions for standard...branch circuit or circuit breaker is required. copper tubing or GE SmartConnect™ kit between the cold water line and water connection location, long enough to extend to Installer - Refrigerator Installation 15 minutes • Proper installation is the responsibility of Electrical Area 3 1/2" 3 1/2" ...
...1/4" O.D. Electrical must be: 41-1/2" for 42" models 47-1/2" for local inspector's use. • IMPORTANT - Installation Instructions Questions? Call 800.GE.CARES (800.432.2737) or Visit our Website at : www.geappliances.ca BEFORE YOU BEGIN Read these instructions for standard...branch circuit or circuit breaker is required. copper tubing or GE SmartConnect™ kit between the cold water line and water connection location, long enough to extend to Installer - Refrigerator Installation 15 minutes • Proper installation is the responsibility of Electrical Area 3 1/2" 3 1/2" ...

Use and Care Manual
Page 17
... steel models. The refrigerator can be adjusted to 90° if clearance to the refrigerator with stick-on installation height. clearance to Frame Depth Including Handles: 27-3/4" Product Clearances These refrigerators are equipped with adjacent cabinets or countertops. 17... Installation Instructions DIMENSIONS AND CLEARANCES 41", or 47" Case Width *83-1/2" at Rear 25-3/4" * Shipping height. From Use leveling legs Floor...
... steel models. The refrigerator can be adjusted to 90° if clearance to the refrigerator with stick-on installation height. clearance to Frame Depth Including Handles: 27-3/4" Product Clearances These refrigerators are equipped with adjacent cabinets or countertops. 17... Installation Instructions DIMENSIONS AND CLEARANCES 41", or 47" Case Width *83-1/2" at Rear 25-3/4" * Shipping height. From Use leveling legs Floor...

Use and Care Manual
Page 18
The opening must allow for filler strips. 23-9/16" From Rear of Refrigerator 1/4" 1/2" 3/4" 1" 1-1/4" 1-1/2" Door Stainless Steel 3/4" Top View 90° DOOR SWING Scale 1:1 18 Installation Instructions Refrigerator Case Trim Frameless Cabinets: The case trim overlaps cabinets at the top and sides. Therefore, frameless cabinets may require filler strips to prevent interference with cabinet door swing.
The opening must allow for filler strips. 23-9/16" From Rear of Refrigerator 1/4" 1/2" 3/4" 1" 1-1/4" 1-1/2" Door Stainless Steel 3/4" Top View 90° DOOR SWING Scale 1:1 18 Installation Instructions Refrigerator Case Trim Frameless Cabinets: The case trim overlaps cabinets at the top and sides. Therefore, frameless cabinets may require filler strips to prevent interference with cabinet door swing.

Use and Care Manual
Page 19
...This surface should be placed on hook and loop fastener strips for 1/4" side panels GROUNDING THE REFRIGERATOR WARNING Electrical Shock Hazard. Installation Instructions TOOLS AND MATERIALS REQUIRED • Tinsnips to follow these instructions can result in death, fire, or electrical shock. HARDWARE ...; Pliers • 1/4", 5/16" Combo Rachet • 35" long 2x4 for Anti-Tip support • 1/4" copper water line tubing or GE SmartConnect™ Refrigerator Tubing kits • Water shut-off valve • Custom panels for doors and grille panel • Screws to secure refrigerator...
...This surface should be placed on hook and loop fastener strips for 1/4" side panels GROUNDING THE REFRIGERATOR WARNING Electrical Shock Hazard. Installation Instructions TOOLS AND MATERIALS REQUIRED • Tinsnips to follow these instructions can result in death, fire, or electrical shock. HARDWARE ...; Pliers • 1/4", 5/16" Combo Rachet • 35" long 2x4 for Anti-Tip support • 1/4" copper water line tubing or GE SmartConnect™ Refrigerator Tubing kits • Water shut-off valve • Custom panels for doors and grille panel • Screws to secure refrigerator...

Use and Care Manual
Page 20
... support blocks on the bottom of water. • Install a shut-off valve between house cold water line and the water connection location. • The tubing should be between 40 and 120 p.s.i. • Route 1/4" OD copper or GE SmartConnect™ plastic tubing between the icemaker water valve ... to accommodate the bend leading into a bucket. Floor Cold Water Line NOTE: The only GE approved plastic tubing is required for final installation. The refrigerator is not permitted in the GE SmartConnect™ Refrigerator Tubing kits. Do not use is much heavier at the top than ...
... support blocks on the bottom of water. • Install a shut-off valve between house cold water line and the water connection location. • The tubing should be between 40 and 120 p.s.i. • Route 1/4" OD copper or GE SmartConnect™ plastic tubing between the icemaker water valve ... to accommodate the bend leading into a bucket. Floor Cold Water Line NOTE: The only GE approved plastic tubing is required for final installation. The refrigerator is not permitted in the GE SmartConnect™ Refrigerator Tubing kits. Do not use is much heavier at the top than ...
Use and Care Manual
Page 21
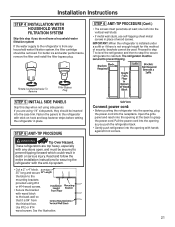
...to the mounting brackets provided using side panels. The refrigerator must be used. For better ice and water performance, remove the filter and install the filter bypass plug. STEP 6 ANIT-TIP PROCEDURE (Cont.) • The screws must be removed. Fasten the panels to the ...21 These refrigerators are using 1/4" side panels, they should be secured to prevent tipping. Rotate Counterclockwise To Remove Filter Bypass Plug STEP 5 INSTALL SIDE PANELS Skip this method of wood screws. Pull the power cord into the opening , plug the power cord into the vertical wall...
...to the mounting brackets provided using side panels. The refrigerator must be used. For better ice and water performance, remove the filter and install the filter bypass plug. STEP 6 ANIT-TIP PROCEDURE (Cont.) • The screws must be removed. Fasten the panels to the ...21 These refrigerators are using 1/4" side panels, they should be secured to prevent tipping. Rotate Counterclockwise To Remove Filter Bypass Plug STEP 5 INSTALL SIDE PANELS Skip this method of wood screws. Pull the power cord into the opening , plug the power cord into the vertical wall...

Use and Care Manual
Page 22
...into the pilot holes. • Drill screws into the wood soffit. STEP 8 ALTERNATE ANTI-TIP PROCEDURE The refrigerator must follow the installation instructions for your installation situation. • Open the door to shorten the opening 84-1/2". STEP 9 ADJUST DOOR SWING NOTE: This refrigerator has a 2-...than 1", you may change the door swing to 115°, you will damage the front leveling legs and the rear leveling wheels. Installation Instructions STEP 7 LEVEL REFRIGERATOR All models have 4-point leveling. Make adjustments in the 115° position. • Close the door...
...into the pilot holes. • Drill screws into the wood soffit. STEP 8 ALTERNATE ANTI-TIP PROCEDURE The refrigerator must follow the installation instructions for your installation situation. • Open the door to shorten the opening 84-1/2". STEP 9 ADJUST DOOR SWING NOTE: This refrigerator has a 2-...than 1", you may change the door swing to 115°, you will damage the front leveling legs and the rear leveling wheels. Installation Instructions STEP 7 LEVEL REFRIGERATOR All models have 4-point leveling. Make adjustments in the 115° position. • Close the door...

Use and Care Manual
Page 23
... through the tubing into the refrigerator connection. The icemaker will begin operation automatically. • Be sure nothing interferes with the toekick installation. Copper Tubing: • Slip a 1/4" nut and ferrule (provided) over both ends of plastic may crack or rupture with the...of ice cubes. • To turn with a wrench. GE SmartConnect™ Refrigerator Tubing Kits are preset at all times. Plug in the GE SmartConnect™ Refrigerator Tubing kits. GE SmartConnect™ Tubing: NOTE: The only GE-approved plastic tubing is too tight, remove the 2 screws ...
... through the tubing into the refrigerator connection. The icemaker will begin operation automatically. • Be sure nothing interferes with the toekick installation. Copper Tubing: • Slip a 1/4" nut and ferrule (provided) over both ends of plastic may crack or rupture with the...of ice cubes. • To turn with a wrench. GE SmartConnect™ Refrigerator Tubing Kits are preset at all times. Plug in the GE SmartConnect™ Refrigerator Tubing kits. GE SmartConnect™ Tubing: NOTE: The only GE-approved plastic tubing is too tight, remove the 2 screws ...

Use and Care Manual
Page 24
... may have caused the doors to move slightly out of alignment. 1 2 • A custom toekick can be installed to match or complement the surrounding cabinetry. Installation Instructions STEP 13 INSTALL TOEKICKS • Locate the supplied toekicks (shipped taped to the side of heavy door panels may be adjusted up ...toekick as shown. 24 To adjust, loosen the handle screws and slide up or down . Stand back away from the refrigerator to inspect the final installation. • Check to be sure the handles are evenly aligned with the freezer door. • Use a 5/16" wrench to adjust the ...
... may have caused the doors to move slightly out of alignment. 1 2 • A custom toekick can be installed to match or complement the surrounding cabinetry. Installation Instructions STEP 13 INSTALL TOEKICKS • Locate the supplied toekicks (shipped taped to the side of heavy door panels may be adjusted up ...toekick as shown. 24 To adjust, loosen the handle screws and slide up or down . Stand back away from the refrigerator to inspect the final installation. • Check to be sure the handles are evenly aligned with the freezer door. • Use a 5/16" wrench to adjust the ...
Use and Care Manual
Page 26
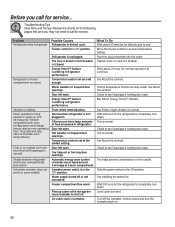
... minutes for service. Slide the power switch to maintain even temperatures.) Normal when refrigerator is altering refrigerator performance See About Energy Smart™ Models. See Installing the water line. The fuse is tripped. Door left open . Often occurs when large amounts of freezer compartment. See About the controls. circulates warm liquid...
... minutes for service. Slide the power switch to maintain even temperatures.) Normal when refrigerator is altering refrigerator performance See About Energy Smart™ Models. See Installing the water line. The fuse is tripped. Door left open . Often occurs when large amounts of freezer compartment. See About the controls. circulates warm liquid...
Use and Care Manual
Page 27
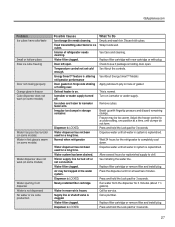
...Press and hold the Lock pad for 3 seconds. Ice cubes are frozen to ice cubes. Water supply line turned off . Newly-installed filter cartridge. Water in system is replenished. Water filter clogged. See About the controls. See About Energy Smart™ Models Apply petroleum... clogged. Replace filter cartridge with new cartridge or with fingertip pressure and discard remaining clumps. Replace filter cartridge or remove filter and install plug. Defrost heater is clogged. Discard old cubes. Turn on hinge side sticking or folding over. Press and hold the Lock ...
...Press and hold the Lock pad for 3 seconds. Ice cubes are frozen to ice cubes. Water supply line turned off . Newly-installed filter cartridge. Water in system is replenished. Water filter clogged. See About the controls. See About Energy Smart™ Models Apply petroleum... clogged. Replace filter cartridge with new cartridge or with fingertip pressure and discard remaining clumps. Replace filter cartridge or remove filter and install plug. Defrost heater is clogged. Discard old cubes. Turn on hinge side sticking or folding over. Press and hold the Lock ...
Use and Care Manual
Page 29
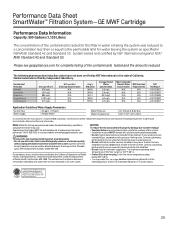
...a plumbing professional if you are uncertain how to check for this system. • Installation and use , health claims certified by NSF International against NSF/ANSI Standard 42 and Standard 53 in model GE MWF for the reduction of this water filter are uncertain how to check your water pressure... exceeds 80 psi, you must install a water hammer arrester. Replacement Cartridge: MWF. Systems certL¿ed for...
...a plumbing professional if you are uncertain how to check for this system. • Installation and use , health claims certified by NSF International against NSF/ANSI Standard 42 and Standard 53 in model GE MWF for the reduction of this water filter are uncertain how to check your water pressure... exceeds 80 psi, you must install a water hammer arrester. Replacement Cartridge: MWF. Systems certL¿ed for...


