
Owners Manual
Page 1
... of this product meets the ENERGY STAR® guidelines for energy efficiency. Air ConditionRoeorms ge.com Owner's Manual and Installation Instructions Safety Instructions 2, 3 Operating Instructions Controls-Control Knobs . . . . 8, 9 Controls-Touch Pads 4-6 Care and Cleaning Air Filter 11 Front Grille 10 Grille and Case 10 Outdoor Coils 10 Installation Instructions Before You Begin 12, 13 Installing a J-Model in an Existing Wall Case 14 Through-the-Wall Installation-Optional 15 Window Installation- Back Cover Warranty 23 *ENERGY STAR® labeled product Cool Only: AJCH...
... of this product meets the ENERGY STAR® guidelines for energy efficiency. Air ConditionRoeorms ge.com Owner's Manual and Installation Instructions Safety Instructions 2, 3 Operating Instructions Controls-Control Knobs . . . . 8, 9 Controls-Touch Pads 4-6 Care and Cleaning Air Filter 11 Front Grille 10 Grille and Case 10 Outdoor Coils 10 Installation Instructions Before You Begin 12, 13 Installing a J-Model in an Existing Wall Case 14 Through-the-Wall Installation-Optional 15 Window Installation- Back Cover Warranty 23 *ENERGY STAR® labeled product Cool Only: AJCH...
Owners Manual
Page 2
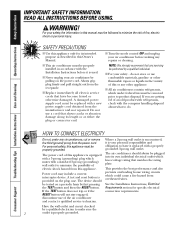
... or use of an old product with refrigerants, check with a new power supply cord obtained from this manual must be replaced with the company handling disposal about what to make sure the 2 outlet is used. READ ALL INSTRUCTIONS BEFORE USING. Power cord may include a current interrupter device. Consumer Support Troubleshooting Tips Installation Instructions Care and Cleaning Operating Instructions Safety Instructions IMPORTANT SAFETY INFORMATION. WARNING! The air conditioner should be properly grounded. I Turn the mode control OFF...
... or use of an old product with refrigerants, check with a new power supply cord obtained from this manual must be replaced with the company handling disposal about what to make sure the 2 outlet is used. READ ALL INSTRUCTIONS BEFORE USING. Power cord may include a current interrupter device. Consumer Support Troubleshooting Tips Installation Instructions Care and Cleaning Operating Instructions Safety Instructions IMPORTANT SAFETY INFORMATION. WARNING! The air conditioner should be properly grounded. I Turn the mode control OFF...
Owners Manual
Page 3
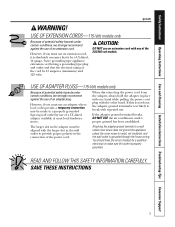
... power cord plug with the larger slot in the wall outlet to provide proper polarity in the adapter must use of the 230/208 volt models. READ AND FOLLOW THIS SAFETY INFORMATION CAREFULLY. Safety Instructions Operating Instructions Care and Cleaning Installation Instructions Troubleshooting Tips Consumer Support ge.com WARNING! If this is not done, the adapter ground terminal is grounded through the house wiring. You should have the circuit...
... power cord plug with the larger slot in the wall outlet to provide proper polarity in the adapter must use of the 230/208 volt models. READ AND FOLLOW THIS SAFETY INFORMATION CAREFULLY. Safety Instructions Operating Instructions Care and Cleaning Installation Instructions Troubleshooting Tips Consumer Support ge.com WARNING! If this is not done, the adapter ground terminal is grounded through the house wiring. You should have the circuit...
Owners Manual
Page 4
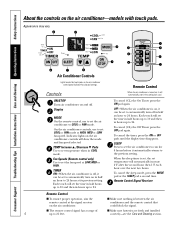
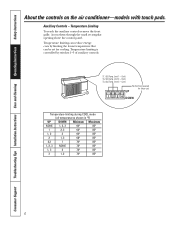
... can be set COOL or FAN mode at its previous setting. To cancel the sleep mode, press the MODE pad or the SLEEP pad a second time. Consumer Support Troubleshooting Tips Installation Instructions Care and Cleaning Operating Instructions Safety Instructions About the controls on the air conditioner control panel indicate the selected settings. Each touch will show the mode and fan speed selected. To cancel (CL) the Off Timer press the OFF pad again. Fan Speeds (Remote control only) Use to...
... can be set COOL or FAN mode at its previous setting. To cancel the sleep mode, press the MODE pad or the SLEEP pad a second time. Consumer Support Troubleshooting Tips Installation Instructions Care and Cleaning Operating Instructions Safety Instructions About the controls on the air conditioner control panel indicate the selected settings. Each touch will show the mode and fan speed selected. To cancel (CL) the Off Timer press the OFF pad again. Fan Speeds (Remote control only) Use to...

Owners Manual
Page 5
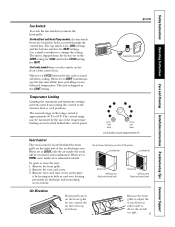
... before switching back to keep the room at the set at front. The unit is lit for the desired fan speed. 2. Remove the vent card screw. 3. Locating hole Locating hole Screw hole OPEN position (Mesh end toward back) Screw hole CLOSE position (Mesh end toward front) Air Direction Horizontal louvers on the control box. Safety Instructions Operating Instructions Care and Cleaning Installation Instructions Troubleshooting Tips Consumer Support ge.com COOL MODE Remote Control 1. Set the thermostat at a higher number and the indoor air will take...
... before switching back to keep the room at the set at front. The unit is lit for the desired fan speed. 2. Remove the vent card screw. 3. Locating hole Locating hole Screw hole OPEN position (Mesh end toward back) Screw hole CLOSE position (Mesh end toward front) Air Direction Horizontal louvers on the control box. Safety Instructions Operating Instructions Care and Cleaning Installation Instructions Troubleshooting Tips Consumer Support ge.com COOL MODE Remote Control 1. Set the thermostat at a higher number and the indoor air will take...
Owners Manual
Page 6
...; 85° 2 1, 3 68° 85° 2,3 1 70° 85° 1, 2, 3 NONE 72° 85° 1, 3 2 74° 85° 3 1, 2 76° 85° 6 Cool) No function (reserved for cooling. Cool) TL3 (C) (Temp. Access them through the small rectangular opening above the control panel. Limit 1 - TL1 (C) (Temp. Consumer Support Troubleshooting Tips Installation Instructions Care and Cleaning Operating Instructions Safety Instructions About the controls on the air conditioner-models with touch pads.
...; 85° 2 1, 3 68° 85° 2,3 1 70° 85° 1, 2, 3 NONE 72° 85° 1, 3 2 74° 85° 3 1, 2 76° 85° 6 Cool) No function (reserved for cooling. Cool) TL3 (C) (Temp. Access them through the small rectangular opening above the control panel. Limit 1 - TL1 (C) (Temp. Consumer Support Troubleshooting Tips Installation Instructions Care and Cleaning Operating Instructions Safety Instructions About the controls on the air conditioner-models with touch pads.
Owners Manual
Page 8
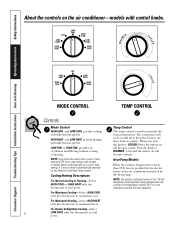
... electric heater in the 115-volt heat pump model operates during defrost when the outdoor coil temperature is automatically provided on the air conditioner-models with the thermostat at least 3 minutes before switching back to a fan setting, wait at maximum heat. It is not intended to COOLER (blue) the indoor air will become cooler. OOLER OFF LOW HEAT HIGH HEAT LOW FAN HIGH FAN LOW COOL HIGH COOL ER C COOLER OFF LOW LOW FAN COOL HIGH FAN HIGH COOL MODE CONTROL TEMP CONTROL Controls Mode Control...
... electric heater in the 115-volt heat pump model operates during defrost when the outdoor coil temperature is automatically provided on the air conditioner-models with the thermostat at least 3 minutes before switching back to a fan setting, wait at maximum heat. It is not intended to COOLER (blue) the indoor air will become cooler. OOLER OFF LOW HEAT HIGH HEAT LOW FAN HIGH FAN LOW COOL HIGH COOL ER C COOLER OFF LOW LOW FAN COOL HIGH FAN HIGH COOL MODE CONTROL TEMP CONTROL Controls Mode Control...
Owners Manual
Page 9
... position. Vent Control The vent control is approximately 60°F to the extreme heat or cool positions. Remove vent card, turn it over and replace it by the use of the temperature limiting screws located behind the front grille on the right side of the control box. The unit is exhausted outside. Remove the front grille. 2. Limits heat temp Limits cool temp Each position equals approximately 3°F. Safety Instructions Operating Instructions Care and Cleaning Installation Instructions Troubleshooting Tips Consumer Support Fan Switch To...
... position. Vent Control The vent control is approximately 60°F to the extreme heat or cool positions. Remove vent card, turn it over and replace it by the use of the temperature limiting screws located behind the front grille on the right side of the control box. The unit is exhausted outside. Remove the front grille. 2. Limits heat temp Limits cool temp Each position equals approximately 3°F. Safety Instructions Operating Instructions Care and Cleaning Installation Instructions Troubleshooting Tips Consumer Support Fan Switch To...
Owners Manual
Page 10
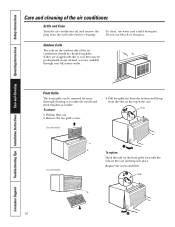
... snap into place. Pull the grille out from the bottom and lift up from the wall outlet before cleaning. To remove: 1. Grille and Case Turn the air conditioner off and remove the plug from the tabs on the outdoor side of the air conditioner. Pull the filter out. 2. Grille Tab On some models 3. Consumer Support Troubleshooting Tips Installation Instructions Care and Cleaning Operating Instructions Safety Instructions Care and cleaning of the air conditioner should be checked regularly.
... snap into place. Pull the grille out from the bottom and lift up from the wall outlet before cleaning. To remove: 1. Grille and Case Turn the air conditioner off and remove the plug from the tabs on the outdoor side of the air conditioner. Pull the filter out. 2. Grille Tab On some models 3. Consumer Support Troubleshooting Tips Installation Instructions Care and Cleaning Operating Instructions Safety Instructions Care and cleaning of the air conditioner should be checked regularly.
Owners Manual
Page 11
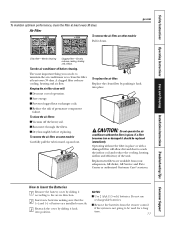
Turn the air conditioner off the heavy soil. I Vacuum off before replacing. To clean the air filters: I Save energy. To remove the air filter, on other models: FRONT FRONT Pull it down. CAUTION: Do not operate the air conditioner without the filter in place. Replacement filters are installed correctly. 3 Reattach the cover by pushing it back into place. I Run water through the filters. Safety Instructions Operating Instructions Care and Cleaning Installation Instructions Troubleshooting Tips Consumer Support To maintain optimum performance, clean the...
Turn the air conditioner off the heavy soil. I Vacuum off before replacing. To clean the air filters: I Save energy. To remove the air filter, on other models: FRONT FRONT Pull it down. CAUTION: Do not operate the air conditioner without the filter in place. Replacement filters are installed correctly. 3 Reattach the cover by pushing it back into place. I Run water through the filters. Safety Instructions Operating Instructions Care and Cleaning Installation Instructions Troubleshooting Tips Consumer Support To maintain optimum performance, clean the...
Owners Manual
Page 12
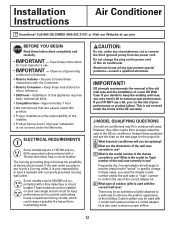
... from the power cord. If you DO NOT use ? C What is not covered under the Warranty. Frequently, the J-model adapter kit will you run the risk of outdoor grille is used with the current wall case? D What type of poor performance or product failure. There may be installed on their own single branch circuit for local inspector's use ? Custom grilles may need a kit to improper installation is the model number of the GE warranty. Installation Instructions Air Conditioner Questions? Approximately...
... from the power cord. If you DO NOT use ? C What is not covered under the Warranty. Frequently, the J-model adapter kit will you run the risk of outdoor grille is used with the current wall case? D What type of poor performance or product failure. There may be installed on their own single branch circuit for local inspector's use ? Custom grilles may need a kit to improper installation is the model number of the GE warranty. Installation Instructions Air Conditioner Questions? Approximately...
Owners Manual
Page 13
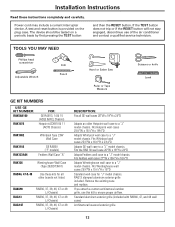
...;W x 161⁄2″H x 231⁄8″D Adapts GE wall case to a "J" model chassis. Fits the RAB 30 wall case 26″W x 18″H x 24″D Adapts Fedders wall case to a "J" model chassis. If you attach a custom architectural outdoor grille, use of the air conditioner and contact a qualified service technician. RAG13 stamped aluminum exterior grille included. Remove the existing case and replace. Power cord may include a current interrupter device. Fits Fedders...
...;W x 161⁄2″H x 231⁄8″D Adapts GE wall case to a "J" model chassis. Fits the RAB 30 wall case 26″W x 18″H x 24″D Adapts Fedders wall case to a "J" model chassis. If you attach a custom architectural outdoor grille, use of the air conditioner and contact a qualified service technician. RAG13 stamped aluminum exterior grille included. Remove the existing case and replace. Power cord may include a current interrupter device. Fits Fedders...
Owners Manual
Page 14
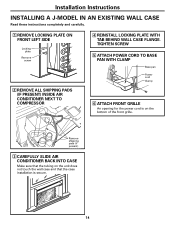
... front grille. Installation Instructions INSTALLING A J-MODEL IN AN EXISTING WALL CASE Read these instructions completely and carefully. 1 REMOVE LOCKING PLATE ON FRONT LEFT SIDE Locking plate Remove screw 2 REMOVE ALL SHIPPING PADS (IF PRESENT) INSIDE AIR CONDITIONER NEXT TO COMPRESSOR 4 REINSTALL LOCKING PLATE WITH TAB BEHIND WALL CASE FLANGE. TIGHTEN SCREW 5 ATTACH POWER CORD TO BASE PAN WITH CLAMP Base pan Power cord Clamp 6 ATTACH FRONT GRILLE An opening for the power cord...
... front grille. Installation Instructions INSTALLING A J-MODEL IN AN EXISTING WALL CASE Read these instructions completely and carefully. 1 REMOVE LOCKING PLATE ON FRONT LEFT SIDE Locking plate Remove screw 2 REMOVE ALL SHIPPING PADS (IF PRESENT) INSIDE AIR CONDITIONER NEXT TO COMPRESSOR 4 REINSTALL LOCKING PLATE WITH TAB BEHIND WALL CASE FLANGE. TIGHTEN SCREW 5 ATTACH POWER CORD TO BASE PAN WITH CLAMP Base pan Power cord Clamp 6 ATTACH FRONT GRILLE An opening for the power cord...
Owners Manual
Page 15
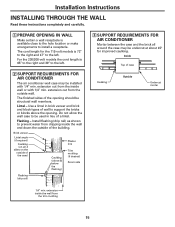
... and block types of wall to be undercut at about 45° for the 115-volt models is 65″ to the right and 39″ to the left . 2 SUPPORT REQUIREMENTS FOR AIR CONDITIONER The air conditioner wall case may be used in lieu of a lintel. Do not allow the wall case to support the bricks or blocks above & below the flashing) Plaster...
... and block types of wall to be undercut at about 45° for the 115-volt models is 65″ to the right and 39″ to the left . 2 SUPPORT REQUIREMENTS FOR AIR CONDITIONER The air conditioner wall case may be used in lieu of a lintel. Do not allow the wall case to support the bricks or blocks above & below the flashing) Plaster...
Owners Manual
Page 16
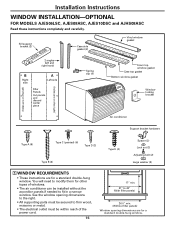
... them for other types of windows. • The air conditioner can be within reach of the power cord. 16 17″ min. 31″ to fit in a narrow window. See the window opening dimensions to the right. • All supporting parts must be secured to firm wood, masonry or metal. • The electrical outlet must be installed without the accordion panels if needed to 43″...
... them for other types of windows. • The air conditioner can be within reach of the power cord. 16 17″ min. 31″ to fit in a narrow window. See the window opening dimensions to the right. • All supporting parts must be secured to firm wood, masonry or metal. • The electrical outlet must be installed without the accordion panels if needed to 43″...
Owners Manual
Page 17
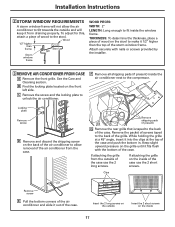
... top of the case. THICKNESS: To determine the thickness, place a piece of wood to make it fits flush with nails or screws provided by the installer. 3 REMOVE AIR CONDITIONER FROM CASE A Remove the front grille. Keep slight upward pressure on the stool to the stool. Installation Instructions 2 STORM WINDOW REQUIREMENTS A storm window frame will keep it from draining properly.
... top of the case. THICKNESS: To determine the thickness, place a piece of wood to make it fits flush with nails or screws provided by the installer. 3 REMOVE AIR CONDITIONER FROM CASE A Remove the front grille. Keep slight upward pressure on the stool to the stool. Installation Instructions 2 STORM WINDOW REQUIREMENTS A storm window frame will keep it from draining properly.
Owners Manual
Page 19
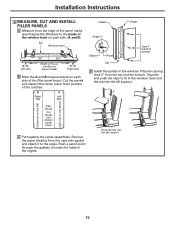
... panel board. Remove the paper backing from the case side gasket and attach it to locate the holes in the angles. Push a pencil point through the gaskets to the angle. Cut the panels and discard the center piece. B A Right Left side side Gasket Angle Angle Gasket Panel Tab Type C (painted screws) D Install the panels in the window. Installation Instructions 6 MEASURE, CUT AND INSTALL FILLER PANELS...
... panel board. Remove the paper backing from the case side gasket and attach it to locate the holes in the angles. Push a pencil point through the gaskets to the angle. Cut the panels and discard the center piece. B A Right Left side side Gasket Angle Angle Gasket Panel Tab Type C (painted screws) D Install the panels in the window. Installation Instructions 6 MEASURE, CUT AND INSTALL FILLER PANELS...
Owners Manual
Page 21
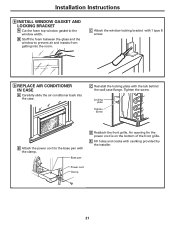
... front grille. Installation Instructions 8 INSTALL WINDOW GASKET AND LOCKING BRACKET A Cut the foam top window gasket to prevent air and insects from getting into the case. B Stuff the foam between the glass and the window to the window width. Power cord Clamp 21 C Attach the window locking bracket with the clamp. Locking plate Tighten screw B Attach the power cord to the base pan with 1 type E screw. 9 REPLACE AIR CONDITIONER IN...
... front grille. Installation Instructions 8 INSTALL WINDOW GASKET AND LOCKING BRACKET A Cut the foam top window gasket to prevent air and insects from getting into the case. B Stuff the foam between the glass and the window to the window width. Power cord Clamp 21 C Attach the window locking bracket with the clamp. Locking plate Tighten screw B Attach the power cord to the base pan with 1 type E screw. 9 REPLACE AIR CONDITIONER IN...
Owners Manual
Page 22
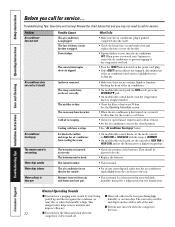
.... The air filter is high. Cooling coils have been hot. Normal Operating Sounds I Water will not stay engaged, discontinue use of the compressor overload. • Press the RESET button located on and off. Ice blocks the airflow and stops the air conditioner from the outdoor side of the air conditioner. • On models with touch pads: In COOL mode, press the DECREASE M pad. • On models with control knobs, turn the air conditioner OFF. The...
.... The air filter is high. Cooling coils have been hot. Normal Operating Sounds I Water will not stay engaged, discontinue use of the compressor overload. • Press the RESET button located on and off. Ice blocks the airflow and stops the air conditioner from the outdoor side of the air conditioner. • On models with touch pads: In COOL mode, press the DECREASE M pad. • On models with control knobs, turn the air conditioner OFF. The...
Owners Manual
Page 23
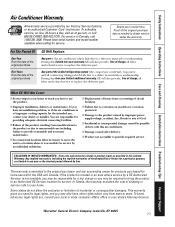
... sealed refrigerating system (the compressor, condenser, evaporator and all labor and related service to a defect in materials or workmanship. Louisville, KY 40225 23 Safety Instructions Operating Instructions Care and Cleaning Installation Instructions Troubleshooting Tips Consumer Support Air Conditioner Warranty. You are , consult your local or state consumer affairs office or your home. I Product not accessible to a location where it is product repair as provided in Canada, call 800.GE.CARES...
... sealed refrigerating system (the compressor, condenser, evaporator and all labor and related service to a defect in materials or workmanship. Louisville, KY 40225 23 Safety Instructions Operating Instructions Care and Cleaning Installation Instructions Troubleshooting Tips Consumer Support Air Conditioner Warranty. You are , consult your local or state consumer affairs office or your home. I Product not accessible to a location where it is product repair as provided in Canada, call 800.GE.CARES...

