
Reference Guide
Page 3
Contents Chapter 1: About This Reference 1 About this guide 2 Accessing your online User Guide 2 Gateway contact information 3 Gateway model and serial number 3 Microsoft Certificate of Authenticity 3 For more information 4 Chapter 2: Checking Out Your Notebook . . . . . 5 Front 6 Left 7 Right 8 Back 9 Bottom 9 Keyboard area 11 Chapter 3: ...
Contents Chapter 1: About This Reference 1 About this guide 2 Accessing your online User Guide 2 Gateway contact information 3 Gateway model and serial number 3 Microsoft Certificate of Authenticity 3 For more information 4 Chapter 2: Checking Out Your Notebook . . . . . 5 Front 6 Left 7 Right 8 Back 9 Bottom 9 Keyboard area 11 Chapter 3: ...

Reference Guide
Page 4
Contents Using the EZ Pad touchpad 29 Using the optional EZ Point pointing device 32 Replacing the EZ Point pointing device cap 33 Turning the touchpad or pointing device on or off . . . 34 Adjusting the brightness 35 Adjusting the volume 36 Turning your wireless radio on or off 37 IEEE 802.11 wireless network radio 38 Bluetooth radio 38 Chapter 4: Using Drives and Accessories . . . . . 39 Changing modules 40 Using the CD or DVD drive 42 Identifying drive types 42 Using a CD or DVD 43 Using the memory card reader 44 Memory card types 44 Inserting a memory card 44 Using a memory ...
Contents Using the EZ Pad touchpad 29 Using the optional EZ Point pointing device 32 Replacing the EZ Point pointing device cap 33 Turning the touchpad or pointing device on or off . . . 34 Adjusting the brightness 35 Adjusting the volume 36 Turning your wireless radio on or off 37 IEEE 802.11 wireless network radio 38 Bluetooth radio 38 Chapter 4: Using Drives and Accessories . . . . . 39 Changing modules 40 Using the CD or DVD drive 42 Identifying drive types 42 Using a CD or DVD 43 Using the memory card reader 44 Memory card types 44 Inserting a memory card 44 Using a memory ...

Reference Guide
Page 5
www.gateway.com Recalibrating the battery(ies 61 Extending battery life 62 Maximizing battery performance 62 Conserving battery power 62 Using alternate power sources 63 Changing power ...
www.gateway.com Recalibrating the battery(ies 61 Extending battery life 62 Maximizing battery performance 62 Conserving battery power 62 Using alternate power sources 63 Changing power ...

Reference Guide
Page 6
... 125 Pointing device 126 Power 126 Printer 127 Sound 128 Status indicators 129 Touchpad or pointing device 129 Video 129 Telephone support 130 Before calling Gateway Customer Care 130 iv
... 125 Pointing device 126 Power 126 Printer 127 Sound 128 Status indicators 129 Touchpad or pointing device 129 Video 129 Telephone support 130 Before calling Gateway Customer Care 130 iv

Reference Guide
Page 7
www.gateway.com Appendix A: Legal Information 133 Index 143 v
www.gateway.com Appendix A: Legal Information 133 Index 143 v

Reference Guide
Page 9
CHAPTER1 About This Reference • About this guide • Accessing your online User Guide • Gateway contact information • Microsoft Certificate of Authenticity • For more information 1
CHAPTER1 About This Reference • About this guide • Accessing your online User Guide • Gateway contact information • Microsoft Certificate of Authenticity • For more information 1
Reference Guide
Page 10
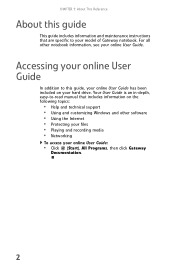
...; Help and technical support • Using and customizing Windows and other notebook information, see your online User Guide: • Click (Start), All Programs, then click Gateway Documentation. 2 Accessing your online User Guide In addition to your hard drive. For all other software • Using the Internet • Protecting your files •...-depth, easy-to-read manual that are specific to this guide This guide includes information and maintenance instructions that includes information on your model of Gateway notebook.
...; Help and technical support • Using and customizing Windows and other notebook information, see your online User Guide: • Click (Start), All Programs, then click Gateway Documentation. 2 Accessing your online User Guide In addition to your hard drive. For all other software • Using the Internet • Protecting your files •...-depth, easy-to-read manual that are specific to this guide This guide includes information and maintenance instructions that includes information on your model of Gateway notebook.

Reference Guide
Page 11
...: S/No: Microsoft Certificate of Authenticity The Microsoft Certificate of Authenticity label found on the bottom of your operating system. 3 Gateway model and serial number The label on the bottom of your notebook contains information that identifies your notebook model and its features. Label... information varies by model, features ordered, and location. www.gateway.com Gateway contact information Important The labels shown in this information if you call for assistance. Gateway Customer Care will need this section are for your notebook includes the product key...
...: S/No: Microsoft Certificate of Authenticity The Microsoft Certificate of Authenticity label found on the bottom of your operating system. 3 Gateway model and serial number The label on the bottom of your notebook contains information that identifies your notebook model and its features. Label... information varies by model, features ordered, and location. www.gateway.com Gateway contact information Important The labels shown in this information if you call for assistance. Gateway Customer Care will need this section are for your notebook includes the product key...

Reference Guide
Page 12
CHAPTER 1: About This Reference For more information For more information about your notebook, visit Gateway's Support page at www.gateway.com or the Web address shown on your notebook's label. The Support page also has links to additional Gateway documentation and detailed specifications. 4
CHAPTER 1: About This Reference For more information For more information about your notebook, visit Gateway's Support page at www.gateway.com or the Web address shown on your notebook's label. The Support page also has links to additional Gateway documentation and detailed specifications. 4

Reference Guide
Page 14
Battery is charging. ■ LED blinking red - Power indicator Microphone jack ■ LED on . ■ LED blinking - Notebook is in microphone is connected. Plug a microphone into this jack. Headphone jack Plug amplified speakers or headphones into this jack. Battery is fully charged. ■ LED purple - The built-in Sleep or Hybrid Sleep mode. ■ LED off while an external microphone is turned off - LCD panel release latch Slide to AC power or the battery charge is off when speakers or headphones are not plugged in speakers are turned off . Notebook is...
Battery is charging. ■ LED blinking red - Power indicator Microphone jack ■ LED on . ■ LED blinking - Notebook is in microphone is connected. Plug a microphone into this jack. Headphone jack Plug amplified speakers or headphones into this jack. Battery is fully charged. ■ LED purple - The built-in Sleep or Hybrid Sleep mode. ■ LED off while an external microphone is turned off - LCD panel release latch Slide to AC power or the battery charge is off when speakers or headphones are not plugged in speakers are turned off . Notebook is...

Reference Guide
Page 15
... out jack Ventilation fan Modular bay Component Icon Description Kensington™ lock slot Secure your notebook may become hot enough to harm your notebook, contact Gateway. 7 Insert a module such as a television, into this bay. If the air vents are not obstructed. For more information, see "Changing modules" on a bed, sofa, rug...
... out jack Ventilation fan Modular bay Component Icon Description Kensington™ lock slot Secure your notebook may become hot enough to harm your notebook, contact Gateway. 7 Insert a module such as a television, into this bay. If the air vents are not obstructed. For more information, see "Changing modules" on a bed, sofa, rug...

Reference Guide
Page 16
Right CHAPTER 2: Checking Out Your Notebook PC Card slot Component PC Card slot IEEE 1394 port Memory card reader USB ports Ethernet jack Modem jack Memory card reader USB ports IEEE 1394 port Ethernet jack USB ports Modem jack Icon Description Insert one Type II PC Card into this jack. The memory card reader supports Memory Stick®, Memory Stick Pro®, Mini Secure Digital®, MultiMediaCard™, RS-MultiMediaCard™, and Secure Digital™ cards. For more information, see "Connecting to a broadband modem or network" on page 44. For more ...
Right CHAPTER 2: Checking Out Your Notebook PC Card slot Component PC Card slot IEEE 1394 port Memory card reader USB ports Ethernet jack Modem jack Memory card reader USB ports IEEE 1394 port Ethernet jack USB ports Modem jack Icon Description Insert one Type II PC Card into this jack. The memory card reader supports Memory Stick®, Memory Stick Pro®, Mini Secure Digital®, MultiMediaCard™, RS-MultiMediaCard™, and Secure Digital™ cards. For more information, see "Connecting to a broadband modem or network" on page 44. For more ...

Reference Guide
Page 17
Plug an analog VGA monitor or projector into this port. Back www.gateway.com Power connector Component Icon Power connector Monitor port Monitor port Description Plug the AC adapter cable into this connector. Bottom Docking port Main battery Battery latch Customer Care label Hard drive bay Website: Online Support: Tech Support Phone: Hours: Battery lock Memory bay System label Modular bay latch 9 For more information, see "Viewing the display on a projector or monitor" on page 49.
Plug an analog VGA monitor or projector into this port. Back www.gateway.com Power connector Component Icon Power connector Monitor port Monitor port Description Plug the AC adapter cable into this connector. Bottom Docking port Main battery Battery latch Customer Care label Hard drive bay Website: Online Support: Tech Support Phone: Hours: Battery lock Memory bay System label Modular bay latch 9 For more information, see "Viewing the display on a projector or monitor" on page 49.

Reference Guide
Page 18
... located in this port. Slide to UL 1950 for use only with port replicators designed for your Gateway notebook. For more information, see "Replacing the hard drive kit" on page 95. For more information, see "Gateway contact information" on page 59. Warning: Power is certified to unlock the main battery. For more...
... located in this port. Slide to UL 1950 for use only with port replicators designed for your Gateway notebook. For more information, see "Replacing the hard drive kit" on page 95. For more information, see "Gateway contact information" on page 59. Warning: Power is certified to unlock the main battery. For more...

Reference Guide
Page 19
... off while an external microphone is connected. For the location of your microphone jack, see "Using the optional EZ Point pointing device" on page 6. www.gateway.com Keyboard area Optional EZ Point pointing device Power button Keyboard Microphone Optional EZ Point pointing device buttons Status indicators Touchpad Component Icon Description EZ...
... off while an external microphone is connected. For the location of your microphone jack, see "Using the optional EZ Point pointing device" on page 6. www.gateway.com Keyboard area Optional EZ Point pointing device Power button Keyboard Microphone Optional EZ Point pointing device buttons Status indicators Touchpad Component Icon Description EZ...

Reference Guide
Page 20
Inform you when a drive is in use or when a button has been pressed that affects how the keyboard is used. CHAPTER 2: Checking Out Your Notebook Component Touchpad Status indicators Icon Description Provides all the functionality of a mouse. For more information, see "Using the status indicators" on page 29. For more information, see "Using the EZ Pad touchpad" on page 24. 12
Inform you when a drive is in use or when a button has been pressed that affects how the keyboard is used. CHAPTER 2: Checking Out Your Notebook Component Touchpad Status indicators Icon Description Provides all the functionality of a mouse. For more information, see "Using the status indicators" on page 29. For more information, see "Using the EZ Pad touchpad" on page 24. 12

Reference Guide
Page 21
CHAPTER3 Setting Up and Getting Started • Working safely and comfortably • Connecting the AC adapter • Connecting the dial-up modem • Connecting to a broadband modem or network • Starting your notebook • Turning off your notebook • Restarting (rebooting) your notebook • Using the status indicators • Using the keyboard • Using the EZ Pad touchpad • Using the optional EZ Point pointing device • Adjusting the brightness • Adjusting the volume • Turning your wireless radio on or off 13
CHAPTER3 Setting Up and Getting Started • Working safely and comfortably • Connecting the AC adapter • Connecting the dial-up modem • Connecting to a broadband modem or network • Starting your notebook • Turning off your notebook • Restarting (rebooting) your notebook • Using the status indicators • Using the keyboard • Using the EZ Pad touchpad • Using the optional EZ Point pointing device • Adjusting the brightness • Adjusting the volume • Turning your wireless radio on or off 13

Reference Guide
Page 22
You must keep your head vertical while looking at the screen. Do not use your notebook on windows, and by installing shades or curtains on a soft surface, such as your lap, a blanket, carpet, or a sofa. Instead, place your notebook on a rigid, hard surface, and make sure that you keep the ventilation openings on your screen for setting up a safe and comfortable work area. Warning Do not use your notebook in your work area and avoiding discomfort and strain: • Keep hands and arms parallel to your line of sight. • Place your feet flat on the floor or on a ...
You must keep your head vertical while looking at the screen. Do not use your notebook on windows, and by installing shades or curtains on a soft surface, such as your lap, a blanket, carpet, or a sofa. Instead, place your notebook on a rigid, hard surface, and make sure that you keep the ventilation openings on your screen for setting up a safe and comfortable work area. Warning Do not use your notebook in your work area and avoiding discomfort and strain: • Keep hands and arms parallel to your line of sight. • Place your feet flat on the floor or on a ...

Reference Guide
Page 23
... height and the chair helps you maintain good posture. • Select a flat surface for your computer desk. • Adjust the height of your elbow. www.gateway.com Setting up your computer desk and chair When you are setting up the work . • Take breaks to stand and stretch your legs. •...
... height and the chair helps you maintain good posture. • Select a flat surface for your computer desk. • Adjust the height of your elbow. www.gateway.com Setting up your computer desk and chair When you are setting up the work . • Take breaks to stand and stretch your legs. •...
Reference Guide
Page 24
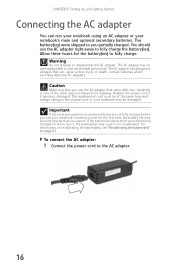
... cord must be of the same type and voltage rating as the original cord or your notebook or one of the same type purchased from Gateway. For information on recalibrating the battery(ies), see "Recalibrating the battery(ies)" on battery power for three hours, the battery(ies) may be much shorter... came with your notebook may be recalibrated. Allow three hours for the battery(ies) to you use your notebook's main and optional secondary batteries. Contact Gateway about returning defective AC adapters. The battery(ies) were shipped to fully charge.
... cord must be of the same type and voltage rating as the original cord or your notebook or one of the same type purchased from Gateway. For information on recalibrating the battery(ies), see "Recalibrating the battery(ies)" on battery power for three hours, the battery(ies) may be much shorter... came with your notebook may be recalibrated. Allow three hours for the battery(ies) to you use your notebook's main and optional secondary batteries. Contact Gateway about returning defective AC adapters. The battery(ies) were shipped to fully charge.
