
Owner s Manual
Page 3
... Up the Sport PRO System 1 Device Overviews 1 Sport PRO Handheld Device 1 Sport PRO Dog Device 1 Attaching the Dog Collar Device to the Collar Strap 1 Charging the Handheld Device 1 Charging the Dog Collar Device 1 Turning On the Dog Collar Device 2 Turning Off the Device 2 Dog Collar Device 2 Pairing a Dog Collar Device with the Handheld Device ......... 2 Selecting a Dog Collar Device 2 Fitting the Collar on Your Dog...
... Up the Sport PRO System 1 Device Overviews 1 Sport PRO Handheld Device 1 Sport PRO Dog Device 1 Attaching the Dog Collar Device to the Collar Strap 1 Charging the Handheld Device 1 Charging the Dog Collar Device 1 Turning On the Dog Collar Device 2 Turning Off the Device 2 Dog Collar Device 2 Pairing a Dog Collar Device with the Handheld Device ......... 2 Selecting a Dog Collar Device 2 Fitting the Collar on Your Dog...
Owner s Manual
Page 5
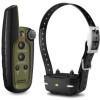
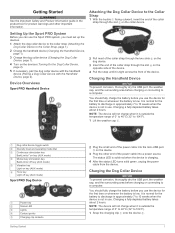
...(AUX mode) Momentary stimulation key à BarkLimiter off key (AUX mode) Vibration key Ä Light on the collar device. Á Setting Up the Sport PRO System Before you can use the Sport PRO system, you use the device for the first time or whenever the battery is low. You should fully charge the... tight across the front of the power cable into a power source. Device Overviews Sport PRO Handheld Device 2 Pull most of the collar strap through the two slots on the  dog device. 3 Insert the end of the collar strap through the slot on key (AUX mode) Tone key Å Light off...
...(AUX mode) Momentary stimulation key à BarkLimiter off key (AUX mode) Vibration key Ä Light on the collar device. Á Setting Up the Sport PRO System Before you can use the Sport PRO system, you use the device for the first time or whenever the battery is low. You should fully charge the... tight across the front of the power cable into a power source. Device Overviews Sport PRO Handheld Device 2 Pull most of the collar strap through the two slots on the  dog device. 3 Insert the end of the collar strap through the slot on key (AUX mode) Tone key Å Light off...
Owner s Manual
Page 6
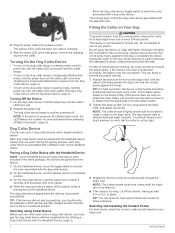
...and the intensity level is very snug around the dog's neck, and fasten the buckle. The dog must pair the dog collar device with the handheld device (Pairing a Dog Collar Device with the handheld device before it is set the intensity level to confirm powering off (Bark Odometer™, page 4). ... the Contact Points For best results, select the correct contact points based on the handheld device. Turning Off the Device 1 On the dog collar device, hold the power key for human use. NOTE: If the device is associated with the selected color. During the pairing process, each dog...
...and the intensity level is very snug around the dog's neck, and fasten the buckle. The dog must pair the dog collar device with the handheld device (Pairing a Dog Collar Device with the handheld device before it is set the intensity level to confirm powering off (Bark Odometer™, page 4). ... the Contact Points For best results, select the correct contact points based on the handheld device. Turning Off the Device 1 On the dog collar device, hold the power key for human use. NOTE: If the device is associated with the selected color. During the pairing process, each dog...

Owner s Manual
Page 7
...Sport PRO training system is an effective training tool to aid your dog in stimulation intensity Automatic Intensity The device can return to BarkLimiter Dog Training 3 Choosing the Correct Intensity Level 1 Set the intensity to the lowest level. 2 Select a training key. 3 Observe the dog for you should remove all other collars... 8 seconds. If the dog vocalizes more immediately, you press the training key, for each dog collar device. 1 Select a dog collar device (Selecting a Dog Collar Device, page 2). 2 Adjust the dial to distinguish between barking and other items from the dog ...
...Sport PRO training system is an effective training tool to aid your dog in stimulation intensity Automatic Intensity The device can return to BarkLimiter Dog Training 3 Choosing the Correct Intensity Level 1 Set the intensity to the lowest level. 2 Select a training key. 3 Observe the dog for you should remove all other collars... 8 seconds. If the dog vocalizes more immediately, you press the training key, for each dog collar device. 1 Select a dog collar device (Selecting a Dog Collar Device, page 2). 2 Adjust the dial to distinguish between barking and other items from the dog ...
Owner s Manual
Page 8
...battery life than enabling the BarkLimiter feature from the Handheld Device, page 3). Sport PRO Battery Replacement Instructions WARNING This product contains a lithium-ion battery. CAUTION Contact your dog at night. 1 Select a dog collar device (Selecting a Dog Collar Device, page 2). 2 Set the dial to AUX. 3 Select to ...50°C (from -4° to 122°F) From -20° to www.garmin.com /waterrating. Bark Odometer™ When you cannot control the dog collar device with the handheld device. 1 On the dog collar device, hold the power key until the LED flashes blue. 2 To return to...
...battery life than enabling the BarkLimiter feature from the Handheld Device, page 3). Sport PRO Battery Replacement Instructions WARNING This product contains a lithium-ion battery. CAUTION Contact your dog at night. 1 Select a dog collar device (Selecting a Dog Collar Device, page 2). 2 Set the dial to AUX. 3 Select to ...50°C (from -4° to 122°F) From -20° to www.garmin.com /waterrating. Bark Odometer™ When you cannot control the dog collar device with the handheld device. 1 On the dog collar device, hold the power key until the LED flashes blue. 2 To return to...
Owner s Manual
Page 9
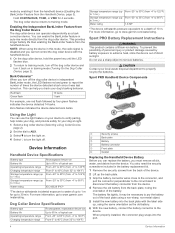
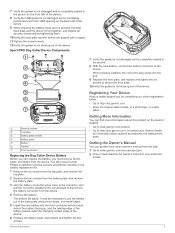
...battery connector to http://my.garmin.com. • Keep the original sales receipt, or a photocopy, in a safe place. Getting More Information You can replace the battery, you by completing our online registration today. • Go to the device. Sport PRO Dog Collar Device Components Security screws ...À Top plate Á Battery plate screws  Battery plate à Battery Ä Gasket Å Front enclosure Æ Replacing the Dog Collar Device Battery Before you can find more information ...
...battery connector to http://my.garmin.com. • Keep the original sales receipt, or a photocopy, in a safe place. Getting More Information You can replace the battery, you by completing our online registration today. • Go to the device. Sport PRO Dog Collar Device Components Security screws ...À Top plate Á Battery plate screws  Battery plate à Battery Ä Gasket Å Front enclosure Æ Replacing the Dog Collar Device Battery Before you can find more information ...

Owner s Manual
Page 10
Index A accessories 5 B bark correction 3, 4 bark odometer 4 battery charging 1 replacing 4, 5 C charging collar 1 handheld 1 collar attaching strap 1 charging 1 contact points 1, 2 fitting 2 light 4 pairing 2 contact points 1, 2 D device, registration 5 dog status 3 training 2 training basics 3 training intensity levels 3 dog collar device 1, 2 I intensity level automatic 3 changing 3 choosing 3 K keys 1 P pairing, collar 2 power key 1, 2 product registration 5 R registering the device 5 replacing the battery 4 S specifications...
Index A accessories 5 B bark correction 3, 4 bark odometer 4 battery charging 1 replacing 4, 5 C charging collar 1 handheld 1 collar attaching strap 1 charging 1 contact points 1, 2 fitting 2 light 4 pairing 2 contact points 1, 2 D device, registration 5 dog status 3 training 2 training basics 3 training intensity levels 3 dog collar device 1, 2 I intensity level automatic 3 changing 3 choosing 3 K keys 1 P pairing, collar 2 power key 1, 2 product registration 5 R registering the device 5 replacing the battery 4 S specifications...


