
Owners Manual
Page 3
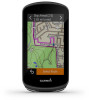
... Location 11 Courses 11 Planning and Riding a Course 11 Creating and Riding a Round-Trip Course 11 Following a Course From Garmin Connect 12 Tips for Riding a Course 12 Viewing Course Details 12 Displaying a Course on the Map 12 Using ClimbPro 12 Course...Locking the Touchscreen 1 Pairing Your Smartphone 1 Charging the Device 2 About the Battery 2 Installing the Standard Mount 2 Installing the Out-Front Mount 2 Releasing the Edge 3 Installing the Mountain Bike Mount 3 Acquiring Satellite Signals 3 Training 3 Going for Erratic Heart Rate Data 16 Installing the Speed Sensor 16...
... Location 11 Courses 11 Planning and Riding a Course 11 Creating and Riding a Round-Trip Course 11 Following a Course From Garmin Connect 12 Tips for Riding a Course 12 Viewing Course Details 12 Displaying a Course on the Map 12 Using ClimbPro 12 Course...Locking the Touchscreen 1 Pairing Your Smartphone 1 Charging the Device 2 About the Battery 2 Installing the Standard Mount 2 Installing the Out-Front Mount 2 Releasing the Edge 3 Installing the Mountain Bike Mount 3 Acquiring Satellite Signals 3 Training 3 Going for Erratic Heart Rate Data 16 Installing the Speed Sensor 16...

Owners Manual
Page 6
..., a message appears, and your device syncs automatically with your bike. NOTE: The device will not charge when outside the approved temperature range (Edge Specifications, page 23). 1 Pull up the weather cap from the handlebar connector . After you do not have sensors paired with your computer. See... where it locks into place. 2 Plug the small end of the USB cable into a standard wall outlet. NOTE: Garmin® recommends tightening the screw so the mount is oriented toward the sky. Two rubber disks are included, and you can select the disk that you connect the device...
..., a message appears, and your device syncs automatically with your bike. NOTE: The device will not charge when outside the approved temperature range (Edge Specifications, page 23). 1 Pull up the weather cap from the handlebar connector . After you do not have sensors paired with your computer. See... where it locks into place. 2 Plug the small end of the USB cable into a standard wall outlet. NOTE: Garmin® recommends tightening the screw so the mount is oriented toward the sky. Two rubber disks are included, and you can select the disk that you connect the device...

Owners Manual
Page 7
...device may take 30-60 seconds to unlock the device. 2 Lift the Edge off the mount. The time and date are set automatically based on the handlebar connector. Training 3 NOTE: Garmin recommends tightening the screw so the mount arm is ready. 3 From the home screen, select or to select... be paired and activated during initial setup. 1 Hold to mount the Edge device where it locks into place. NOTE: Garmin recommends tightening the screw so the mount is secure, with the safe operation of your device was packaged with the bike mount notches . 3 Select an option: • If the ...
...device may take 30-60 seconds to unlock the device. 2 Lift the Edge off the mount. The time and date are set automatically based on the handlebar connector. Training 3 NOTE: Garmin recommends tightening the screw so the mount arm is ready. 3 From the home screen, select or to select... be paired and activated during initial setup. 1 Hold to mount the Edge device where it locks into place. NOTE: Garmin recommends tightening the screw so the mount is secure, with the safe operation of your device was packaged with the bike mount notches . 3 Select an option: • If the ...
Owners Manual
Page 10
..., select to begin the • At any time, swipe down the time or distance until you have a Garmin Connect account (Garmin Connect, page 19). Using Garmin Connect Training Plans Before you must mount your bike on the trainer and pair it . • At any time, select to stop the activity timer.... • At any time, swipe up a training plan in your calendar. 5 Select an option: • Sync your device with the Garmin Express&#...
..., select to begin the • At any time, swipe down the time or distance until you have a Garmin Connect account (Garmin Connect, page 19). Using Garmin Connect Training Plans Before you must mount your bike on the trainer and pair it . • At any time, select to stop the activity timer.... • At any time, swipe up a training plan in your calendar. 5 Select an option: • Sync your device with the Garmin Express&#...

Owners Manual
Page 23
...your data: You can view more . The file appears in the list of files in My Computer on Windows computers and as a mounted volume on your activities on Garmin Connect. You can customize a data field to display your time in training zones during your ride (Adding a Data Screen, page 20...distance, and calories. Deleting Files NOTICE If you must empty the Trash folder to completely remove the files. Sending Your Ride to Garmin Connect • Sync your Edge device with friends to follow each other 's activities or post links to your computer. When a power meter is not compatible ...
...your data: You can view more . The file appears in the list of files in My Computer on Windows computers and as a mounted volume on your activities on Garmin Connect. You can customize a data field to display your time in training zones during your ride (Adding a Data Screen, page 20...distance, and calories. Deleting Files NOTICE If you must empty the Trash folder to completely remove the files. Sending Your Ride to Garmin Connect • Sync your Edge device with friends to follow each other 's activities or post links to your computer. When a power meter is not compatible ...
Owners Manual
Page 30
... level. Calories to Go: During a workout, the remaining calories when you are available for this data to http://buy .garmin.com, or contact your Garmin dealer. Di2 Battery Level: The remaining battery power of a bike light accessory. Go to appear. 26 Appendix Anaerobic Training ..., or contact your Garmin dealer for the current activity. Battery Status: The remaining battery power of a Di2 sensor. Distance: The remaining distance to a cadence accessory for the mounts. Assist Mode: The current eBike assistance mode. Avg Power: The average power output for information about ...
... level. Calories to Go: During a workout, the remaining calories when you are available for this data to http://buy .garmin.com, or contact your Garmin dealer. Di2 Battery Level: The remaining battery power of a bike light accessory. Go to appear. 26 Appendix Anaerobic Training ..., or contact your Garmin dealer for the current activity. Battery Status: The remaining battery power of a Di2 sensor. Distance: The remaining distance to a cadence accessory for the mounts. Assist Mode: The current eBike assistance mode. Avg Power: The average power output for information about ...
Owners Manual
Page 34
... distance, alerts 21 E eBike 18 elevation 8, 25 emergency contacts 13, 14 extended display 23 F files, transferring 19 fitness 9 30 G Garmin Connect 1, 4-6, 12, 13, 15, 19, 23 Garmin Express 15 updating software 23 GLONASS 22 goals 4, 7 GPS 6, 14, 22 signal 1, 3, 25 GroupTrack 14 H heart rate alerts 21 monitor... editing 11 finding with the map 10 sending 14 locking, screen 1 M maps 10, 12 finding locations 10 orientation 13 settings 13 updating 23 mounting the device 2, 3 N navigation 10 back to start notice message 22 storing data 19 stress score 10 system settings 22 T target 7 temperature ...
... distance, alerts 21 E eBike 18 elevation 8, 25 emergency contacts 13, 14 extended display 23 F files, transferring 19 fitness 9 30 G Garmin Connect 1, 4-6, 12, 13, 15, 19, 23 Garmin Express 15 updating software 23 GLONASS 22 goals 4, 7 GPS 6, 14, 22 signal 1, 3, 25 GroupTrack 14 H heart rate alerts 21 monitor... editing 11 finding with the map 10 sending 14 locking, screen 1 M maps 10, 12 finding locations 10 orientation 13 settings 13 updating 23 mounting the device 2, 3 N navigation 10 back to start notice message 22 storing data 19 stress score 10 system settings 22 T target 7 temperature ...
