
Complete Owners Guide
Page 1
All about the Use &Care of your Microwave Oven A06823410(August 2018) TABLE OF CONTENTS WELCOME & CONGRATULATION 2 IMPORTANT SAFETY INSTRUCTIONS 2 PART NAMES 8 CONTROL PANEL 9 SENSOR COOKING 19 CONVENIENT FEATURES 21 CLEANING AND CARE 24 SERVICE CALL CHECK 27 BEFORE OPERATING 10 MANUAL COOKING 11 AUTO COOKING 14 SPECIFICATIONS 27 WARRANTY 28 www.frigidaire.com USA 1-800-374-4432 www.frigidaire.ca Canada 1-800-265-8352
All about the Use &Care of your Microwave Oven A06823410(August 2018) TABLE OF CONTENTS WELCOME & CONGRATULATION 2 IMPORTANT SAFETY INSTRUCTIONS 2 PART NAMES 8 CONTROL PANEL 9 SENSOR COOKING 19 CONVENIENT FEATURES 21 CLEANING AND CARE 24 SERVICE CALL CHECK 27 BEFORE OPERATING 10 MANUAL COOKING 11 AUTO COOKING 14 SPECIFICATIONS 27 WARRANTY 28 www.frigidaire.com USA 1-800-374-4432 www.frigidaire.ca Canada 1-800-265-8352

Complete Owners Guide
Page 2
... the risk of toll-free customer service numbers is damaged. Model Number Serial Number Purchase Date NEED HELP? Visit the Frigidaire Web Site at 1-800-374-4432, 24 hours a day, 7 days a week. PRECAUTIONS TO AVOID POSSIBLE EXPOSURE TO EXCESSIVE MICROWAVE ENERGY (a) Do not attempt to...oven properly. This section helps you solve common problems that sold you call for future reference. It is only a phone call Frigidaire Customer Services at : http://www.frigidaire.com Before you the Microwave Oven. These instructions are not meant to the: (1) door (bent), (2) hinges and latches (...
... the risk of toll-free customer service numbers is damaged. Model Number Serial Number Purchase Date NEED HELP? Visit the Frigidaire Web Site at 1-800-374-4432, 24 hours a day, 7 days a week. PRECAUTIONS TO AVOID POSSIBLE EXPOSURE TO EXCESSIVE MICROWAVE ENERGY (a) Do not attempt to...oven properly. This section helps you solve common problems that sold you call for future reference. It is only a phone call Frigidaire Customer Services at : http://www.frigidaire.com Before you the Microwave Oven. These instructions are not meant to the: (1) door (bent), (2) hinges and latches (...

Complete Owners Guide
Page 24
... and dry with hot water. The rack can be wiped up splashes may be easier to remove any other types of microwave oven) Grease filter 24 Boil for stubborn stains use baking soda or a mild soap; The turntable motor shaft is no baking and setting of spray and other alkali; CLEANING...
... and dry with hot water. The rack can be wiped up splashes may be easier to remove any other types of microwave oven) Grease filter 24 Boil for stubborn stains use baking soda or a mild soap; The turntable motor shaft is no baking and setting of spray and other alkali; CLEANING...

Installation Instructions
Page 5
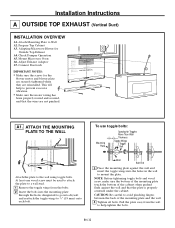
... wood pieces, if needed for top cabinet spacing (used on the top cabinet template for power cord clearance. • As a guide to installation, see page 24 for Mounting Template Information. • If the cabinet depth including the cabinet doors is more than 13'" ' then the unit must be spaced out from... the Floor to the Top of the Microwave NOTES: • The space between the cabinets must be 24" (61.0cm)wide and free of Cabinet Needs to be careful to allow proper top vent air exhaust/intake. Bottom Edge of obstructions. • If...
... wood pieces, if needed for top cabinet spacing (used on the top cabinet template for power cord clearance. • As a guide to installation, see page 24 for Mounting Template Information. • If the cabinet depth including the cabinet doors is more than 13'" ' then the unit must be spaced out from... the Floor to the Top of the Microwave NOTES: • The space between the cabinets must be 24" (61.0cm)wide and free of Cabinet Needs to be careful to allow proper top vent air exhaust/intake. Bottom Edge of obstructions. • If...

Installation Instructions
Page 7
... along the dotted line. 3/8" TO EDGE 12" 4" Trim the rear wall template along the dotted line. 24 ILLMmSTAMoOHPRAoPcCAEuERaOnCAAtKCetRTE.inETTaEDgNHnAAdpTTENTlOEamTLRtGL:OeaEL.GrCkIANLAShEEToT.IlBeOOOsNNLtoEFTOSaSlRiTIgNUn2TDwAHiODtEhDNhMITEoOIlIeOTUsHNNiEAnTRLItNh, SeEGIVDPEELNAOLTFYE C 300″3 to Cooktop Draw a...and touching the bottom cabinet frame. Plate position-beneath recessed bottom cabinet with this type of the 24" space. Use a level to make sure the cabinet bottom is level. THE MICROWAVE MUST BE ...
... along the dotted line. 3/8" TO EDGE 12" 4" Trim the rear wall template along the dotted line. 24 ILLMmSTAMoOHPRAoPcCAEuERaOnCAAtKCetRTE.inETTaEDgNHnAAdpTTENTlOEamTLRtGL:OeaEL.GrCkIANLAShEEToT.IlBeOOOsNNLtoEFTOSaSlRiTIgNUn2TDwAHiODtEhDNhMITEoOIlIeOTUsHNNiEAnTRLItNh, SeEGIVDPEELNAOLTFYE C 300″3 to Cooktop Draw a...and touching the bottom cabinet frame. Plate position-beneath recessed bottom cabinet with this type of the 24" space. Use a level to make sure the cabinet bottom is level. THE MICROWAVE MUST BE ...

Installation Instructions
Page 8
Review the Installation Instruction book for the supplied toggle bolts. 3. Installation Instructions D. For holes that the template is positioned accurately. 2. Mark two additional, evenly spaced locations for your installation situation. Where there is important to use at least one stud on the left or right side of the microwave. Darle vuelta a la hoja para consultar la versión en Español. This Rear Wall Template serves to position the bottom mounting plate and to check that do not line up with holes in the mounting plate. Locate and mark at least one ...
Review the Installation Instruction book for the supplied toggle bolts. 3. Installation Instructions D. For holes that the template is positioned accurately. 2. Mark two additional, evenly spaced locations for your installation situation. Where there is important to use at least one stud on the left or right side of the microwave. Darle vuelta a la hoja para consultar la versión en Español. This Rear Wall Template serves to position the bottom mounting plate and to check that do not line up with holes in the mounting plate. Locate and mark at least one ...

Installation Instructions
Page 10
... of the damper. Maximum duct length: For satisfactory air movement, the total duct length of exhaust and helps prevent blockages. or m Ft. or m Roof Cap 24 Ft. (7.3 m) x ( ) = Ft.
... of the damper. Maximum duct length: For satisfactory air movement, the total duct length of exhaust and helps prevent blockages. or m Ft. or m Roof Cap 24 Ft. (7.3 m) x ( ) = Ft.

Installation Instructions
Page 11
... venting performance with space between the wall studs to allow free movement of the damper. DUCT PIECES EQUIVALENT NUMBER EQUIVALENT LENGTH x USED = LENGTH Roof Cap 24 Ft. (7.3 m) x (1) = 24 Ft. (7.3 m) 12 Ft. (3.6 m) Straight Duct 12 Ft. (3.6 m) x (1) (6"/15.2 cm Round) = 12 Ft. (3.6 m) Rectangular-to-Round 5 Ft. (1.5 m) x (1) Transition Adaptor* = 5 Ft. (1.5 m) Equivalent lengths of one possible...
... venting performance with space between the wall studs to allow free movement of the damper. DUCT PIECES EQUIVALENT NUMBER EQUIVALENT LENGTH x USED = LENGTH Roof Cap 24 Ft. (7.3 m) x (1) = 24 Ft. (7.3 m) 12 Ft. (3.6 m) Straight Duct 12 Ft. (3.6 m) x (1) (6"/15.2 cm Round) = 12 Ft. (3.6 m) Rectangular-to-Round 5 Ft. (1.5 m) x (1) Transition Adaptor* = 5 Ft. (1.5 m) Equivalent lengths of one possible...
Installation Instructions
Page 12
... EITHER SIDE OF MSTHPAAERCKCEETDNHTTEOELRGOLGCINLAEET.IBOONLFTOSRIN2TAHDEDMITOIOUNNATLIN, EGVPELNALTYE AREA. CAUTION: Be careful to Wall A2. Trim the rear wall template along the dotted line. 3/8" TO EDGE 12" 24" Trim the rear wall template along the dotted line. Prepare Top Cabinet A3. NOTE: Before tightening toggle bolts and wood screw, make sure the bottom...
... EITHER SIDE OF MSTHPAAERCKCEETDNHTTEOELRGOLGCINLAEET.IBOONLFTOSRIN2TAHDEDMITOIOUNNATLIN, EGVPELNALTYE AREA. CAUTION: Be careful to Wall A2. Trim the rear wall template along the dotted line. 3/8" TO EDGE 12" 24" Trim the rear wall template along the dotted line. Prepare Top Cabinet A3. NOTE: Before tightening toggle bolts and wood screw, make sure the bottom...

Installation Instructions
Page 16
... with holes in the rear wall for outside exhaust. Trim the rear wall template along the dotted line. 3/8" TO EDGE 12" 24" Trim the rear wall template along the dotted line. 24 ILLMmSTAMOoHPRAoPcCAEuERaOnCAAtKCetRTE.inETTaEDgNHnAAdpTTENTlOEamTLRtGL:OeaEL.GrCkIANLAShEEToT.IlBeOOOsNNLtoEFTOSaSlRiTIgNUn2TDwAHiODtEhDNhMITEoOlIIeOTUsHNNiEnATRLItNh, SeEGIVDPEELNAOLTFYE • Read the instructions on the REAR WALL TEMPLATE. •...
... with holes in the rear wall for outside exhaust. Trim the rear wall template along the dotted line. 3/8" TO EDGE 12" 24" Trim the rear wall template along the dotted line. 24 ILLMmSTAMOoHPRAoPcCAEuERaOnCAAtKCetRTE.inETTaEDgNHnAAdpTTENTlOEamTLRtGL:OeaEL.GrCkIANLAShEEToT.IlBeOOOsNNLtoEFTOSaSlRiTIgNUn2TDwAHiODtEhDNhMITEoOlIIeOTUsHNNiEnATRLItNh, SeEGIVDPEELNAOLTFYE • Read the instructions on the REAR WALL TEMPLATE. •...
Installation Instructions
Page 24
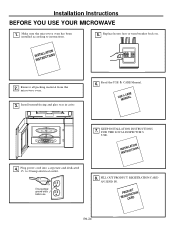
... turntable ring and glass tray in cavity. 6. KEEP INSTALLATION INSTRUCTIONS FOR THE LOCAL INSPECTOR'S USE. Plug power cord into a seperate and dedicated 15- D RPEGROISDCTUARCRATDTION D D G D G EN-24 to instructions. 5. Installation Instructions BEFORE YOU USE YOUR MICROWAVE 1. Ensure proper ground exists before use 8. Replace house fuse or turn breaker back on. Remove all...
... turntable ring and glass tray in cavity. 6. KEEP INSTALLATION INSTRUCTIONS FOR THE LOCAL INSPECTOR'S USE. Plug power cord into a seperate and dedicated 15- D RPEGROISDCTUARCRATDTION D D G D G EN-24 to instructions. 5. Installation Instructions BEFORE YOU USE YOUR MICROWAVE 1. Ensure proper ground exists before use 8. Replace house fuse or turn breaker back on. Remove all...

Installation Instructions
Page 33
... that the template is a stud, drill a 3/16" hole for toggle bolts. Darle vuelta a la hoja para consultar la versión en Español. 12" 4" 24" Locate and mark holes to align with holes in a stud to use at least one wood screw mounted firmly in the mounting plate. NOTA: NO...
... that the template is a stud, drill a 3/16" hole for toggle bolts. Darle vuelta a la hoja para consultar la versión en Español. 12" 4" 24" Locate and mark holes to align with holes in a stud to use at least one wood screw mounted firmly in the mounting plate. NOTA: NO...
Product Specifications Sheet
Page 1
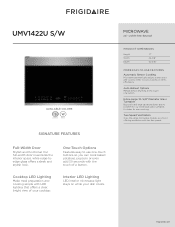
... rotates for our extra-large glass turntable. Interior LED Lighting LED interior microwave light stays on while your cooktop. MICROWAVE 24" OVER-THE-RANGE PRODUCT DIMENSIONS Height Width Depth 17" 23-7/8" 16-3/16" MORE EASY-TO-USE FEATURES Automatic Sensor ... Two Speed Ventilation Over-the-range microwave doubles as a hood offering ventilation with LED lighting that offers a clear, bright view of a button. frigidaire.com Extra-Large 13- 5/8" Diameter Glass Turntable Big bowls and large casserole dishes are no problem for even cooking. UMV1422U S/W AVAILABLE COLORS S Stainless...
... rotates for our extra-large glass turntable. Interior LED Lighting LED interior microwave light stays on while your cooktop. MICROWAVE 24" OVER-THE-RANGE PRODUCT DIMENSIONS Height Width Depth 17" 23-7/8" 16-3/16" MORE EASY-TO-USE FEATURES Automatic Sensor ... Two Speed Ventilation Over-the-range microwave doubles as a hood offering ventilation with LED lighting that offers a clear, bright view of a button. frigidaire.com Extra-Large 13- 5/8" Diameter Glass Turntable Big bowls and large casserole dishes are no problem for even cooking. UMV1422U S/W AVAILABLE COLORS S Stainless...

Product Specifications Sheet
Page 2
... codes. Note: For planning purposes only. Depth 16-3/16" Integrated Depth with Door Open 90° 39" 1.4 24" Over-the-Range Microwave Oven 1,000 Yes CUTOUT DIMENSIONS Height 16-1/2" Frigidaire Baseline White 13-5/8" Width Depth (Max.) 24" 13" Yes Yes Yes 26 High (1 - 9) MICROWAVE CONTROL OPTIONS Popcorn Button Veggies Button Sensor Reheat Button...
... codes. Note: For planning purposes only. Depth 16-3/16" Integrated Depth with Door Open 90° 39" 1.4 24" Over-the-Range Microwave Oven 1,000 Yes CUTOUT DIMENSIONS Height 16-1/2" Frigidaire Baseline White 13-5/8" Width Depth (Max.) 24" 13" Yes Yes Yes 26 High (1 - 9) MICROWAVE CONTROL OPTIONS Popcorn Button Veggies Button Sensor Reheat Button...

Product Specifications Sheet
Page 3
...22iAUdVaSE/irWe Gallery 24" OVER-THE-RANGE Locate 120V/60Hz grounded outlet inside with no less than 6" diameter. • For most efficient airflow exhaust, use on web for detailed duct preparation and converting exhaust vent blower system for exterior exhaust ventilation. Refer to at frigidaire.com USA ....) to allow proper top vent air exhaust/intake rear extrusion 16 3/16" 17" 23 7/8" lower extrusion Allow at frigidaire.com. from floor to top of microwave Rear Wall 30" min. 24" min. 2" min. 13" max.** Backsplash Cabinet MUST be mounted to BOTH a top cabinet AND a wall, ...
...22iAUdVaSE/irWe Gallery 24" OVER-THE-RANGE Locate 120V/60Hz grounded outlet inside with no less than 6" diameter. • For most efficient airflow exhaust, use on web for detailed duct preparation and converting exhaust vent blower system for exterior exhaust ventilation. Refer to at frigidaire.com USA ....) to allow proper top vent air exhaust/intake rear extrusion 16 3/16" 17" 23 7/8" lower extrusion Allow at frigidaire.com. from floor to top of microwave Rear Wall 30" min. 24" min. 2" min. 13" max.** Backsplash Cabinet MUST be mounted to BOTH a top cabinet AND a wall, ...
