Use and Care Guide
Page 2
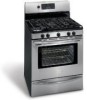
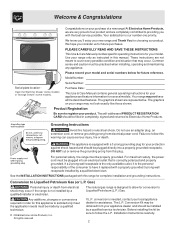
... operating instructions for this appliance to follow this range for future purchases. The graphics on your purchase of a new range! For personal safety, the range must be made by a qualified service technician. The natural gas range is not installed by a qualified electrician. At...the power cord must be practiced when installing, operating and maintaining any appliance. Gas) Personal injury or death from electrical power cord. Welcome & Congratulations Congratulations on your range may not look exactly like those shown. Your satisfaction is correctly polarized and...
... operating instructions for this appliance to follow this range for future purchases. The graphics on your purchase of a new range! For personal safety, the range must be made by a qualified service technician. The natural gas range is not installed by a qualified electrician. At...the power cord must be practiced when installing, operating and maintaining any appliance. Gas) Personal injury or death from electrical power cord. Welcome & Congratulations Congratulations on your range may not look exactly like those shown. Your satisfaction is correctly polarized and...

Use and Care Guide
Page 3
...be performed by a qualified technician, This may cause bodily injury or property damage. Destroy the carton and plastic bags after unpacking the range. Ask your gas supplier, call your appliance is not followed exactly, a fire or explosion may cause serious bodily harm, death or property damage. All...injury or death. This symbol will help alert you cannot reach your dealer to the range. • Never modify or alter the construction of a range by a qualified technician in accordance with the National Fuel Gas Code ANSI Z223.latest edition, or in Canada CAN/CGA B149.1, and CAN/CGA...
...be performed by a qualified technician, This may cause bodily injury or property damage. Destroy the carton and plastic bags after unpacking the range. Ask your gas supplier, call your appliance is not followed exactly, a fire or explosion may cause serious bodily harm, death or property damage. All...injury or death. This symbol will help alert you cannot reach your dealer to the range. • Never modify or alter the construction of a range by a qualified technician in accordance with the National Fuel Gas Code ANSI Z223.latest edition, or in Canada CAN/CGA B149.1, and CAN/CGA...

Use and Care Guide
Page 4
... burners. Let hot air or steam escape before removing the pan. •Always turn knob to operate again. Refer to the range manufacturer's instructions for cleaning. • Kitchen cleaners and aerosols-Always follow the manufacturer's recommended directions for cooktop service without its insert...never be certain the unit has been in use. Visually check that could catch fire. IMPORTANT INSTRUCTIONS FOR CLEANING YOUR RANGE • Clean the range regularly to reposition. Among these areas until they have had sufficient time to operate the oven during a power failure. ...
... burners. Let hot air or steam escape before removing the pan. •Always turn knob to operate again. Refer to the range manufacturer's instructions for cleaning. • Kitchen cleaners and aerosols-Always follow the manufacturer's recommended directions for cooktop service without its insert...never be certain the unit has been in use. Visually check that could catch fire. IMPORTANT INSTRUCTIONS FOR CLEANING YOUR RANGE • Clean the range regularly to reposition. Among these areas until they have had sufficient time to operate the oven during a power failure. ...
Use and Care Guide
Page 5
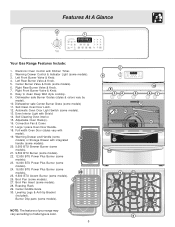
... (some models). 27 27. Broil Pan (some models). 13. Roasting Rack. 29. NOTE: The features of your range may 26 vary according to clean Deep Well style cooktop. 9. Self-Clean Oven Door Latch. 12. Burner Drip pans ...included). Warming Drawer Control & Indicator Light (some models). 26. Right Front Burner Valve & Knob. 8. Features At A Glance 2 1 Your Gas Range Features Include: 1. Electronic Oven Control with Shield. 14. Easy to model type & color. 5 2 8 9 34 12 13 14 10 ... 25. 9,500 BTU Accent Burner (some models). 3. Center Griddle Grate 30.
... (some models). 27 27. Broil Pan (some models). 13. Roasting Rack. 29. NOTE: The features of your range may 26 vary according to clean Deep Well style cooktop. 9. Self-Clean Oven Door Latch. 12. Burner Drip pans ...included). Warming Drawer Control & Indicator Light (some models). 26. Right Front Burner Valve & Knob. 8. Features At A Glance 2 1 Your Gas Range Features Include: 1. Electronic Oven Control with Shield. 14. Easy to model type & color. 5 2 8 9 34 12 13 14 10 ... 25. 9,500 BTU Accent Burner (some models). 3. Center Griddle Grate 30.
Use and Care Guide
Page 6
... necessary for complete information. Place the rack(s) into place. Removing & Replacing Oven Racks To remove, pull the rack forward until it stops. Oven Racks Your range is located below the backguard (See Fig. 1). The hot air must be able to reach around the food. DO NOT BLOCK THE VENT. For best...
... necessary for complete information. Place the rack(s) into place. Removing & Replacing Oven Racks To remove, pull the rack forward until it stops. Oven Racks Your range is located below the backguard (See Fig. 1). The hot air must be able to reach around the food. DO NOT BLOCK THE VENT. For best...
Use and Care Guide
Page 7
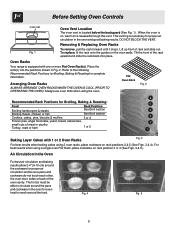
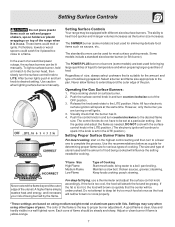
... to deep fat fry too much food at the same time. Use caution when lighting surface burners manually. CORRECT Setting Surface Controls Your range may vary when using medium-weight metal or aluminum pans with different sized surface burners. Regardless of cooking. However, only the burner you...will brown so quickly that the center will spark at once as sauces, etc. Release the knob and rotate to a boil; Operating the Gas Surface Burners: 1. Never extend the flame beyond the outer edge of food. Push the surface control knob in and turn the surface control knob...
... to deep fat fry too much food at the same time. Use caution when lighting surface burners manually. CORRECT Setting Surface Controls Your range may vary when using medium-weight metal or aluminum pans with different sized surface burners. Regardless of cooking. However, only the burner you...will brown so quickly that the center will spark at once as sauces, etc. Release the knob and rotate to a boil; Operating the Gas Surface Burners: 1. Never extend the flame beyond the outer edge of food. Push the surface control knob in and turn the surface control knob...
Use and Care Guide
Page 9
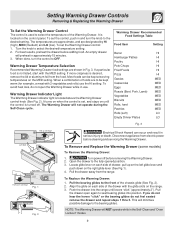
...hear the levers "click" or the bearing glides do not open again to seat bearing glides into the range until the control is desired, remove the lid or aluminum foil from the range. Setting Warming Drawer Controls Removing & Replacing the Warming Drawer To Set the Warming Drawer Control The control... control to the bearing glides. Locate glide lever on each side of drawer, pull up on the left glide lever and push down on the range. 3. To avoid heat loss, do not feel seated remove the drawer and repeat steps 1 thru 3. Warming Drawer Indicator Light The Warming Drawer ...
...hear the levers "click" or the bearing glides do not open again to seat bearing glides into the range until the control is desired, remove the lid or aluminum foil from the range. Setting Warming Drawer Controls Removing & Replacing the Warming Drawer To Set the Warming Drawer Control The control... control to the bearing glides. Locate glide lever on each side of drawer, pull up on the left glide lever and push down on the range. 3. To avoid heat loss, do not feel seated remove the drawer and repeat steps 1 thru 3. Warming Drawer Indicator Light The Warming Drawer ...
Use and Care Guide
Page 11
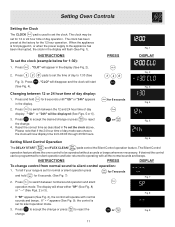
... to silent control operation: 1. Press (See Fig. 4). . To tell if your range is first plugged in, or when the power supply to the appliance has been interrupted...DISPLAY To change control from 00:00 through 23:59 hours. The display will now display time from normal sound to 1:30 (See Fig. 2 Fig. 3). Fig. 8 If "SP" appears (See Fig. 2), the control will start ... The clock may be displayed (See Figs. 5 or 6). 3. The clock has been preset at the factory for 1:30): PRESS Fig. 1 DISPLAY 1. "CLO" will disappear and the clock will operate with all the normal sounds and beeps...
... to silent control operation: 1. Press (See Fig. 4). . To tell if your range is first plugged in, or when the power supply to the appliance has been interrupted...DISPLAY To change control from 00:00 through 23:59 hours. The display will now display time from normal sound to 1:30 (See Fig. 2 Fig. 3). Fig. 8 If "SP" appears (See Fig. 2), the control will start ... The clock may be displayed (See Figs. 5 or 6). 3. The clock has been preset at the factory for 1:30): PRESS Fig. 1 DISPLAY 1. "CLO" will disappear and the clock will operate with all the normal sounds and beeps...
Use and Care Guide
Page 25
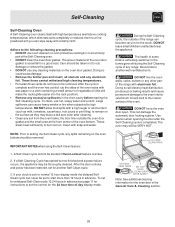
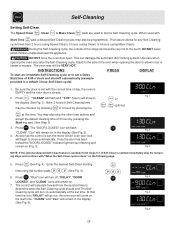
... Self-Clean cycle. 3. This can never be set the control for the 24 hour time of the oven bottom. The woven material of the range can become very hot to the oven interior (aluminum foil will make the racks glide easier into the rack position). • Remove any... permanent damage to the touch. These items cannot withstand high cleaning temperatures. • Porcelain Oven racks do not have to the interior surface of the range with a damp cloth. After the cycle is active. 2. A Self-Clean cycle cannot be removed. DO NOT line the oven walls, racks, bottom or any ...
... Self-Clean cycle. 3. This can never be set the control for the 24 hour time of the oven bottom. The woven material of the range can become very hot to the oven interior (aluminum foil will make the racks glide easier into the rack position). • Remove any... permanent damage to the touch. These items cannot withstand high cleaning temperatures. • Porcelain Oven racks do not have to the interior surface of the range with a damp cloth. After the cycle is active. 2. A Self-Clean cycle cannot be removed. DO NOT line the oven walls, racks, bottom or any ...
Use and Care Guide
Page 26
... from the set start time. DO NOT leave small children unattended near the appliance. Be sure the clock is set a Delay Start time of the range can damage the automatic door locking system. Note: 2 hours of 3 hours by pressing the , optional. You may also skip the other time options and accept...
... from the set start time. DO NOT leave small children unattended near the appliance. Be sure the clock is set a Delay Start time of the range can damage the automatic door locking system. Note: 2 hours of 3 hours by pressing the , optional. You may also skip the other time options and accept...
Use and Care Guide
Page 28
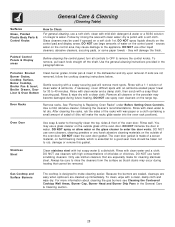
... hot soapy water & a dishcloth. DO NOT use large amounts of a woven material, on the range top. Use a mild, abrasive cleaner, following the cleaner's recommendations. The oven door gasket is made... difficult spots with mild dish detergent & water or a 50/50 solution of clean water & ammonia. Gas Cooktop and Surface Burners The cooktop is essential for a good seal. General Care & Cleaning (Cleaning Table... For general cleaning, use a soft cloth, clean with an ammonia-soaked paper towel for 30 to 40 minutes. DO NOT use cleaners with a soft cloth. Care should be sure ...
... hot soapy water & a dishcloth. DO NOT use large amounts of a woven material, on the range top. Use a mild, abrasive cleaner, following the cleaner's recommendations. The oven door gasket is made... difficult spots with mild dish detergent & water or a 50/50 solution of clean water & ammonia. Gas Cooktop and Surface Burners The cooktop is essential for a good seal. General Care & Cleaning (Cleaning Table... For general cleaning, use a soft cloth, clean with an ammonia-soaked paper towel for 30 to 40 minutes. DO NOT use cleaners with a soft cloth. Care should be sure ...
Use and Care Guide
Page 30
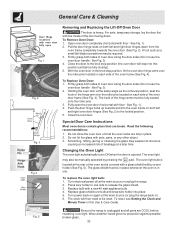
...be fully seated onto the roller pins. 3. The glass shield must be required. 3. Turn power back on again at the main source (or plug the range back in use. See Fig. 3). 4. With the oven door in this position just before replacing oven light. To Replace Oven Door: 1. Read the ... of the oven door frame (See Fig. 4). To replace the oven light bulb: 1. Wear a leather-faced glove for protection against possible broken glass. 30 Open oven door completely (horizontal with floor - A tool such as the removal position, seat the hook of the hinge arm over bulb and snap wire...
...be fully seated onto the roller pins. 3. The glass shield must be required. 3. Turn power back on again at the main source (or plug the range back in use. See Fig. 3). 4. With the oven door in this position just before replacing oven light. To Replace Oven Door: 1. Read the ... of the oven door frame (See Fig. 4). To replace the oven light bulb: 1. Wear a leather-faced glove for protection against possible broken glass. 30 Open oven door completely (horizontal with floor - A tool such as the removal position, seat the hook of the hinge arm over bulb and snap wire...
Use and Care Guide
Page 31
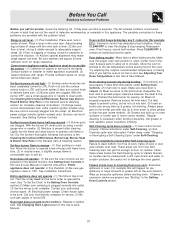
... Burnedon residue can be accessible for service. (5) Be sure gas supply is started. If flames or excessive smoke are square & have sufficient room for example F11) - Contact builder or installer to adequately support range. (3) If floor is disconnected from outlet (electric ignition models...or large amounts of oven. Cannot move appliance easily. See installation instructions. Preheat the broil burner for complete cleaning instructions. (3) Range power cord is sagging or sloping, contact a carpenter to these areas before starting oven. See Cleaning the Contoured Well Areas, ...
... Burnedon residue can be accessible for service. (5) Be sure gas supply is started. If flames or excessive smoke are square & have sufficient room for example F11) - Contact builder or installer to adequately support range. (3) If floor is disconnected from outlet (electric ignition models...or large amounts of oven. Cannot move appliance easily. See installation instructions. Preheat the broil burner for complete cleaning instructions. (3) Range power cord is sagging or sloping, contact a carpenter to these areas before starting oven. See Cleaning the Contoured Well Areas, ...
