
Use and Care Guide
Page 1
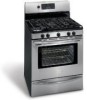
RaGnasge Visit the Frigidaire Web Site at: http://www.frigidaire.com Welcome 2 ES530 Control, Self-Cleaning Oven with Deep Well Style Cooktop Important Safety Instructions .....3-4 Features at a Glance 5 Before Setting Oven Controls ....... 6 Setting Surface Controls 7 ... Adjusting Oven Temperature....... 27 Questions or for Service Call: 1-800-944-9044 (U.S.) 1-800-668-4606 (Canada) READ AND SAVE THESE INSTRUCTIONS General Care & Cleaning ....... 28-30 Before You Call Solutions to Common Problems 31 Warranty Back Page p/n 316417171 Rev A (0906)
RaGnasge Visit the Frigidaire Web Site at: http://www.frigidaire.com Welcome 2 ES530 Control, Self-Cleaning Oven with Deep Well Style Cooktop Important Safety Instructions .....3-4 Features at a Glance 5 Before Setting Oven Controls ....... 6 Setting Surface Controls 7 ... Adjusting Oven Temperature....... 27 Questions or for Service Call: 1-800-944-9044 (U.S.) 1-800-668-4606 (Canada) READ AND SAVE THESE INSTRUCTIONS General Care & Cleaning ....... 28-30 Before You Call Solutions to Common Problems 31 Warranty Back Page p/n 316417171 Rev A (0906)
Use and Care Guide
Page 5
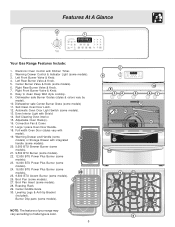
... (some models). 26. Large 1 piece Oven Door Handle. 18. Broil Pan (some models). 28. Center Griddle Grate 30. Right Rear Burner Valve & Knob. 7. Self-Clean Oven Door Latch. 12. Self-Cleaning Oven interior. 15. Adjustable ...23 22 24 Dishwasher safe Center Burner Grate (some models). Roasting Rack. 29. NOTE: The features of your range may 26 vary according to clean Deep Well style cooktop. 9. Left Front Burner Valve & Knob. 4. Warming .... 17. Oven Interior Light with model). 19. Features At A Glance 2 1 Your Gas Range Features Include: 1.
... (some models). 26. Large 1 piece Oven Door Handle. 18. Broil Pan (some models). 28. Center Griddle Grate 30. Right Rear Burner Valve & Knob. 7. Self-Clean Oven Door Latch. 12. Self-Cleaning Oven interior. 15. Adjustable ...23 22 24 Dishwasher safe Center Burner Grate (some models). Roasting Rack. 29. NOTE: The features of your range may 26 vary according to clean Deep Well style cooktop. 9. Left Front Burner Valve & Knob. 4. Warming .... 17. Oven Interior Light with model). 19. Features At A Glance 2 1 Your Gas Range Features Include: 1.
Use and Care Guide
Page 11
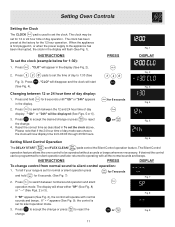
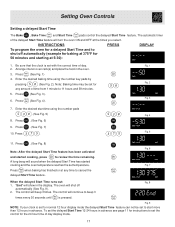
... 1). If " - -" appears (See Fig. 9), the control is set the clock above. The clock may be displayed (See Figs. 5 or 6). 3. To tell if your range is set for normal or silent operation press for 7seconds and hold for 6 seconds untill "12h" or "24h" appears for 6 seconds in the display will.... Setting Oven Controls Setting the Clock The CLOCK pad is used to set the clock (example below for 1:30): PRESS Fig. 1 DISPLAY 1. Press . Press and hold for silent operation and later returned to 1:30 (See Fig. 2 Fig. 3). "12h" or "24h" will appear in , or when the power supply ...
... 1). If " - -" appears (See Fig. 9), the control is set the clock above. The clock may be displayed (See Figs. 5 or 6). 3. To tell if your range is set for normal or silent operation press for 7seconds and hold for 6 seconds untill "12h" or "24h" appears for 6 seconds in the display will.... Setting Oven Controls Setting the Clock The CLOCK pad is used to set the clock (example below for 1:30): PRESS Fig. 1 DISPLAY 1. Press . Press and hold for silent operation and later returned to 1:30 (See Fig. 2 Fig. 3). "12h" or "24h" will appear in , or when the power supply ...
Use and Care Guide
Page 16
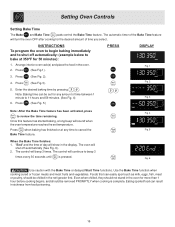
... should be removed PROMPTLY when cooking is pressed. Press . (See Fig. 5 ) Note: After the Bake Time feature has been activated, press to beep 3 times every 30 seconds until is complete. Use the Bake Time function when cooking cured or frozen meats and most fruits and vegetables. The oven will beep 3 times.
... should be removed PROMPTLY when cooking is pressed. Press . (See Fig. 5 ) Note: After the Bake Time feature has been activated, press to beep 3 times every 30 seconds until is complete. Use the Bake Time function when cooking cured or frozen meats and most fruits and vegetables. The oven will beep 3 times.
Use and Care Guide
Page 17
... the correct time of day display mode. 17 "End" will turn the oven ON and OFF at 5:30): 1. The control will sound when the delayed Start Time has started cooking, press to beep 3 times every 30 seconds until is set for 50 minutes and starting at the times you select. Fig. 9 NOTE...
... the correct time of day display mode. 17 "End" will turn the oven ON and OFF at 5:30): 1. The control will sound when the delayed Start Time has started cooking, press to beep 3 times every 30 seconds until is set for 50 minutes and starting at the times you select. Fig. 9 NOTE...
Use and Care Guide
Page 20
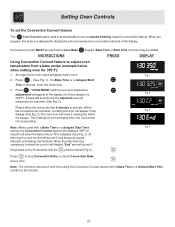
... desired, enter the times now. 3. Note: When used with a Bake Time or a delayed Start Time setting, the Convection Convert feature will sound 3 long beeps every 30 seconds until baking has finished. Setting Oven Controls To set the Convection Convert feature The Conv Convert pad is used to automatically convert a standard baking...
... desired, enter the times now. 3. Note: When used with a Bake Time or a delayed Start Time setting, the Convection Convert feature will sound 3 long beeps every 30 seconds until baking has finished. Setting Oven Controls To set the Convection Convert feature The Conv Convert pad is used to automatically convert a standard baking...
Use and Care Guide
Page 21
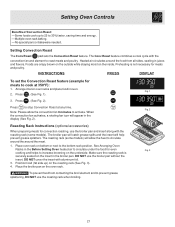
... help prevent grease splatters. The roasting rack (some models). See Arranging Oven Racks in juices and flavors. Position food (fat side up to 25 to 30% faster, saving time and energy. -Multiple oven rack baking. -No special pans or bakeware needed. Arrange interior oven racks and place food in the broiler...
... help prevent grease splatters. The roasting rack (some models). See Arranging Oven Racks in juices and flavors. Position food (fat side up to 25 to 30% faster, saving time and energy. -Multiple oven rack baking. -No special pans or bakeware needed. Arrange interior oven racks and place food in the broiler...

Use and Care Guide
Page 27
... the temperature use the number pads to reject the change the Self-Clean cycle temperature. Press to enter the desired change. (Example -30°F) and then press (Fig. 5). Press change and the display will remain in the oven can then be adjusted. Press to ...or Interrupting a Self-Cleaning cycle: If it becomes necessary to stop or interrupt a Self-Cleaning cycle due to accept the temperature change . (Example 30°F) (Fig. 2). To decrease the temperature use the number pads to enter the desired change and the display Fig. 2 will return to the...
... the temperature use the number pads to reject the change the Self-Clean cycle temperature. Press to enter the desired change. (Example -30°F) and then press (Fig. 5). Press change and the display will remain in the oven can then be adjusted. Press to ...or Interrupting a Self-Cleaning cycle: If it becomes necessary to stop or interrupt a Self-Cleaning cycle due to accept the temperature change . (Example 30°F) (Fig. 2). To decrease the temperature use the number pads to enter the desired change and the display Fig. 2 will return to the...
Use and Care Guide
Page 28
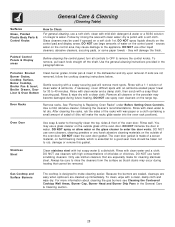
...& let dry. DO NOT spray liquids directly on the outside of water on the range top. DO NOT use harsh scrubbing cleaners. Porcelain Enamel Burner Grates, Cooktop Surface, Below... Steel Clean stainless steel with a soap-filled scouring pad. For more information about cleaning the gas burners see Cleaning the Contoured Cooktop Well Areas, Burner Cap, Burner Head and Burner Drip Pans...of the oven door. If necessary, cover difficult spots with an ammonia-soaked paper towel for 30 to rub, damage or remove this will make cleaning easier. Care should be removed. To...
...& let dry. DO NOT spray liquids directly on the outside of water on the range top. DO NOT use harsh scrubbing cleaners. Porcelain Enamel Burner Grates, Cooktop Surface, Below... Steel Clean stainless steel with a soap-filled scouring pad. For more information about cleaning the gas burners see Cleaning the Contoured Cooktop Well Areas, Burner Cap, Burner Head and Burner Drip Pans...of the oven door. If necessary, cover difficult spots with an ammonia-soaked paper towel for 30 to rub, damage or remove this will make cleaning easier. Care should be removed. To...
Use and Care Guide
Page 30
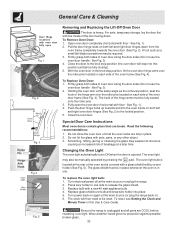
... be fully seated onto the roller pins. 3. The glass shield must be required. 3. Wear a leather-faced glove for protection against possible broken glass. 30 Changing the Oven Light The oven light automatically turns ON when the door is covered with pots, pans, or any other object. 3. Fig. 5 Be... sure the range is in use the oven door handle - To Remove Oven Door: 1. Push the door hinge locks up towards the oven door (See Fig. 2). ...
... be fully seated onto the roller pins. 3. The glass shield must be required. 3. Wear a leather-faced glove for protection against possible broken glass. 30 Changing the Oven Light The oven light automatically turns ON when the door is covered with pots, pans, or any other object. 3. Fig. 5 Be... sure the range is in use the oven door handle - To Remove Oven Door: 1. Push the door hinge locks up towards the oven door (See Fig. 2). ...
