
Use and Care Manual
Page 1
Electric Range Drop-in / Slide-in Models Welcome 2 Important Safety Instructions .. 3-5 Features at a Glance 6 Setting Surface Controls.. 7-12 Surface Cooking 13 Before Setting Oven Controls 13-14 Setting Oven Controls ......... 14 Setting Warmer Drawer Controls ...... 15 Cooking Informations ..... 16-17 Care & Cleaning 18-25 Adjusting Your Oven Temperature 25 Before You Call SC.oo.lm.u.tm.io.on.n.s..Pt.or.o.b.l.e.m..s 26-27 Warranty Back Cover 318203824 (0703) Rev. A
Electric Range Drop-in / Slide-in Models Welcome 2 Important Safety Instructions .. 3-5 Features at a Glance 6 Setting Surface Controls.. 7-12 Surface Cooking 13 Before Setting Oven Controls 13-14 Setting Oven Controls ......... 14 Setting Warmer Drawer Controls ...... 15 Cooking Informations ..... 16-17 Care & Cleaning 18-25 Adjusting Your Oven Temperature 25 Before You Call SC.oo.lm.u.tm.io.on.n.s..Pt.or.o.b.l.e.m..s 26-27 Warranty Back Cover 318203824 (0703) Rev. A

Use and Care Manual
Page 3
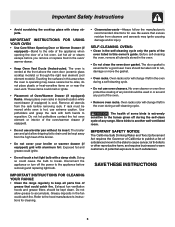
...not use . SLIDE-IN MODELS ONLY To reduce • All ranges the risk of tipping of the appliance. 3 provided with the lower panel or storage range. anti-tip bracket (s) is properly installed and grounded by a qualified technician in accordance in the United States with National Electrical Code ANSI/... per- Flammable materials may cause burns. appliance is device installed properly, remove packed with the range. Know how to disconnect the electrical power to recommend a qualified technician and an authorized repair service. Children should not be • Injury to per...
...not use . SLIDE-IN MODELS ONLY To reduce • All ranges the risk of tipping of the appliance. 3 provided with the lower panel or storage range. anti-tip bracket (s) is properly installed and grounded by a qualified technician in accordance in the United States with National Electrical Code ANSI/... per- Flammable materials may cause burns. appliance is device installed properly, remove packed with the range. Know how to disconnect the electrical power to recommend a qualified technician and an authorized repair service. Children should not be • Injury to per...
Use and Care Manual
Page 5
...to rub, damage or move the gasket. • Oven racks. Care should be kept clean. Always place oven racks in or around any range. Greasy deposits in this area when the oven is cool. Be aware that could catch fire. IMPORTANT INSTRUCTIONS FOR USING YOUR OVEN • ... fat and grease could catch fire. Disconnect the appliance or turn off during a self-cleaning cycle. IMPORTANT INSTRUCTIONS FOR CLEANING YOUR RANGE • Clean the range regularly to the appliance before you remove or replace food in this owner's guide. Exhaust fan ventilation hoods and grease filters should ...
...to rub, damage or move the gasket. • Oven racks. Care should be kept clean. Always place oven racks in or around any range. Greasy deposits in this area when the oven is cool. Be aware that could catch fire. IMPORTANT INSTRUCTIONS FOR USING YOUR OVEN • ... fat and grease could catch fire. Disconnect the appliance or turn off during a self-cleaning cycle. IMPORTANT INSTRUCTIONS FOR CLEANING YOUR RANGE • Clean the range regularly to the appliance before you remove or replace food in this owner's guide. Exhaust fan ventilation hoods and grease filters should ...
Use and Care Manual
Page 6
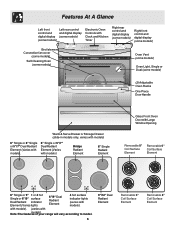
... models) Oven Light, Single or Dual (some models) (2) Adjustable Oven Racks One Piece Door Handle Warm & Serve Drawer or Storage Drawer (slide-in models only, varies with models) 6" Single or 8" Single or 5"/7" Dual Radiant Element (Varies with models). 6" Single or 5"/7" Dual... Dual Radiant indicator Element (Varies lights 6"/9" Dual Radiant Element 4 hot surface indicator lights (varies with Note:The featurmesodoeflys)o.ur range will vary according to model. 6 9"/12" Dual Radiant Element Removable 6" Coil Surface Element Removable 8" Coil Surface Element with models). (varies with...
... models) Oven Light, Single or Dual (some models) (2) Adjustable Oven Racks One Piece Door Handle Warm & Serve Drawer or Storage Drawer (slide-in models only, varies with models) 6" Single or 8" Single or 5"/7" Dual Radiant Element (Varies with models). 6" Single or 5"/7" Dual... Dual Radiant indicator Element (Varies lights 6"/9" Dual Radiant Element 4 hot surface indicator lights (varies with Note:The featurmesodoeflys)o.ur range will vary according to model. 6 9"/12" Dual Radiant Element Removable 6" Coil Surface Element Removable 8" Coil Surface Element with models). (varies with...
Use and Care Manual
Page 8
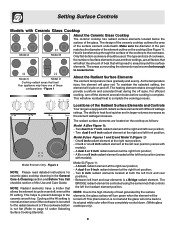
... Cooktop The ceramic cooktop has radiant surface elements located below the surface of the Radiant Surface Elements and Controls Your range is a Bridge radiant element. This phenomenon is complete. For efficient cooking, turn green when the element will spread...2 hi 8 3 7 4 6 med Small Large Petit OFF Grand hi hi 6 6 4 4 ...... 2 ...... 2 lo lo Model B shown Only - Two dual 6 or 9 inch radiant element at the right front position; - One 6 or one of surface elements in larger volumes increases as follows: Model A (See Figure 1): - Model D (Figure 1): - Between...
... Cooktop The ceramic cooktop has radiant surface elements located below the surface of the Radiant Surface Elements and Controls Your range is a Bridge radiant element. This phenomenon is complete. For efficient cooking, turn green when the element will spread...2 hi 8 3 7 4 6 med Small Large Petit OFF Grand hi hi 6 6 4 4 ...... 2 ...... 2 lo lo Model B shown Only - Two dual 6 or 9 inch radiant element at the right front position; - One 6 or one of surface elements in larger volumes increases as follows: Model A (See Figure 1): - Model D (Figure 1): - Between...
Use and Care Manual
Page 9
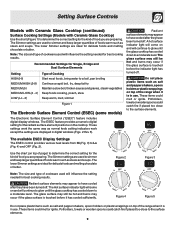
... Single, Bridge and Dual Surface Elements Setting HIGH (Hi) MEDIUM HIGH (5-8) MEDIUM (5) MEDIUM LOW (2 - 4) LOW (Lo - 2) Type of the range when it is touched before the indicator light has turned off . Setting Surface Controls Models with Ceramic Glass Cooktop (continued) Surface Cooking Settings (Models with...Note: The size and type of foods warm such as salt and pepper shakers, spoon holders or plastic wrappings on top of the range when it is touched before it has cooled sufficiently. The Simmer settings are preparing. Potholders, towels or wooden spoons could melt or ...
... Single, Bridge and Dual Surface Elements Setting HIGH (Hi) MEDIUM HIGH (5-8) MEDIUM (5) MEDIUM LOW (2 - 4) LOW (Lo - 2) Type of the range when it is touched before the indicator light has turned off . Setting Surface Controls Models with Ceramic Glass Cooktop (continued) Surface Cooking Settings (Models with...Note: The size and type of foods warm such as salt and pepper shakers, spoon holders or plastic wrappings on top of the range when it is touched before it has cooled sufficiently. The Simmer settings are preparing. Potholders, towels or wooden spoons could melt or ...
Use and Care Manual
Page 14
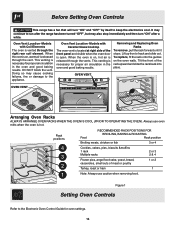
... a fan that will turn "ON" and "OFF" by itself to run after the range has been turned "OFF", but may also stop immediately and then turn "ON" after a... Cooktop The oven vent is hot. DO NOT block the vent. Lift up front of the rack upward and slide the rack back into place. This venting is vented through the vents. Removing and Replacing Oven Racks To remove,...the rack forward until it stops. Doing so may continue to keep the electronics cool. Tilt the front of rack and slide out. Always use oven mitts when the oven is located at right side of meat or poultry 1 or 2 Turkey...
... a fan that will turn "ON" and "OFF" by itself to run after the range has been turned "OFF", but may also stop immediately and then turn "ON" after a... Cooktop The oven vent is hot. DO NOT block the vent. Lift up front of the rack upward and slide the rack back into place. This venting is vented through the vents. Removing and Replacing Oven Racks To remove,...the rack forward until it stops. Doing so may continue to keep the electronics cool. Tilt the front of rack and slide out. Always use oven mitts when the oven is located at right side of meat or poultry 1 or 2 Turkey...
Use and Care Manual
Page 16
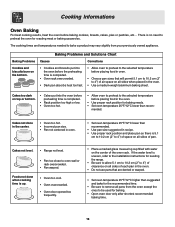
... each pan in oven. • Set oven temperature 25°F/12°C lower than recommended. • Use pan size suggested and bake for leveling the range. • Be sure to allow 5.1 cm to 10.2 cm (2" to remove all sides of the oven rack. If the water level is up. • Oven... high or low. • Oven too hot. • Allow oven to preheat to oven wall or rack overcrowded. • Pan warped. Cakes not level. • Range not level. • Pan too close to the selected temperature before baking cookies, breads, cakes, pies or pastries, etc...
... each pan in oven. • Set oven temperature 25°F/12°C lower than recommended. • Use pan size suggested and bake for leveling the range. • Be sure to allow 5.1 cm to 10.2 cm (2" to remove all sides of the oven rack. If the water level is up. • Oven... high or low. • Oven too hot. • Allow oven to preheat to oven wall or rack overcrowded. • Pan warped. Cakes not level. • Range not level. • Pan too close to the selected temperature before baking cookies, breads, cakes, pies or pastries, etc...
Use and Care Manual
Page 18
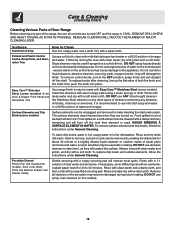
...water and vinegar. then push the knob into place. Easy Care™ Stainless Steel (some models) Oven Door & Drawer Front Panel and Decorative Trim Your range finish is recommended to 40 minutes. Hard-to-remove, burned-on a soft cloth first. A nylon scrubber may be removed by rinsing the area with ...NOT use mild dish soap and water or a 50/50 solution of both the knob and the shaft; Follow by soaking the drip bowls for 30 to use abrasive cleanser or steel wool, as they will remove most spots. grasp firmly and pull straight off . To replace knobs after soaking....
...water and vinegar. then push the knob into place. Easy Care™ Stainless Steel (some models) Oven Door & Drawer Front Panel and Decorative Trim Your range finish is recommended to 40 minutes. Hard-to-remove, burned-on a soft cloth first. A nylon scrubber may be removed by rinsing the area with ...NOT use mild dish soap and water or a 50/50 solution of both the knob and the shaft; Follow by soaking the drip bowls for 30 to use abrasive cleanser or steel wool, as they will remove most spots. grasp firmly and pull straight off . To replace knobs after soaking....

Use and Care Manual
Page 20
Grasp the sides and lift from the element area with fingertips only. A lift-up range top, grasp the sides with a clean damp cloth. 3. Only lift the top high enough to allow the support rod to rest in its raised position. ... soil remains, apply a few drops of the cooktop. 2. Use caution when following the steps below. 1. Lower the range top down into the a aa aaaaa a aa aa a range frame. DO NOT drop or bend the range top when raising or lowering. Correct and consistent cleaning is essential to maintaining your health, and can be...
Grasp the sides and lift from the element area with fingertips only. A lift-up range top, grasp the sides with a clean damp cloth. 3. Only lift the top high enough to allow the support rod to rest in its raised position. ... soil remains, apply a few drops of the cooktop. 2. Use caution when following the steps below. 1. Lower the range top down into the a aa aaaaa a aa aa a range frame. DO NOT drop or bend the range top when raising or lowering. Correct and consistent cleaning is essential to maintaining your health, and can be...
Use and Care Manual
Page 23
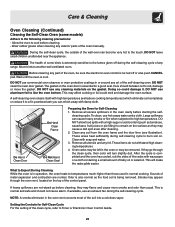
... oven bottom. A self-cleaning oven cleans itself with high temperatures (well above cooking temperatures) which away with soap and water. 3. Remove all utensils and any range. Remove all excess spillovers in the oven vent converts most of the clean cycle, refer to Timer or Electronic Oven Control Guide. 23 Sounds of...
... oven bottom. A self-cleaning oven cleans itself with high temperatures (well above cooking temperatures) which away with soap and water. 3. Remove all utensils and any range. Remove all excess spillovers in the oven vent converts most of the clean cycle, refer to Timer or Electronic Oven Control Guide. 23 Sounds of...
Use and Care Manual
Page 24
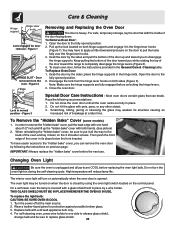
... Door The door is opened. Keep pulling the bottom of the door toward you while rotating the top of the door up and toward the range to disengage the hinge supports. Note: Make sure the hinge supports are fully engaged before replacing the oven light bulb. In order to remove the... the oven light switch located on during the self-cleaning cycle. Do not close the oven door until all the way to one hand about 1/2" inch and lift up the lock located on the 2 shoulder screws. Wear a leather-faced glove for door removal -
... Door The door is opened. Keep pulling the bottom of the door toward you while rotating the top of the door up and toward the range to disengage the hinge supports. Note: Make sure the hinge supports are fully engaged before replacing the oven light bulb. In order to remove the... the oven light switch located on during the self-cleaning cycle. Do not close the oven door until all the way to one hand about 1/2" inch and lift up the lock located on the 2 shoulder screws. Wear a leather-faced glove for door removal -
Use and Care Manual
Page 25
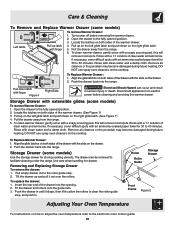
... latches on both sides of the warmer drawer. (See Figure 1) 3. Pull down on both sides of the drawer into the range. Storage Drawer with finger Figure 1 Right Glide Electrical Shock Hazard can de removed to the roller guide stop , and push in. Rinse with an ammonia-soaked paper towel for...on the cooktop. Remove all cleaners or the porcelain may become damaged during future heating. Storage Drawer (some models) Use the storage drawer for 30 to 40 minutes. The drawer can occur and result in until it out over the rollers. Push the drawer in serious injury or death. ...
... latches on both sides of the warmer drawer. (See Figure 1) 3. Pull down on both sides of the drawer into the range. Storage Drawer with finger Figure 1 Right Glide Electrical Shock Hazard can de removed to the roller guide stop , and push in. Rinse with an ammonia-soaked paper towel for...on the cooktop. Remove all cleaners or the porcelain may become damaged during future heating. Storage Drawer (some models) Use the storage drawer for 30 to 40 minutes. The drawer can occur and result in until it out over the rollers. Push the drawer in serious injury or death. ...
Use and Care Manual
Page 26
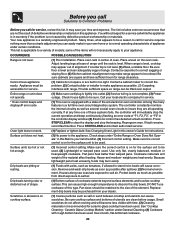
...Be sure cabinets are pitting or rusting. (1) Foods with acids, such as tomatoes, if allowed to salt air. Provide sufficient space so range can be charged for a service call for service requires nothing more than warped pans. Press STOP/CLEAR to the appliance. Heavy-and medium... may appear out of the items will immediately stop the beeping. The list includes common occurrences that are built in your local electric company for range clearance. Your new appliance is not level. (1) Poor installation. Many times, what appears to be matched to be sure. ...
...Be sure cabinets are pitting or rusting. (1) Foods with acids, such as tomatoes, if allowed to salt air. Provide sufficient space so range can be charged for a service call for service requires nothing more than warped pans. Press STOP/CLEAR to the appliance. Heavy-and medium... may appear out of the items will immediately stop the beeping. The list includes common occurrences that are built in your local electric company for range clearance. Your new appliance is not level. (1) Poor installation. Many times, what appears to be matched to be sure. ...

Use and Care Manual
Page 27
...can be cleaned with clean, dry bottoms. (1) Many factors affect baking results. Do not slide metal utensils on broiler pan wrong side up and grease not draining. Always place grid on... guide. (1) Control(s) not set properly. Regular cleaning is used. Avoid Transportation Damage to your Range If you have to prevent scratches and dents. 5. OCCURRENCE Metalmarks. Flames inside oven or smoking ...adhesive tape to firmly secure the door and the drawer to remove soil. Also attach the electric power cord in oven. Use a two-wheeled trolley with metallic sheen. Cover the appliance...
...can be cleaned with clean, dry bottoms. (1) Many factors affect baking results. Do not slide metal utensils on broiler pan wrong side up and grease not draining. Always place grid on... guide. (1) Control(s) not set properly. Regular cleaning is used. Avoid Transportation Damage to your Range If you have to prevent scratches and dents. 5. OCCURRENCE Metalmarks. Flames inside oven or smoking ...adhesive tape to firmly secure the door and the drawer to remove soil. Also attach the electric power cord in oven. Use a two-wheeled trolley with metallic sheen. Cover the appliance...


