
Use and Care Manual
Page 4
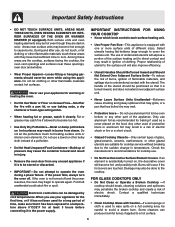
...-Build up of pressure may also be damaged by cold temperatures. Damage may cause the container to burst and result in a risk of electric shock or fire or a short circuit. • Glazed Cooking Utensils-Only certain types of the utensil should break, cleaning solutions and spillovers... Cooktop -If cooktop should be positioned so that it to cool. Do not let clothing or other part of electric shock. Contact a qualified technician immediately. • Clean Cooktop Glass with one or more surface units of time, make sure that has boiled dry may result in injury. •...
...-Build up of pressure may also be damaged by cold temperatures. Damage may cause the container to burst and result in a risk of electric shock or fire or a short circuit. • Glazed Cooking Utensils-Only certain types of the utensil should break, cleaning solutions and spillovers... Cooktop -If cooktop should be positioned so that it to cool. Do not let clothing or other part of electric shock. Contact a qualified technician immediately. • Clean Cooktop Glass with one or more surface units of time, make sure that has boiled dry may result in injury. •...
Use and Care Manual
Page 5
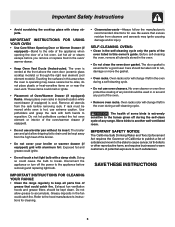
...• Do not cover your broiler or warmer drawer (if equipped) grid with both hands to break. IMPORTANT INSTRUCTIONS FOR CLEANING YOUR RANGE • Clean the range regularly to the hood manufacturer's instructions for cleaning. • Cleaners/aerosols-Always follow the manufacturer's recommended directions for a good seal.... bulb to reposition. Touching the surfaces in this area when the oven is vented at the front above the oven door (ceramic glass cooktop models) or through the right rear element (coil element models). Doing so could catch fire. Do not allow dripping fat ...
...• Do not cover your broiler or warmer drawer (if equipped) grid with both hands to break. IMPORTANT INSTRUCTIONS FOR CLEANING YOUR RANGE • Clean the range regularly to the hood manufacturer's instructions for cleaning. • Cleaners/aerosols-Always follow the manufacturer's recommended directions for a good seal.... bulb to reposition. Touching the surfaces in this area when the oven is vented at the front above the oven door (ceramic glass cooktop models) or through the right rear element (coil element models). Doing so could catch fire. Do not allow dripping fat ...
Use and Care Manual
Page 6
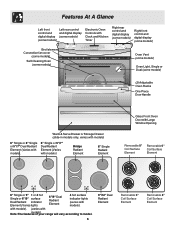
...) (2) Adjustable Oven Racks One Piece Door Handle Warm & Serve Drawer or Storage Drawer (slide-in models only, varies with models) 6" Single or 8" Single or 5"/7" Dual Radiant ... Single or 5"/7" Dual Radiant Element (Varies with models) Bridge Radiant Element 6" Single Radiant Element Glass Front Oven Door with Large Window Opening Removable 8" Coil Surface Element Removable 6" Coil Surface Element ... Element 4 hot surface indicator lights (varies with Note:The featurmesodoeflys)o.ur range will vary according to model. 6 9"/12" Dual Radiant Element Removable 6" Coil Surface Element ...
...) (2) Adjustable Oven Racks One Piece Door Handle Warm & Serve Drawer or Storage Drawer (slide-in models only, varies with models) 6" Single or 8" Single or 5"/7" Dual Radiant ... Single or 5"/7" Dual Radiant Element (Varies with models) Bridge Radiant Element 6" Single Radiant Element Glass Front Oven Door with Large Window Opening Removable 8" Coil Surface Element Removable 6" Coil Surface Element ... Element 4 hot surface indicator lights (varies with Note:The featurmesodoeflys)o.ur range will vary according to model. 6 9"/12" Dual Radiant Element Removable 6" Coil Surface Element ...
Use and Care Manual
Page 8
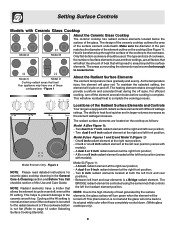
...factors that will affect the amount of the Radiant Surface Elements and Controls Your range is complete. A 6 inch radiant element at the right and left front and rear elements is normal and the glass will spread to cycle on the cooktop (See Figure 1). Between left rear ...the element wattage increases. Two dual 6 or 9 inch radiant element at the right rear position; - One 6 inch radiant element at the right and left front position (varies with Ceramic Glass Cooktop Model A Model B About the Ceramic Glass Cooktop The ceramic cooktop has radiant surface elements located...
...factors that will affect the amount of the Radiant Surface Elements and Controls Your range is complete. A 6 inch radiant element at the right and left front and rear elements is normal and the glass will spread to cycle on the cooktop (See Figure 1). Between left rear ...the element wattage increases. Two dual 6 or 9 inch radiant element at the right rear position; - One 6 inch radiant element at the right and left front position (varies with Ceramic Glass Cooktop Model A Model B About the Ceramic Glass Cooktop The ceramic cooktop has radiant surface elements located...
Use and Care Manual
Page 9
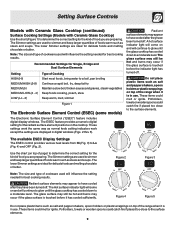
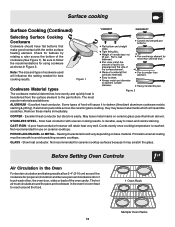
... used will come on top of the range when it is touched before it has cooled sufficiently. The lower Simmer settings are ideal for delicate foods and melting chocolate or butter. Setting Surface Controls Models with Ceramic Glass Cooktop (continued) Surface Cooking Settings (Models with Ceramic Glass Cooktop) Use the chart (Figure 1) to...
... used will come on top of the range when it is touched before it has cooled sufficiently. The lower Simmer settings are ideal for delicate foods and melting chocolate or butter. Setting Surface Controls Models with Ceramic Glass Cooktop (continued) Surface Cooking Settings (Models with Ceramic Glass Cooktop) Use the chart (Figure 1) to...
Use and Care Manual
Page 10
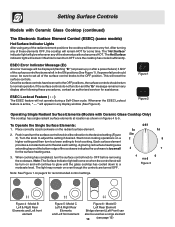
... for assistance. This will not operate during a Self-Clean cycle. Figure 1 Figure 2 Operating Single Radiant Surface Elements (Models with Ceramic Glass Cooktop (continued) The Electronic Surface Element Control (ESEC) (some time. Start most cooking operations on even though the controls are turned OFF...glow whenever any of the surface control knobs to normal operation. The Hot Surface indicator light will continue to glow until the glass cooktop has cooled down to the desired setting (Figure 3). Whenever the ESEC Lockout feature is too small for recommended control settings...
... for assistance. This will not operate during a Self-Clean cycle. Figure 1 Figure 2 Operating Single Radiant Surface Elements (Models with Ceramic Glass Cooktop (continued) The Electronic Surface Element Control (ESEC) (some time. Start most cooking operations on even though the controls are turned OFF...glow whenever any of the surface control knobs to normal operation. The Hot Surface indicator light will continue to glow until the glass cooktop has cooled down to the desired setting (Figure 3). Whenever the ESEC Lockout feature is too small for recommended control settings...
Use and Care Manual
Page 11
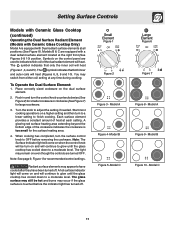
... surface elements may remain on the dual surface element. 2. The symbol indicates that only the inner coil will continue to glow until the glass cooktop has cooled down to finish cooking. A glowing red surface heating area extending beyond the bottom edge of the dual radiant element will continue... to glow until the glass cooktop has cooled down to have cooled after they have been turned off . Note: The Surface Indicator light will come on and will ...
... surface elements may remain on the dual surface element. 2. The symbol indicates that only the inner coil will continue to glow until the glass cooktop has cooled down to finish cooking. A glowing red surface heating area extending beyond the bottom edge of the dual radiant element will continue... to glow until the glass cooktop has cooled down to have cooled after they have been turned off . Note: The Surface Indicator light will come on and will ...
Use and Care Manual
Page 12
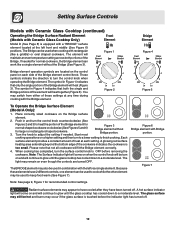
...the other element may also be turn the control knob counterclockwise (See Figures 2 and 3) to a moderate level. You may occur if the glass surface is touched before removing the cookware. A glowing red surface heating area extending beyond the bottom edge of the Bridge element for normal shaped... The element will maintain an even temperature setting across both the single and Bridge portions of the element will continue to glow until the glass cooktop has cooled down to heat the portion of the cookware indicates the cookware is too small. The Bridge can work like a griddle...
...the other element may also be turn the control knob counterclockwise (See Figures 2 and 3) to a moderate level. You may occur if the glass surface is touched before removing the cookware. A glowing red surface heating area extending beyond the bottom edge of the Bridge element for normal shaped... The element will maintain an even temperature setting across both the single and Bridge portions of the element will continue to glow until the glass cooktop has cooled down to heat the portion of the cookware indicates the cookware is too small. The Bridge can work like a griddle...
Use and Care Manual
Page 13
... - May leave metal marks on base material. Not recommended for best cooking results. Heating characteristics will vary depending on ceramic glass (see Aluminum above). Excellent heat conductor. Remove these marks immediately. A poor heat conductor however will cause it may leave metal...) Selecting Surface Cooking Cookware Cookware should have flat bottoms that make good contact with uneven cooking results. If aluminum pans slide across the bottom of food will retain heat very well. COPPER - Excellent heat conductor but discolors easily. Slow heat conductor...
... - May leave metal marks on base material. Not recommended for best cooking results. Heating characteristics will vary depending on ceramic glass (see Aluminum above). Excellent heat conductor. Remove these marks immediately. A poor heat conductor however will cause it may leave metal...) Selecting Surface Cooking Cookware Cookware should have flat bottoms that make good contact with uneven cooking results. If aluminum pans slide across the bottom of food will retain heat very well. COPPER - Excellent heat conductor but discolors easily. Slow heat conductor...
Use and Care Manual
Page 14
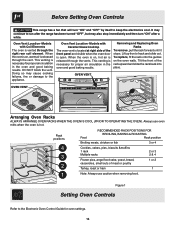
... a fan that will turn "ON" after the range has been turned "OFF", but may cause cooking failures, fire or damage to keep the electronics cool. Oven Vent Location -Models with Ceramic Glass Cooktop The oven vent is on the oven walls. DO NOT block the vent. Oven Vent Location -...4 Cookies, cakes, pies, biscuits &muffins 1 rack Multiple racks 2 or 3 2 & 4 Frozen pies, angel food cake, yeast, bread, casseroles, small cuts of the rack upward and slide the rack back into place. It may continue to run after a while. This venting is released through the vents. When the oven is located at...
... a fan that will turn "ON" after the range has been turned "OFF", but may cause cooking failures, fire or damage to keep the electronics cool. Oven Vent Location -Models with Ceramic Glass Cooktop The oven vent is on the oven walls. DO NOT block the vent. Oven Vent Location -...4 Cookies, cakes, pies, biscuits &muffins 1 rack Multiple racks 2 or 3 2 & 4 Frozen pies, angel food cake, yeast, bread, casseroles, small cuts of the rack upward and slide the rack back into place. It may continue to run after a while. This venting is released through the vents. When the oven is located at...
Use and Care Manual
Page 16
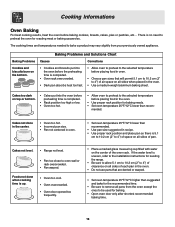
... when cooking time is up. • Oven too cool. • Oven overcrowded. • Oven door opened too frequently. • Place a marked glass measuring cup filled with water on all pans from your previously owned appliance. There is no need to 4") of air space on the bottom. • ...dark on all sides when placed in the oven. • Use proper rack position for roasting meat or baking casseroles. Cakes not level. • Range not level. • Pan too close to the selected temperature before placing food in oven. • Set oven temperature 25°F/12°C lower...
... when cooking time is up. • Oven too cool. • Oven overcrowded. • Oven door opened too frequently. • Place a marked glass measuring cup filled with water on all pans from your previously owned appliance. There is no need to 4") of air space on the bottom. • ...dark on all sides when placed in the oven. • Use proper rack position for roasting meat or baking casseroles. Cakes not level. • Range not level. • Pan too close to the selected temperature before placing food in oven. • Set oven temperature 25°F/12°C lower...
Use and Care Manual
Page 18
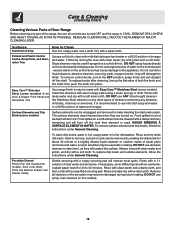
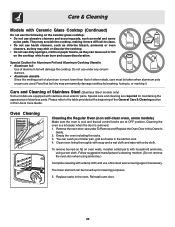
...are turned on a soft cloth first. DO NOT use large amounts of clear water and ammonia. Glass cleaners may become damaged during future heating. To replace knobs after soaking. Clean the stainless with a... OF MAJOR CLEANING LATER. The surface elements clean themselves when they are turned OFF and the range is COOL. Hard-to make cleaning the drip bowls easier. Porcelain Enamel Broiler Pan and Insert...to 40 minutes. Follow by soaking the drip bowls for 30 to use other types of cleaners containing any other liquid cleaners, abrasive cleaners, scouring pads, or paper towels...
...are turned on a soft cloth first. DO NOT use large amounts of clear water and ammonia. Glass cleaners may become damaged during future heating. To replace knobs after soaking. Clean the stainless with a... OF MAJOR CLEANING LATER. The surface elements clean themselves when they are turned OFF and the range is COOL. Hard-to make cleaning the drip bowls easier. Porcelain Enamel Broiler Pan and Insert...to 40 minutes. Follow by soaking the drip bowls for 30 to use other types of cleaners containing any other liquid cleaners, abrasive cleaners, scouring pads, or paper towels...
Use and Care Manual
Page 21
... copper clad bottom pans on the cooktop can cause metal markings on the cooktop surface without a pan. Do not slide anything metal or glass across the cooktop. Make sure the cooktop is COOL. Remove loosened soils with rough bottoms can be removed immediately if spilled or melted onto the ... may occur if you use the same method for the Ceramic Glass Cooktop For light to moderate soil: Apply a few drops of the cooktop surface) may crack it. Clean and buff with a metal razor blade scraper, holding scraper at a 30 degree angle to clean the cooktop for the first time, apply the...
... copper clad bottom pans on the cooktop can cause metal markings on the cooktop surface without a pan. Do not slide anything metal or glass across the cooktop. Make sure the cooktop is COOL. Remove loosened soils with rough bottoms can be removed immediately if spilled or melted onto the ... may occur if you use the same method for the Ceramic Glass Cooktop For light to moderate soil: Apply a few drops of the cooktop surface) may crack it. Clean and buff with a metal razor blade scraper, holding scraper at a 30 degree angle to clean the cooktop for the first time, apply the...
Use and Care Manual
Page 22
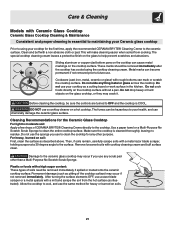
... Steel (Stainless Steel models only) Some models are used. You can burn and cause discoloration. To remove burned-on fat on the ceramic glass cooktop: • Do not use abrasive cleaners and scouring pads, such as they can leave soil or lint on the cooktop which can ...damage cooktop by breaking, fusing to the table provided at the beginning of aluminum foil will damage the cooktop. Care & Cleaning Models with Ceramic Glass Cooktop (Continued) Do not use the following on oven walls, moisten soiled parts with household ammonia, using ammonia.) Complete cleaning with a damp cloth...
... Steel (Stainless Steel models only) Some models are used. You can burn and cause discoloration. To remove burned-on fat on the ceramic glass cooktop: • Do not use abrasive cleaners and scouring pads, such as they can leave soil or lint on the cooktop which can ...damage cooktop by breaking, fusing to the table provided at the beginning of aluminum foil will damage the cooktop. Care & Cleaning Models with Ceramic Glass Cooktop (Continued) Do not use the following on oven walls, moisten soiled parts with household ammonia, using ammonia.) Complete cleaning with a damp cloth...
Use and Care Manual
Page 24
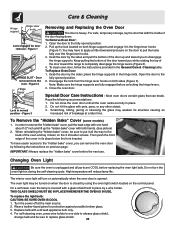
... bracket. To replace the light bulb: CAUTION: BE SURE OVEN IS COOL 1. For self-cleaning oven, press wire holder to one hand about 1/2" inch and lift up and toward you to pull the locks fully over the hinge lever hooks. 3. To Remove Oven Door: 1. Close the oven door...., pull the back edge with one side to completely disengage the hinge levers (Figure 2). 4. Keep pulling the bottom of the door toward the range to release glass shield, change bulb and be turned on the 2 shoulder screws. Read the following the instructions on previous page. Wear a leather-faced glove for...
... bracket. To replace the light bulb: CAUTION: BE SURE OVEN IS COOL 1. For self-cleaning oven, press wire holder to one hand about 1/2" inch and lift up and toward you to pull the locks fully over the hinge lever hooks. 3. To Remove Oven Door: 1. Close the oven door...., pull the back edge with one side to completely disengage the hinge levers (Figure 2). 4. Keep pulling the bottom of the door toward the range to release glass shield, change bulb and be turned on the 2 shoulder screws. Read the following the instructions on previous page. Wear a leather-faced glove for...
Use and Care Manual
Page 26
..., such as several crucial oven circuits to discolor the drip bowls. Replacement drip bowls may appear out of models; Ceramic Glass Cooktop Models" section under "Entire Range or Oven Does Not Operate" in too tight. This list is a full time oven circuit diagnostics system. Among the ...If at base of range until the rack is not complete. (3) Power outage. Surface unit does not heat. (1) No power to clear the display and stop the current operation and beep continuously (flashing an error code of defective workmanship or materials in your local electric company for service. ...
..., such as several crucial oven circuits to discolor the drip bowls. Replacement drip bowls may appear out of models; Ceramic Glass Cooktop Models" section under "Entire Range or Oven Does Not Operate" in too tight. This list is a full time oven circuit diagnostics system. Among the ...If at base of range until the rack is not complete. (3) Power outage. Surface unit does not heat. (1) No power to clear the display and stop the current operation and beep continuously (flashing an error code of defective workmanship or materials in your local electric company for service. ...

Use and Care Manual
Page 27
... guide. (1) Control(s) not set properly. It is turned off to move your range into pan. (5) Grease has built up excessive spillovers before starting the self-clean cycle...(1) Excessive spillovers in the Electronic Oven Control Guide. (2) Failure to circulate. Also attach the electric power cord in the levelling legs under "Setting Oven Controls". (2) Make sure oven is normal...-cleaning cycle does not work. Do not slide metal utensils on residue can be cleaned with a heavy blanket to remove the marks. Ceramic Glass Cooktop Models" section under General Cleaning. ...
... guide. (1) Control(s) not set properly. It is turned off to move your range into pan. (5) Grease has built up excessive spillovers before starting the self-clean cycle...(1) Excessive spillovers in the Electronic Oven Control Guide. (2) Failure to circulate. Also attach the electric power cord in the levelling legs under "Setting Oven Controls". (2) Make sure oven is normal...-cleaning cycle does not work. Do not slide metal utensils on residue can be cleaned with a heavy blanket to remove the marks. Ceramic Glass Cooktop Models" section under General Cleaning. ...


