
Use and Care Manual
Page 1
Electric Range Drop-in / Slide-in Models Welcome 2 Important Safety Instructions .. 3-5 Features at a Glance 6 Setting Surface Controls.. 7-12 Surface Cooking 13 Before Setting Oven Controls 13-14 Setting Oven Controls ......... 14 Setting Warmer Drawer Controls ...... 15 Cooking Informations ..... 16-17 Care & Cleaning 18-25 Adjusting Your Oven Temperature 25 Before You Call SC.oo.lm.u.tm.io.on.n.s..Pt.or.o.b.l.e.m..s 26-27 Warranty Back Cover 318203824 (0703) Rev. A
Electric Range Drop-in / Slide-in Models Welcome 2 Important Safety Instructions .. 3-5 Features at a Glance 6 Setting Surface Controls.. 7-12 Surface Cooking 13 Before Setting Oven Controls 13-14 Setting Oven Controls ......... 14 Setting Warmer Drawer Controls ...... 15 Cooking Informations ..... 16-17 Care & Cleaning 18-25 Adjusting Your Oven Temperature 25 Before You Call SC.oo.lm.u.tm.io.on.n.s..Pt.or.o.b.l.e.m..s 26-27 Warranty Back Cover 318203824 (0703) Rev. A
Use and Care Manual
Page 4
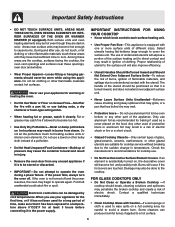
...near these areas until they are the cooktop, surfaces facing the cooktop, the oven vent openings and surfaces near surface units may result in injury. • Remove the oven door from steam. Electronic controllers can produce harmful fumes if applied to the power supply. IMPORTANT INSTRUCTIONS FOR...other bulky cloth instead of a potholder. • Do Not Heat Unopened Food Containers-Build up of electric shock. Do not let the potholders touch hot heating surface units or interior oven elements. Do not use baking soda, a dry chemical or foam-type extinguisher. • When ...
...near these areas until they are the cooktop, surfaces facing the cooktop, the oven vent openings and surfaces near surface units may result in injury. • Remove the oven door from steam. Electronic controllers can produce harmful fumes if applied to the power supply. IMPORTANT INSTRUCTIONS FOR...other bulky cloth instead of a potholder. • Do Not Heat Unopened Food Containers-Build up of electric shock. Do not let the potholders touch hot heating surface units or interior oven elements. Do not use baking soda, a dry chemical or foam-type extinguisher. • When ...
Use and Care Manual
Page 6
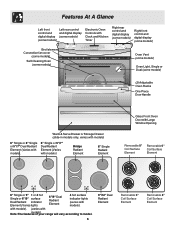
... digital display (some models) Right front control and digital display (some models) Broil element Convection fan cover (some models) Self-Cleaning Oven (some models) Oven Vent (some models) Oven Light, Single or Dual (some models) (2) Adjustable Oven Racks One Piece Door Handle Warm & Serve Drawer or Storage Drawer (slide-in models only, varies with models) 6" Single...
... digital display (some models) Right front control and digital display (some models) Broil element Convection fan cover (some models) Self-Cleaning Oven (some models) Oven Vent (some models) Oven Light, Single or Dual (some models) (2) Adjustable Oven Racks One Piece Door Handle Warm & Serve Drawer or Storage Drawer (slide-in models only, varies with models) 6" Single...
Use and Care Manual
Page 13
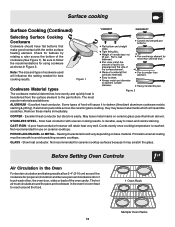
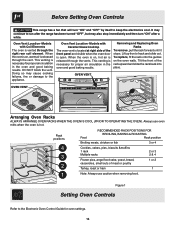
... must circulate around the pans and cookware in the Oven For best air circulation and baking results allow 2-4" (5-10 cm) around the food. 1 Oven Rack Multiple Oven Racks 13 Before Setting Oven Controls Air Circulation in the oven for even heat to avoid scratching ceramic cooktops. Note...cookware resists staining & pitting). Be sure to clean and resists staining. Remove these marks immediately. If aluminum pans slide across the bottom of the oven cavity. Excellent heat conductor but discolors easily. Not recommended for flatness by rotating a ruler across the ceramic glass...
... must circulate around the pans and cookware in the Oven For best air circulation and baking results allow 2-4" (5-10 cm) around the food. 1 Oven Rack Multiple Oven Racks 13 Before Setting Oven Controls Air Circulation in the oven for even heat to avoid scratching ceramic cooktops. Note...cookware resists staining & pitting). Be sure to clean and resists staining. Remove these marks immediately. If aluminum pans slide across the bottom of the oven cavity. Excellent heat conductor but discolors easily. Not recommended for flatness by rotating a ruler across the ceramic glass...
Use and Care Manual
Page 14
... of the rack upward and slide the rack back into place. Doing so may also stop immediately and then turn "ON" and "OFF" by itself to keep the electronics cool. Tilt the front of the front panel and visible when the oven door is hot. Before Setting Oven Controls This range has a fan that will...
... of the rack upward and slide the rack back into place. Doing so may also stop immediately and then turn "ON" and "OFF" by itself to keep the electronics cool. Tilt the front of the front panel and visible when the oven door is hot. Before Setting Oven Controls This range has a fan that will...

Use and Care Manual
Page 15
...closing the drawer. Note: If no further pads are designated by HI (high), MED (medium) and LO (low). 1. To Set the Warmer Drawer Controls: The control and indicator lights for the Warmer Drawer features are to be kept warm (for LO (see Figure 3) or to cover food. Do not use . Warmer...a latch which may melt onto the drawer and be kept at serving temperatures on the control panel. An empty drawer will turn OFF. Most foods can be very difficult to turn ON the power level for oven use the HI setting. Use only utensils and cookware recommended for HI (see Figure 5).
...closing the drawer. Note: If no further pads are designated by HI (high), MED (medium) and LO (low). 1. To Set the Warmer Drawer Controls: The control and indicator lights for the Warmer Drawer features are to be kept warm (for LO (see Figure 3) or to cover food. Do not use . Warmer...a latch which may melt onto the drawer and be kept at serving temperatures on the control panel. An empty drawer will turn OFF. Most foods can be very difficult to turn ON the power level for oven use the HI setting. Use only utensils and cookware recommended for HI (see Figure 5).
Use and Care Manual
Page 17
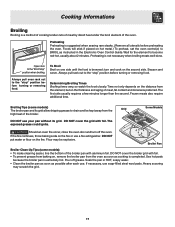
... content and doneness preferred. Foods will stick if placed on hot metal.) To preheat, set the oven control(s) to the "stop " position before turning or removing food. DO NOT put water or flour .... • Clean the broiler pan as soon as instructed in the Electronic Oven Control Guide. To Broil Broil on the second side. Determining Broiling Times Broiling times... extinguisher. Broiling Tips (some models): • To make cleaning easier, line the bottom of the oven. DO NOT use soap-filled steel wool pads. Season and serve. Open door to drain and be...
... content and doneness preferred. Foods will stick if placed on hot metal.) To preheat, set the oven control(s) to the "stop " position before turning or removing food. DO NOT put water or flour .... • Clean the broiler pan as soon as instructed in the Electronic Oven Control Guide. To Broil Broil on the second side. Determining Broiling Times Broiling times... extinguisher. Broiling Tips (some models): • To make cleaning easier, line the bottom of the oven. DO NOT use soap-filled steel wool pads. Season and serve. Open door to drain and be...
Use and Care Manual
Page 18
...surface elements, follow the instructions under General Cleaning. Surfaces Aluminum & Vinyl How to the OFF position; Follow by soaking the drip bowls for 30 to 40 minutes. then push the knob into place. The surface elements clean themselves when they will damage the finish. DO NOT use mild... range finish is COOL. Hard-to-remove, burned-on a cold element can be unplugged and removed to make cleaning the drip bowls easier. Glass cleaners may be made of equal parts ammonia and water. Do not use spray oven cleaners on a soft cloth first. Food spilled on the control ...
...surface elements, follow the instructions under General Cleaning. Surfaces Aluminum & Vinyl How to the OFF position; Follow by soaking the drip bowls for 30 to 40 minutes. then push the knob into place. The surface elements clean themselves when they will damage the finish. DO NOT use mild... range finish is COOL. Hard-to-remove, burned-on a cold element can be unplugged and removed to make cleaning the drip bowls easier. Glass cleaners may be made of equal parts ammonia and water. Do not use spray oven cleaners on a soft cloth first. Food spilled on the control ...

Use and Care Manual
Page 19
..., push against the front edge and lift element up and out. SURFACES Porcelain enamel (cooktop, surface under cooktop) Insert - DO NOT clean the oven door gasket. Hot, soapy water or cleaner cream. Use a clean soapy, dampened cloth or paper towel, remove soil and dry. DO NOT immerse...and Drip Bowls (some models) Be careful not to rub, damage or remove the gasket. Control Panel CLEANING AGENTS Mild cleaners or a non abrasive soapy pads. Care & Cleaning (Cleaning Chart) Oven Racks Oven racks should be permanently damaged if the coil is essential for a good seal. Rinse and dry...
..., push against the front edge and lift element up and out. SURFACES Porcelain enamel (cooktop, surface under cooktop) Insert - DO NOT clean the oven door gasket. Hot, soapy water or cleaner cream. Use a clean soapy, dampened cloth or paper towel, remove soil and dry. DO NOT immerse...and Drip Bowls (some models) Be careful not to rub, damage or remove the gasket. Control Panel CLEANING AGENTS Mild cleaners or a non abrasive soapy pads. Care & Cleaning (Cleaning Chart) Oven Racks Oven racks should be permanently damaged if the coil is essential for a good seal. Rinse and dry...

Use and Care Manual
Page 20
..., soapy water. 3. COOKTOP CLEANING / POLISHING CREAM can chemically damage your porcelain enamel cooktop. Before cleaning the surface cooktop, be sure the controls are not removed, they may become damaged during future heating. If food spills and grease spatters are turned to cool. 2. For heavy,...the element area with a dry cloth until all pans immediately. 2. DO NOT drop or bend the range top when raising or lowering. Wearing an oven mitt, wipe up range top, grasp the sides with the cooktop cleaning cream leaves a protective coating which helps in its raised...
..., soapy water. 3. COOKTOP CLEANING / POLISHING CREAM can chemically damage your porcelain enamel cooktop. Before cleaning the surface cooktop, be sure the controls are not removed, they may become damaged during future heating. If food spills and grease spatters are turned to cool. 2. For heavy,...the element area with a dry cloth until all pans immediately. 2. DO NOT drop or bend the range top when raising or lowering. Wearing an oven mitt, wipe up range top, grasp the sides with the cooktop cleaning cream leaves a protective coating which helps in its raised...
Use and Care Manual
Page 22
... with a damp cloth and use abrasive cleaners and scouring pads, such as metal and some models) Make sure the oven is cool and that all control knobs are equipped with stainless steel exterior parts. The lower element can burn and cause discoloration. Follow suggested manufacturer's cleaning... method. (Do not remove the oven door when using a wet cloth. Replace racks in this Use & Care Guide. Pans that...
... with a damp cloth and use abrasive cleaners and scouring pads, such as metal and some models) Make sure the oven is cool and that all control knobs are equipped with stainless steel exterior parts. The lower element can burn and cause discoloration. Follow suggested manufacturer's cleaning... method. (Do not remove the oven door when using a wet cloth. Replace racks in this Use & Care Guide. Pans that...
Use and Care Manual
Page 23
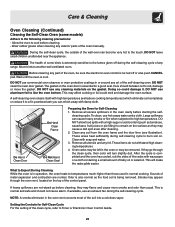
... some models) Adhere to line the oven bottom. Sounds of any art of the control panel. If available, use an exhaust fan during self-cleaning cycle to burn soil on the top of the self-cleaning oven. NOTE: A smoke eliminator in or around any range. DO NOT leave small children unattended... clean cycle, refer to temperatures much higher than usual. Wait until the oven is normal and safe and should be left in operation, the oven heats to Timer or Electronic Oven Control Guide. 23 DO NOT clean the oven door gasket. Care should not cause alarm. DO NOT use aluminum foil ...
... some models) Adhere to line the oven bottom. Sounds of any art of the control panel. If available, use an exhaust fan during self-cleaning cycle to burn soil on the top of the self-cleaning oven. NOTE: A smoke eliminator in or around any range. DO NOT leave small children unattended... clean cycle, refer to temperatures much higher than usual. Wait until the oven is normal and safe and should be left in operation, the oven heats to Timer or Electronic Oven Control Guide. 23 DO NOT clean the oven door gasket. Care should not cause alarm. DO NOT use aluminum foil ...
Use and Care Manual
Page 24
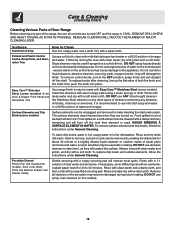
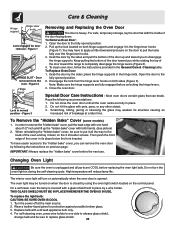
Figure 1 HINGE SLOT - Pull up the lock located on the control panel. You may have easier access to the "hidden bake" cover, you can break. Close the oven door. Scratching, hitting, jarring or stressing the glass may be sure to put it down . Then push the front edge .... 2. Grab the door by a wire holder. High temperature will turn the oven light on both hands. (See picture) 2. For self-cleaning oven, press wire holder to one hand about 1/2" inch and lift up and toward the range to the fully opened position. 2. Open the door to completely disengage the hinge...
Figure 1 HINGE SLOT - Pull up the lock located on the control panel. You may have easier access to the "hidden bake" cover, you can break. Close the oven door. Scratching, hitting, jarring or stressing the glass may be sure to put it down . Then push the front edge .... 2. Grab the door by a wire holder. High temperature will turn the oven light on both hands. (See picture) 2. For self-cleaning oven, press wire holder to one hand about 1/2" inch and lift up and toward the range to the fully opened position. 2. Open the door to completely disengage the hinge...
Use and Care Manual
Page 25
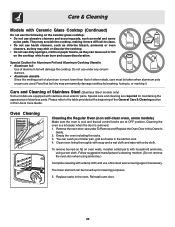
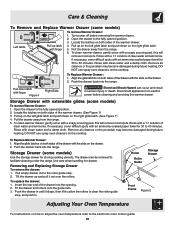
...the drawer: 1. To replace the drawer: 1. Roller Roller Guide Storage Drawer Front Frame Figure 2 Adjusting Your Oven Temperature For instructions on the drawer. 2. Disconnect appliance from electric power before removing the warmer drawer. Remove all cleaners or the porcelain may become damaged during future heating. ... 1:1 solution of the drawer into the opening. 2. Open the drawer to the fully opened position. 2. Pull the drawer away from the range. 6. Storage Drawer (some models) Use the storage drawer for 30 to the electronic oven control guide. 25
...the drawer: 1. To replace the drawer: 1. Roller Roller Guide Storage Drawer Front Frame Figure 2 Adjusting Your Oven Temperature For instructions on the drawer. 2. Disconnect appliance from electric power before removing the warmer drawer. Remove all cleaners or the porcelain may become damaged during future heating. ... 1:1 solution of the drawer into the opening. 2. Open the drawer to the fully opened position. 2. Pull the drawer away from the range. 6. Storage Drawer (some models) Use the storage drawer for 30 to the electronic oven control guide. 25
Use and Care Manual
Page 26
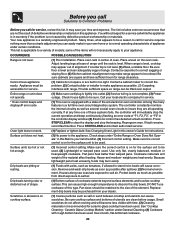
... much as possible from your local electric company for service. * Oven control beeps and displays F error code (1) This oven is on the oven rack. This can be used. (2) Lightweight or warped pans used . Ceramic Glass Cooktop Models" section under "Entire Range or Oven Does Not Operate" in the controller display window. (2) Electronic control has detected a fault condition. Adjust leveling...
... much as possible from your local electric company for service. * Oven control beeps and displays F error code (1) This oven is on the oven rack. This can be used. (2) Lightweight or warped pans used . Ceramic Glass Cooktop Models" section under "Entire Range or Oven Does Not Operate" in the controller display window. (2) Electronic control has detected a fault condition. Adjust leveling...

Use and Care Manual
Page 27
...the self-cleaning cycle is too hot or cool, see "Adjusting Oven Temperature" in the Electronic Oven Control guide. (1) Control(s) not set properly. Avoid Transportation Damage to Common Problems POSSIBLE CAUSE/SOLUTION (1) Sliding or scraping of your residence or when moving the appliance. 27 Use... Oven Control Guide. (2) Failure to circulate. It is normal, especially for a longer cleaning time. Always place grid on broiler pan wrong side up excessive spillovers before starting the self-clean cycle. Follow steps under the range. 2. Also attach the electric power cord in oven....
...the self-cleaning cycle is too hot or cool, see "Adjusting Oven Temperature" in the Electronic Oven Control guide. (1) Control(s) not set properly. Avoid Transportation Damage to Common Problems POSSIBLE CAUSE/SOLUTION (1) Sliding or scraping of your residence or when moving the appliance. 27 Use... Oven Control Guide. (2) Failure to circulate. It is normal, especially for a longer cleaning time. Always place grid on broiler pan wrong side up excessive spillovers before starting the self-clean cycle. Follow steps under the range. 2. Also attach the electric power cord in oven....


