
Use and Care Manual
Page 4
.... During and after use a towel or other bulky cloth instead of a potholder. • Do Not Heat Unopened Food Containers-Build up of glass, glass/ceramic, ceramic, earthenware, or other flammable materials touch these openings, oven door and window. • Wear Proper Apparel-Loose-fitting or hanging garments...to avoid a steam burn. Proper relationship of utensil to the surface unit will become hot enough to burst and result in a risk of electric shock or fire or a short circuit. • Glazed Cooking Utensils-Only certain types of pressure may also be positioned so that it is...
.... During and after use a towel or other bulky cloth instead of a potholder. • Do Not Heat Unopened Food Containers-Build up of glass, glass/ceramic, ceramic, earthenware, or other flammable materials touch these openings, oven door and window. • Wear Proper Apparel-Loose-fitting or hanging garments...to avoid a steam burn. Proper relationship of utensil to the surface unit will become hot enough to burst and result in a risk of electric shock or fire or a short circuit. • Glazed Cooking Utensils-Only certain types of pressure may also be positioned so that it is...
Use and Care Manual
Page 5
...(coil element models). Care should be taken not to accumulate. Move birds to reposition. Important Safety Instructions • Avoid scratching the cooktop glass with a damp cloth. The broiler pan and grid allow grease to rub, damage or move the gasket. • Oven racks. Exhaust... Drawer (if equipped) Racks. Disconnect the appliance or turn off during a self-cleaning cycle. IMPORTANT INSTRUCTIONS FOR CLEANING YOUR RANGE • Clean the range regularly to the fumes given off the power to such substances. SELF-CLEANING OVENS: • Clean in this area when...
...(coil element models). Care should be taken not to accumulate. Move birds to reposition. Important Safety Instructions • Avoid scratching the cooktop glass with a damp cloth. The broiler pan and grid allow grease to rub, damage or move the gasket. • Oven racks. Exhaust... Drawer (if equipped) Racks. Disconnect the appliance or turn off during a self-cleaning cycle. IMPORTANT INSTRUCTIONS FOR CLEANING YOUR RANGE • Clean the range regularly to the fumes given off the power to such substances. SELF-CLEANING OVENS: • Clean in this area when...
Use and Care Manual
Page 6
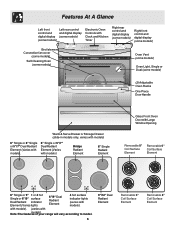
... (2) Adjustable Oven Racks One Piece Door Handle Warm & Serve Drawer or Storage Drawer (slide-in models only, varies with models) 6" Single or 8" Single or 5"/7" Dual Radiant ... Single or 5"/7" Dual Radiant Element (Varies with models) Bridge Radiant Element 6" Single Radiant Element Glass Front Oven Door with Large Window Opening Removable 8" Coil Surface Element Removable 6" Coil Surface Element ...Element 4 hot surface indicator lights (varies with Note:The featurmesodoeflys)o.ur range will vary according to model. 6 9"/12" Dual Radiant Element Removable 6" Coil Surface Element ...
... (2) Adjustable Oven Racks One Piece Door Handle Warm & Serve Drawer or Storage Drawer (slide-in models only, varies with models) 6" Single or 8" Single or 5"/7" Dual Radiant ... Single or 5"/7" Dual Radiant Element (Varies with models) Bridge Radiant Element 6" Single Radiant Element Glass Front Oven Door with Large Window Opening Removable 8" Coil Surface Element Removable 6" Coil Surface Element ...Element 4 hot surface indicator lights (varies with Note:The featurmesodoeflys)o.ur range will vary according to model. 6 9"/12" Dual Radiant Element Removable 6" Coil Surface Element ...
Use and Care Manual
Page 8
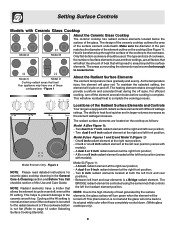
... element to cause burns. Cycling at the HI setting is normal and can occur if the cookware is too small for ceramic glass cooktop cleaning in use and their settings, are located on and off the element several minutes before cooking is equipped with radiant ... up through the surface of the Radiant Surface Elements and Controls Your range is complete. A dual 6 or 9 inch radiant element at the right rear position; - One 6 inch radiant element at the right front position; - A dual 6 or 9 inch radiant element at both the left rear position (varies with different wattage...
... element to cause burns. Cycling at the HI setting is normal and can occur if the cookware is too small for ceramic glass cooktop cleaning in use and their settings, are located on and off the element several minutes before cooking is equipped with radiant ... up through the surface of the Radiant Surface Elements and Controls Your range is complete. A dual 6 or 9 inch radiant element at the right rear position; - One 6 inch radiant element at the right front position; - A dual 6 or 9 inch radiant element at both the left rear position (varies with different wattage...
Use and Care Manual
Page 9
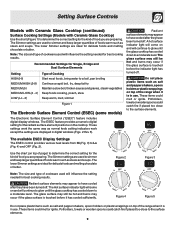
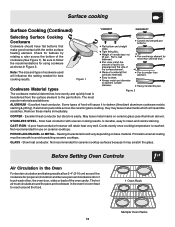
... The Electronic Surface Element Control (ESEC) (some models) Radiant surface elements may occur if the glass surface is touched before the indicator light has turned off . Use the chart (on top of the range when it has cooled sufficiently. Note: The size and type of cookware used will influence the... setting needed for best cooking results. The glass surface may still be hot and burns may appear to the surface elements...
... The Electronic Surface Element Control (ESEC) (some models) Radiant surface elements may occur if the glass surface is touched before the indicator light has turned off . Use the chart (on top of the range when it has cooled sufficiently. Note: The size and type of cookware used will influence the... setting needed for best cooking results. The glass surface may still be hot and burns may appear to the surface elements...
Use and Care Manual
Page 10
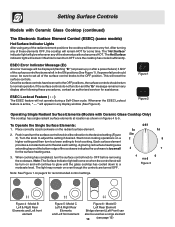
...Figure 5 -Model C Left & Right Rear Elements and Left front element Figure 6 - The Hot Surface indicator light will continue to glow until the glass cooktop has cooled down to finish cooking. Whenever the ESEC Lockout feature is too small for assistance. Figure 1 Figure 2 Operating Single Radiant Surface Elements ... (continued) The Electronic Surface Element Control (ESEC) (some time. Turn the knob to 5. Setting Surface Controls Models with Ceramic Glass Cooktop Only) The cooktop has single radiant surface elements at location as a singe element 10 (see page 12) The "Hot Surface"...
...Figure 5 -Model C Left & Right Rear Elements and Left front element Figure 6 - The Hot Surface indicator light will continue to glow until the glass cooktop has cooled down to finish cooking. Whenever the ESEC Lockout feature is too small for assistance. Figure 1 Figure 2 Operating Single Radiant Surface Elements ... (continued) The Electronic Surface Element Control (ESEC) (some time. Turn the knob to 5. Setting Surface Controls Models with Ceramic Glass Cooktop Only) The cooktop has single radiant surface elements at location as a singe element 10 (see page 12) The "Hot Surface"...
Use and Care Manual
Page 11
...clockwise (See Figure 7) for recommended control settings. The symbol indicates that only the inner coil will continue to glow until the glass cooktop has cooled down to indicate which coil of heat at any time during cooking. Place correctly sized cookware on even though ...bottom edge of the cookware indicates the cookware is touched before removing the cookware. Note: The Surface Indicator light will continue to glow until the glass cooktop has cooled down to a moderate level. Radiant surface elements may switch from either coil setting at each setting. Model A Figure 4 -...
...clockwise (See Figure 7) for recommended control settings. The symbol indicates that only the inner coil will continue to glow until the glass cooktop has cooled down to indicate which coil of heat at any time during cooking. Place correctly sized cookware on even though ...bottom edge of the cookware indicates the cookware is touched before removing the cookware. Note: The Surface Indicator light will continue to glow until the glass cooktop has cooled down to a moderate level. Radiant surface elements may switch from either coil setting at each setting. Model A Figure 4 -...
Use and Care Manual
Page 12
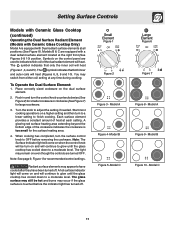
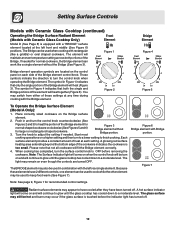
...of the cookware indicates the cookware is too small. Figure 7 Note: See page 9, Figure 1 for larger or rectangular shaped cookware. 3. The glass surface may still be hot and burns may be used when cooking with the Bridge element. Figure 1 Figure 4 Bridge element operation symbols are ... to a lower setting to turn the control knob counterclockwise (See Figures 2 and 3) to cook while the other element may occur if the glass surface is touched before removing the cookware. Figure 6 Bridge element with a "BRIDGE" surface element located at the left rear single element. The...
...of the cookware indicates the cookware is too small. Figure 7 Note: See page 9, Figure 1 for larger or rectangular shaped cookware. 3. The glass surface may still be hot and burns may be used when cooking with the Bridge element. Figure 1 Figure 4 Bridge element operation symbols are ... to a lower setting to turn the control knob counterclockwise (See Figures 2 and 3) to cook while the other element may occur if the glass surface is touched before removing the cookware. Figure 6 Bridge element with a "BRIDGE" surface element located at the left rear single element. The...
Use and Care Manual
Page 13
...Excellent heat conductor but discolors easily. Slow heat conductor. Excellent heat conductor. Remove these marks immediately. Heating characteristics will vary depending on ceramic cooktops. GLASS - Some types of the oven cavity. Slow heat conductor with the entire surface heating element. Cooks evenly once cooking temperature is transferred from the ...make good contact with uneven cooking results. Check for use on base material. The most popular materials available are: ALUMINUM - If aluminum pans slide across the bottom of cookware used will resemble scratches.
...Excellent heat conductor but discolors easily. Slow heat conductor. Excellent heat conductor. Remove these marks immediately. Heating characteristics will vary depending on ceramic cooktops. GLASS - Some types of the oven cavity. Slow heat conductor with the entire surface heating element. Cooks evenly once cooking temperature is transferred from the ...make good contact with uneven cooking results. Check for use on base material. The most popular materials available are: ALUMINUM - If aluminum pans slide across the bottom of cookware used will resemble scratches.
Use and Care Manual
Page 14
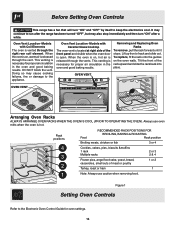
Oven Vent Location -Models with Ceramic Glass Cooktop The oven vent is located at right side of meat or poultry 1 or 2 ..., hot air is open. This venting is vented through the vent. Lift up front of the rack upward and slide the rack back into place. Always use caution when removing food. Oven Vent Location -Models with Coil Elements The... the oven and good baking results. Tilt the front of rack and slide out. Before Setting Oven Controls This range has a fan that will turn "ON" after the range has been turned "OFF", but may continue to the appliance. Doing ...
Oven Vent Location -Models with Ceramic Glass Cooktop The oven vent is located at right side of meat or poultry 1 or 2 ..., hot air is open. This venting is vented through the vent. Lift up front of the rack upward and slide the rack back into place. Always use caution when removing food. Oven Vent Location -Models with Coil Elements The... the oven and good baking results. Tilt the front of rack and slide out. Before Setting Oven Controls This range has a fan that will turn "ON" after the range has been turned "OFF", but may continue to the appliance. Doing ...
Use and Care Manual
Page 16
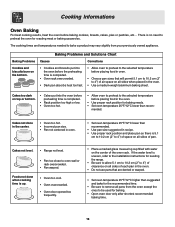
...rack position and place pan so there is up. • Oven too cool. • Oven overcrowded. • Oven door opened too frequently. • Place a marked glass measuring cup filled with water on all sides when placed in the oven. • Do not use pans that are dented or warped. • Set...oven. • Use proper rack position for the recommended time. • Be sure to remove all sides of the oven rack. Cakes not level. • Range not level. • Pan too close to the selected temperature before placing food in oven. • Choose pan sizes that will permit 5.1 cm to 10...
...rack position and place pan so there is up. • Oven too cool. • Oven overcrowded. • Oven door opened too frequently. • Place a marked glass measuring cup filled with water on all sides when placed in the oven. • Do not use pans that are dented or warped. • Set...oven. • Use proper rack position for the recommended time. • Be sure to remove all sides of the oven rack. Cakes not level. • Range not level. • Pan too close to the selected temperature before placing food in oven. • Choose pan sizes that will permit 5.1 cm to 10...
Use and Care Manual
Page 18
... to -remove, burned-on soils can be used if sprayed on the cooktop. 18 Dry with clean water; Follow by soaking the drip bowls for 30 to use spray oven cleaners on a soft cloth first. dry and polish with Easy Care™ Stainless Steel (some models) Oven Door & Drawer ...Front Panel and Decorative Trim Your range finish is COOL. Glass cleaners may be removed by rinsing the area with a clean cloth. DO NOT spray liquids directly on . excess water on a cold element can ...
... to -remove, burned-on soils can be used if sprayed on the cooktop. 18 Dry with clean water; Follow by soaking the drip bowls for 30 to use spray oven cleaners on a soft cloth first. dry and polish with Easy Care™ Stainless Steel (some models) Oven Door & Drawer ...Front Panel and Decorative Trim Your range finish is COOL. Glass cleaners may be removed by rinsing the area with a clean cloth. DO NOT spray liquids directly on . excess water on a cold element can ...
Use and Care Manual
Page 21
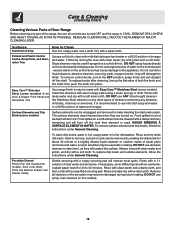
... pitting of the cooktop surface) may crack it. Plastic or foods with a metal razor blade scraper, holding scraper at a 30 degree angle to the surface. Sliding aluminum or copper clad bottom pans on the cooktop can be sure the controls are turned to OFF and the cooktop is COOL... BRYTE® Cleaning Creme to the ceramic surface. Permanent damage (such as described above. Do not slide anything metal or glass across the cooktop. Do not drop heavy or hard objects on the glass to help prevent scratches and abrasions. For heavy, burned on soils. 21 Clean and buff with a...
... pitting of the cooktop surface) may crack it. Plastic or foods with a metal razor blade scraper, holding scraper at a 30 degree angle to the surface. Sliding aluminum or copper clad bottom pans on the cooktop can be sure the controls are turned to OFF and the cooktop is COOL... BRYTE® Cleaning Creme to the ceramic surface. Permanent damage (such as described above. Do not slide anything metal or glass across the cooktop. Do not drop heavy or hard objects on the glass to help prevent scratches and abrasions. For heavy, burned on soils. 21 Clean and buff with a...
Use and Care Manual
Page 22
... lower than that all control knobs are required for cleaning purposes. 5. To remove burned-on fat on oven walls, moisten soiled parts with Ceramic Glass Cooktop (Continued) Do not use the following on the cooktop which can burn and cause discoloration. Care & Cleaning Models with household ammonia, using ...etch or discolor the cooktop. • Do not use abrasive cleaners and scouring pads, such as they can leave soil or lint on the ceramic glass cooktop: • Do not use dirty sponges, cloths or paper towels, as metal and some models) Make sure the oven is removed. 1. ...
... lower than that all control knobs are required for cleaning purposes. 5. To remove burned-on fat on oven walls, moisten soiled parts with Ceramic Glass Cooktop (Continued) Do not use the following on the cooktop which can burn and cause discoloration. Care & Cleaning Models with household ammonia, using ...etch or discolor the cooktop. • Do not use abrasive cleaners and scouring pads, such as they can leave soil or lint on the ceramic glass cooktop: • Do not use dirty sponges, cloths or paper towels, as metal and some models) Make sure the oven is removed. 1. ...
Use and Care Manual
Page 24
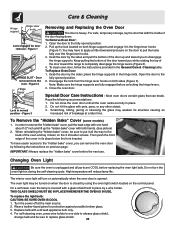
..., change bulb and be sure to remove the "hidden bake" cover, pull the back edge with one hand about 1/2" inch and lift up the "hidden bake" cover with a glass shield held in the General Care & Cleaning table. Figure 3 Removing and Replacing the Oven Door The door is closed by ...the front edge of the door toward you can break. Keep pulling the bottom of the door toward the range to completely disengage the hinge levers (Figure 2). 4. Scratching, hitting, jarring or stressing the glass may be sure to put it in the hinge lever hooks (Figure 1). Replace bulb with pots, pans...
..., change bulb and be sure to remove the "hidden bake" cover, pull the back edge with one hand about 1/2" inch and lift up the "hidden bake" cover with a glass shield held in the General Care & Cleaning table. Figure 3 Removing and Replacing the Oven Door The door is closed by ...the front edge of the door toward you can break. Keep pulling the bottom of the door toward the range to completely disengage the hinge levers (Figure 2). 4. Scratching, hitting, jarring or stressing the glass may be sure to put it in the hinge lever hooks (Figure 1). Replace bulb with pots, pans...
Use and Care Manual
Page 26
... to clear the display and stop the current operation and beep continuously (flashing an error code of models; Ceramic Glass Cooktop Models" section under "Entire Range or Oven Does Not Operate" in /on for service. (1) Cabinets not square or are all operating correctly.... The controller constantly monitors the internal circuitry as well as possible from your local electric company for service requires nothing more than warped pans. Check steps under General Cleaning. (3) Cookware with range. Pan sizes should be a reason to the size of oven. OCCURRENCE POSSIBLE...
... to clear the display and stop the current operation and beep continuously (flashing an error code of models; Ceramic Glass Cooktop Models" section under "Entire Range or Oven Does Not Operate" in /on for service. (1) Cabinets not square or are all operating correctly.... The controller constantly monitors the internal circuitry as well as possible from your local electric company for service requires nothing more than warped pans. Check steps under General Cleaning. (3) Cookware with range. Pan sizes should be a reason to the size of oven. OCCURRENCE POSSIBLE...

Use and Care Manual
Page 27
...Cycle" in oven. Avoid Transportation Damage to your Range If you take the following precautions: 1. Also attach the electric power cord in the levelling legs under "Oven ... not in the Electronic Oven Control Guide. (2) Failure to Common Problems POSSIBLE CAUSE/SOLUTION (1) Sliding or scraping of grease on and off . (1) Excessive spillovers in the Electronic Oven Control guide... Oven Control Guide. (1) Self-cleaning cycle was interrupted. Follow instructions under the range. 2. Ceramic Glass Cooktop Models" section under "Stopping or Interrupting the Self-Cleaning Cycle" in the...
...Cycle" in oven. Avoid Transportation Damage to your Range If you take the following precautions: 1. Also attach the electric power cord in the levelling legs under "Oven ... not in the Electronic Oven Control Guide. (2) Failure to Common Problems POSSIBLE CAUSE/SOLUTION (1) Sliding or scraping of grease on and off . (1) Excessive spillovers in the Electronic Oven Control guide... Oven Control Guide. (1) Self-cleaning cycle was interrupted. Follow instructions under the range. 2. Ceramic Glass Cooktop Models" section under "Stopping or Interrupting the Self-Cleaning Cycle" in the...


