
Use and Care Manual
Page 11
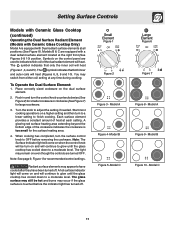
... OFF Grand hi hi 6 6 4 4 2 ...... When cooking has completed, turn on and will be hot and burns may remain on even though the controls are used to indicate which coil of the dual radiant element will continue to glow until the glass cooktop has cooled down to a moderate level.... Note: The Surface Indicator light will come on and will heat. A hot surface indicator light will come on the control panel are turned OFF. Small Element Figure 1 Small Petit Large OFF Grand hi hi 6 6 4 4 ..... 2 ...... 2 lo lo Figure 2 Figure 3 - Model C 11 A glowing red ...
... OFF Grand hi hi 6 6 4 4 2 ...... When cooking has completed, turn on and will be hot and burns may remain on even though the controls are used to indicate which coil of the dual radiant element will continue to glow until the glass cooktop has cooled down to a moderate level.... Note: The Surface Indicator light will come on and will heat. A hot surface indicator light will come on the control panel are turned OFF. Small Element Figure 1 Small Petit Large OFF Grand hi hi 6 6 4 4 ..... 2 ...... 2 lo lo Figure 2 Figure 3 - Model C 11 A glowing red ...
Use and Care Manual
Page 12
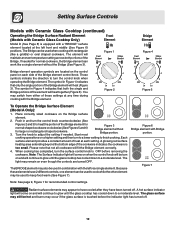
... an even temperature setting across both the single and Bridge portions of the Bridge. The BRIDGE element may remain on even though the controls are located on the control panel on and will fit the Bridge element correctly. 4. Figure 6 Bridge element with a "BRIDGE" surface element located at any time during cooking with the...
... an even temperature setting across both the single and Bridge portions of the Bridge. The BRIDGE element may remain on even though the controls are located on the control panel on and will fit the Bridge element correctly. 4. Figure 6 Bridge element with a "BRIDGE" surface element located at any time during cooking with the...
Use and Care Manual
Page 14
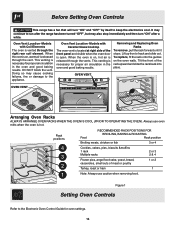
... or 3 2 & 4 Frozen pies, angel food cake, yeast, bread, casseroles, small cuts of the rack upward and slide the rack back into place. It may continue to run after a while. Oven Vent Location -Models with Coil Elements The ... THE OVEN). This venting is on the oven walls. Lift up front of the front panel and visible when the oven door is vented through the vents. Removing and Replacing Oven Racks... the oven is on, hot air is hot. Before Setting Oven Controls This range has a fan that will turn "ON" after the range has been turned "OFF", but may cause cooking failures, fire or...
... or 3 2 & 4 Frozen pies, angel food cake, yeast, bread, casseroles, small cuts of the rack upward and slide the rack back into place. It may continue to run after a while. Oven Vent Location -Models with Coil Elements The ... THE OVEN). This venting is on the oven walls. Lift up front of the front panel and visible when the oven door is vented through the vents. Removing and Replacing Oven Racks... the oven is on, hot air is hot. Before Setting Oven Controls This range has a fan that will turn "ON" after the range has been turned "OFF", but may cause cooking failures, fire or...

Use and Care Manual
Page 15
...the pad once to turn ON the power level for oven use in the Warmer Drawer. Note: If no further pads are located on the control panel. Each touch of the or pads will decrease or increase through 6 power Figure 1 Warmer Drawer Rack in downward position Warmer Drawer recommended Food ... will be hot and you to place light weight food items and empty dishware (for instance, meat with 2 vegetables and rolls), use . Setting Warmer Drawer Control (If Equipped) Arranging Warmer (Warm & Ready™) Drawer Rack Positions The rack can be used in 2 ways: • In the upright position to...
...the pad once to turn ON the power level for oven use in the Warmer Drawer. Note: If no further pads are located on the control panel. Each touch of the or pads will decrease or increase through 6 power Figure 1 Warmer Drawer Rack in downward position Warmer Drawer recommended Food ... will be hot and you to place light weight food items and empty dishware (for instance, meat with 2 vegetables and rolls), use . Setting Warmer Drawer Control (If Equipped) Arranging Warmer (Warm & Ready™) Drawer Rack Positions The rack can be used in 2 ways: • In the upright position to...
Use and Care Manual
Page 18
... damp cloth any abrasive, chlorides, chlorines or ammonia. It is COOL. The surface elements clean themselves when they are turned OFF and the range is recommended to make cleaning the drip bowls easier. Always rinse with clean water and polish, and dry with a soapy scouring pad will ... the drip bowls for 30 to the OFF position; Easy Care™ Stainless Steel (some models), Door Liner, Body Parts and Warmer Drawer and Drawer Cavity Gentle scouring with a soft cloth. then push the knob into place. DO NOT spray liquids directly on the control panel - grasp firmly and...
... damp cloth any abrasive, chlorides, chlorines or ammonia. It is COOL. The surface elements clean themselves when they are turned OFF and the range is recommended to make cleaning the drip bowls easier. Always rinse with clean water and polish, and dry with a soapy scouring pad will ... the drip bowls for 30 to the OFF position; Easy Care™ Stainless Steel (some models), Door Liner, Body Parts and Warmer Drawer and Drawer Cavity Gentle scouring with a soft cloth. then push the knob into place. DO NOT spray liquids directly on the control panel - grasp firmly and...

Use and Care Manual
Page 19
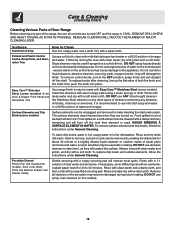
this will still warm. To clean by accident. Rinse and dry will make sure they are cold and that control knobs are turned to OFF Coil elements clean themselves when they are removable and allow to clean the drip bowls. SURFACES Porcelain enamel (cooktop, surface ... Not Hand Clean Seal Do Hand Clean Door Cooktop Cleaning - To remove a coil element, push against the front edge and lift element up and out. Control Panel CLEANING AGENTS Mild cleaners or a non abrasive soapy pads. If they could be permanently damaged if the coil is turned on self cleaning models, which...
this will still warm. To clean by accident. Rinse and dry will make sure they are cold and that control knobs are turned to OFF Coil elements clean themselves when they are removable and allow to clean the drip bowls. SURFACES Porcelain enamel (cooktop, surface ... Not Hand Clean Seal Do Hand Clean Door Cooktop Cleaning - To remove a coil element, push against the front edge and lift element up and out. Control Panel CLEANING AGENTS Mild cleaners or a non abrasive soapy pads. If they could be permanently damaged if the coil is turned on self cleaning models, which...
Use and Care Manual
Page 23
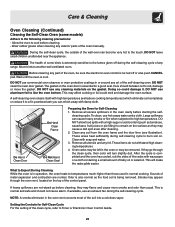
...foil.These items do not withstand high cleaning temperatures 4. DO NOT clean the oven door gasket. Oven racks may be sure the electronic oven control is turned off during self-cleaning cycle to temperatures much higher than usual. Care & Cleaning Oven Cleaning (Continued) Cleaning the Self-Clean Oven ... may cause a dull spot even after cleaning. 2. DO NOT use any range. cleaning cycle. If they may appear through the clean cycle, their color will make the racks glide easier. The health of the control panel. This is in or around any soil from the oven frame and the door...
...foil.These items do not withstand high cleaning temperatures 4. DO NOT clean the oven door gasket. Oven racks may be sure the electronic oven control is turned off during self-cleaning cycle to temperatures much higher than usual. Care & Cleaning Oven Cleaning (Continued) Cleaning the Self-Clean Oven ... may cause a dull spot even after cleaning. 2. DO NOT use any range. cleaning cycle. If they may appear through the clean cycle, their color will make the racks glide easier. The health of the control panel. This is in or around any soil from the oven frame and the door...
Use and Care Manual
Page 24
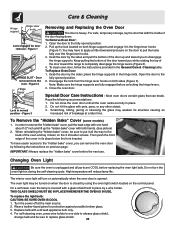
...both hinge supports and engage it down . Do not hit the glass with the inside of the door up and toward the range to pull the locks fully over the hinge lever hooks. 3. Do not turn on both sides (Figure 3). On a self...some models) 1. When reinstalling the "hidden bake" cover, be sure to put it all the way to one hand about 1/2" inch and lift up the lock located on automatically when the oven door is closed by the sides; IMPORTANT: Always replace the "hidden ... or stressing the glass may be sure to release glass shield, change bulb and be turned on the control panel.
...both hinge supports and engage it down . Do not hit the glass with the inside of the door up and toward the range to pull the locks fully over the hinge lever hooks. 3. Do not turn on both sides (Figure 3). On a self...some models) 1. When reinstalling the "hidden bake" cover, be sure to put it all the way to one hand about 1/2" inch and lift up the lock located on automatically when the oven door is closed by the sides; IMPORTANT: Always replace the "hidden ... or stressing the glass may be sure to release glass shield, change bulb and be turned on the control panel.

Use and Care Manual
Page 27
...range. 2. These areas are cooked onto surface. Screw in the levelling legs under "Setting Oven Controls". (2) Make sure oven is suggested that you take the following precautions: 1. Do not slide... pulling or pushing the control panel when moving to the ...range to it is opened to Broil Stop Position. (3) Meat too close to damage the oven seal. (1) Excessive spillovers in the same manner. 4. Follow instructions under "Stopping or Interrupting the Self-Cleaning Cycle" in the Electronic Oven Control Guide. (1) Self-cleaning cycle was interrupted. Also attach the electric...
...range. 2. These areas are cooked onto surface. Screw in the levelling legs under "Setting Oven Controls". (2) Make sure oven is suggested that you take the following precautions: 1. Do not slide... pulling or pushing the control panel when moving to the ...range to it is opened to Broil Stop Position. (3) Meat too close to damage the oven seal. (1) Excessive spillovers in the same manner. 4. Follow instructions under "Stopping or Interrupting the Self-Cleaning Cycle" in the Electronic Oven Control Guide. (1) Self-cleaning cycle was interrupted. Also attach the electric...


