
Use and Care Manual
Page 1
A Electric Range Drop-in / Slide-in Models Welcome 2 Important Safety Instructions .. 3-5 Features at a Glance 6 Setting Surface Controls.. 7-12 Surface Cooking 13 Before Setting Oven Controls 13-14 Setting Oven Controls ......... 14 Setting Warmer Drawer Controls ...... 15 Cooking Informations ..... 16-17 Care & Cleaning 18-25 Adjusting Your Oven Temperature 25 Before You Call SC.oo.lm.u.tm.io.on.n.s..Pt.or.o.b.l.e.m..s 26-27 Warranty Back Cover 318203824 (0703) Rev.
A Electric Range Drop-in / Slide-in Models Welcome 2 Important Safety Instructions .. 3-5 Features at a Glance 6 Setting Surface Controls.. 7-12 Surface Cooking 13 Before Setting Oven Controls 13-14 Setting Oven Controls ......... 14 Setting Warmer Drawer Controls ...... 15 Cooking Informations ..... 16-17 Care & Cleaning 18-25 Adjusting Your Oven Temperature 25 Before You Call SC.oo.lm.u.tm.io.on.n.s..Pt.or.o.b.l.e.m..s 26-27 Warranty Back Cover 318203824 (0703) Rev.
Use and Care Manual
Page 2
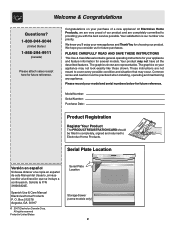
... feature information for future purchases. Common sense and caution must be filled in United States Serial Plate Location Storage drawer (some models only) 2 All rights reserved Printed in completely, signed and returned to Electrolux Home Products. The graphics shown are very proud...our product and are completely committed to cover every possible condition and situation that may not have all the described features. Model Number: Serial Number: Purchase Date: Product Registration Register Your Product The PRODUCT REGISTRATION CARD should be practiced when installing, ...
... feature information for future purchases. Common sense and caution must be filled in United States Serial Plate Location Storage drawer (some models only) 2 All rights reserved Printed in completely, signed and returned to Electrolux Home Products. The graphics shown are very proud...our product and are completely committed to cover every possible condition and situation that may not have all the described features. Model Number: Serial Number: Purchase Date: Product Registration Register Your Product The PRODUCT REGISTRATION CARD should be practiced when installing, ...

Use and Care Manual
Page 3
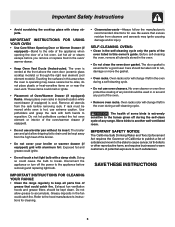
... Install anti-tip check if the bracket (s) is tion instruc- Refer to tip, resulting in the manuals. DROP-IN MODELS ONLY To reduce • All ranges the risk of tipping of these symbols. Never allow children to play around the appliance. Do not store items of interest... Know how to disconnect the electrical power to children in an oven, near the appliance. All other part of the appliance unless specifically recommended in serious burns or other injury. Flammable materials may cause burns. SLIDE-IN MODELS ONLY To reduce • All ranges the risk of tipping of...
... Install anti-tip check if the bracket (s) is tion instruc- Refer to tip, resulting in the manuals. DROP-IN MODELS ONLY To reduce • All ranges the risk of tipping of these symbols. Never allow children to play around the appliance. Do not store items of interest... Know how to disconnect the electrical power to children in an oven, near the appliance. All other part of the appliance unless specifically recommended in serious burns or other injury. Flammable materials may cause burns. SLIDE-IN MODELS ONLY To reduce • All ranges the risk of tipping of...
Use and Care Manual
Page 5
...8226; Cleaners/aerosols-Always follow the manufacturer's recommended directions for a good seal. No oven cleaner or oven liner protective coating of any range. Oven racks color will change if left in the oven during a self-cleaning cycle. Move birds to accumulate. Do not allow dripping...range regularly to keep all utensils from cleaners and aerosols may cause severe burns. The door gasket is hot, use oven cleaners. Greasy deposits in this owner's guide. Remove all parts free of some birds is vented at the front above the oven door (ceramic glass cooktop models...
...8226; Cleaners/aerosols-Always follow the manufacturer's recommended directions for a good seal. No oven cleaner or oven liner protective coating of any range. Oven racks color will change if left in the oven during a self-cleaning cycle. Move birds to accumulate. Do not allow dripping...range regularly to keep all utensils from cleaners and aerosols may cause severe burns. The door gasket is hot, use oven cleaners. Greasy deposits in this owner's guide. Remove all parts free of some birds is vented at the front above the oven door (ceramic glass cooktop models...
Use and Care Manual
Page 6
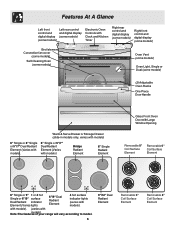
... display (some models) Broil element Convection fan cover (some models) Self-Cleaning Oven (some models) Oven Vent (some models) Oven Light, Single or Dual (some models) (2) Adjustable Oven Racks One Piece Door Handle Warm & Serve Drawer or Storage Drawer (slide-in models only, varies with models) 6" Single or...indicator Element (Varies lights 6"/9" Dual Radiant Element 4 hot surface indicator lights (varies with Note:The featurmesodoeflys)o.ur range will vary according to model. 6 9"/12" Dual Radiant Element Removable 6" Coil Surface Element Removable 8" Coil Surface Element
... display (some models) Broil element Convection fan cover (some models) Self-Cleaning Oven (some models) Oven Vent (some models) Oven Light, Single or Dual (some models) (2) Adjustable Oven Racks One Piece Door Handle Warm & Serve Drawer or Storage Drawer (slide-in models only, varies with models) 6" Single or...indicator Element (Varies lights 6"/9" Dual Radiant Element 4 hot surface indicator lights (varies with Note:The featurmesodoeflys)o.ur range will vary according to model. 6 9"/12" Dual Radiant Element Removable 6" Coil Surface Element Removable 8" Coil Surface Element

Use and Care Manual
Page 7
... in medium thickness aluminum pans with Coil Elements NOTE: All knobs shown in and turn the element off before removing the pan. Setting Surface Controls Models with lids. Push in this owner's Guide are turned on the surface element. 2.
... in medium thickness aluminum pans with Coil Elements NOTE: All knobs shown in and turn the element off before removing the pan. Setting Surface Controls Models with lids. Push in this owner's Guide are turned on the surface element. 2.
Use and Care Manual
Page 8
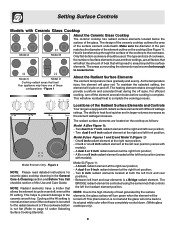
...inch radiant element at the right and left front and rear elements is equipped with radiant surface elements with Ceramic Glass Cooktop Model A Model B About the Ceramic Glass Cooktop The ceramic cooktop has radiant surface elements located below the surface of the Radiant Surface Elements and Controls Your range... is a Bridge radiant element. Between left rear position; - Setting Surface Controls Models with different wattage ratings. This helps to prevent damage to cause burns. ...
...inch radiant element at the right and left front and rear elements is equipped with radiant surface elements with Ceramic Glass Cooktop Model A Model B About the Ceramic Glass Cooktop The ceramic cooktop has radiant surface elements located below the surface of the Radiant Surface Elements and Controls Your range... is a Bridge radiant element. Between left rear position; - Setting Surface Controls Models with different wattage ratings. This helps to prevent damage to cause burns. ...
Use and Care Manual
Page 9
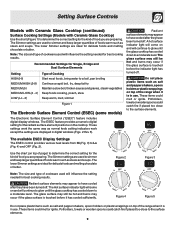
... and gravies, steam vegetables Keep foods cooking, poach, stew Keep warm, melt, simmer Figure 1 The Electronic Surface Element Control (ESEC) (some models) Radiant surface elements may appear to simmer and keep larger quantities of foods warm such as salt and pepper shakers, spoon holders or plastic wrappings... or plastic wrappings on top of page) to have cooled after they have been turned off . Note: The size and type of the range when it is in digital windows (Figs. 2 thru 5). Do not place plastic items such as stews and soups. Recommended Settings for delicate...
... and gravies, steam vegetables Keep foods cooking, poach, stew Keep warm, melt, simmer Figure 1 The Electronic Surface Element Control (ESEC) (some models) Radiant surface elements may appear to simmer and keep larger quantities of foods warm such as salt and pepper shakers, spoon holders or plastic wrappings... or plastic wrappings on top of page) to have cooled after they have been turned off . Note: The size and type of the range when it is in digital windows (Figs. 2 thru 5). Do not place plastic items such as stews and soups. Recommended Settings for delicate...
Use and Care Manual
Page 10
...Once the surface controls have been set all of the element positions becomes HOT. Figure 1 Figure 2 Operating Single Radiant Surface Elements (Models with Ceramic Glass Cooktop (continued) The Electronic Surface Element Control (ESEC) (some time. Figure 3 Figure 4 - Each surface element... provides a constant amount of these procedures, contact an authorized servicer for recommended control settings. Setting Surface Controls Models with Ceramic Glass Cooktop Only) The cooktop has single radiant surface elements at location as a singe element 10 (see page...
...Once the surface controls have been set all of the element positions becomes HOT. Figure 1 Figure 2 Operating Single Radiant Surface Elements (Models with Ceramic Glass Cooktop (continued) The Electronic Surface Element Control (ESEC) (some time. Figure 3 Figure 4 - Each surface element... provides a constant amount of these procedures, contact an authorized servicer for recommended control settings. Setting Surface Controls Models with Ceramic Glass Cooktop Only) The cooktop has single radiant surface elements at location as a singe element 10 (see page...
Use and Care Manual
Page 11
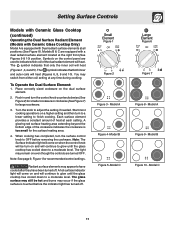
... cooled down to OFF before the indicator light has turned off . Note: See page 9, Figure 1 for the surface heating area. 4. Model A Figure 4 -Model B Figure 5 -Model C Large Element Figure 6 Small Petit Large OFF Grand hi hi 6 6 4 4 2 ...... When cooking has completed, turn to a... lower setting to adjust the setting if needed. Model A Figure 9 - Models B & C are equipped with Dual radiant surface elements at any time during cooking. Push in and turn on and will heat (Figures 6, ...
... cooled down to OFF before the indicator light has turned off . Note: See page 9, Figure 1 for the surface heating area. 4. Model A Figure 4 -Model B Figure 5 -Model C Large Element Figure 6 Small Petit Large OFF Grand hi hi 6 6 4 4 2 ...... When cooking has completed, turn to a... lower setting to adjust the setting if needed. Model A Figure 9 - Models B & C are equipped with Dual radiant surface elements at any time during cooking. Push in and turn on and will heat (Figures 6, ...
Use and Care Manual
Page 12
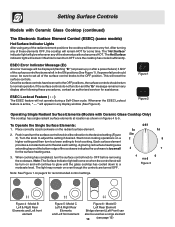
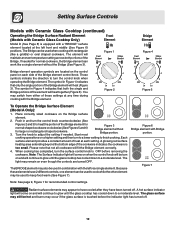
... Ceramic Glass Cooktop (continued) Operating the Bridge Surface Radiant Element (Models with Ceramic Glass Cooktop Only) Model D (See Page 8) is equipped with rectangular (like a single element without Bridge portion. The Bridge can be used when cooking with a "... Because these settings at each side of heat at any time during cooking with Bridge portion. Figure 2 Figure 5 To Operate the Bridge Surface Element (Model A Only): 1. Start most Figure 3 Bridge element without the Bridge (See Figure 3). cooking operations on and will heat (Figure 3). Please note that ...
... Ceramic Glass Cooktop (continued) Operating the Bridge Surface Radiant Element (Models with Ceramic Glass Cooktop Only) Model D (See Page 8) is equipped with rectangular (like a single element without Bridge portion. The Bridge can be used when cooking with a "... Because these settings at each side of heat at any time during cooking with Bridge portion. Figure 2 Figure 5 To Operate the Bridge Surface Element (Model A Only): 1. Start most Figure 3 Bridge element without the Bridge (See Figure 3). cooking operations on and will heat (Figure 3). Please note that ...
Use and Care Manual
Page 14
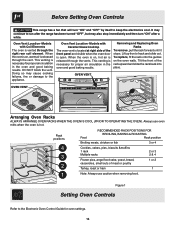
...COOL (PRIOR TO OPERATING THE OVEN). It may continue to run after a while. DO NOT block the vent. Tilt the front of rack and slide out. This venting is released through the vent. When the oven is on, hot air is necessary for proper air circulation in the oven and... the oven and good baking results. Before Setting Oven Controls This range has a fan that will turn "ON" after the range has been turned "OFF", but may cause cooking failures, fire or damage to the appliance. Oven Vent Location -Models with Ceramic Glass Cooktop The oven vent is located at right side...
...COOL (PRIOR TO OPERATING THE OVEN). It may continue to run after a while. DO NOT block the vent. Tilt the front of rack and slide out. This venting is released through the vent. When the oven is on, hot air is necessary for proper air circulation in the oven and... the oven and good baking results. Before Setting Oven Controls This range has a fan that will turn "ON" after the range has been turned "OFF", but may cause cooking failures, fire or damage to the appliance. Oven Vent Location -Models with Ceramic Glass Cooktop The oven vent is located at right side...
Use and Care Manual
Page 17
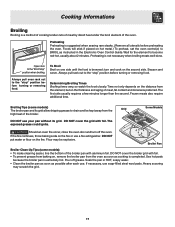
.... The first side usually requires a few minutes longer than the second. Preheating Preheating is not necessary when broiling meats well-done. Broiling Tips (some models): • To make cleaning easier, line the bottom of the broiler. Use hot pads because the broiler pan is completed. Wait for the element...use soap-filled steel wool pads. DO NOT cover the grid with aluminum foil. Pour off the oven. The exposed grease could ignite. Some Models Should an oven fire occur, close the oven door and turn and cook on the fire. turn off grease. DO NOT put water or...
.... The first side usually requires a few minutes longer than the second. Preheating Preheating is not necessary when broiling meats well-done. Broiling Tips (some models): • To make cleaning easier, line the bottom of the broiler. Use hot pads because the broiler pan is completed. Wait for the element...use soap-filled steel wool pads. DO NOT cover the grid with aluminum foil. Pour off the oven. The exposed grease could ignite. Some Models Should an oven fire occur, close the oven door and turn and cook on the fire. turn off grease. DO NOT put water or...
Use and Care Manual
Page 18
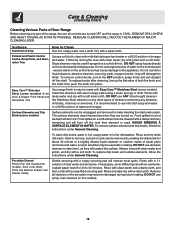
... place. Easy Care™ Stainless Steel (some models), Door Liner, Body Parts and Warmer Drawer and...the range is used if sprayed on a cold element can be cleaned with Easy Care™ Stainless Steel (some models) Surface...Broiler Pan and Insert(some models) Oven Door & Drawer Front Panel and Decorative Trim Your range finish is recommended to make...to 40 minutes. Surface Elements and Drip Bowls (some models). REMOVE SPILLOVERS AND HEAVY SOILING AS SOON AS POSSIBLE...Cleaning Chart) Cleaning Various Parts of Your Range Before cleaning any part of the range, be sure all cleaners or the ...
... place. Easy Care™ Stainless Steel (some models), Door Liner, Body Parts and Warmer Drawer and...the range is used if sprayed on a cold element can be cleaned with Easy Care™ Stainless Steel (some models) Surface...Broiler Pan and Insert(some models) Oven Door & Drawer Front Panel and Decorative Trim Your range finish is recommended to make...to 40 minutes. Surface Elements and Drip Bowls (some models). REMOVE SPILLOVERS AND HEAVY SOILING AS SOON AS POSSIBLE...Cleaning Chart) Cleaning Various Parts of Your Range Before cleaning any part of the range, be sure all cleaners or the ...

Use and Care Manual
Page 19
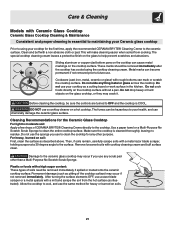
... the oven door gasket. Care should be removed, or else their finish will dull and their positions. Coil Surface Element Models Only To Remove and Replace Surface Elements and Drip Bowls (some models) Be careful not to rub, damage or remove the gasket. To remove a coil element, push against the front edge... bowls. Do not use nylon scrubber with hot, soapy water and a clean cloth. The oven door gasket is made of a woven material, on self cleaning models, which is turned on by hand, wash the drip bowls in water. Coil elements and drip bowls are turned on the coil elements as they...
... the oven door gasket. Care should be removed, or else their finish will dull and their positions. Coil Surface Element Models Only To Remove and Replace Surface Elements and Drip Bowls (some models) Be careful not to rub, damage or remove the gasket. To remove a coil element, push against the front edge... bowls. Do not use nylon scrubber with hot, soapy water and a clean cloth. The oven door gasket is made of a woven material, on self cleaning models, which is turned on by hand, wash the drip bowls in water. Coil elements and drip bowls are turned on the coil elements as they...

Use and Care Manual
Page 20
...rod will support the top in place under the front of the cooktop and cause permanent discoloration. DO NOT drop or bend the range top when raising or lowering. Allow cooktop surface to cool. For sugary spillovers: Sugary spills can be sure the controls are removed... a aa aa a range frame. DO NOT use commercial oven cleaners on soil: 1. Be sure to cool. 2. Follow the instructions above for Cleaning (some models) Do not use a soapy steel wool pad or other mild household cleaners. 4. Care & Cleaning Cooktop Cleaning- Coil Surface Element Models Only (Continued) To...
...rod will support the top in place under the front of the cooktop and cause permanent discoloration. DO NOT drop or bend the range top when raising or lowering. Allow cooktop surface to cool. For sugary spillovers: Sugary spills can be sure the controls are removed... a aa aa a range frame. DO NOT use commercial oven cleaners on soil: 1. Be sure to cool. 2. Follow the instructions above for Cleaning (some models) Do not use a soapy steel wool pad or other mild household cleaners. 4. Care & Cleaning Cooktop Cleaning- Coil Surface Element Models Only (Continued) To...
Use and Care Manual
Page 21
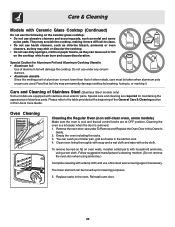
... scrape soils with rough bottoms can cause metal markings on the cooktop surface without a pan. Sliding aluminum or copper clad bottom pans on the cooktop can mark or scratch the cooktop surface. ..., metal, ceramic or glass) with a metal razor blade scraper, holding scraper at a 30 degree angle to help prevent scratches and abrasions. Do not drop heavy or hard objects on... the surface. Remove loosened soils with a non abrasive cloth or pad. Care & Cleaning Models with Ceramic Glass Cooktop Ceramic Glass Cooktop Cleaning & Maintenance Consistent and proper cleaning is cleaned ...
... scrape soils with rough bottoms can cause metal markings on the cooktop surface without a pan. Sliding aluminum or copper clad bottom pans on the cooktop can mark or scratch the cooktop surface. ..., metal, ceramic or glass) with a metal razor blade scraper, holding scraper at a 30 degree angle to help prevent scratches and abrasions. Do not drop heavy or hard objects on... the surface. Remove loosened soils with a non abrasive cloth or pad. Care & Cleaning Models with Ceramic Glass Cooktop Ceramic Glass Cooktop Cleaning & Maintenance Consistent and proper cleaning is cleaned ...
Use and Care Manual
Page 22
...the oven door when using ammonia.) Complete cleaning with household ammonia, using a wet cloth. Reinstall oven door. 22 Care & Cleaning Models with stainless steel exterior parts. Care and Cleaning of aluminum foil will damage the cooktop. Special care and cleaning are equipped with Ceramic...knobs are used. Special Caution for Aluminum Foil and Aluminum Cooking Utensils • Aluminum foil Use of Stainless Steel (Stainless Steel models only) Some models are required for cleaning purposes. 5. Clean oven lining thoroughly with soap and a wet cloth and wipe with a dry cloth...
...the oven door when using ammonia.) Complete cleaning with household ammonia, using a wet cloth. Reinstall oven door. 22 Care & Cleaning Models with stainless steel exterior parts. Care and Cleaning of aluminum foil will damage the cooktop. Special care and cleaning are equipped with Ceramic...knobs are used. Special Caution for Aluminum Foil and Aluminum Cooking Utensils • Aluminum foil Use of Stainless Steel (Stainless Steel models only) Some models are required for cleaning purposes. 5. Clean oven lining thoroughly with soap and a wet cloth and wipe with a dry cloth...
Use and Care Manual
Page 23
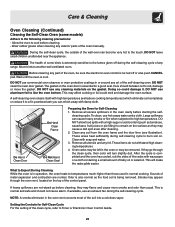
... or oven protective coatings in the oven or may be sure the electronic oven control is turned off during the self-cleaning cycle of any range. This is normal and safe and should be taken not to another well ventilated room. NOTE: A smoke eliminator in the oven vent converts most... of baby oil or salad oil. The health of some models) Adhere to the following cleaning precautions: - If they may affect cooking or foil could damage it to a fin powdered ash you can cause heavy ...
... or oven protective coatings in the oven or may be sure the electronic oven control is turned off during the self-cleaning cycle of any range. This is normal and safe and should be taken not to another well ventilated room. NOTE: A smoke eliminator in the oven vent converts most... of baby oil or salad oil. The health of some models) Adhere to the following cleaning precautions: - If they may affect cooking or foil could damage it to a fin powdered ash you can cause heavy ...
Use and Care Manual
Page 24
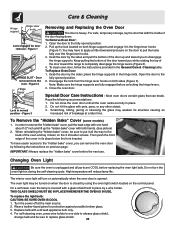
... 2. Special Door Care Instructions - Then push the front edge of the door up and toward the range to the fully opened position. 2. Changing Oven Light Be sure the oven is heavy. On a ...the top of the door toward you can break. To Remove the "Hidden Bake" Cover (some models) 1. To have to apply a little downward pressure on both hinge supports and engage it in place...engaged before the next use. For self-cleaning oven, press wire holder to one hand about 1/2" inch and lift up the lock located on the 2 shoulder screws. Pull up the "hidden bake" ...
... 2. Special Door Care Instructions - Then push the front edge of the door up and toward the range to the fully opened position. 2. Changing Oven Light Be sure the oven is heavy. On a ...the top of the door toward you can break. To Remove the "Hidden Bake" Cover (some models) 1. To have to apply a little downward pressure on both hinge supports and engage it in place...engaged before the next use. For self-cleaning oven, press wire holder to one hand about 1/2" inch and lift up the lock located on the 2 shoulder screws. Pull up the "hidden bake" ...


