Use and Care Manual
Page 5
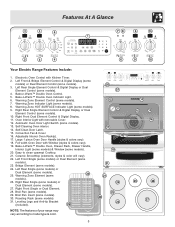
...Single (some models) or Dual Element (some models). 8. Warming Zone Element (some models). 29. Broil Pan (some 30 models). 26. Warming Zone HOT SURFACE Indicator Light (some models). 30. Broil Pan Insert (some models). 9. Automatic Oven Door Light Switch (some models). 25. Easy to model type &... (some models). 31. Adjustable Interior Oven Rack(s). 17. Roasting Rack (some models). 4. Features At A Glance 2 3 5 78 9 10 1 2 3 4 6 Your Electric Range Features Include: 1. Electronic Oven Control with Kitchen Timer. 2. Self-Cleaning Oven interior. 14.
...Single (some models) or Dual Element (some models). 8. Warming Zone Element (some models). 29. Broil Pan (some 30 models). 26. Warming Zone HOT SURFACE Indicator Light (some models). 30. Broil Pan Insert (some models). 9. Automatic Oven Door Light Switch (some models). 25. Easy to model type &... (some models). 31. Adjustable Interior Oven Rack(s). 17. Roasting Rack (some models). 4. Features At A Glance 2 3 5 78 9 10 1 2 3 4 6 Your Electric Range Features Include: 1. Electronic Oven Control with Kitchen Timer. 2. Self-Cleaning Oven interior. 14.
Use and Care Manual
Page 15
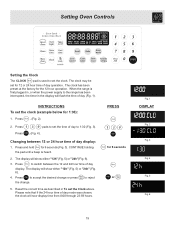
... as described in the display will show either "12h"(Fig. 5) or "24h"(Fig. 6). 3. Press . (Fig. 2). 2. The display will flash the time of day to the range has been interrupted, the timer in To set for 12 or 24 hour time of day display: 1. The clock may be set the Clock above.... When the range is first plugged in, or when the power supply to 1:30 (Fig. 3). . (Fig. 4). Changing between the 12 and 24 hour time of day mode was chosen, the clock will show either...
... as described in the display will show either "12h"(Fig. 5) or "24h"(Fig. 6). 3. Press . (Fig. 2). 2. The display will flash the time of day to the range has been interrupted, the timer in To set for 12 or 24 hour time of day display: 1. The clock may be set the Clock above.... When the range is first plugged in, or when the power supply to 1:30 (Fig. 3). . (Fig. 4). Changing between the 12 and 24 hour time of day mode was chosen, the clock will show either...

Use and Care Manual
Page 20
... 1 Fig. 2 minute to cancel the Fig. 4 Timed Bake feature. Press . (See Fig. 5 ) Note: After the Timed Bake feature has activated, press to beep 3 times every 30 seconds until is completed. The oven will turn the oven OFF after cooking for more than 1 hour before cooking begins, and should not stand in...
... 1 Fig. 2 minute to cancel the Fig. 4 Timed Bake feature. Press . (See Fig. 5 ) Note: After the Timed Bake feature has activated, press to beep 3 times every 30 seconds until is completed. The oven will turn the oven OFF after cooking for more than 1 hour before cooking begins, and should not stand in...

Use and Care Manual
Page 21
.... NOTE: If your clock is set for normal 12 hour display mode the Delayed Start feature can never be set to beep 3 Fig. 8 times every 30 seconds until is set the control for any time to 11 hours and 59 minutes. 5. Press . (See Fig. 1). 4. Fig. 3 6. Press (See Fig. 8).... will shut off automatically (example for baking at 375°F for instructions to display the bake time remaining. Press when baking has finished or at 5:30): 1. Fig. 7 When the set temperature once the Delayed Start has started baking, Fig. 6 Press to set with the correct time of time from ...
.... NOTE: If your clock is set for normal 12 hour display mode the Delayed Start feature can never be set to beep 3 Fig. 8 times every 30 seconds until is set the control for any time to 11 hours and 59 minutes. 5. Press . (See Fig. 1). 4. Fig. 3 6. Press (See Fig. 8).... will shut off automatically (example for baking at 375°F for instructions to display the bake time remaining. Press when baking has finished or at 5:30): 1. Fig. 7 When the set temperature once the Delayed Start has started baking, Fig. 6 Press to set with the correct time of time from ...
Use and Care Manual
Page 23
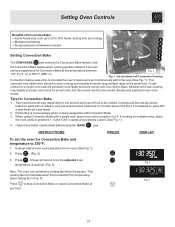
... continuously within the square. When using the BAKE pad. Press . (Fig. 2) 3. Press . Arrange interior oven racks and place food in position 3 or 4. Fig. 3 Press to 30% faster, saving time and energy. -Multiple rack baking. 6 -No special pans or bakeware needed. 5 4 3 Setting Convection Bake 2 1 The CONV BAKE pad controls the Convection Bake...
... continuously within the square. When using the BAKE pad. Press . (Fig. 2) 3. Press . Arrange interior oven racks and place food in position 3 or 4. Fig. 3 Press to 30% faster, saving time and energy. -Multiple rack baking. 6 -No special pans or bakeware needed. 5 4 3 Setting Convection Bake 2 1 The CONV BAKE pad controls the Convection Bake...

Use and Care Manual
Page 25
..."End" and will sound once the adjusted oven set Fig. 2 temperature is pressed (See Fig. 4). A beep will sound 3 long beeps every 30 seconds until baking has finished. This rotating fan icon indicates when the Convection Fan is 20 minutes. 25 Note: The minimum amount of cook time...the pad is reached. (See Fig. 2). At this feature is pressed (See Fig. 4). Fig. 4 The oven icon will sound 3 long beeps every 30 seconds until baking has finished. Press , (See Fig. 1). When the bake time has completely finished the control will display "End" and will show a rotating...
..."End" and will sound once the adjusted oven set Fig. 2 temperature is pressed (See Fig. 4). A beep will sound 3 long beeps every 30 seconds until baking has finished. This rotating fan icon indicates when the Convection Fan is 20 minutes. 25 Note: The minimum amount of cook time...the pad is reached. (See Fig. 2). At this feature is pressed (See Fig. 4). Fig. 4 The oven icon will sound 3 long beeps every 30 seconds until baking has finished. Press , (See Fig. 1). When the bake time has completely finished the control will display "End" and will show a rotating...

Use and Care Manual
Page 30
... approximately 15 minutes. 3. Push in Fig. 3. Place the food on the oven drawer rack using oven mitts (See Fig. 2 on Bake-n-Warm™ oven cavity. 30 page). 5. Gently close the drawer. Recommended Warmer Drawer food settings are designated by HI (high), MED MED (medium) and LO (low). Most foods can be...
... approximately 15 minutes. 3. Push in Fig. 3. Place the food on the oven drawer rack using oven mitts (See Fig. 2 on Bake-n-Warm™ oven cavity. 30 page). 5. Gently close the drawer. Recommended Warmer Drawer food settings are designated by HI (high), MED MED (medium) and LO (low). Most foods can be...

Use and Care Manual
Page 34
... day display mode. When first using the oven, be opened . INSTRUCTIONS PRESS Note: The oven temperature adjustments made with this feature will not change . (Example 30°F) (Fig. 2). To set for a delayed Self-Cleaning cycle 12-24 hours in advance. Once the oven has cooled down for the 24 hour time...
... day display mode. When first using the oven, be opened . INSTRUCTIONS PRESS Note: The oven temperature adjustments made with this feature will not change . (Example 30°F) (Fig. 2). To set for a delayed Self-Cleaning cycle 12-24 hours in advance. Once the oven has cooled down for the 24 hour time...
Use and Care Manual
Page 35
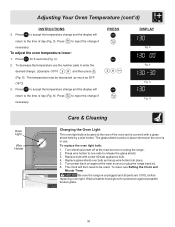
... located at the main source or unplug the range. 2. To adjust the oven temperature lower: 1. Press to reject the change if necessary. Press to reject the change if necessary. Turn electrical power off at the rear of the oven and is in ). 6. Replace glass shield over bulb and ...Fig. 6). Adjusting Your Oven Temperature (cont'd) 3. Turn power back on again at the main source (or plug the range back in use the number pads to enter the desired change. (Example -30°F) and then press (Fig. 5). Press wire holder to one side to the time of day (Fig. 3). ...
... located at the main source or unplug the range. 2. To adjust the oven temperature lower: 1. Press to reject the change if necessary. Press to reject the change if necessary. Turn electrical power off at the rear of the oven and is in ). 6. Replace glass shield over bulb and ...Fig. 6). Adjusting Your Oven Temperature (cont'd) 3. Turn power back on again at the main source (or plug the range back in use the number pads to enter the desired change. (Example -30°F) and then press (Fig. 5). Press wire holder to one side to the time of day (Fig. 3). ...

Use and Care Manual
Page 36
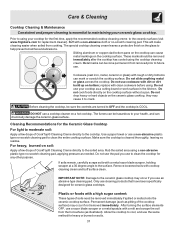
...cleaner on the control panel - If necessary, cover difficult spots with a soap-filled scouring pad. The oven door gasket is essential for 30 to 40 minutes. DO NOT use other types of the oven door. You may be used if sprayed on the control pad and ...the control knobs. DO NOT use oven cleaners, cleaning powders or any other liquid cleaners, abrasive cleaners, scouring pads, or some models) Your range finish may become damaged during future heating. Easy Care™ Stainless Steel (some paper towels - Painted Control Panels & Display areas Before cleaning the...
...cleaner on the control panel - If necessary, cover difficult spots with a soap-filled scouring pad. The oven door gasket is essential for 30 to 40 minutes. DO NOT use other types of the oven door. You may be used if sprayed on the control pad and ...the control knobs. DO NOT use oven cleaners, cleaning powders or any other liquid cleaners, abrasive cleaners, scouring pads, or some models) Your range finish may become damaged during future heating. Easy Care™ Stainless Steel (some paper towels - Painted Control Panels & Display areas Before cleaning the...
Use and Care Manual
Page 37
... the ceramic-glass surface. Do not use your cooktop for the first time, apply the recommended cooktop cleaning creme to the ceramic surface (visit www.frigidaire.com for replacment cleaner). Do not drop heavy or hard objects on soils. 37 Do not use the pad you use an abrasive type cleaning... as needed. The fumes can be sure the controls are turned to the surface. Plastic or foods with a metal razor blade scraper, holding scraper at a 30 degree angle to OFF and the cooktop is COOL. replace with cooktop cleaning cream and buff surface clean. Do not cook foods directly on bottom...
... the ceramic-glass surface. Do not use your cooktop for the first time, apply the recommended cooktop cleaning creme to the ceramic surface (visit www.frigidaire.com for replacment cleaner). Do not drop heavy or hard objects on soils. 37 Do not use the pad you use an abrasive type cleaning... as needed. The fumes can be sure the controls are turned to the surface. Plastic or foods with a metal razor blade scraper, holding scraper at a 30 degree angle to OFF and the cooktop is COOL. replace with cooktop cleaning cream and buff surface clean. Do not cook foods directly on bottom...


