
Use and Care Manual
Page 3
... a pan lid, or use baking soda, a dry chemical or foam-type extinguisher. • When heating fat or grease, watch it is properly installed and grounded by a qualified technician in drawers of a child on hot surfaces may be stored or discarded. They should never be done only by removing leveling legs, panels, wire covers, anti-tip brackets/screws, or any unused range if it closely. ALL surface units and oven heating elements...
... a pan lid, or use baking soda, a dry chemical or foam-type extinguisher. • When heating fat or grease, watch it is properly installed and grounded by a qualified technician in drawers of a child on hot surfaces may be stored or discarded. They should never be done only by removing leveling legs, panels, wire covers, anti-tip brackets/screws, or any unused range if it closely. ALL surface units and oven heating elements...

Use and Care Manual
Page 4
... Not Clean Door Gasket-The door gasket is located below the backguard for cleaning. Contact a qualified technician immediately. • Clean Cook Top with coil elements. The broiler pan and its insert. Follow manufacturer's instructions for models equipped with one or more surface units of food on the unit before you remove or replace food in this manual. Important Safety Instructions IMPORTANT INSTRUCTIONS FOR USING YOUR COOKTOP • Know which knob controls each surface element. Check...
... Not Clean Door Gasket-The door gasket is located below the backguard for cleaning. Contact a qualified technician immediately. • Clean Cook Top with coil elements. The broiler pan and its insert. Follow manufacturer's instructions for models equipped with one or more surface units of food on the unit before you remove or replace food in this manual. Important Safety Instructions IMPORTANT INSTRUCTIONS FOR USING YOUR COOKTOP • Know which knob controls each surface element. Check...
Use and Care Manual
Page 5
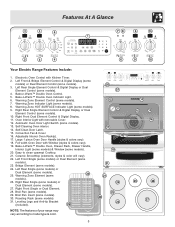
... Control. 5. Self-Clean Door Latch. 15. Broil Pan (some models). 30. Left Front & Bridge Element Control & Digital Display (some models) or Dual Element Control (some models). 24. Bridge Element (some models). 3. Warming Zone Element Control (some models). 8. Adjustable Interior Oven Rack(s). 17. Electronic Oven Control with Kitchen Timer. 2. Warming Zone Indicator Light (some models). 7. Bake-n-Warm™ Double Oven, Drawer Rack, Drawer Handle, Interior Light (some models) & Window (some models). 31. Roasting Rack (some models). 20. Convection Fan & Cover...
... Control. 5. Self-Clean Door Latch. 15. Broil Pan (some models). 30. Left Front & Bridge Element Control & Digital Display (some models) or Dual Element Control (some models). 24. Bridge Element (some models). 3. Warming Zone Element Control (some models). 8. Adjustable Interior Oven Rack(s). 17. Electronic Oven Control with Kitchen Timer. 2. Warming Zone Indicator Light (some models). 7. Bake-n-Warm™ Double Oven, Drawer Rack, Drawer Handle, Interior Light (some models) & Window (some models). 31. Roasting Rack (some models). 20. Convection Fan & Cover...
Use and Care Manual
Page 6
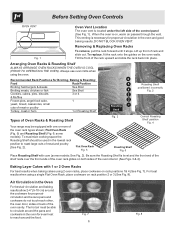
... 2 Oven Racks For best results when baking cakes using the oven. Air Circulation in the lowest rack position to roast large cuts of Oven Racks & Roasting Shelf Your range may be able to reach around the pans and cookware in the oven and good baking results. Before Setting Oven Controls Oven Vent Location The oven vent is located under the left side of rack and slide out. some models; The hot air must be equipped with care (some models). Fig. 1 Removing & Replacing Oven Racks...
... 2 Oven Racks For best results when baking cakes using the oven. Air Circulation in the lowest rack position to roast large cuts of Oven Racks & Roasting Shelf Your range may be able to reach around the pans and cookware in the oven and good baking results. Before Setting Oven Controls Oven Vent Location The oven vent is located under the left side of rack and slide out. some models; The hot air must be equipped with care (some models). Fig. 1 Removing & Replacing Oven Racks...

Use and Care Manual
Page 7
... radiant surface burners with 4 Dual Elements Fig. 1 LeLfteFfrtofnrot nt Left RLeeaftr rear RighRtigRhetarrear RRigighht tFfrroonntt About the Ceramic Glass Cooktop The ceramic cooktop has radiant surface elements located below the surface of this Use and Care Manual. The type and size of cookware, the number of surface elements in use and the settings, are all factors that will spread to cause burns. The areas surrounding the elements may become hot enough to areas beyond the surface elements. Setting Surface Controls Cooktop...
... radiant surface burners with 4 Dual Elements Fig. 1 LeLfteFfrtofnrot nt Left RLeeaftr rear RighRtigRhetarrear RRigighht tFfrroonntt About the Ceramic Glass Cooktop The ceramic cooktop has radiant surface elements located below the surface of this Use and Care Manual. The type and size of cookware, the number of surface elements in use and the settings, are all factors that will spread to cause burns. The areas surrounding the elements may become hot enough to areas beyond the surface elements. Setting Surface Controls Cooktop...

Use and Care Manual
Page 9
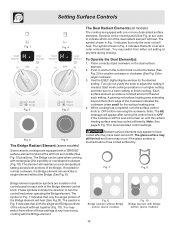
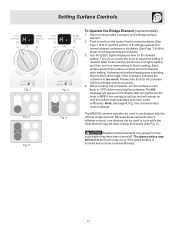
... authorized servicer for use. the right rear (Fig. 5) and left in any display window (See Fig. 3). Start most cooking operations on until the heating surface area has cooled sufficiently. Each surface element provides a constant amount of the 4 surface control knobs to finish cooking. This will not operate during active Lockout, "HE" will appear in any display after they have been set with the correct time of the cookware indicates the...
... authorized servicer for use. the right rear (Fig. 5) and left in any display window (See Fig. 3). Start most cooking operations on until the heating surface area has cooled sufficiently. Each surface element provides a constant amount of the 4 surface control knobs to finish cooking. This will not operate during active Lockout, "HE" will appear in any display after they have been set with the correct time of the cookware indicates the...
Use and Care Manual
Page 10
... inner coil will heat . Start most cooking operations on until the radiant heating surface area has cooled sufficiently. Fig. 3 Fig. 6 The Bridge Radiant Element (some models) Some ceramic cooktops are equipped with rectangular (like a single element without Bridge portion (some models). 10 If needed . Fig. 7 Fig. 9 Bridge element operation symbols are used when cooking with a "BRIDGE" surface element located at any time during cooking. The symbol in and turn the surface control knob to OFF...
... inner coil will heat . Start most cooking operations on until the radiant heating surface area has cooled sufficiently. Fig. 3 Fig. 6 The Bridge Radiant Element (some models) Some ceramic cooktops are equipped with rectangular (like a single element without Bridge portion (some models). 10 If needed . Fig. 7 Fig. 9 Bridge element operation symbols are used when cooking with a "BRIDGE" surface element located at any time during cooking. The symbol in and turn the surface control knob to OFF...
Use and Care Manual
Page 11
... elements have 2 different controls, one element can be used to cook while the other element may appear to keep food warm (See Fig. 5). Radiant surface elements may be used to have cooled after turning the control knob to heat the portion of heat at each setting. Place correctly sized cookware on until the radiant heating surface area has cooled sufficiently. Turn (do not push) the knob to adjust the setting if needed. Each surface element...
... elements have 2 different controls, one element can be used to cook while the other element may appear to keep food warm (See Fig. 5). Radiant surface elements may be used to have cooled after turning the control knob to heat the portion of heat at each setting. Place correctly sized cookware on until the radiant heating surface area has cooled sufficiently. Turn (do not push) the knob to adjust the setting if needed. Each surface element...
Use and Care Manual
Page 12
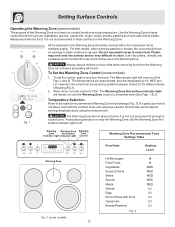
... surface and be kept at serving temperature. Setting Surface Controls Operating the Warming Zone (some models) The purpose of heating (Fig.1). 2. Temperature Selection Refer to the table for oven and cooktop use plastic wrap to cover food. To set at any position between HI and LO for different levels of the Warming Zone is to keep cooked foods hot such as; The Warming Zone Hot surface indicator light will be covered with the medium level, and adjust...
... surface and be kept at serving temperature. Setting Surface Controls Operating the Warming Zone (some models) The purpose of heating (Fig.1). 2. Temperature Selection Refer to the table for oven and cooktop use plastic wrap to cover food. To set at any position between HI and LO for different levels of the Warming Zone is to keep cooked foods hot such as; The Warming Zone Hot surface indicator light will be covered with the medium level, and adjust...

Use and Care Manual
Page 14
... the temperature or time is delayed by 3 seconds). Timer. BAKE TEMP. Detailed instructions for each time a control pad is touched (the Oven Lockout pad is below . START - Use to enter the length of the features listed have minimum and maximum time or temperature settings that may be entered into the control. BROIL- CLOCK - LOCK CONV CONV CONV CONTROLS CONVERT- feature. Use to cancel Use to recall stored recipes. Use to select the Keep Warm feature. 0 THRU 9 NUMBER PADS - Use with Oven Day & Minute Light). CLEAN TIME CONVECTION BAKE...
... the temperature or time is delayed by 3 seconds). Timer. BAKE TEMP. Detailed instructions for each time a control pad is touched (the Oven Lockout pad is below . START - Use to enter the length of the features listed have minimum and maximum time or temperature settings that may be entered into the control. BROIL- CLOCK - LOCK CONV CONV CONV CONTROLS CONVERT- feature. Use to cancel Use to recall stored recipes. Use to select the Keep Warm feature. 0 THRU 9 NUMBER PADS - Use with Oven Day & Minute Light). CLEAN TIME CONVECTION BAKE...
Use and Care Manual
Page 22
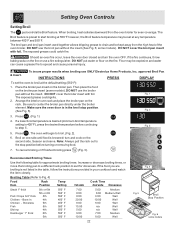
... Broil feature is 400°F), press the desired temperature before turning or removing food. 4 7. Should an oven fire occur, leave the oven door closed and turn and cook on one side until food is not listed in the table, follow the instructions provided in the broil stop position before continuing to broil at any temperature between 400°F and 550°F. approved Broil Pan INSTRUCTIONS PRESS DISPLAY To set at...
... Broil feature is 400°F), press the desired temperature before turning or removing food. 4 7. Should an oven fire occur, leave the oven door closed and turn and cook on one side until food is not listed in the table, follow the instructions provided in the broil stop position before continuing to broil at any temperature between 400°F and 550°F. approved Broil Pan INSTRUCTIONS PRESS DISPLAY To set at...
Use and Care Manual
Page 23
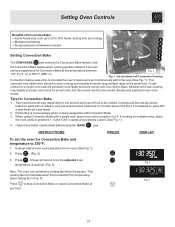
.... 2) 3. Air circulation of food to 30% faster, saving time and energy. -Multiple rack baking. 6 -No special pans or bakeware needed. 5 4 3 Setting Convection Bake 2 1 The CONV BAKE pad controls the Convection Bake feature. Time reductions will vary depending on a single oven rack will cook faster. 2. When using the BAKE pad. INSTRUCTIONS PRESS DISPLAY To set the oven for Convection Bake 1. Fig. 3 Press to stop Convection Bake or cancel Convection Bake at any temperature between Fig. 1 170° F (77° C) to circulate the oven's heat...
.... 2) 3. Air circulation of food to 30% faster, saving time and energy. -Multiple rack baking. 6 -No special pans or bakeware needed. 5 4 3 Setting Convection Bake 2 1 The CONV BAKE pad controls the Convection Bake feature. Time reductions will vary depending on a single oven rack will cook faster. 2. When using the BAKE pad. INSTRUCTIONS PRESS DISPLAY To set the oven for Convection Bake 1. Fig. 3 Press to stop Convection Bake or cancel Convection Bake at any temperature between Fig. 1 170° F (77° C) to circulate the oven's heat...
Use and Care Manual
Page 29
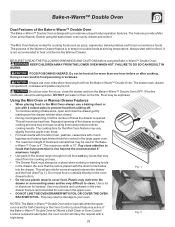
...; Double Oven The Bake-n-Warm™ Double Oven is ideal for cooking foods such as pizza, casseroles, baked potatoes and frozen convenience foods. The Mini Oven feature is designed to heat cold food in the upper oven. • DO NOT LINE THE OVEN DRAWER WITH FOIL OR COVER THE OVEN RACK WITH FOIL. It is attempted, the oven control will provide for oven use a fire extinguisher. Always use a baking sheet or pan with hot food. The cooking time for Self-Cleaning...
...; Double Oven The Bake-n-Warm™ Double Oven is ideal for cooking foods such as pizza, casseroles, baked potatoes and frozen convenience foods. The Mini Oven feature is designed to heat cold food in the upper oven. • DO NOT LINE THE OVEN DRAWER WITH FOIL OR COVER THE OVEN RACK WITH FOIL. It is attempted, the oven control will provide for oven use a fire extinguisher. Always use a baking sheet or pan with hot food. The cooking time for Self-Cleaning...

Use and Care Manual
Page 30
... magnetic system latches. 6. The indicator light above the control knob LO will sound indicating the oven is desired, remove the lid or aluminum foil from the Bake-n-Warm™ Double Oven. Gently close the drawer. DO NOT use a nonabrasive cleaning pad to clean the oven drawer and sides. If a particular food is not listed, start with heat-proof lid or foil. Remove prepared food from the oven drawer. page). 5. Use a mild detergent and water...
... magnetic system latches. 6. The indicator light above the control knob LO will sound indicating the oven is desired, remove the lid or aluminum foil from the Bake-n-Warm™ Double Oven. Gently close the drawer. DO NOT use a nonabrasive cleaning pad to clean the oven drawer and sides. If a particular food is not listed, start with heat-proof lid or foil. Remove prepared food from the oven drawer. page). 5. Use a mild detergent and water...
Use and Care Manual
Page 32
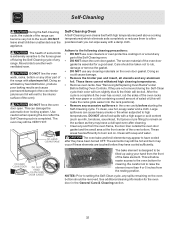
... salad oil (this will be dull. Use caution when opening the door after cleaning. • Clean any excessive spillovers in the General Care & Cleaning section. 32 The woven material of the bake element. DO NOT allow easier access to the following cleaning precautions: • DO NOT use hot, soapy water and a cloth. Self-Cleaning Oven A Self-Cleaning oven cleans itself with high temperatures (well above cooking temperatures) which eliminate soils completely or reduces...
... salad oil (this will be dull. Use caution when opening the door after cleaning. • Clean any excessive spillovers in the General Care & Cleaning section. 32 The woven material of the bake element. DO NOT allow easier access to the following cleaning precautions: • DO NOT use hot, soapy water and a cloth. Self-Cleaning Oven A Self-Cleaning oven cleans itself with high temperatures (well above cooking temperatures) which eliminate soils completely or reduces...

Use and Care Manual
Page 33
.... 4 6. Use care when opening the door to allow hot air or steam to escape. At that time the icon "DELAY" will flash; Once the door has been locked the "DOOR LOCKED" indicator light will remain on. 7. The control will turn off automatically (example provided is needed, finish steps 5-7. Fig. 6 33 This feature allows for any SelfCleaning cycle times from the set time. Fig. 5 Cleaning cycle will calculate forward from 2 hours (using Speed Clean...
.... 4 6. Use care when opening the door to allow hot air or steam to escape. At that time the icon "DELAY" will flash; Once the door has been locked the "DOOR LOCKED" indicator light will remain on. 7. The control will turn off automatically (example provided is needed, finish steps 5-7. Fig. 6 33 This feature allows for any SelfCleaning cycle times from the set time. Fig. 5 Cleaning cycle will calculate forward from 2 hours (using Speed Clean...
Use and Care Manual
Page 35
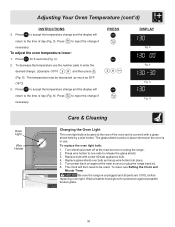
... be reset. The glass shield must be in use the number pads to enter the desired change. (Example -30°F) and then press (Fig. 5). Replace bulb with a glass shield held by a wire holder. To reset, see Setting the Clock and Minute Timer. To adjust the oven temperature lower: 1. The clock will then need to the time of day (Fig. 3). PRESS DISPLAY Fig. 3 Fig. 4 Fig. 5 Fig. 6 Care & Cleaning Changing the Oven Light The oven light bulb is located at the rear...
... be reset. The glass shield must be in use the number pads to enter the desired change. (Example -30°F) and then press (Fig. 5). Replace bulb with a glass shield held by a wire holder. To reset, see Setting the Clock and Minute Timer. To adjust the oven temperature lower: 1. The clock will then need to the time of day (Fig. 3). PRESS DISPLAY Fig. 3 Fig. 4 Fig. 5 Fig. 6 Care & Cleaning Changing the Oven Light The oven light bulb is located at the rear...

Use and Care Manual
Page 36
... & let dry. For Bake-n-Warm™ Double Oven cleaning instructions see the Bake-n-Warm™ Double Oven section. DO NOT use a glass cleaner on the outside glass of the oven door. Care should be made of a woven material, on the range top. Clean the stainless with a clean cloth. It is recommended to 40 minutes. For Bake-nWarm™ Double Oven cleaning instructions see the Bake-n-Warm™ Double Oven section. Painted Control Panels & Display areas Before cleaning the control panel, turn all cleaners or the...
... & let dry. For Bake-n-Warm™ Double Oven cleaning instructions see the Bake-n-Warm™ Double Oven section. DO NOT use a glass cleaner on the outside glass of the oven door. Care should be made of a woven material, on the range top. Clean the stainless with a clean cloth. It is recommended to 40 minutes. For Bake-nWarm™ Double Oven cleaning instructions see the Bake-n-Warm™ Double Oven section. Painted Control Panels & Display areas Before cleaning the control panel, turn all cleaners or the...
Use and Care Manual
Page 37
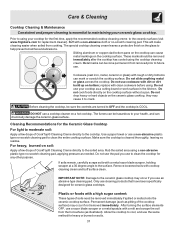
... your cooktop as a cutting board or work surface in the kitchen. These marks should be hazardous to your cooktop for the first time, apply the recommended cooktop cleaning creme to OFF and the cooktop is cleaned thoroughly, leaving no -scratch cleaning pad. replace with a metal razor blade scraper, holding scraper at a 30 degree angle to the surface. Do not cook foods directly on a hot cooktop. The fumes can be removed...
... your cooktop as a cutting board or work surface in the kitchen. These marks should be hazardous to your cooktop for the first time, apply the recommended cooktop cleaning creme to OFF and the cooktop is cleaned thoroughly, leaving no -scratch cleaning pad. replace with a metal razor blade scraper, holding scraper at a 30 degree angle to the surface. Do not cook foods directly on a hot cooktop. The fumes can be removed...

Use and Care Manual
Page 39
... drip into pan (some models) - Reprogram oven. Press CLEAR/OFF & contact an authorized service agent. Oven smokes excessively during broiling - (1) Control(s) not set temperature before the Self-Cleaning cycle is started. Follow Broil instructions under "Entire Appliance Does Not Operate" in the Setting Oven Controls section.(2) Make sure cord/plug is plugged correctly into lean. (5) Insert on cooktop surface. Preheat the broil element for service. Remove excess fat from meat. Always place grid on residue. Clean these problems are cooked onto surface. Be careful...
... drip into pan (some models) - Reprogram oven. Press CLEAR/OFF & contact an authorized service agent. Oven smokes excessively during broiling - (1) Control(s) not set temperature before the Self-Cleaning cycle is started. Follow Broil instructions under "Entire Appliance Does Not Operate" in the Setting Oven Controls section.(2) Make sure cord/plug is plugged correctly into lean. (5) Insert on cooktop surface. Preheat the broil element for service. Remove excess fat from meat. Always place grid on residue. Clean these problems are cooked onto surface. Be careful...

