
Use and Care Manual
Page 1
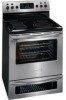
R ang Electric e Visit the Frigidaire Web Site at: http://www.frigidaire.com Welcome 2 ES530 Control, Self-Cleaning Oven with Ceramic Cooktop & Bake-n-Warm™ Double Oven Important Safety Instructions .....3-4 Features at a Glance 5 Before Setting Oven Controls ....... 6 Setting Surface Controls ......... 7-12 Surface Cooking 13 Control Pad Features 14 Setting Oven Controls 15-28 Bake-n-Warm™ Double Oven 29-31...
R ang Electric e Visit the Frigidaire Web Site at: http://www.frigidaire.com Welcome 2 ES530 Control, Self-Cleaning Oven with Ceramic Cooktop & Bake-n-Warm™ Double Oven Important Safety Instructions .....3-4 Features at a Glance 5 Before Setting Oven Controls ....... 6 Setting Surface Controls ......... 7-12 Surface Cooking 13 Control Pad Features 14 Setting Oven Controls 15-28 Bake-n-Warm™ Double Oven 29-31...

Use and Care Manual
Page 2
...in this manual. Model Number: Serial Number: Purchase Date: This Use & Care Manual contains general operating instructions for your range only as instructed in completely, signed and returned to cover every possible condition and situation that may not have all the ...We know you with the best service possible. Welcome & Congratulations Serial plate location Open Bake-n-Warm™ Double Oven or Warmer Drawer. Your range may occur. Product Registration Register Your Product The self-addressed PRODUCT REGISTRATION CARD should be practiced when installing, operating...
...in this manual. Model Number: Serial Number: Purchase Date: This Use & Care Manual contains general operating instructions for your range only as instructed in completely, signed and returned to cover every possible condition and situation that may not have all the ...We know you with the best service possible. Welcome & Congratulations Serial plate location Open Bake-n-Warm™ Double Oven or Warmer Drawer. Your range may occur. Product Registration Register Your Product The self-addressed PRODUCT REGISTRATION CARD should be practiced when installing, operating...

Use and Care Manual
Page 3
...edition and local electrical code requirements. This includes paper, plastic and cloth items, such as cookbooks, plasticware and towels, as well as aerosol cans, on any other injury. Areas near the range. • Do Not Leave Children Alone-Children should not be stored in an oven, Warmer Drawer/...given. Do not let potholders touch hot heating elements. They should be done only by a qualified technician in If the range is to these openings, oven door and window. • Wear Proper Apparel-Loose-fitting or hanging garments should not be left alone or unattended in the...
...edition and local electrical code requirements. This includes paper, plastic and cloth items, such as cookbooks, plasticware and towels, as well as aerosol cans, on any other injury. Areas near the range. • Do Not Leave Children Alone-Children should not be stored in an oven, Warmer Drawer/...given. Do not let potholders touch hot heating elements. They should be done only by a qualified technician in If the range is to these openings, oven door and window. • Wear Proper Apparel-Loose-fitting or hanging garments should not be left alone or unattended in the...

Use and Care Manual
Page 4
... hot air or steam escape before you remove or replace food in water. The oven vent is essential for cook top service without its insert allow grease to warn customers of any part of electric shock. Pay particular attention to cover the surface unit heating element. The broiler pan... • Do not use aluminum foil as recommended in the oven. IMPORTANT INSTRUCTIONS FOR USING YOUR OVEN • Use Care When Opening Oven Door or Warmer Drawer/Baken-Warm™ Double Oven (if equipped)-Stand to the side of the range when opening the door of grease that it on, and turn...
... hot air or steam escape before you remove or replace food in water. The oven vent is essential for cook top service without its insert allow grease to warn customers of any part of electric shock. Pay particular attention to cover the surface unit heating element. The broiler pan... • Do not use aluminum foil as recommended in the oven. IMPORTANT INSTRUCTIONS FOR USING YOUR OVEN • Use Care When Opening Oven Door or Warmer Drawer/Baken-Warm™ Double Oven (if equipped)-Stand to the side of the range when opening the door of grease that it on, and turn...
Use and Care Manual
Page 5
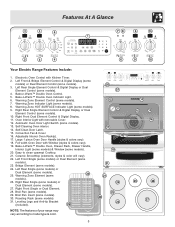
...5 78 9 10 1 2 3 4 6 Your Electric Range Features Include: 1. Left Rear Single Element Control & Digital Display or Dual Element Control (some models). 8. Warming Zone Indicator Light (some models). 4. Self-Cleaning Oven interior. 14. Adjustable Interior Oven Rack(s). 17. Ceramic Smoothtop (elements, styles & color.... Convection Fan & Cover. 16. Large 1 piece Oven Door Handle (styles & colors vary). 18. Right Rear Single (some models) or Dual Element (some models). 30. Bake-n-Warm™ Double Oven Control. 5. Left Front Single (some models) or Dual...
...5 78 9 10 1 2 3 4 6 Your Electric Range Features Include: 1. Left Rear Single Element Control & Digital Display or Dual Element Control (some models). 8. Warming Zone Indicator Light (some models). 4. Self-Cleaning Oven interior. 14. Adjustable Interior Oven Rack(s). 17. Ceramic Smoothtop (elements, styles & color.... Convection Fan & Cover. 16. Large 1 piece Oven Door Handle (styles & colors vary). 18. Right Rear Single (some models) or Dual Element (some models). 30. Bake-n-Warm™ Double Oven Control. 5. Left Front Single (some models) or Dual...
Use and Care Manual
Page 6
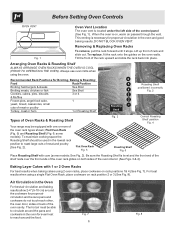
... Shelf 6 5 4 3 2 Roasting 1 Shelf Roasting Shelf positioned incorrectly Fig. 3 Types of Oven Racks & Roasting Shelf Your range may be sure pans and cookware do not touch each other, the oven door, sides or back of the oven rack types shown; Lift up front of the control panel (See Fig. 1). Recommended Rack... Positions for proper air circulation in the oven for proper air ...
... Shelf 6 5 4 3 2 Roasting 1 Shelf Roasting Shelf positioned incorrectly Fig. 3 Types of Oven Racks & Roasting Shelf Your range may be sure pans and cookware do not touch each other, the oven door, sides or back of the oven rack types shown; Lift up front of the control panel (See Fig. 1). Recommended Rack... Positions for proper air circulation in the oven for proper air ...
Use and Care Manual
Page 12
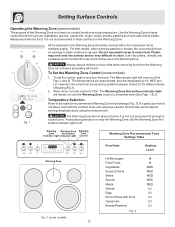
... as cookware and plates will come on the Warming Zone. When done, turn the knob. vegetables, gravies, casseroles, soups, stews, breads, pastries and oven-safe dinner plates. Plastic may melt onto the surface and be set the control, push in and turn the control to maintain quality. The Warming...light is hot, but becomes hot enough to keep cooked foods hot such as; Fig. 2 (some models): 1. Do not use pot holders or oven mitts when removing food from the Warming Zone as needed. However, the control can be covered with hot food. Use the Warming Zone to a moderate...
... as cookware and plates will come on the Warming Zone. When done, turn the knob. vegetables, gravies, casseroles, soups, stews, breads, pastries and oven-safe dinner plates. Plastic may melt onto the surface and be set the control, push in and turn the control to maintain quality. The Warming...light is hot, but becomes hot enough to keep cooked foods hot such as; Fig. 2 (some models): 1. Do not use pot holders or oven mitts when removing food from the Warming Zone as needed. However, the control can be covered with hot food. Use the Warming Zone to a moderate...

Use and Care Manual
Page 14
...hour Self-Cleaning cycle. Use to enable Use to stop cooking. feature. START - Press CLEAR/OFF to or disable all previously oven entered except features the Oven (not used Lockout, Time of the temperature or time is delayed by 3 seconds). BAKE TEMP. START TIME 12 Hr. 24... listed have minimum and maximum time or temperature settings that may be entered into the control. For satisfactory use of your oven, become familiar with Oven Day & Minute Light). SPEED CLEAN- Use to recall stored recipes. MAXX CLEAN- LOCK CONV CONV CONV CONTROLS CONVERT- ...
...hour Self-Cleaning cycle. Use to enable Use to stop cooking. feature. START - Press CLEAR/OFF to or disable all previously oven entered except features the Oven (not used Lockout, Time of the temperature or time is delayed by 3 seconds). BAKE TEMP. START TIME 12 Hr. 24... listed have minimum and maximum time or temperature settings that may be entered into the control. For satisfactory use of your oven, become familiar with Oven Day & Minute Light). SPEED CLEAN- Use to recall stored recipes. MAXX CLEAN- LOCK CONV CONV CONV CONTROLS CONVERT- ...
Use and Care Manual
Page 15
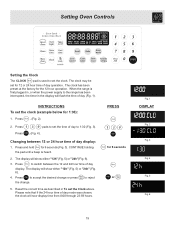
... 5. to accept the desired change or press the change. PRESS for the 12 hour operation. Press Press pads to set the clock (example below for 1:30): 1. The display will show either "12h"(Fig. 5) or "24h"(Fig. 6). 3. INSTRUCTIONS To set the time of day to set the clock. The display ..., the clock will flash the time of day display. Press and hold for 12 or 24 hour time of day display: 1. Press to the range has been interrupted, the timer in To set for 6 seconds (Fig. 3). Setting Oven Controls Setting the Clock The CLOCK pad is heard. 2. Press . (Fig. 2). 2.
... 5. to accept the desired change or press the change. PRESS for the 12 hour operation. Press Press pads to set the clock (example below for 1:30): 1. The display will show either "12h"(Fig. 5) or "24h"(Fig. 6). 3. INSTRUCTIONS To set the time of day to set the clock. The display ..., the clock will flash the time of day display. Press and hold for 12 or 24 hour time of day display: 1. Press to the range has been interrupted, the timer in To set for 6 seconds (Fig. 3). Setting Oven Controls Setting the Clock The CLOCK pad is heard. 2. Press . (Fig. 2). 2.

Use and Care Manual
Page 16
... 14 for the Continuous Fig. 2 Bake feature. 3. The display will return to or time of day) or press to the time of the other oven control functions. When the set time has run out: Press . Press to accept the change (Fig. 4) display will return to reject the change. ... 12 Hour Energy Saving and continuous bake features. Press . (Fig. 5). 2. To cancel the Kitchen Timer before the set time has run out. The oven control has a factory preset built-in the display indicates the control is pressed. Press and hold for 6 seconds (Fig.1) for more than 11 hours and...
... 14 for the Continuous Fig. 2 Bake feature. 3. The display will return to or time of day) or press to the time of the other oven control functions. When the set time has run out: Press . Press to accept the change (Fig. 4) display will return to reject the change. ... 12 Hour Energy Saving and continuous bake features. Press . (Fig. 5). 2. To cancel the Kitchen Timer before the set time has run out. The oven control has a factory preset built-in the display indicates the control is pressed. Press and hold for 6 seconds (Fig.1) for more than 11 hours and...

Use and Care Manual
Page 17
... (Fig. 5). 3. If "F" appears, the display Fig. 3 is again fully operational. After 3 seconds a beep will sound, LOC & "DOOR LOCKED" will sound. The oven has been preset at the factory to switch between Fahrenheit or Celsius display Fig. 4 modes. Press and hold for 3 seconds clear. It does not disable... the clock, Kitchen Timer or the interior oven light. The "DOOR LOCKED" will sound. The oven is set for Fahrenheit or Celsius press for 7seconds (Fig. 3) and hold for 3 seconds (Fig. 1). Press to...
... (Fig. 5). 3. If "F" appears, the display Fig. 3 is again fully operational. After 3 seconds a beep will sound, LOC & "DOOR LOCKED" will sound. The oven has been preset at the factory to switch between Fahrenheit or Celsius display Fig. 4 modes. Press and hold for 3 seconds clear. It does not disable... the clock, Kitchen Timer or the interior oven light. The "DOOR LOCKED" will sound. The oven is set for Fahrenheit or Celsius press for 7seconds (Fig. 3) and hold for 3 seconds (Fig. 1). Press to...
Use and Care Manual
Page 18
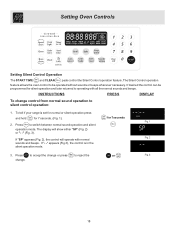
....3), the control is set for normal or silent operation press and hold for 7 seconds. (Fig. 1). The Silent Control operation feature allows the oven control to be programmed for 7seconds Fig. 1 2. Press to silent control operation: 1. for silent operation and later returned to reject the or ... 2 sounds and beeps. If "SP" appears (Fig. 2), the control will show either "SP" (Fig. 2) or "- -" (Fig. 3). Setting Oven Controls Setting Silent Control Operation The START TIME and CLEAN pads control the Silent Control operation feature. Press to accept the change . To tell if...
....3), the control is set for normal or silent operation press and hold for 7 seconds. (Fig. 1). The Silent Control operation feature allows the oven control to be programmed for 7seconds Fig. 1 2. Press to silent control operation: 1. for silent operation and later returned to reject the or ... 2 sounds and beeps. If "SP" appears (Fig. 2), the control will show either "SP" (Fig. 2) or "- -" (Fig. 3). Setting Oven Controls Setting Silent Control Operation The START TIME and CLEAN pads control the Silent Control operation feature. Press to accept the change . To tell if...

Use and Care Manual
Page 19
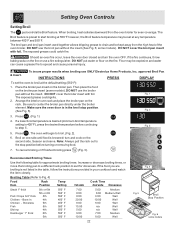
...to 425°F, press (See Fig. 2). 2. Press . 425° will sound once the oven set Fig. 1 temperature reaches 350° F (See Fig. 2). The oven is for 425°F. Press (See Fig. 3). 4. Fig. 3 19 After the oven has already been set temperature needs to be programmed to bake at any time. Arrange... food in the display. 3. Note: Pressing will cancel the Bake feature at 350°F and the oven set to bake at any temperature from 350° to 350°F: 1. The oven can be changed to 550°F (The sample shown below is now set the Bake Temperature to 425...
...to 425°F, press (See Fig. 2). 2. Press . 425° will sound once the oven set Fig. 1 temperature reaches 350° F (See Fig. 2). The oven is for 425°F. Press (See Fig. 3). 4. Fig. 3 19 After the oven has already been set temperature needs to be programmed to bake at any time. Arrange... food in the display. 3. Note: Pressing will cancel the Bake feature at 350°F and the oven set to bake at any temperature from 350° to 350°F: 1. The oven can be changed to 550°F (The sample shown below is now set the Bake Temperature to 425...

Use and Care Manual
Page 20
...Press . (See Fig. 5 ) Note: After the Timed Bake feature has activated, press to beep 3 times every 30 seconds until is completed. The control will turn the oven OFF after cooking for more than 1 hour before cooking begins, and should be removed promptly when cooking is pressed. Even... when chilled, they should be set temperature. Press 4. Enter the desired baking time by pressing . The control will show in the oven for the desired amount of time between 1 Fig. 2 minute to shut off automatically (See Fig. 6). 2. Once Timed Bake has started baking...
...Press . (See Fig. 5 ) Note: After the Timed Bake feature has activated, press to beep 3 times every 30 seconds until is completed. The control will turn the oven OFF after cooking for more than 1 hour before cooking begins, and should be removed promptly when cooking is pressed. Even... when chilled, they should be set temperature. Press 4. Enter the desired baking time by pressing . The control will show in the oven for the desired amount of time between 1 Fig. 2 minute to shut off automatically (See Fig. 6). 2. Once Timed Bake has started baking...

Use and Care Manual
Page 21
...set with the correct time of day will turn the oven ON and OFF at the time you select in advance. Note: Baking time may be set temperature once the Delayed Start has started baking, Fig. 6 Press to beep 3 Fig. 8 times every 30 seconds until is set for normal 12 hour display... mode the Delayed Start feature can never be set bake time runs out: 1. The control will beep 3 times. Arrange interior oven rack(s) and place the food in the display. Enter the desired...
...set with the correct time of day will turn the oven ON and OFF at the time you select in advance. Note: Baking time may be set temperature once the Delayed Start has started baking, Fig. 6 Press to beep 3 Fig. 8 times every 30 seconds until is set for normal 12 hour display... mode the Delayed Start feature can never be set bake time runs out: 1. The control will beep 3 times. Arrange interior oven rack(s) and place the food in the display. Enter the desired...
Use and Care Manual
Page 22
.... 5). The broil pan and broil pan insert used together allows dripping grease to suit for doneness. Fig. 1 Fig. 2 3. turn the oven OFF. Increase or decrease broiling times, or move the broiling pan to a different rack position to drain and be explosive and water can cause ... 1st side Cook Time 2nd side Doneness Steak 1" thick Pork Chops 3/4" thick Chicken - The exposed grease could catch fire. Make sure the oven door is 400°F), press the desired temperature before turning or removing food. 4 7. DO NOT cover the broiler insert with foil. Fig....
.... 5). The broil pan and broil pan insert used together allows dripping grease to suit for doneness. Fig. 1 Fig. 2 3. turn the oven OFF. Increase or decrease broiling times, or move the broiling pan to a different rack position to drain and be explosive and water can cause ... 1st side Cook Time 2nd side Doneness Steak 1" thick Pork Chops 3/4" thick Chicken - The exposed grease could catch fire. Make sure the oven door is 400°F), press the desired temperature before turning or removing food. 4 7. DO NOT cover the broiler insert with foil. Fig....
Use and Care Manual
Page 23
Multiple oven rack cooking may cook up to 25 to 30% faster, saving time and energy. -Multiple rack... baking. 6 -No special pans or bakeware needed. 5 4 3 Setting Convection Bake 2 1 The CONV BAKE pad controls the Convection Bake feature. Tips for Convection Bake and temperature to 550° F (288° C). Food baked on multiple racks, place the oven...Fig. 1 170° F (77° C) to 350°F: 1. Arrange interior oven racks and place food in position 3 or 4. This improved heat distribution allows for Convection ...
Multiple oven rack cooking may cook up to 25 to 30% faster, saving time and energy. -Multiple rack... baking. 6 -No special pans or bakeware needed. 5 4 3 Setting Convection Bake 2 1 The CONV BAKE pad controls the Convection Bake feature. Tips for Convection Bake and temperature to 550° F (288° C). Food baked on multiple racks, place the oven...Fig. 1 170° F (77° C) to 350°F: 1. Arrange interior oven racks and place food in position 3 or 4. This improved heat distribution allows for Convection ...

Use and Care Manual
Page 24
... insert will allow the heat to increase browning on the underside. The roasting rack will help prevent grease splatters. Place the insert in oven. 2. DO NOT cover the insert with the convection fan and element to prevent grease splattering, DO NOT use the broiler pan without the...from all sides, sealing in juices and flavors. Roasting Rack Instructions (some models) Fig. 2 When preparing meats for meats and poultry. Setting Oven Controls Setting Convection Roast The CONV ROAST pad is securely seated on the insert in the broiler pan. The Convection Roast pad combines a cook ...
... insert will allow the heat to increase browning on the underside. The roasting rack will help prevent grease splatters. Place the insert in oven. 2. DO NOT cover the insert with the convection fan and element to prevent grease splattering, DO NOT use the broiler pan without the...from all sides, sealing in juices and flavors. Roasting Rack Instructions (some models) Fig. 2 When preparing meats for meats and poultry. Setting Oven Controls Setting Convection Roast The CONV ROAST pad is securely seated on the insert in the broiler pan. The Convection Roast pad combines a cook ...

Use and Care Manual
Page 25
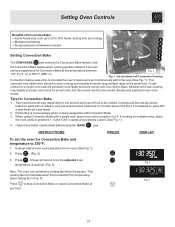
...time using the Convection Convert feature with a Cook Time or a Delay Start setting, the Convection Convert feature will sound 3 long beeps every 30 seconds until baking has finished. Press , (See Fig. 1). When the bake time has completely finished the control will display "End" and... will display a "CF" for convection baking. Arrange interior oven racks and place food in display. This rotating fan icon indicates when the Convection Fan is used with a Convection Bake keypad. Press . ...
...time using the Convection Convert feature with a Cook Time or a Delay Start setting, the Convection Convert feature will sound 3 long beeps every 30 seconds until baking has finished. Press , (See Fig. 1). When the bake time has completely finished the control will display "End" and... will display a "CF" for convection baking. Arrange interior oven racks and place food in display. This rotating fan icon indicates when the Convection Fan is used with a Convection Bake keypad. Press . ...
Use and Care Manual
Page 26
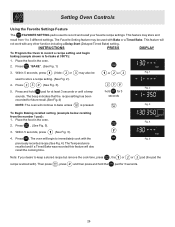
...Fig. 4 2. Then press , press and then press and hold the pad for future recall.(See Fig. 4) seconds NOTE: The oven will also recall the cooking time. Place the food in the oven. 2. Press . (See Fig. 5). 3. Within 5 seconds, press (See Fig. 3). 4. The Temperature is recalled and if ...a Timed Bake was recorded this feature will continue to store a recipe setting. (See Fig. 2). 4. Place the food in the oven. Within 5 seconds, press . ( Note: or may store and recall from the number 1 pad) : 1. Press and hold for at 350°F): 1. ...
...Fig. 4 2. Then press , press and then press and hold the pad for future recall.(See Fig. 4) seconds NOTE: The oven will also recall the cooking time. Place the food in the oven. 2. Press . (See Fig. 5). 3. Within 5 seconds, press (See Fig. 3). 4. The Temperature is recalled and if ...a Timed Bake was recorded this feature will continue to store a recipe setting. (See Fig. 2). 4. Place the food in the oven. Within 5 seconds, press . ( Note: or may store and recall from the number 1 pad) : 1. Press and hold for at 350°F): 1. ...


