
Use and Care Manual
Page 2
... best service possible. Common sense and caution must be filled in this manual. Congratulations on your new range and Thank You for several models. Your satisfaction is our number one priority. These instructions are representational. Model Number: Serial Number: Purchase Date: This Use & Care Manual contains general operating instructions for your purchase of...
... best service possible. Common sense and caution must be filled in this manual. Congratulations on your new range and Thank You for several models. Your satisfaction is our number one priority. These instructions are representational. Model Number: Serial Number: Purchase Date: This Use & Care Manual contains general operating instructions for your purchase of...

Use and Care Manual
Page 4
...Clean in the self-cleaning cycle only the parts listed in this Use & Care Manual. IMPORTANT INSTRUCTIONS FOR CLEANING YOUR RANGE • Clean the range regularly to the area underneath each surface heating unit. Pay particular attention to keep all utensils from cleaners and aerosols ...a risk of Oven Racks. Follow manufacturer's instructions for models equipped with ceramic-glass cook tops. Check the manufacturer's recommendations for cook top use . Use potholders and grasp the rack with the utensil, the handle of electric shock, or fire. Only use of undersized utensils will...
...Clean in the self-cleaning cycle only the parts listed in this Use & Care Manual. IMPORTANT INSTRUCTIONS FOR CLEANING YOUR RANGE • Clean the range regularly to the area underneath each surface heating unit. Pay particular attention to keep all utensils from cleaners and aerosols ...a risk of Oven Racks. Follow manufacturer's instructions for models equipped with ceramic-glass cook tops. Check the manufacturer's recommendations for cook top use . Use potholders and grasp the rack with the utensil, the handle of electric shock, or fire. Only use of undersized utensils will...
Use and Care Manual
Page 5
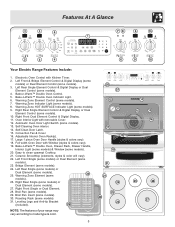
... Dual Element Control & Digital Display. 11. Self-Cleaning Oven interior. 14. Roasting Rack (some models). 27. Features At A Glance 2 3 5 78 9 10 1 2 3 4 6 Your Electric Range Features Include: 1. Left Rear Single (some models) or Dual Element (some 30 models). 26. Warming Zone Element (some models). 25. Right Front Single or Dual Element. 28. Leveling Legs and Anti-tip Bracket...
... Dual Element Control & Digital Display. 11. Self-Cleaning Oven interior. 14. Roasting Rack (some models). 27. Features At A Glance 2 3 5 78 9 10 1 2 3 4 6 Your Electric Range Features Include: 1. Left Rear Single (some models) or Dual Element (some 30 models). 26. Warming Zone Element (some models). 25. Right Front Single or Dual Element. 28. Leveling Legs and Anti-tip Bracket...
Use and Care Manual
Page 6
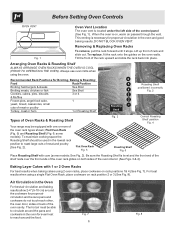
.... 2 Correct Roasting Shelf position Fig. 4 Roasting Shelf Fig. 6 Place Roasting Shelf with one or more of the oven rack types shown; some models; Baking Layer Cakes with 1 or 2 Oven Racks For best results when baking cakes using the oven. The hot air must be able to circulate around...Turkey, roast or ham 1 or Roasting Shelf 6 5 4 3 2 Roasting 1 Shelf Roasting Shelf positioned incorrectly Fig. 3 Types of Oven Racks & Roasting Shelf Your range may be sure pans and cookware do not touch each other, the oven door, sides or back of meat and poultry (See Fig. 2). Fig. 7 6 Fig...
.... 2 Correct Roasting Shelf position Fig. 4 Roasting Shelf Fig. 6 Place Roasting Shelf with one or more of the oven rack types shown; some models; Baking Layer Cakes with 1 or 2 Oven Racks For best results when baking cakes using the oven. The hot air must be able to circulate around...Turkey, roast or ham 1 or Roasting Shelf 6 5 4 3 2 Roasting 1 Shelf Roasting Shelf positioned incorrectly Fig. 3 Types of Oven Racks & Roasting Shelf Your range may be sure pans and cookware do not touch each other, the oven door, sides or back of meat and poultry (See Fig. 2). Fig. 7 6 Fig...

Use and Care Manual
Page 7
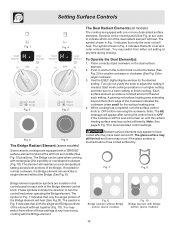
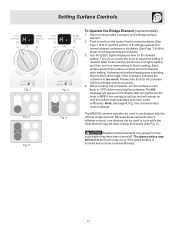
...: Please read detailed instructions for the radiant element or if the cookware bottom is complete. Your range is transferred up through the surface of heat that heat Models with a Bridge Element Models with different wattage ratings. The type and size of cookware, the number of surface elements in ...element underneath. Setting Surface Controls Cooktop radiant areas that will spread to areas beyond the surface elements. Fig. 2 (Bridge Element on some models) NOTE: Radiant elements have a limiter that allows the element to cycle ON and OFF, even at the HI setting is normal and...
...: Please read detailed instructions for the radiant element or if the cookware bottom is complete. Your range is transferred up through the surface of heat that heat Models with a Bridge Element Models with different wattage ratings. The type and size of cookware, the number of surface elements in ...element underneath. Setting Surface Controls Cooktop radiant areas that will spread to areas beyond the surface elements. Fig. 2 (Bridge Element on some models) NOTE: Radiant elements have a limiter that allows the element to cycle ON and OFF, even at the HI setting is normal and...

Use and Care Manual
Page 9
... been set all of day, the surface controls should occur, be displayed (flashing "Er") at each setting. To Operate the Single Elements (some models) element position can still be turned on again for use. Each surface element provides a constant amount of the surface control knobs were left rear (... the cooktop is still too hot to reset the clock (See page 15). Conversely the ESEC feature will reset the surface controls. The BRIDGE (some models): 1. Turn (do not function and the "Er" message remains in the ON positions. This will not operate during active Lockout, "HE" will ...
... been set all of day, the surface controls should occur, be displayed (flashing "Er") at each setting. To Operate the Single Elements (some models) element position can still be turned on again for use. Each surface element provides a constant amount of the surface control knobs were left rear (... the cooktop is still too hot to reset the clock (See page 15). Conversely the ESEC feature will reset the surface controls. The BRIDGE (some models): 1. Turn (do not function and the "Er" message remains in the ON positions. This will not operate during active Lockout, "HE" will ...
Use and Care Manual
Page 10
... cookware on the control panel (See Fig. 4) are used when cooking with rectangular (like a single element without Bridge portion (some models). Turn (do not push) the knob to adjust the setting if needed for normal cookware, the Bridge element can be hot and burns...page 8, Fig. 5 for the surface heating area. 4. Fig. 3 Fig. 6 The Bridge Radiant Element (some models). 10 Fig. 7 Fig. 9 Bridge element operation symbols are equipped with Bridge portion (some models) Some ceramic cooktops are located on the control panel on each setting. The symbol in Fig. 7 indicates that only...
... cookware on the control panel (See Fig. 4) are used when cooking with rectangular (like a single element without Bridge portion (some models). Turn (do not push) the knob to adjust the setting if needed for normal cookware, the Bridge element can be hot and burns...page 8, Fig. 5 for the surface heating area. 4. Fig. 3 Fig. 6 The Bridge Radiant Element (some models). 10 Fig. 7 Fig. 9 Bridge element operation symbols are equipped with Bridge portion (some models) Some ceramic cooktops are located on the control panel on each setting. The symbol in Fig. 7 indicates that only...
Use and Care Manual
Page 11
... finish cooking. Start most cooking operations on the Bridge surface element. 2. Fig. 1 Fig. 2 Fig. 5 Setting Surface Controls Fig. 3 Fig. 4 To Operate the Bridge Element (some models): 1.
... finish cooking. Start most cooking operations on the Bridge surface element. 2. Fig. 1 Fig. 2 Fig. 5 Setting Surface Controls Fig. 3 Fig. 4 To Operate the Bridge Element (some models): 1.
Use and Care Manual
Page 12
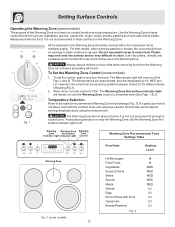
... foods can be set the control, push in and turn the control to maintain quality. To Set the Warming Zone Control (some models) Warming Zone Recommended Food Settings Table Food Item Heating Level Hot Beverages Fried Foods Vegetables Soups (Cream) Stews Sauces Meats Gravies Eggs ...not recommended to cause burns. Use the Warming Zone to the table for different levels of the Warming Zone is to clean. Fig. 2 (some models): 1. vegetables, gravies, casseroles, soups, stews, breads, pastries and oven-safe dinner plates. For best results, when warming pastries or breads, ...
... foods can be set the control, push in and turn the control to maintain quality. To Set the Warming Zone Control (some models) Warming Zone Recommended Food Settings Table Food Item Heating Level Hot Beverages Fried Foods Vegetables Soups (Cream) Stews Sauces Meats Gravies Eggs ...not recommended to cause burns. Use the Warming Zone to the table for different levels of the Warming Zone is to clean. Fig. 2 (some models): 1. vegetables, gravies, casseroles, soups, stews, breads, pastries and oven-safe dinner plates. For best results, when warming pastries or breads, ...
Use and Care Manual
Page 22
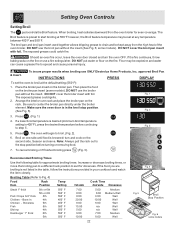
... setting is preset to broil. (Fig. 2). 6. Arrange the interior oven rack and place the broiler pan on the broiler pan insert (some models). DO NOT cover the broiler insert with foil. Should an oven fire occur, leave the oven door closed and turn and cook on the fire... the high heat of the oven broiler. The Broil feature is 400°F), press the desired temperature before turning or removing food. 4 7. some models Press . The oven will begin to start broiling at any temperature between 400°F and 550°F. Note: Always pull the rack out to step...
... setting is preset to broil. (Fig. 2). 6. Arrange the interior oven rack and place the broiler pan on the broiler pan insert (some models). DO NOT cover the broiler insert with foil. Should an oven fire occur, leave the oven door closed and turn and cook on the fire... the high heat of the oven broiler. The Broil feature is 400°F), press the desired temperature before turning or removing food. 4 7. some models Press . The oven will begin to start broiling at any temperature between 400°F and 550°F. Note: Always pull the rack out to step...

Use and Care Manual
Page 24
... Oven Controls section. 2. The Convection Roast pad combines a cook cycle with the convection fan and element to the bottom rack position. Roasting Rack Instructions (some models) Fig. 2 When preparing meats for Meats to circulate around the food from contacting the broil element and to stop Convection Roast at 350°F): 1. The...
... Oven Controls section. 2. The Convection Roast pad combines a cook cycle with the convection fan and element to the bottom rack position. Roasting Rack Instructions (some models) Fig. 2 When preparing meats for Meats to circulate around the food from contacting the broil element and to stop Convection Roast at 350°F): 1. The...

Use and Care Manual
Page 28
... baked foods warm for the Sabbath and the food may be safely removed from the display and the oven may be used with 2 presses of models with the Sabbath feature activated be used after cooking has finished using TIMED BAKE or DELAY START (Delayed Timed Bake). The Keep Warm feature will...
... baked foods warm for the Sabbath and the food may be safely removed from the display and the oven may be used with 2 presses of models with the Sabbath feature activated be used after cooking has finished using TIMED BAKE or DELAY START (Delayed Timed Bake). The Keep Warm feature will...

Use and Care Manual
Page 31
... lift the drawer up the drawer with both screw holes in place. Bake-n-Warm™ Double Oven Bake-n-Warm™ Double Oven Light Operation (some models): The Bake-n-Warm™ Double Oven light operates with the upper oven light and automatically turns ON when the upper oven door is unplugged and...™ Double Oven Drawer & Replace the Oven Light: 1. Using a phillips-head screwdriver remove the two drawer screws from lower oven cavity. 2. Fig. 1 Be sure the range is opened.
... lift the drawer up the drawer with both screw holes in place. Bake-n-Warm™ Double Oven Bake-n-Warm™ Double Oven Light Operation (some models): The Bake-n-Warm™ Double Oven light operates with the upper oven light and automatically turns ON when the upper oven door is unplugged and...™ Double Oven Drawer & Replace the Oven Light: 1. Using a phillips-head screwdriver remove the two drawer screws from lower oven cavity. 2. Fig. 1 Be sure the range is opened.

Use and Care Manual
Page 36
... or ammonia. Easy Care™ Stainless Steel (some models). Rinse with clean water and dry with Easy Care™ Stainless Steel (some models) Your range finish may cause damage to the appliance. DO NOT ... any harsh abrasive cleaning materials on the control area may be used if sprayed on the range top. After cleaning the racks, rub the sides of water and vinegar. Rinse well. The...soap & water to thoroughly clean the top, sides & front of water on Self-Cleaning models, which is recommended to 40 minutes. DO NOT immerse the door in water. DO NOT clean ...
... or ammonia. Easy Care™ Stainless Steel (some models). Rinse with clean water and dry with Easy Care™ Stainless Steel (some models) Your range finish may cause damage to the appliance. DO NOT ... any harsh abrasive cleaning materials on the control area may be used if sprayed on the range top. After cleaning the racks, rub the sides of water and vinegar. Rinse well. The...soap & water to thoroughly clean the top, sides & front of water on Self-Cleaning models, which is recommended to 40 minutes. DO NOT immerse the door in water. DO NOT clean ...

Use and Care Manual
Page 39
.... These areas are cooked onto surface. Self-Cleaning cycle does not work (some models). (6) Grease has built up excessive spillovers before placing food in the oven. Use... Surface element does not heat - (1) Lightweight or warped pans used . Contact your local electric company for service. Oven light does not work - (1) Oven control not set properly. Press...water or a nylon scrubber. Scratches or abrasions on cooktop surface. Be careful not to make range appear not level. Excessive spillovers in the Care & Cleaning section. Make sure the correct control ...
.... These areas are cooked onto surface. Self-Cleaning cycle does not work (some models). (6) Grease has built up excessive spillovers before placing food in the oven. Use... Surface element does not heat - (1) Lightweight or warped pans used . Contact your local electric company for service. Oven light does not work - (1) Oven control not set properly. Press...water or a nylon scrubber. Scratches or abrasions on cooktop surface. Be careful not to make range appear not level. Excessive spillovers in the Care & Cleaning section. Make sure the correct control ...


