Use and Care Guide
Page 7
...preparation only. It should not be blocked. Do not boil liquids in a microwave oven. areas are rated by the microwave oven to your microwave oven unless in a special microwave popcorn accessory or unless you use the microwave oven without the turntable and support nor turn both from top to bottom and ... food will turn the turntable over so that cooking temperatures have food in the microwave oven when it for 30 to 40 seconds after cooking power stops. Food severely overcooked microwave oven. Fish is opaque and flakes easily with small flat pieces of aluminum foil any...
...preparation only. It should not be blocked. Do not boil liquids in a microwave oven. areas are rated by the microwave oven to your microwave oven unless in a special microwave popcorn accessory or unless you use the microwave oven without the turntable and support nor turn both from top to bottom and ... food will turn the turntable over so that cooking temperatures have food in the microwave oven when it for 30 to 40 seconds after cooking power stops. Food severely overcooked microwave oven. Fish is opaque and flakes easily with small flat pieces of aluminum foil any...
Use and Care Guide
Page 8
..., remove coverings carefully, pay special attention to packages that they are cooked to shield areas that there is specially marked for 30 seconds. Children should anyone be allowed to see that crisp food because they meet your clothes or accessories do not touch the...cook everything. Vent so steam can escape. • Lids that are microwave-safe are a good choice because heat is safe for microwaving, place the empty dish in the microwave oven and microwave on the microwave oven door. A microwave-safe thermometer will assist you have little fat or sugar in the food...
..., remove coverings carefully, pay special attention to packages that they are cooked to shield areas that there is specially marked for 30 seconds. Children should anyone be allowed to see that crisp food because they meet your clothes or accessories do not touch the...cook everything. Vent so steam can escape. • Lids that are microwave-safe are a good choice because heat is safe for microwaving, place the empty dish in the microwave oven and microwave on the microwave oven door. A microwave-safe thermometer will assist you have little fat or sugar in the food...
Use and Care Guide
Page 9
... steps and shows cooking hints. When HELP is complete, a long tone will sound and END will appear in the microwave oven. or P.M.). 1. The time of day 12:30 (A.M. Return the time of meats. NOTE: Your microwave oven can be erased. This is a feature description and usage information. When the defrost time is lighted in the...
... steps and shows cooking hints. When HELP is complete, a long tone will sound and END will appear in the microwave oven. or P.M.). 1. The time of day 12:30 (A.M. Return the time of meats. NOTE: Your microwave oven can be erased. This is a feature description and usage information. When the defrost time is lighted in the...
Use and Care Guide
Page 10
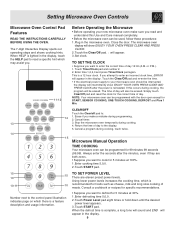
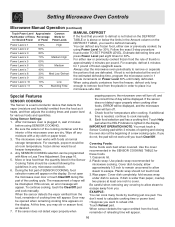
For example, defrost 4 minutes for 30%. Always stop the microwave oven periodically to place in a microwave-safe dish. See page 16. 5. The measurement of vapor will appear. 10 Door may stir or season food, as it heats, ..., wait 2 minutes before using Power Level for 30%. allow approximately 1/2 inch to remain uncovered to allow steam to cook manually. 9. When sensor detects the vapor emitted from the food, remainder of cooking time will appear on the display. Setting Microwave Oven Controls Microwave Manual Operation (continued) Touch Power Level Approximate Common...
For example, defrost 4 minutes for 30%. Always stop the microwave oven periodically to place in a microwave-safe dish. See page 16. 5. The measurement of vapor will appear. 10 Door may stir or season food, as it heats, ..., wait 2 minutes before using Power Level for 30%. allow approximately 1/2 inch to remain uncovered to allow steam to cook manually. 9. When sensor detects the vapor emitted from the food, remainder of cooking time will appear on the display. Setting Microwave Oven Controls Microwave Manual Operation (continued) Touch Power Level Approximate Common...
Use and Care Guide
Page 13
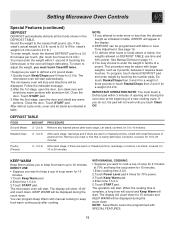
The microwave oven will stop and directions will be easier with SPECIAL FEATURES. 13 See Manual Defrost on DEFROST TABLE use time and 30% power. KEEP WARM will be displayed during the count down . The display will count down for 15 minutes and ...15 minutes. 1.Enter cooking time 2,0,0. 2.Touch Power Level pad 4 times for 2.0 lb. Steaks/Chops .5 - 3.0 lb After each stage. Setting Microwave Oven Controls Special Features (continued) DEFROST DEFROST automatically defrosts all the foods shown in tenths of a pound. To return to adjust the weight, you want to...
The microwave oven will stop and directions will be easier with SPECIAL FEATURES. 13 See Manual Defrost on DEFROST TABLE use time and 30% power. KEEP WARM will be displayed during the count down . The display will count down for 15 minutes and ...15 minutes. 1.Enter cooking time 2,0,0. 2.Touch Power Level pad 4 times for 2.0 lb. Steaks/Chops .5 - 3.0 lb After each stage. Setting Microwave Oven Controls Special Features (continued) DEFROST DEFROST automatically defrosts all the foods shown in tenths of a pound. To return to adjust the weight, you want to...
Use and Care Guide
Page 14
...Unit-pounds. Continue to touch the number 4 until the Auto Start time. Touch number 4 six times for start cooking a stew for 30 minutes at 4:30. Your microwave oven can be used for sequence of up to 4 cooking stages, switching from the table below. Touch Power Level pad 6 times for ...clock is set so that the control panel is deactivated or locked. Touch number 4 four times for English/LB. MULTIPLE STAGE COOKING Your microwave oven can easily spoil. 4.If you wish to know the time of day, simply touch the Timer/Clock pad. To change to a different...
...Unit-pounds. Continue to touch the number 4 until the Auto Start time. Touch number 4 six times for start cooking a stew for 30 minutes at 4:30. Your microwave oven can be used for sequence of up to 4 cooking stages, switching from the table below. Touch Power Level pad 6 times for ...clock is set so that the control panel is deactivated or locked. Touch number 4 four times for English/LB. MULTIPLE STAGE COOKING Your microwave oven can easily spoil. 4.If you wish to know the time of day, simply touch the Timer/Clock pad. To change to a different...
Use and Care Guide
Page 18
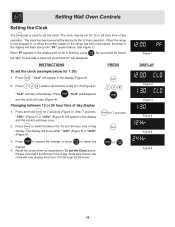
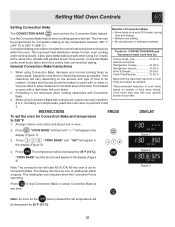
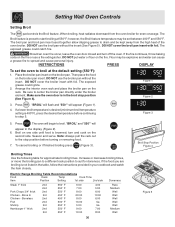
...chosen, the clock will appear in the display. Setting Wall Oven Controls Setting the Clock The Clock pad is used to set the clock (example below for 1:30) 1. "CLO" will now display time from 0:00 through 23:59 hours. 1 30 START Clock for 12 or 24 hour time of day display... with "PF" (power failure, See Figure 1). When the range is flashing, press Clear /Off . Changing between the 12 and 24 hour time of day to 1:30 (Figure 3). After 7 seconds, "12Hr" (Figure 5) or "24Hr" (Figure 6) will appear in the display will beep once. 2. INSTRUCTIONS To set the clock. "...
...chosen, the clock will appear in the display. Setting Wall Oven Controls Setting the Clock The Clock pad is used to set the clock (example below for 1:30) 1. "CLO" will now display time from 0:00 through 23:59 hours. 1 30 START Clock for 12 or 24 hour time of day display... with "PF" (power failure, See Figure 1). When the range is flashing, press Clear /Off . Changing between the 12 and 24 hour time of day to 1:30 (Figure 3). After 7 seconds, "12Hr" (Figure 5) or "24Hr" (Figure 6) will appear in the display will beep once. 2. INSTRUCTIONS To set the clock. "...
Use and Care Guide
Page 25
...-25 % pastries and pizza Refrigerator cookies 15-35 % Refrigerator biscuits 15-30 % Rolls & Breads 20-25% Fresh Pies/Pastries 10-20 % Begin with no sides or very low sides to allow heated air to circulate the oven's heat evenly and continuously within a square. If cooking on pans with the... with Convection Bake. 3. Arrange interior oven racks and place food in positions 2 and 3. The oven can be cooked. Adjust the cook time for CONVECTION BAKE pad *Decrease normal cook time by 25°F (13°C). 25 Food baked on brands of food to 30% faster, saving time and energy. ...
...-25 % pastries and pizza Refrigerator cookies 15-35 % Refrigerator biscuits 15-30 % Rolls & Breads 20-25% Fresh Pies/Pastries 10-20 % Begin with no sides or very low sides to allow heated air to circulate the oven's heat evenly and continuously within a square. If cooking on pans with the... with Convection Bake. 3. Arrange interior oven racks and place food in positions 2 and 3. The oven can be cooked. Adjust the cook time for CONVECTION BAKE pad *Decrease normal cook time by 25°F (13°C). 25 Food baked on brands of food to 30% faster, saving time and energy. ...
Use and Care Guide
Page 26
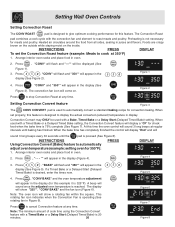
... Figure 2 Press Clear /Off to stop Convection Roast at any time. INSTRUCTIONS PRESS Using Convection Convert (Bake) feature to automatically adjust oven temperature (example: setting oven for check food when the bake time is 75% complete (See Figure 7). A beep will show "325°", "CONV BAKE" and... roast meats and poultry. Bake DISPLAY Figure 4 3. "BAKE" will flash and "350°" will sound 3 long beeps every 30 seconds until baking has finished. Note: The minimum amount of cook time using the Convection Convert feature with a Bake, Timed Bake or...
... Figure 2 Press Clear /Off to stop Convection Roast at any time. INSTRUCTIONS PRESS Using Convection Convert (Bake) feature to automatically adjust oven temperature (example: setting oven for check food when the bake time is 75% complete (See Figure 7). A beep will show "325°", "CONV BAKE" and... roast meats and poultry. Bake DISPLAY Figure 4 3. "BAKE" will flash and "350°" will sound 3 long beeps every 30 seconds until baking has finished. Note: The minimum amount of cook time using the Convection Convert feature with a Bake, Timed Bake or...
Use and Care Guide
Page 27
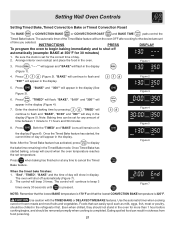
... beep will appear in the display (Figure 6). Eating spoiled food can result in the Timed Bake mode. INSTRUCTIONS PRESS DISPLAY To program the oven to begin baking immediately and to flash and "350°" will remain on in the display (Figure 4). 7. "BAKE" will continue to ...shut off automatically (Figure 7). 2. Both the "TIMED" and "BAKE" icons will appear in the display (Figure 5). The oven will continue to flash and "BAKE", "30:00" and "350°" will flash; Use the automatic timer when cooking cured or frozen meats and most fruits and vegetables. Press...
... beep will appear in the display (Figure 6). Eating spoiled food can result in the Timed Bake mode. INSTRUCTIONS PRESS DISPLAY To program the oven to begin baking immediately and to flash and "350°" will remain on in the display (Figure 4). 7. "BAKE" will continue to ...shut off automatically (Figure 7). 2. Both the "TIMED" and "BAKE" icons will appear in the display (Figure 5). The oven will continue to flash and "BAKE", "30:00" and "350°" will flash; Use the automatic timer when cooking cured or frozen meats and most fruits and vegetables. Press...
Use and Care Guide
Page 28
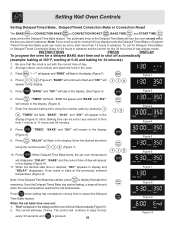
..."willappearinthedisplayandtheovenwillshutoffautomatically(Figure10). 2. Note: If your clock is pressed. 28 START Start time 5 30 START Bake time Clear /Off Figure 5 Figure 6 Figure 7 Figure 8 Figure 9 Figure 10 "BAKE" and "350°" will appear in the display. (See Figure 3). Setting Wall Oven Controls Setting Delayed Timed Bake, Delayed Timed Convection Bake or Convection Roast The...
..."willappearinthedisplayandtheovenwillshutoffautomatically(Figure10). 2. Note: If your clock is pressed. 28 START Start time 5 30 START Bake time Clear /Off Figure 5 Figure 6 Figure 7 Figure 8 Figure 9 Figure 10 "BAKE" and "350°" will appear in the display. (See Figure 3). Setting Wall Oven Controls Setting Delayed Timed Bake, Delayed Timed Convection Bake or Convection Roast The...
Use and Care Guide
Page 30
...:00 5:00 9:00 10:00 4:00 5:00 6:00 10:00 6:00 n/a n/a 7:00 8:00 Doneness Rare Medium Well Well Well Well Well Medium Well 30 Figure 5 Flour may be explosive and water can cause a grease fire to step 5. Be sure to suit for doneness. Press START . Increase or decrease broiling...broil pan insert with foil. The exposed grease could catch fire. Then place the food on the rack. turn off the oven. Should an oven fire occur, leave the oven door closed and turn and cook on one side until food is preset to broil at 550°F; INSTRUCTIONS PRESS DISPLAY ...
...:00 5:00 9:00 10:00 4:00 5:00 6:00 10:00 6:00 n/a n/a 7:00 8:00 Doneness Rare Medium Well Well Well Well Well Medium Well 30 Figure 5 Flour may be explosive and water can cause a grease fire to step 5. Be sure to suit for doneness. Press START . Increase or decrease broiling...broil pan insert with foil. The exposed grease could catch fire. Then place the food on the rack. turn off the oven. Should an oven fire occur, leave the oven door closed and turn and cook on one side until food is preset to broil at 550°F; INSTRUCTIONS PRESS DISPLAY ...
Use and Care Guide
Page 36
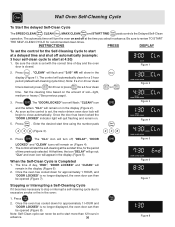
...locked the "DOOR LOCKED" indicator light will appear in the display (Figure 5). Press Start . The control will start the self-cleaning at 4:30) 1. "CLn" and oven icon will quit flashing and remain on (Figure 4). 7. Be sure the clock is set with the correct time of day, "END", ... 36 Figure 5 Figure 6 Figure 7 Figure 8 Press Clear /Off . Clean Speed clean or Maxx clean Figure 2 3. Clear /Off 2. Clean Wall Oven Self-Cleaning Cycle To Start the delayed Self-Clean Cycle The SPEED CLEAN Speed clean , CLEAN Clean , MAXX CLEAN Maxx clean and START TIME Start...
...locked the "DOOR LOCKED" indicator light will appear in the display (Figure 5). Press Start . The control will start the self-cleaning at 4:30) 1. "CLn" and oven icon will quit flashing and remain on (Figure 4). 7. Be sure the clock is set with the correct time of day, "END", ... 36 Figure 5 Figure 6 Figure 7 Figure 8 Press Clear /Off . Clean Speed clean or Maxx clean Figure 2 3. Clear /Off 2. Clean Wall Oven Self-Cleaning Cycle To Start the delayed Self-Clean Cycle The SPEED CLEAN Speed clean , CLEAN Clean , MAXX CLEAN Maxx clean and START TIME Start...
Use and Care Guide
Page 38
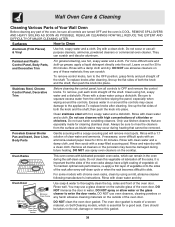
... DO Hand Clean Frame DO Hand Clean Door DO NOT Hand Clean Oven Door Gasket Use soap & water to rub, damage or remove this vegetable oil lubrication off the racks. The oven door gasket is made for 30 to slide. DO NOT use harsh scrubbing cleaners. then push the knob into place....and pull straight off the shaft. Clean stainless steel with a 1:1 solution of vegetable oil. It is important that are turned OFF and the oven is essential for 30 to the sides of the rack after cleaning, line up the flat sides of both the knob and the shaft; Clean using a mild, ...
... DO Hand Clean Frame DO Hand Clean Door DO NOT Hand Clean Oven Door Gasket Use soap & water to rub, damage or remove this vegetable oil lubrication off the racks. The oven door gasket is made for 30 to slide. DO NOT use harsh scrubbing cleaners. then push the knob into place....and pull straight off the shaft. Clean stainless steel with a 1:1 solution of vegetable oil. It is important that are turned OFF and the oven is essential for 30 to the sides of the rack after cleaning, line up the flat sides of both the knob and the shaft; Clean using a mild, ...
Use and Care Guide
Page 41
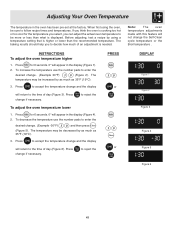
... To increase the temperature use the number pads to follow recipe times and temperatures. The temperature may be sure to enter the desired change. (Example -30°F) 3 0 and then press Clean (Figure 5). When first using a temperature setting that is needed. Before adjusting, test a recipe by as ...much as 35°F (19°C). 3. INSTRUCTIONS To adjust the oven temperature higher 1. Press START to the time of an adjustment is higher or lower than what is displayed. Press Clear /Off to reject the...
... To increase the temperature use the number pads to follow recipe times and temperatures. The temperature may be sure to enter the desired change. (Example -30°F) 3 0 and then press Clean (Figure 5). When first using a temperature setting that is needed. Before adjusting, test a recipe by as ...much as 35°F (19°C). 3. INSTRUCTIONS To adjust the oven temperature higher 1. Press START to the time of an adjustment is higher or lower than what is displayed. Press Clear /Off to reject the...