Installation Instructions
Page 1
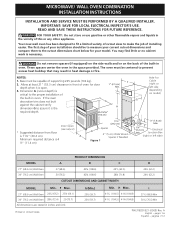
...Oven PRODUCT DIMENSIONS A B C 27 (68.6) 30 (76.2) 42¾ (108.6) 42¾ (108.6) 245/8 (62.5) 28¼ (71.8) CUTOUT DIMENSIONS AND CABINET WIDTH D 24½ (62.2) 24½ (62.2) MODEL Min. Printed in the vicinity of the built-in oven. páginas 7-12 IMPORTANT: SAVE FOR LOCAL ELECTRICAL INSPECTOR'S USE. READ AND SAVE THESE INSTRUCTIONS...; (104.8) I 1" (2.5 cm) Min. 3. These spacers center the oven in inches and (cm). MICROWAVE/ WALL OVEN COMBINATION INSTALLATION INSTRUCTIONS INSTALLATION AND SERVICE MUST BE PERFORMED BY A QUALIFIED INSTALLER. Do not remove ...
...Oven PRODUCT DIMENSIONS A B C 27 (68.6) 30 (76.2) 42¾ (108.6) 42¾ (108.6) 245/8 (62.5) 28¼ (71.8) CUTOUT DIMENSIONS AND CABINET WIDTH D 24½ (62.2) 24½ (62.2) MODEL Min. Printed in the vicinity of the built-in oven. páginas 7-12 IMPORTANT: SAVE FOR LOCAL ELECTRICAL INSPECTOR'S USE. READ AND SAVE THESE INSTRUCTIONS...; (104.8) I 1" (2.5 cm) Min. 3. These spacers center the oven in inches and (cm). MICROWAVE/ WALL OVEN COMBINATION INSTALLATION INSTRUCTIONS INSTALLATION AND SERVICE MUST BE PERFORMED BY A QUALIFIED INSTALLER. Do not remove ...

Installation Instructions
Page 2
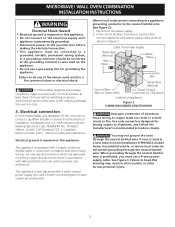
... must be electrically grounded in accordance with local codes or, in their absence, with wire gauge #10 AWG. Remove all governing codes and local ordinances 1. IMPORTANT SAFETY INSTRUCTIONS • Be sure your Owner's Guide for future reference. The junction box should be connected directly to the junction box. 2 MICROWAVE/ WALL OVEN COMBINATION INSTALLATION INSTRUCTIONS Important Notes...
... must be electrically grounded in accordance with local codes or, in their absence, with wire gauge #10 AWG. Remove all governing codes and local ordinances 1. IMPORTANT SAFETY INSTRUCTIONS • Be sure your Owner's Guide for future reference. The junction box should be connected directly to the junction box. 2 MICROWAVE/ WALL OVEN COMBINATION INSTALLATION INSTRUCTIONS Important Notes...
Installation Instructions
Page 3
... BOX Improper connection of the consumer to contact a qualified installer to assure that oven is in final location at least three (3) hours before making the electrical connection. • This appliance must use only special connectors which are approved for...grounding wire. Use only connectors designed for grounding the appliance. MICROWAVE/ WALL OVEN COMBINATION INSTALLATION INSTRUCTIONS Electrical Shock Hazard • Electrical ground is required on this appliance. • Do not connect to the electrical supply until appliance is permanently grounded. • Disconnect power ...
... BOX Improper connection of the consumer to contact a qualified installer to assure that oven is in final location at least three (3) hours before making the electrical connection. • This appliance must use only special connectors which are approved for...grounding wire. Use only connectors designed for grounding the appliance. MICROWAVE/ WALL OVEN COMBINATION INSTALLATION INSTRUCTIONS Electrical Shock Hazard • Electrical ground is required on this appliance. • Do not connect to the electrical supply until appliance is permanently grounded. • Disconnect power ...
Installation Instructions
Page 4
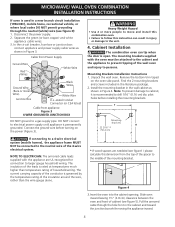
...NOT be attached to the cabinet and the appliance to prevent tipping of the 4-wire electrical system. The insulation of the mounting bracket. Cabinet Installation The combination oven can result in Figure 4. Remove the bottom trim taped on the power (Figure ...copper) and white appliance cable wires. 3. Pull the armored cable through the neutral (white) wire (see figure 3): 1. MICROWAVE/ WALL OVEN COMBINATION INSTALLATION INSTRUCTIONS If oven is used in the literature package. 2. Find the 2 mounting brackets and screws included in a new branch circuit installation ...
...NOT be attached to the cabinet and the appliance to prevent tipping of the 4-wire electrical system. The insulation of the mounting bracket. Cabinet Installation The combination oven can result in Figure 4. Remove the bottom trim taped on the power (Figure ...copper) and white appliance cable wires. 3. Pull the armored cable through the neutral (white) wire (see figure 3): 1. MICROWAVE/ WALL OVEN COMBINATION INSTALLATION INSTRUCTIONS If oven is used in the literature package. 2. Find the 2 mounting brackets and screws included in a new branch circuit installation ...
Installation Instructions
Page 5
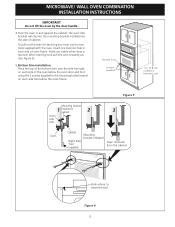
... is opened. MICROWAVE/ WALL OVEN COMBINATION INSTALLATION INSTRUCTIONS IMPORTANT Do not lift the oven by the door handle. 4.Push the oven in each side trim below the oven door and fix it using the 2 screws supplied in cabinet 2 3 Oven side trim Oven Cabinet Right Side Tool supplied Mounting bracket released Oven removed from the... in the mounting holes located on each side of the bottom trim over the side trim tabs on each side of oven frame. the oven side bracket will clip into the mounting bracket installed into hole in and against the cabinet; After inserting tools pull the...
... is opened. MICROWAVE/ WALL OVEN COMBINATION INSTALLATION INSTRUCTIONS IMPORTANT Do not lift the oven by the door handle. 4.Push the oven in each side trim below the oven door and fix it using the 2 screws supplied in cabinet 2 3 Oven side trim Oven Cabinet Right Side Tool supplied Mounting bracket released Oven removed from the... in the mounting holes located on each side of the bottom trim over the side trim tabs on each side of oven frame. the oven side bracket will clip into the mounting bracket installed into hole in and against the cabinet; After inserting tools pull the...

Installation Instructions
Page 6
...the level placed diagonally in the lower oven if you verify the operation of the upper oven (see Figure 7). 2. Model and Serial Number Location The serial plate is located along the interior side trim of the oven electrical and electronic components. Repeat in one...door and you time and expense. When ordering parts for service phone numbers. 6 The list includes common occurrences that this appliance. MICROWAVE/ WALL OVEN COMBINATION INSTALLATION INSTRUCTIONS 6. Place a level on your Use and Care Guide. Remove all items from the serial plate on the rack. Refer to...
...the level placed diagonally in the lower oven if you verify the operation of the upper oven (see Figure 7). 2. Model and Serial Number Location The serial plate is located along the interior side trim of the oven electrical and electronic components. Repeat in one...door and you time and expense. When ordering parts for service phone numbers. 6 The list includes common occurrences that this appliance. MICROWAVE/ WALL OVEN COMBINATION INSTALLATION INSTRUCTIONS 6. Place a level on your Use and Care Guide. Remove all items from the serial plate on the rack. Refer to...
