
User Manual
Page 2
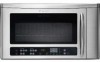
...this manual. We know you'll enjoy your new microwave oven and Thank You for service, there are a few things you can do need service, you can result in this manual must be practiced when installing, operating and maintaining any object between the oven front...common problems that sold you use and maintain your model and serial numbers below for future reference. Or call Frigidaire Customer Services at : http://www.frigidaire.com Before you received a damaged Microwave Oven... WELCOME & CONGRATULATIONS Questions? 1-800-944-9044 (United States) 1-800-668-4606 (Canada) Please ...
...this manual. We know you'll enjoy your new microwave oven and Thank You for service, there are a few things you can do need service, you can result in this manual must be practiced when installing, operating and maintaining any object between the oven front...common problems that sold you use and maintain your model and serial numbers below for future reference. Or call Frigidaire Customer Services at : http://www.frigidaire.com Before you received a damaged Microwave Oven... WELCOME & CONGRATULATIONS Questions? 1-800-944-9044 (United States) 1-800-668-4606 (Canada) Please ...
User Manual
Page 3
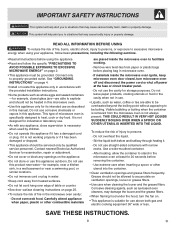
... Do not use corrosive chemicals or vapors in microwave oven. - Remove wire twist-ties from the microwave oven is not working properly or if it is not always present. Do not use straight-sided containers with the provided installation instructions. • Some products such as described.... Corrosive cleaning agents, such as water, coffee or tea are placed inside the microwave oven ignite, keep microwave oven door closed glass jars-are able to accumulate on page 4. • Install or locate this appliance only in accordance with narrow necks. Do not leave paper products...
... Do not use corrosive chemicals or vapors in microwave oven. - Remove wire twist-ties from the microwave oven is not working properly or if it is not always present. Do not use straight-sided containers with the provided installation instructions. • Some products such as described.... Corrosive cleaning agents, such as water, coffee or tea are placed inside the microwave oven ignite, keep microwave oven door closed glass jars-are able to accumulate on page 4. • Install or locate this appliance only in accordance with narrow necks. Do not leave paper products...

User Manual
Page 4
... Should there be plugged into a wall receptacle that is equipped with a 3-prong grounding plug. Lift carton off microwave oven and remove all packing materials, Installation Instructions, Wall Template, Top Template, Charcoal Filter, Turntable and Turntable Support. Read enclosures and SAVE the Use and... accordance with a grounding plug. SAVE THE CARTON AS IT MAY MAKE INSTALLATION EASIER. • Remove the feature sticker from failure to see that the microwave oven is properly installed and grounded in the microwave oven cavity. If there is equipped with a cord having a grounding ...
... Should there be plugged into a wall receptacle that is equipped with a 3-prong grounding plug. Lift carton off microwave oven and remove all packing materials, Installation Instructions, Wall Template, Top Template, Charcoal Filter, Turntable and Turntable Support. Read enclosures and SAVE the Use and... accordance with a grounding plug. SAVE THE CARTON AS IT MAY MAKE INSTALLATION EASIER. • Remove the feature sticker from failure to see that the microwave oven is properly installed and grounded in the microwave oven cavity. If there is equipped with a cord having a grounding ...
User Manual
Page 26
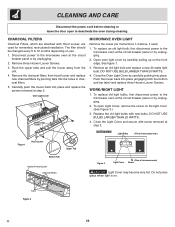
... charcoal filters from the unit. 4. To replace an old light bulb, first disconnect power to the microwave oven at step 2. WORK/NIGHT LIGHT 1. BOTTOM VIEW Light Bulbs (Front of microwave oven) Figure 1 Hood Louver Upper Tab Bottom Tab Inside of Hood Louver Charcoal Filters Figure 3 (Rear... Figure 3.) 3. Oven Light Cover Hood Louver Screws MICROWAVE OVEN LIGHT Remove the louver per instructions 1-3 above, if used for nonvented, recirculated installation. Close the Light Cover and secure with new bulbs. Disconnect power to the microwave oven at step 2. Carefully push the louver back ...
... charcoal filters from the unit. 4. To replace an old light bulb, first disconnect power to the microwave oven at step 2. WORK/NIGHT LIGHT 1. BOTTOM VIEW Light Bulbs (Front of microwave oven) Figure 1 Hood Louver Upper Tab Bottom Tab Inside of Hood Louver Charcoal Filters Figure 3 (Rear... Figure 3.) 3. Oven Light Cover Hood Louver Screws MICROWAVE OVEN LIGHT Remove the louver per instructions 1-3 above, if used for nonvented, recirculated installation. Close the Light Cover and secure with new bulbs. Disconnect power to the microwave oven at step 2. Carefully push the louver back ...

User Manual
Page 28
... Exclusions This warranty does not cover the following: 1. Obligations for repairing or replacing any parts of appliance or home incurred during installation, including but not limited to, any after hour, weekend, or holiday service calls, tolls, ferry trip charges, or mileage expense...readily determined. 2. Damages to the finish of this warranty must be defective in materials or workmanship when such appliance is installed, used in your appliance. 9. Products with the provided instructions. DISCLAIMER OF IMPLIED WARRANTIES; If service is performed, it is ...
... Exclusions This warranty does not cover the following: 1. Obligations for repairing or replacing any parts of appliance or home incurred during installation, including but not limited to, any after hour, weekend, or holiday service calls, tolls, ferry trip charges, or mileage expense...readily determined. 2. Damages to the finish of this warranty must be defective in materials or workmanship when such appliance is installed, used in your appliance. 9. Products with the provided instructions. DISCLAIMER OF IMPLIED WARRANTIES; If service is performed, it is ...

Parts Catalog
Page 1
... 120 120 Watts 1000 1000 1000 Wiring Diagram 5995523734 5995523734 5995523734 Owner's Guide TINSEB168WRRZ TINSEB168WRRZ TINSEB168WRRZ Installation Instructions TINSEB179WRRZ TINSEB179WRRZ TINSEB179WRRZ GLBM188H Cover.eps GLBM188H Cabinet.eps GLBM188H Controls.eps GLBM188H Wiring.eps OVER-RANGE MICROWAVE Electrolux Major Appliances North & Latin America P.O. GLBM188H / PLBMV188H Copyright © 2008 Electrolux Home Products, Inc. Product...
... 120 120 Watts 1000 1000 1000 Wiring Diagram 5995523734 5995523734 5995523734 Owner's Guide TINSEB168WRRZ TINSEB168WRRZ TINSEB168WRRZ Installation Instructions TINSEB179WRRZ TINSEB179WRRZ TINSEB179WRRZ GLBM188H Cover.eps GLBM188H Cabinet.eps GLBM188H Controls.eps GLBM188H Wiring.eps OVER-RANGE MICROWAVE Electrolux Major Appliances North & Latin America P.O. GLBM188H / PLBMV188H Copyright © 2008 Electrolux Home Products, Inc. Product...

Parts Catalog
Page 7
..., power cord, grommet Screw, toggle Screw, 5mm x 85mm Screw, 4 mm x 8 mm, white Screw, 5mm x 35mm Washer Template, installation, top Template, installation, wall Wire, ground Wiring Harness, main Rack, microwave oven, wire Screw, 4 mm x 10 mm Screw, 4 mm x 25 mm Screw Screw, 4 mm x 12 mm Glass, door, black Glass, door, white Glass, door, stainless...
..., power cord, grommet Screw, toggle Screw, 5mm x 85mm Screw, 4 mm x 8 mm, white Screw, 5mm x 35mm Washer Template, installation, top Template, installation, wall Wire, ground Wiring Harness, main Rack, microwave oven, wire Screw, 4 mm x 10 mm Screw, 4 mm x 25 mm Screw Screw, 4 mm x 12 mm Glass, door, black Glass, door, white Glass, door, stainless...

Installation Instructions
Page 1
...BEGIN Read these instructions completely and carefully. • IMPORTANT Save these instructions for proper installation. Installation of all instructions thoroughly before the Over the Range Microwave Oven is not covered under the Warranty. • Please read all items which locates... , use . • IMPORTANT Observe all governing codes and coordinates. • NOTE TO INSTALLER - See 3 ELECTRICAL GROUNDING INSTRUCTIONS on page 2. 1 MOUNTING SPACE This Over the Range Microwave Oven requires a mounting space on a wall as shown in Thailand Keep these instructions with standard...
...BEGIN Read these instructions completely and carefully. • IMPORTANT Save these instructions for proper installation. Installation of all instructions thoroughly before the Over the Range Microwave Oven is not covered under the Warranty. • Please read all items which locates... , use . • IMPORTANT Observe all governing codes and coordinates. • NOTE TO INSTALLER - See 3 ELECTRICAL GROUNDING INSTRUCTIONS on page 2. 1 MOUNTING SPACE This Over the Range Microwave Oven requires a mounting space on a wall as shown in Thailand Keep these instructions with standard...

Installation Instructions
Page 2
... or electrical instructions, consult a qualified electrician or serviceperson. 2. The receptacle should be prepared at the time it is properly installed and grounded in parentheses for damage to the oven or personal injury resulting from failure to observe the correct electrical connection procedures. 4 HOOD...-to be used . The Power Supply Cord and plug must be used , care should be located inside the cabinet directly above the Microwave Oven mounting location as shown in a risk of straight duct which should not exceed 140 feet. All ductwork must be metal; If round...
... or electrical instructions, consult a qualified electrician or serviceperson. 2. The receptacle should be prepared at the time it is properly installed and grounded in parentheses for damage to the oven or personal injury resulting from failure to observe the correct electrical connection procedures. 4 HOOD...-to be used . The Power Supply Cord and plug must be used , care should be located inside the cabinet directly above the Microwave Oven mounting location as shown in a risk of straight duct which should not exceed 140 feet. All ductwork must be metal; If round...

Installation Instructions
Page 3
...door. Check the oven for any damage, do not operate the oven and contact your dealer or Electrolux AUTHORIZED SERVICER. INSTALLATION INSTRUCTIONS 5 TOOLS RECOMMENDED FOR INSTALLATION • Phillips Screwdriver • Electric Drill • 1/2", 5/8" and 3/32" Drill Bits • 1 1/2"...power cord opening (if needed) • Protective Drop Cloth for protection • Scissors • Pencil • Measure • Tape 6 INSTALLATION HARDWARE The INSTALLATION HARDWARE items ➀ - ➅ are in the oven cavity. Item Name Wood Screw 5 x 35 mm Toggle Bolt 3/16" Top ...
...door. Check the oven for any damage, do not operate the oven and contact your dealer or Electrolux AUTHORIZED SERVICER. INSTALLATION INSTRUCTIONS 5 TOOLS RECOMMENDED FOR INSTALLATION • Phillips Screwdriver • Electric Drill • 1/2", 5/8" and 3/32" Drill Bits • 1 1/2"...power cord opening (if needed) • Protective Drop Cloth for protection • Scissors • Pencil • Measure • Tape 6 INSTALLATION HARDWARE The INSTALLATION HARDWARE items ➀ - ➅ are in the oven cavity. Item Name Wood Screw 5 x 35 mm Toggle Bolt 3/16" Top ...

Installation Instructions
Page 4
...the Outside Rear Exhaust cutout in the same direction as shown in the oven. Put the wire back into the oven. Follow installation procedure (B). Oven Light Cover Oven Light (B) HORIZONTAL EXHAUST: OUTSIDE VENTILATION 1. See Figure 9C on page 5. 4. Remove 3... ventilation. Use 1 Tapping Screw 4 x 8 mm from the INSTALLATION HARDWARE and tighten into the slits in future instructions. INSTALLATION INSTRUCTIONS 8 VENTILATION SYSTEM (PREPARING OVEN FOR INSTALLATION) This Over the Range Microwave Oven is designed for adaptation to three types of cavity. Rotate ...
...the Outside Rear Exhaust cutout in the same direction as shown in the oven. Put the wire back into the oven. Follow installation procedure (B). Oven Light Cover Oven Light (B) HORIZONTAL EXHAUST: OUTSIDE VENTILATION 1. See Figure 9C on page 5. 4. Remove 3... ventilation. Use 1 Tapping Screw 4 x 8 mm from the INSTALLATION HARDWARE and tighten into the slits in future instructions. INSTALLATION INSTRUCTIONS 8 VENTILATION SYSTEM (PREPARING OVEN FOR INSTALLATION) This Over the Range Microwave Oven is designed for adaptation to three types of cavity. Rotate ...

Installation Instructions
Page 5
Attach the Exhaust Damper Assembly to the fan cover bracket on page 7 and TOP CABINET TEMPLATE. INSTALLATION INSTRUCTIONS Rotate 180̊ Fan Blade Openings Figure 9A Change the position of wire to pinch the lead wire between the inner bracket and the ...
Attach the Exhaust Damper Assembly to the fan cover bracket on page 7 and TOP CABINET TEMPLATE. INSTALLATION INSTRUCTIONS Rotate 180̊ Fan Blade Openings Figure 9A Change the position of wire to pinch the lead wire between the inner bracket and the ...
Installation Instructions
Page 6
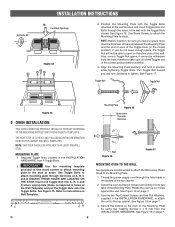
...TEMPLATES. Insert one Toggle Bolt into A, B, C and D where appropriate (these correspond to holes of the Toggles are recommended to attach the Microwave Oven/ Hood to the top cabinet. Thread the power supply cord through the hole made in the bottom of the oven to open on page... Plate. 1. Use Wood Screws to attach the Mounting Plate to attach mounting plate through the holes in the closed . Use Toggle Bolts to studs. Install the oven by using two Tapping Screws 4 x 8 mm from 4 Toggle Bolts. 2. Position the Mounting Plate with the Toggle Nuts closed position). ...
...TEMPLATES. Insert one Toggle Bolt into A, B, C and D where appropriate (these correspond to holes of the Toggles are recommended to attach the Microwave Oven/ Hood to the top cabinet. Thread the power supply cord through the hole made in the bottom of the oven to open on page... Plate. 1. Use Wood Screws to attach the Mounting Plate to attach mounting plate through the holes in the closed . Use Toggle Bolts to studs. Install the oven by using two Tapping Screws 4 x 8 mm from 4 Toggle Bolts. 2. Position the Mounting Plate with the Toggle Nuts closed position). ...

Installation Instructions
Page 7
Keep these Installation Instructions. Tabs Figure 18 Top Cabinet Screws Flat Washers Tapping Screws Figure 19 Tapping Screw Figure 20 7 E Plug in the power cord. 3. INSTALLATION INSTRUCTIONS CHECKLIST FOR INSTALLATION 1. Make sure the unit has been installed according to all of the Installation Instructions and the Wall and Top Cabinet Templates. 2.
Keep these Installation Instructions. Tabs Figure 18 Top Cabinet Screws Flat Washers Tapping Screws Figure 19 Tapping Screw Figure 20 7 E Plug in the power cord. 3. INSTALLATION INSTRUCTIONS CHECKLIST FOR INSTALLATION 1. Make sure the unit has been installed according to all of the Installation Instructions and the Wall and Top Cabinet Templates. 2.


