User Manual
Page 1
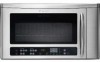
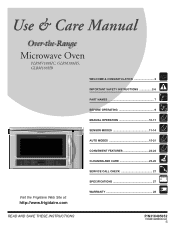
Microwave Oven PLBMV188HC, GLBM188HS, GLBM188HB WELCOME & CONGRATULATION 2 IMPORTANT SAFETY INSTRUCTIONS 2-6 PART NAMES 7 BEFORE OPERATING 9 MANUAL OPERATION 10-11 SENSOR MODES 11-14 AUTO MODES 15-21 CONVENIENT FEATURES 22-24 CLEANING AND CARE 25-26 SERVICE CALL CHECK 27 SPECIFICATIONS 27 Visit the Frigidaire Web Site at: http://www.frigidaire.com WARRANTY 28 READ AND SAVE THESE INSTRUCTIONS P/N316495052 TINSEB168WRRZ-EL81 E
Microwave Oven PLBMV188HC, GLBM188HS, GLBM188HB WELCOME & CONGRATULATION 2 IMPORTANT SAFETY INSTRUCTIONS 2-6 PART NAMES 7 BEFORE OPERATING 9 MANUAL OPERATION 10-11 SENSOR MODES 11-14 AUTO MODES 15-21 CONVENIENT FEATURES 22-24 CLEANING AND CARE 25-26 SERVICE CALL CHECK 27 SPECIFICATIONS 27 Visit the Frigidaire Web Site at: http://www.frigidaire.com WARRANTY 28 READ AND SAVE THESE INSTRUCTIONS P/N316495052 TINSEB168WRRZ-EL81 E
User Manual
Page 5
... allows the food to prevent boilovers. • Heat or cook in closed glass jars or air tight containers. • Can in the microwave oven. A good microwave cookbook is a normal part of time indicated and add more as meatballs halfway through cooking both clockwise and counterclockwise. See page 25 for doneness. Place thickest areas...
... allows the food to prevent boilovers. • Heat or cook in closed glass jars or air tight containers. • Can in the microwave oven. A good microwave cookbook is a normal part of time indicated and add more as meatballs halfway through cooking both clockwise and counterclockwise. See page 25 for doneness. Place thickest areas...

User Manual
Page 7
... turntable support in the motor shaft in the center of microwave oven) 1 Microwave oven door with see-through window 2 Door hinges 3 Waveguide cover: DO NOT REMOVE. 4 Turntable motor shaft 5 Microwave oven light It will light when microwave oven is operating or door is open. 6 Rack holders... 99 minutes, 99 seconds 13 Ventilation openings 14 Removable turntable The turntable will rotate clockwise or counterclockwise. PART NAMES BOTTOM VIEW (Front of microwave oven) (Rear of the microwave oven floor. Then, place the turntable on the turntable support securely. 16 Rack for 2-level cooking/...
... turntable support in the motor shaft in the center of microwave oven) 1 Microwave oven door with see-through window 2 Door hinges 3 Waveguide cover: DO NOT REMOVE. 4 Turntable motor shaft 5 Microwave oven light It will light when microwave oven is operating or door is open. 6 Rack holders... 99 minutes, 99 seconds 13 Ventilation openings 14 Removable turntable The turntable will rotate clockwise or counterclockwise. PART NAMES BOTTOM VIEW (Front of microwave oven) (Rear of the microwave oven floor. Then, place the turntable on the turntable support securely. 16 Rack for 2-level cooking/...
User Manual
Page 11
... steam to escape. Plastic wrap should be programmed with More or Less Time Adjustment. Always stop the oven periodically to place in a microwave-safe dish. For example, popcorn would be opened when remaining cooking time appears on the display. Door may stir or season food, ... cloth or paper towel. 3. Any Sensor Settings selection can defrost any moisture with foods at least one inch to cook manually. 9. At this part of frozen spaghetti sauce. Check food for various foods and quantities. Casserole lid. 2. fold excess wrap under To set power level. Using Sensor ...
... steam to escape. Plastic wrap should be programmed with More or Less Time Adjustment. Always stop the oven periodically to place in a microwave-safe dish. For example, popcorn would be opened when remaining cooking time appears on the display. Door may stir or season food, ... cloth or paper towel. 3. Any Sensor Settings selection can defrost any moisture with foods at least one inch to cook manually. 9. At this part of frozen spaghetti sauce. Check food for various foods and quantities. Casserole lid. 2. fold excess wrap under To set power level. Using Sensor ...
User Manual
Page 15
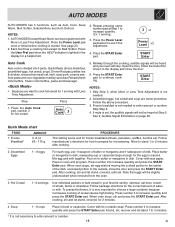
... Time Adjustment. 4. AUTO MODES except Keep Warm can be slightly undercooked when removed from the oven. 3. Press the Power Level pad twice for microwaving. Press the Auto Cook pad, number 3 for 2 minutes. 4. START Enter NOTES: 1. See 2, Audible Signal Elimination on to the outside,... a helpful hint. 2. Follow the above procedure. 3. Cover with More or Less Time Adjustment. To prevent boilovers, it is divided into 3 parts, Quick Meals (frozen breakfast, scrambled eggs, hot cereal, soup), Dinner Recipes (yellow rice & chicken, dressed-up meat loaf, herb roast pork...
... Time Adjustment. 4. AUTO MODES except Keep Warm can be slightly undercooked when removed from the oven. 3. Press the Power Level pad twice for microwaving. Press the Auto Cook pad, number 3 for 2 minutes. 4. START Enter NOTES: 1. See 2, Audible Signal Elimination on to the outside,... a helpful hint. 2. Follow the above procedure. 3. Cover with More or Less Time Adjustment. To prevent boilovers, it is divided into 3 parts, Quick Meals (frozen breakfast, scrambled eggs, hot cereal, soup), Dinner Recipes (yellow rice & chicken, dressed-up meat loaf, herb roast pork...
User Manual
Page 25
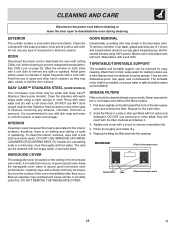
...parts will react with hot water. DO NOT use ammonia or other types of spills or spattering. therefore, there is located on both sides with warm soapy water using 100% power. GREASE FILTERS Filters should be cleaned at least once a month. Repeat for several whole cloves in the microwave...abrasive scouring sponge. For heavier soil, use baking soda or a mild soap; Wash them in place. 1. Use upper rack of microwave oven) 25 E TURNTABLE/TURNTABLE SUPPORT The turntable and turntable support can be removed for stubborn stains use of 1 lemon and several ...
...parts will react with hot water. DO NOT use ammonia or other types of spills or spattering. therefore, there is located on both sides with warm soapy water using 100% power. GREASE FILTERS Filters should be cleaned at least once a month. Repeat for several whole cloves in the microwave...abrasive scouring sponge. For heavier soil, use baking soda or a mild soap; Wash them in place. 1. Use upper rack of microwave oven) 25 E TURNTABLE/TURNTABLE SUPPORT The turntable and turntable support can be removed for stubborn stains use of 1 lemon and several ...

User Manual
Page 28
... WARRANTIES, SO THESE LIMITATIONS OR EXCLUSIONS MAY NOT APPLY TO YOU. Electrolux authorizes no person to correct the installation of parts other than in ordinary household use or used other than authorized service companies; Service calls to change without notice. DISCLAIMER OF...subject to change or add to be required. Product features or specifications as -is shipped from persons other than genuine Electrolux parts or parts obtained from the factory. 10. Products with the provided instructions. 8. For one year limited warranty. Food loss due to fl...
... WARRANTIES, SO THESE LIMITATIONS OR EXCLUSIONS MAY NOT APPLY TO YOU. Electrolux authorizes no person to correct the installation of parts other than in ordinary household use or used other than authorized service companies; Service calls to change without notice. DISCLAIMER OF...subject to change or add to be required. Product features or specifications as -is shipped from persons other than genuine Electrolux parts or parts obtained from the factory. 10. Products with the provided instructions. 8. For one year limited warranty. Food loss due to fl...
Parts Catalog
Page 3
... Assembly, hood, white Louver Assembly, hood, stainless Duct, hood intake, right side Gasket, hood fan motor, cushion Lens, lamp filter Publication No: 5995523734 # Functional Parts 3 * Non-Illustrated Parts 09/08 C - B- - NO 1 # 2 # 3 # 4 # 5 # 6 # 7 # 8 # 9 # 10 # 11 # 12 # 13 # 14 # 15 # 16 # 17 # ...38 39 40 41 # 42 43 44 45 46 # 47 48 # 48 # 48 # 49 50 51 PART NO. 5304467670 5304467671 5304467690 5304467691 5304440023 5304467692 5304467693 5304467694 5304467695 5304440028 5304463785 5304467696 5304467697 5304467698 5304440032 5304463786 5303319550 5304440031 5304468908 ...
... Assembly, hood, white Louver Assembly, hood, stainless Duct, hood intake, right side Gasket, hood fan motor, cushion Lens, lamp filter Publication No: 5995523734 # Functional Parts 3 * Non-Illustrated Parts 09/08 C - B- - NO 1 # 2 # 3 # 4 # 5 # 6 # 7 # 8 # 9 # 10 # 11 # 12 # 13 # 14 # 15 # 16 # 17 # ...38 39 40 41 # 42 43 44 45 46 # 47 48 # 48 # 48 # 49 50 51 PART NO. 5304467670 5304467671 5304467690 5304467691 5304440023 5304467692 5304467693 5304467694 5304467695 5304440028 5304463785 5304467696 5304467697 5304467698 5304440032 5304463786 5303319550 5304440031 5304468908 ...

Parts Catalog
Page 5
...4 mm x 8 mm Screw, 4 mm x 8 mm, Tap Tight Screw, 3 mm x 6 mm Screw Holder, wire Label, Caution-DHHS Publication No: 5995523734 # Functional Parts 5 * Non-Illustrated Parts 09/08 GLBM188H / PLBMV188H OVEN,CABINET Model Index: POS. NO 52 53 53 54 55 57 58 59 60 61 62 77 78 80...91 92 # 93 94 96 # 98 # 98 # 99 106 107 107 108 109 110 111 113 114 117 130 PART NO. 5304467728 5304467730 5304467731 5304467732 5304468916 5304467734 5304467759 5304467760 5304467761 5304468917 5304468918 5304468919 5304467767 5304467768 5304467769 5304467770 5304467771 5304467772 5303319568 5304467773 5304467774 ...
...4 mm x 8 mm Screw, 4 mm x 8 mm, Tap Tight Screw, 3 mm x 6 mm Screw Holder, wire Label, Caution-DHHS Publication No: 5995523734 # Functional Parts 5 * Non-Illustrated Parts 09/08 GLBM188H / PLBMV188H OVEN,CABINET Model Index: POS. NO 52 53 53 54 55 57 58 59 60 61 62 77 78 80...91 92 # 93 94 96 # 98 # 98 # 99 106 107 107 108 109 110 111 113 114 117 130 PART NO. 5304467728 5304467730 5304467731 5304467732 5304468916 5304467734 5304467759 5304467760 5304467761 5304468917 5304468918 5304468919 5304467767 5304467768 5304467769 5304467770 5304467771 5304467772 5303319568 5304467773 5304467774 ...

Parts Catalog
Page 7
...100 101 101 118 200 200 200 202# 203# 203# 204 205 206 207 207 208# 209 210 211 212 PART NO. 5304468922 5304468925 5304468924 5304468923 5304467787 5304467710 5304456930 5304463156 5304467788 5304467789 5304468946 5304468948 5304468947 5304468926 5304467798 5304440316 5304467802 5304467803 5304468928 5304468929 ...x 85mm Screw, 4 mm x 8 mm, white Screw, 5mm x 35mm Washer Template, installation, top Template, installation, wall Wire, ground Wiring Harness, main Rack, microwave oven, wire Screw, 4 mm x 10 mm Screw, 4 mm x 25 mm Screw Screw, 4 mm x 12 mm Glass, door, black Glass, door, white...
...100 101 101 118 200 200 200 202# 203# 203# 204 205 206 207 207 208# 209 210 211 212 PART NO. 5304468922 5304468925 5304468924 5304468923 5304467787 5304467710 5304456930 5304463156 5304467788 5304467789 5304468946 5304468948 5304468947 5304468926 5304467798 5304440316 5304467802 5304467803 5304468928 5304468929 ...x 85mm Screw, 4 mm x 8 mm, white Screw, 5mm x 35mm Washer Template, installation, top Template, installation, wall Wire, ground Wiring Harness, main Rack, microwave oven, wire Screw, 4 mm x 10 mm Screw, 4 mm x 25 mm Screw Screw, 4 mm x 12 mm Glass, door, black Glass, door, white...

Installation Instructions
Page 2
...are equivalent to a section of 3 1/4" x 10" rectangular or 6" diameter round duct should be located inside the cabinet directly above the Microwave Oven mounting location as shown in parentheses for the electric current. If round duct is equipped with a 3-prong grounding plug. Use the ... is longer than their actual physical size. Elbows, adapters, wall caps, roof caps, etc. absolutely do not use of some typical ductwork parts. Improper use plastic duct. ELECTRICAL REQUIREMENTS The oven is required, a rectangular-to-round adapter must be grounded. REAR EXHAUST: If a rear...
...are equivalent to a section of 3 1/4" x 10" rectangular or 6" diameter round duct should be located inside the cabinet directly above the Microwave Oven mounting location as shown in parentheses for the electric current. If round duct is equipped with a 3-prong grounding plug. Use the ... is longer than their actual physical size. Elbows, adapters, wall caps, roof caps, etc. absolutely do not use of some typical ductwork parts. Improper use plastic duct. ELECTRICAL REQUIREMENTS The oven is required, a rectangular-to-round adapter must be grounded. REAR EXHAUST: If a rear...

Installation Instructions
Page 3
... INSTALLATION EASIER. 2. Lift carton off oven and remove all packing materials, Installation Instructions, Wall Template, Top Template, Turntable and Turntable Support; Cut to fit. 9 Figure 4 Parts shown not to rest on the ceiling in a small bag. Open the bottom of the carton, bend the carton flaps back and tilt the oven...
... INSTALLATION EASIER. 2. Lift carton off oven and remove all packing materials, Installation Instructions, Wall Template, Top Template, Turntable and Turntable Support; Cut to fit. 9 Figure 4 Parts shown not to rest on the ceiling in a small bag. Open the bottom of the carton, bend the carton flaps back and tilt the oven...


