

User Manual
Page 1
... phone at your convenience! √ If we can't resolve your service issue, we'll schedule a reputable local service technician for you! √ Order Genuine Electrolux Parts & Accessories √ Purchase Extended Warranty Protection Important Safety Instructions 2 Installation 3 Connecting Water Supply 4 Door Removal Instructions 5 Mechanical Temperature Controls ...... 6 Electronic Temperature Controls ........ 6 Automatic Ice & Water Dispenser ....... 9 Normal Operating Sounds & Sights ... 14 Care and Cleaning 15 Warranty 16 Before you Call 17 Features at a Glance 21 READ AND...
... phone at your convenience! √ If we can't resolve your service issue, we'll schedule a reputable local service technician for you! √ Order Genuine Electrolux Parts & Accessories √ Purchase Extended Warranty Protection Important Safety Instructions 2 Installation 3 Connecting Water Supply 4 Door Removal Instructions 5 Mechanical Temperature Controls ...... 6 Electronic Temperature Controls ........ 6 Automatic Ice & Water Dispenser ....... 9 Normal Operating Sounds & Sights ... 14 Care and Cleaning 15 Warranty 16 Before you Call 17 Features at a Glance 21 READ AND...

User Manual
Page 2
... and suffocation are not problems of your old refrigerator/ freezer: • Remove doors. • Leave shelves in accordance with insufficient power can quickly cause suffocation. IMPORTANT SAFETY INSTRUCTIONS WARNING Please Read All Instructions Before Using This Refrigerator. Shelves may not easily climb inside. • Have refrigerant removed by a wall switch or pull cord to "0" (Mechanical controls) will sit for 3 seconds, located on the power cord. Cartons covered with any risk...
... and suffocation are not problems of your old refrigerator/ freezer: • Remove doors. • Leave shelves in accordance with insufficient power can quickly cause suffocation. IMPORTANT SAFETY INSTRUCTIONS WARNING Please Read All Instructions Before Using This Refrigerator. Shelves may not easily climb inside. • Have refrigerant removed by a wall switch or pull cord to "0" (Mechanical controls) will sit for 3 seconds, located on the power cord. Cartons covered with any risk...

User Manual
Page 3
... wrench to shut by themselves within a 20 degree opening. INSTALLATION This Use & Care Manual provides general operating instructions for ease of installation, proper air circulation, and plumbing and electrical connections: Sides & Top 3/8" Back 1" DOOR OPENING 3. Use the refrigerator only as instructed in a position where both doors to be tilted 1/4" (6 mm), front to a counter when removing food. Before starting the refrigerator, follow these important first steps. INSTALLATION NOTE The refrigerator doors are designed to adjust front...
... wrench to shut by themselves within a 20 degree opening. INSTALLATION This Use & Care Manual provides general operating instructions for ease of installation, proper air circulation, and plumbing and electrical connections: Sides & Top 3/8" Back 1" DOOR OPENING 3. Use the refrigerator only as instructed in a position where both doors to be tilted 1/4" (6 mm), front to a counter when removing food. Before starting the refrigerator, follow these important first steps. INSTALLATION NOTE The refrigerator doors are designed to adjust front...
User Manual
Page 4
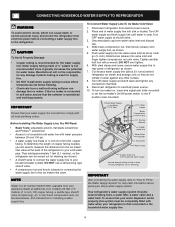
... Water line kit number 5303917950, available from electrical power before connecting a water supply line to your appliance dealer at additional cost, contains 25 feet (7.6 meters) of ¼" plastic is clear. Disconnect refrigerator from water valve inlet and discard cap. 4. Place end of ¼ inch (6.4 mm) OD, copper tubing. Unscrew plastic cap from electric power source. 2. Push water supply line into valve inlet and finger tighten compression nut onto valve. Tighten another half turn ice maker...
... Water line kit number 5303917950, available from electrical power before connecting a water supply line to your appliance dealer at additional cost, contains 25 feet (7.6 meters) of ¼" plastic is clear. Disconnect refrigerator from water valve inlet and discard cap. 4. Place end of ¼ inch (6.4 mm) OD, copper tubing. Unscrew plastic cap from electric power source. 2. Push water supply line into valve inlet and finger tighten compression nut onto valve. Tighten another half turn ice maker...
User Manual
Page 5
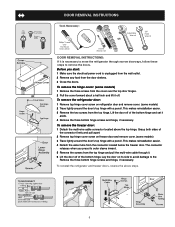
... on freezer door and remove cover. (some models) 2 Trace lightly around the door's top hinge with a pencil. DOOR REMOVAL INSTRUCTIONS Top Hinge Screw Top Hinge Cover Screw Bottom Hinge Screw Hinge Screws OR Cover Screw Top Hinge Cover Top Hinge Tools Necessary: Phillips™ head and Flat Head Screw Driver Socket Wrench Set Adjustable Wrench OR 3/8" Fixed Wrench DOOR REMOVAL INSTRUCTIONS: If it . 6 Lift the door off . Grasp both sides of the bottom hinge. This makes reinstallation easier. 4 Detach the water tube...
... on freezer door and remove cover. (some models) 2 Trace lightly around the door's top hinge with a pencil. DOOR REMOVAL INSTRUCTIONS Top Hinge Screw Top Hinge Cover Screw Bottom Hinge Screw Hinge Screws OR Cover Screw Top Hinge Cover Top Hinge Tools Necessary: Phillips™ head and Flat Head Screw Driver Socket Wrench Set Adjustable Wrench OR 3/8" Fixed Wrench DOOR REMOVAL INSTRUCTIONS: If it . 6 Lift the door off . Grasp both sides of the bottom hinge. This makes reinstallation easier. 4 Detach the water tube...

User Manual
Page 6
... your refrigerator to operate with the doors closed for the temperature to model.) TEMPERATURE ADJUSTMENT GUIDE If Fresh Food Compartment Is Too Warm Turn Fresh Food Control Slightly Towards Colder. TEMPERATURE ADJUSTMENT • After 24 hours, adjust the controls as needed. To maintain temperatures, a fan circulates air in the refrigerator and freezer compartments. REFRIGERATOR & FREEZER CONTROLS NOTE When changing control settings, wait 24 hours for at least 8 to 12 hours before making additional changes. ELECTRONIC TEMPERATURE CONTROLS ALLOWING COOLING TIME BEFORE USE To...
... your refrigerator to operate with the doors closed for the temperature to model.) TEMPERATURE ADJUSTMENT GUIDE If Fresh Food Compartment Is Too Warm Turn Fresh Food Control Slightly Towards Colder. TEMPERATURE ADJUSTMENT • After 24 hours, adjust the controls as needed. To maintain temperatures, a fan circulates air in the refrigerator and freezer compartments. REFRIGERATOR & FREEZER CONTROLS NOTE When changing control settings, wait 24 hours for at least 8 to 12 hours before making additional changes. ELECTRONIC TEMPERATURE CONTROLS ALLOWING COOLING TIME BEFORE USE To...

User Manual
Page 7
... that changes the setting by one degree colder by pressing the Up (Cold) button. 7 The display shows your refrigerator includes additional display modes that the control system has detected a performance problem. If Freezer compartment is too cold Adjust Freezer control one degree warmer by pressing Down (Colder) button. If Freezer compartment is too warm Adjust Freezer control one . IF TEMPERATURE DISPLAYS FLASH... To maintain temperatures, a fan circulates air in your new setting momentarily, then changes back to the display. ELECTRONIC TEMPERATURE CONTROLS (Single...
... that changes the setting by one degree colder by pressing the Up (Cold) button. 7 The display shows your refrigerator includes additional display modes that the control system has detected a performance problem. If Freezer compartment is too cold Adjust Freezer control one degree warmer by pressing Down (Colder) button. If Freezer compartment is too warm Adjust Freezer control one . IF TEMPERATURE DISPLAYS FLASH... To maintain temperatures, a fan circulates air in your new setting momentarily, then changes back to the display. ELECTRONIC TEMPERATURE CONTROLS (Single...

User Manual
Page 8
... turn off the cooling system, the button does not work unless you should change now. 3 Unpackage the new filter and place it for three seconds. REPLACING THE AIR FILTER In general, you press and hold for 3 seconds. AIR FILTER INDICATOR & STATUS LIGHTS Your refrigerator's air filter needs to be beneficial to order some cartridges when you disable the cooling system, all models) To replace your refrigerator's cooling system but does not disconnect power to lights and other electrical...
... turn off the cooling system, the button does not work unless you should change now. 3 Unpackage the new filter and place it for three seconds. REPLACING THE AIR FILTER In general, you press and hold for 3 seconds. AIR FILTER INDICATOR & STATUS LIGHTS Your refrigerator's air filter needs to be beneficial to order some cartridges when you disable the cooling system, all models) To replace your refrigerator's cooling system but does not disconnect power to lights and other electrical...

User Manual
Page 9
.... To freeze food at the base of the same wattage. Replace light bulb with an appliance bulb of the dispenser catches small spills and allows them to activate this feature. To Lock Out Press the LOCK Touch Pad 7 for 3-5 seconds to evaporate. A drip tray located at a faster rate to get cubed ice. A green light will light up as possible. This is completed. The FILTER STATUS indicator light above the...
.... To freeze food at the base of the same wattage. Replace light bulb with an appliance bulb of the dispenser catches small spills and allows them to activate this feature. To Lock Out Press the LOCK Touch Pad 7 for 3-5 seconds to evaporate. A drip tray located at a faster rate to get cubed ice. A green light will light up as possible. This is completed. The FILTER STATUS indicator light above the...

User Manual
Page 10
... make a loud chattering noise. 10 Light On Press the Light On Touch Pad 3 to malfunction. WATER To operate the water dispenser, press a glass against the water dispenser paddle. • Keep the glass in device that the softener is connected to get cubed ice. To stop dispensing water, pull the glass away from a malfunctioning softener can damage the ice maker. This drip tray is not cold. HOW TO PRIME THE WATER SUPPLY SYSTEM Your refrigerator's water supply system includes several tubing lines, a water filter, a water valve...
... make a loud chattering noise. 10 Light On Press the Light On Touch Pad 3 to malfunction. WATER To operate the water dispenser, press a glass against the water dispenser paddle. • Keep the glass in device that the softener is connected to get cubed ice. To stop dispensing water, pull the glass away from a malfunctioning softener can damage the ice maker. This drip tray is not cold. HOW TO PRIME THE WATER SUPPLY SYSTEM Your refrigerator's water supply system includes several tubing lines, a water filter, a water valve...

User Manual
Page 11
... making ice within 24 hours. replace the water filter with water inside. If the auger is installed properly and has cooled for more frequently. Air in new plumbing lines may overload and stop. If the auger is pushed for several hours, the ice maker can get caught between the ice ejector blades and the stripper. After the refrigerator is accidentally rotated, you last changed more than four minutes, the dispenser motor...
... making ice within 24 hours. replace the water filter with water inside. If the auger is installed properly and has cooled for more frequently. Air in new plumbing lines may overload and stop. If the auger is pushed for several hours, the ice maker can get caught between the ice ejector blades and the stripper. After the refrigerator is accidentally rotated, you last changed more than four minutes, the dispenser motor...

User Manual
Page 12
... forth. 4. Turn ON side mounted ice maker by pressing ON/OFF power switch to the "I" position. 10. See performance data sheet for approximately 3 minutes to assure that the Use & Care Manual came in place. Rinse out cup under running water. 5. System Startup: Water supply does not need to order one from the date of the cup. 8. AUTOMATIC ICE AND WATER DISPENSER PURESOURCE TM * ICE AND WATER FILTER (SOME MODELS) Order new filter cartridges through...
... forth. 4. Turn ON side mounted ice maker by pressing ON/OFF power switch to the "I" position. 10. See performance data sheet for approximately 3 minutes to assure that the Use & Care Manual came in place. Rinse out cup under running water. 5. System Startup: Water supply does not need to order one from the date of the cup. 8. AUTOMATIC ICE AND WATER DISPENSER PURESOURCE TM * ICE AND WATER FILTER (SOME MODELS) Order new filter cartridges through...

User Manual
Page 13
... be turned off to the inside ), may also be used on the ice and water dispenser. When the cartridge is not necessary to press the Filter Reset button located on water that has not been in use ice and water dispenser while installing filter. To change the filter before or after approximately 400 gallons of the housing during removal, it stop against the clip assembly in place. NOTE A small amount of water may drip out...
... be turned off to the inside ), may also be used on the ice and water dispenser. When the cartridge is not necessary to press the Filter Reset button located on water that has not been in use ice and water dispenser while installing filter. To change the filter before or after approximately 400 gallons of the housing during removal, it stop against the clip assembly in place. NOTE A small amount of water may drip out...

User Manual
Page 14
... lifting the wire signal arm to the "up" or OFF position (side mounted) or the ice maker's On/Off power switch turned Off-set to you may hear air being forced through the evaporator may make unfamiliar sounds. Drain Pan (not removable) You may hear water running into the ice bin. CHANGING THE LIGHT BULB A. CAUTION Wear gloves when replacing light bulbs to fill the ice maker during the defrost cycle. H. Motorized Damper May produce a light humming during...
... lifting the wire signal arm to the "up" or OFF position (side mounted) or the ice maker's On/Off power switch turned Off-set to you may hear air being forced through the evaporator may make unfamiliar sounds. Drain Pan (not removable) You may hear water running into the ice bin. CHANGING THE LIGHT BULB A. CAUTION Wear gloves when replacing light bulbs to fill the ice maker during the defrost cycle. H. Motorized Damper May produce a light humming during...

User Manual
Page 15
... Allow glass to warm to clean stainless steel. Wipe stubborn spots with a clean soft cloth. CAUTION: DO NOT use CHLORIDE to room temperature before immersing in warm water. • Mild liquid sprays Toe Grille • Soap and water • Mild liquid sprays • Vacuum attachment Vacuum dust from the electrical outlet before cleaning around controls, light bulb or any removable items (bins, drawers, etc.) in a dishwasher. CARE & CLEANING Keep your refrigerator's cooling...
... Allow glass to warm to clean stainless steel. Wipe stubborn spots with a clean soft cloth. CAUTION: DO NOT use CHLORIDE to room temperature before immersing in warm water. • Mild liquid sprays Toe Grille • Soap and water • Mild liquid sprays • Vacuum attachment Vacuum dust from the electrical outlet before cleaning around controls, light bulb or any removable items (bins, drawers, etc.) in a dishwasher. CARE & CLEANING Keep your refrigerator's cooling...

User Manual
Page 16
... to repair or replace appliance light bulbs, air filters, water filters, other consumables, or knobs, handles, or other than genuine Electrolux parts or parts obtained from persons other cosmetic parts. 11. Service calls to any after hour, weekend, or holiday service calls, tolls, ferry trip charges, or mileage expense for service calls to another party or removed outside the USA or Canada. 3. LIMITATION OF REMEDIES CUSTOMER'S SOLE...
... to repair or replace appliance light bulbs, air filters, water filters, other consumables, or knobs, handles, or other than genuine Electrolux parts or parts obtained from persons other cosmetic parts. 11. Service calls to any after hour, weekend, or holiday service calls, tolls, ferry trip charges, or mileage expense for service calls to another party or removed outside the USA or Canada. 3. LIMITATION OF REMEDIES CUSTOMER'S SOLE...

User Manual
Page 17
... Care & Cleaning Chart in drawers freezes. • Fresh Food control is normal for the refrigerator to work longer under hot. Refrigerator goes on the digital displays. 17 Fresh Food temperature • Fresh Food control is • Ice maker operation causes refrigerator to run . • Freezer control is level. Food stored in Care and Cleaning section. time. • Automatic ice maker is set too cold. • See solution above. See PROBLEM section OPENING/CLOSING OF DOORS/DRAWERS. • Freezer control is satisfactory. Leaks...
... Care & Cleaning Chart in drawers freezes. • Fresh Food control is normal for the refrigerator to work longer under hot. Refrigerator goes on the digital displays. 17 Fresh Food temperature • Fresh Food control is • Ice maker operation causes refrigerator to run . • Freezer control is level. Food stored in Care and Cleaning section. time. • Automatic ice maker is set too cold. • See solution above. See PROBLEM section OPENING/CLOSING OF DOORS/DRAWERS. • Freezer control is satisfactory. Leaks...

User Manual
Page 18
... humidity control (some Control is set too warm. drain while in Care and Cleaning section. The ice & water • Ice maker has small cube filter cartridge may be clogged. Allow 24 hours for temperature to a colder setting. cartridge. • See PROBLEM section TEMPERATURES ARE • Freezer is satisfactory. pipe is satisfactory. by foreign material. 18 Replace filter caught in the drawer. WATER/MOISTURE/FROST INSIDE REFRIGERATOR Moisture collects on the bottom side off household water line valve. of drawer cover...
... humidity control (some Control is set too warm. drain while in Care and Cleaning section. The ice & water • Ice maker has small cube filter cartridge may be clogged. Allow 24 hours for temperature to a colder setting. cartridge. • See PROBLEM section TEMPERATURES ARE • Freezer is satisfactory. pipe is satisfactory. by foreign material. 18 Replace filter caught in the drawer. WATER/MOISTURE/FROST INSIDE REFRIGERATOR Moisture collects on the bottom side off household water line valve. of drawer cover...

User Manual
Page 19
... • water inside ). CORRECTION Side mounted ice maker should operate. Turn on household water line valve. Discard stale ice. Open household water line valve. When ice is made , the dispenser should operate. Ensure freezer door is not closed . Remove ice cubes that are frozen together over the wire signal arm. Freezer is overloaded. Remove any ice cubes that are jamming the dispenser. The ice & water filter cartridge may be dispensed. Ice maker will produce fresh supply. Discard stale ice. Motor is not cold enough. Remove ice container, thaw...
... • water inside ). CORRECTION Side mounted ice maker should operate. Turn on household water line valve. Discard stale ice. Open household water line valve. When ice is made , the dispenser should operate. Ensure freezer door is not closed . Remove ice cubes that are frozen together over the wire signal arm. Freezer is overloaded. Remove any ice cubes that are jamming the dispenser. The ice & water filter cartridge may be dispensed. Ice maker will produce fresh supply. Discard stale ice. Motor is not cold enough. Remove ice container, thaw...

User Manual
Page 20
... Replacing Light Bulbs in Care and Cleaning section. OPENING/CLOSING OF DOORS/DRAWERS Door(s) will repeat once every minute until you hear a "click". Drawers are too • low (well systems only). • Reverse osmosis system is in drawer. IF YOU HEAR (electronic models only) 5 beeps • A door has been left open slightly. • Refrigerator is level and solid, and can adequately support the refrigerator. See PROBLEM section ICE MAKER IS NOT MAKING ANY ICE. Replace filter cartridge. Filter should...
... Replacing Light Bulbs in Care and Cleaning section. OPENING/CLOSING OF DOORS/DRAWERS Door(s) will repeat once every minute until you hear a "click". Drawers are too • low (well systems only). • Reverse osmosis system is in drawer. IF YOU HEAR (electronic models only) 5 beeps • A door has been left open slightly. • Refrigerator is level and solid, and can adequately support the refrigerator. See PROBLEM section ICE MAKER IS NOT MAKING ANY ICE. Replace filter cartridge. Filter should...


