Complete Owner's Guide (English)
Page 1
Visit the Frigidaire Web Site at: http://www.frigidaire.com Over-the-Range Microwave Oven with Convenience Pad Welcome 2 Important Safety Instructions .....3-6 Features and Specifications .......... 7 Before Operating 8 Manual Operation 9-14 Convenience Operation ......... 15-16 Cooking Charts 17-18 Questions or for Service Call: 1-800-944-9044(US) 1-800-265-8352(Canada) Care & Cleaning 19-21 Before You Call Solutions to Common Problems 22 Warranty Back Page READ AND SAVE THESE INSTRUCTIONS p/n 316495058
Visit the Frigidaire Web Site at: http://www.frigidaire.com Over-the-Range Microwave Oven with Convenience Pad Welcome 2 Important Safety Instructions .....3-6 Features and Specifications .......... 7 Before Operating 8 Manual Operation 9-14 Convenience Operation ......... 15-16 Cooking Charts 17-18 Questions or for Service Call: 1-800-944-9044(US) 1-800-265-8352(Canada) Care & Cleaning 19-21 Before You Call Solutions to Common Problems 22 Warranty Back Page READ AND SAVE THESE INSTRUCTIONS p/n 316495058
Complete Owner's Guide (English)
Page 2
...Care Manual contains general operating instructions for your product. PLEASE CAREFULLY READ AND SAVE THESE INSTRUCTIONS This Use & Care Manual provides specific operating instructions for your model and serial number. At Electrolux Home Products, we are very proud of a new microwave! Use your purchase of ...our product and are representative. These instructions are not meant to cover every possible condition and situation that may not look exactly like ...
...Care Manual contains general operating instructions for your product. PLEASE CAREFULLY READ AND SAVE THESE INSTRUCTIONS This Use & Care Manual provides specific operating instructions for your model and serial number. At Electrolux Home Products, we are very proud of a new microwave! Use your purchase of ...our product and are representative. These instructions are not meant to cover every possible condition and situation that may not look exactly like ...
Complete Owner's Guide (English)
Page 3
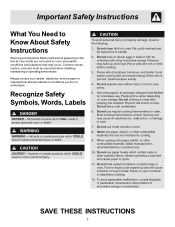
Common sense, caution, and care must be exercised when installing, maintaining or operating a microwave. Always contact your dealer, distributor, service agent or manufacturer about problems or conditions you do not understand. Recognize Safety Symbols, Words, Labels SAVE THESE INSTRUCTIONS 3 Important Safety Instructions What You Need to Know About Safety Instructions Warning and Important Safety Instructions appearing in the Use & Care Guide are not meant to cover all possible conditions and situations that may occur.
Common sense, caution, and care must be exercised when installing, maintaining or operating a microwave. Always contact your dealer, distributor, service agent or manufacturer about problems or conditions you do not understand. Recognize Safety Symbols, Words, Labels SAVE THESE INSTRUCTIONS 3 Important Safety Instructions What You Need to Know About Safety Instructions Warning and Important Safety Instructions appearing in the Use & Care Guide are not meant to cover all possible conditions and situations that may occur.
Complete Owner's Guide (English)
Page 4
... marked electrical rating of the appliance. 2. If you use . and 3. Cooking times may vary when the microwave oven is on unintentionally. SAVE THESE INSTRUCTIONS 4 The extension cord must be longer, too. Important Safety Instructions Federal Communications Grounding Instructions Commission Radio Frequency Interference Statement (U.S.A. Only) a) A short power-supply cord is used if care is exercised...
... marked electrical rating of the appliance. 2. If you use . and 3. Cooking times may vary when the microwave oven is on unintentionally. SAVE THESE INSTRUCTIONS 4 The extension cord must be longer, too. Important Safety Instructions Federal Communications Grounding Instructions Commission Radio Frequency Interference Statement (U.S.A. Only) a) A short power-supply cord is used if care is exercised...

Complete Owner's Guide (English)
Page 5
...surfaces. • Oven should not be be adjusted or repaired by anyone except properaly qualified service personnel. Important Safety Instructions Precautions to Avoid Possible Exposure to Excessive Microwave Energy Adhere to the following precautions: • DO NOT attempt to operate this oven with the safety interlock switches..... • DO NOT use any cleaning materials on the oven door gasket. hinges and latches (broken or loosended), 3. SAVE THESE INSTRUCTIONS 5 Doing so could cause damage. • DO NOT operate the oven if it is important not to defeat or tampler with the...
...surfaces. • Oven should not be be adjusted or repaired by anyone except properaly qualified service personnel. Important Safety Instructions Precautions to Avoid Possible Exposure to Excessive Microwave Energy Adhere to the following precautions: • DO NOT attempt to operate this oven with the safety interlock switches..... • DO NOT use any cleaning materials on the oven door gasket. hinges and latches (broken or loosended), 3. SAVE THESE INSTRUCTIONS 5 Doing so could cause damage. • DO NOT operate the oven if it is important not to defeat or tampler with the...
Complete Owner's Guide (English)
Page 6
... or boiling when the container is removed from the microwave oven is specifically designed to heat, cook, or dry food. for its intended use this Use & Care Manual. Connect only to properly grounded outlet. SAVE THESE INSTRUCTIONS 6 are able overheated beyond the boiling point without appearing... cord AWAY from HEATED surfaces. 14 DO NOT let cord hang over edge of table or counter. 1 READ ALL instructions before using oven. 2 READ AND FOLLOW the specific "PRECAUTIONS TO AVOID POSSIBLE EXPOSURE TO EXCESSIVE MICROWAVE ENERGY" on page 5. 3 This appliance must be grounded.
... or boiling when the container is removed from the microwave oven is specifically designed to heat, cook, or dry food. for its intended use this Use & Care Manual. Connect only to properly grounded outlet. SAVE THESE INSTRUCTIONS 6 are able overheated beyond the boiling point without appearing... cord AWAY from HEATED surfaces. 14 DO NOT let cord hang over edge of table or counter. 1 READ ALL instructions before using oven. 2 READ AND FOLLOW the specific "PRECAUTIONS TO AVOID POSSIBLE EXPOSURE TO EXCESSIVE MICROWAVE ENERGY" on page 5. 3 This appliance must be grounded.
Complete Owner's Guide (English)
Page 8
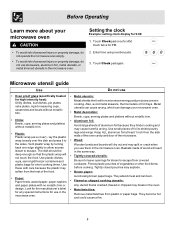
...bowls and boards will react in the microwave oven. lay the plastic wrap loosely over the dish and press it to escape. Use small pieces of vegetables or other food items before cooking. Look for the manufacturer's label for any special instructions for use them in the same ...way. • Tightly covered utensils: Be sure to shield poultry legs and wings. Before Operating Learn more about your microwave oven. • Metal decoration: Bowls, cups, serving plates and...
...bowls and boards will react in the microwave oven. lay the plastic wrap loosely over the dish and press it to escape. Use small pieces of vegetables or other food items before cooking. Look for the manufacturer's label for any special instructions for use them in the same ...way. • Tightly covered utensils: Be sure to shield poultry legs and wings. Before Operating Learn more about your microwave oven. • Metal decoration: Bowls, cups, serving plates and...
Complete Owner's Guide (English)
Page 14
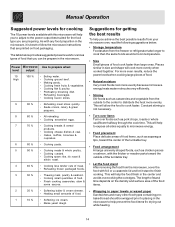
... center of food cook faster than large ones. Pieces similar in the microwave. Constant stirring is best to follow the microwave instructions that you achieve the best possible results from your microwave oven, read the following suggestions below provides suggested power levels for various ...types of food that are preparing. Power Microwave Use to finish cooking. This will...
... center of food cook faster than large ones. Pieces similar in the microwave. Constant stirring is best to follow the microwave instructions that you achieve the best possible results from your microwave oven, read the following suggestions below provides suggested power levels for various ...types of food that are preparing. Power Microwave Use to finish cooking. This will...
Complete Owner's Guide (English)
Page 21
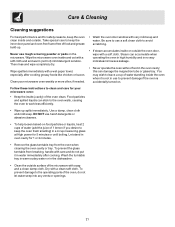
... let water seep into any vents or openings. 21 this can accumulate when operating the oven in high humidity and in no way indicates microwave leakage. • Never operate the oven without food in oven cavity for 5 minutes or until boiling. Never use harsh detergents or abrasive... the oven, do not put it is accidentally turned on the microwave. To prevent the glass turntable from the oven when cleaning the oven cavity or tray. Steam can damage the magnetron tube or glass tray. Follow these instructions to avoid scratching. • If steam accumulates inside or outside...
... let water seep into any vents or openings. 21 this can accumulate when operating the oven in high humidity and in no way indicates microwave leakage. • Never operate the oven without food in oven cavity for 5 minutes or until boiling. Never use harsh detergents or abrasive... the oven, do not put it is accidentally turned on the microwave. To prevent the glass turntable from the oven when cleaning the oven cavity or tray. Steam can damage the magnetron tube or glass tray. Follow these instructions to avoid scratching. • If steam accumulates inside or outside...
Complete Owner's Guide (English)
Page 22
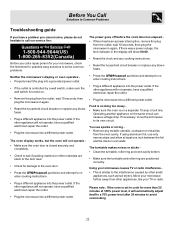
... to the oven door. • Press the STOP/cancel pad twice and attempt to reenter cooking instructions. • Plug a different appliance into the power outlet. wait 10 seconds, then plug the microwave in the display will not operate, have a qualified electrician repair the outlet. • Plug the...least one inch between the foil and the interior oven walls. Move your microwave further away from the outlet; If the other appliance will show 00:00. • Reset the clock and any cooking instructions. • Reset the household circuit breaker or replace any metallic utensils, cookware...
... to the oven door. • Press the STOP/cancel pad twice and attempt to reenter cooking instructions. • Plug a different appliance into the power outlet. wait 10 seconds, then plug the microwave in the display will not operate, have a qualified electrician repair the outlet. • Plug the...least one inch between the foil and the interior oven walls. Move your microwave further away from the outlet; If the other appliance will show 00:00. • Reset the clock and any cooking instructions. • Reset the household circuit breaker or replace any metallic utensils, cookware...
Complete Owner's Guide (English)
Page 24
... YOU MAY ALSO HAVE OTHER RIGHTS THAT VARY FROM STATE TO STATE. If service is performed, it is in your appliance or to instruct you how to another party or removed outside the USA or Canada. 3. In the USA, your receipt, delivery slip, or some other... by unauthorized service companies; use or used other than in accordance with the provided instructions. Major Appliance Warranty Information Your appliance is installed, used and maintained in accordance with the provided instructions. 8. Products with original serial numbers that prove to obtain and keep all costs ...
... YOU MAY ALSO HAVE OTHER RIGHTS THAT VARY FROM STATE TO STATE. If service is performed, it is in your appliance or to instruct you how to another party or removed outside the USA or Canada. 3. In the USA, your receipt, delivery slip, or some other... by unauthorized service companies; use or used other than in accordance with the provided instructions. Major Appliance Warranty Information Your appliance is installed, used and maintained in accordance with the provided instructions. 8. Products with original serial numbers that prove to obtain and keep all costs ...
Installation Instructions (All Languages)
Page 1
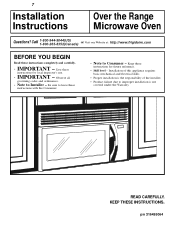
...800-265-8352(Canada) or Visit our Website at: http://www.frigidaire.com BEFORE YOU BEGIN Read these instructions for future reference. • Skill level - Save these instructions completely and carefully. • IMPORTANT - KEEP THESE INSTRUCTIONS. Observe all governing codes and ordinances. • Note to improper... electrical skills. • Proper installation is not covered under the Warranty. p/n 316495064 READ CAREFULLY. 7 Installation Instructions Over the Range Microwave Oven Questions? Installation of the installer. • Product failure due to Installer -
...800-265-8352(Canada) or Visit our Website at: http://www.frigidaire.com BEFORE YOU BEGIN Read these instructions for future reference. • Skill level - Save these instructions completely and carefully. • IMPORTANT - KEEP THESE INSTRUCTIONS. Observe all governing codes and ordinances. • Note to improper... electrical skills. • Proper installation is not covered under the Warranty. p/n 316495064 READ CAREFULLY. 7 Installation Instructions Over the Range Microwave Oven Questions? Installation of the installer. • Product failure due to Installer -
Installation Instructions (All Languages)
Page 2
... General information Important Safety Instructions 3 Electrical Requirements 3 Damage - Shipment/Installation 4 Parts Included 4 Tools You Will Need 5 Mounting Space 5 Step-by-step installation guide Placement of The Mounting Plate 6-8 Removing the ... for Outside Back Exhaust 16 Remove Blower Plate 16 Attach Mounting Plate to Wall 17 Preparation of Top Cabinet 17 Adapting Microwave Blower for Outside Back Exhaust 17-18 Mount the Microwave Oven 19 C Recirculating 20 -22 Attach Mounting Plate to Wall 20 Preparation of Top Cabinet 20 Check Blower Plate 21...
... General information Important Safety Instructions 3 Electrical Requirements 3 Damage - Shipment/Installation 4 Parts Included 4 Tools You Will Need 5 Mounting Space 5 Step-by-step installation guide Placement of The Mounting Plate 6-8 Removing the ... for Outside Back Exhaust 16 Remove Blower Plate 16 Attach Mounting Plate to Wall 17 Preparation of Top Cabinet 17 Adapting Microwave Blower for Outside Back Exhaust 17-18 Mount the Microwave Oven 19 C Recirculating 20 -22 Attach Mounting Plate to Wall 20 Preparation of Top Cabinet 20 Check Blower Plate 21...
Installation Instructions (All Languages)
Page 3
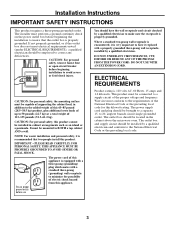
...Electrical Code or the prevailing local code. 3 CAUTION: For personal safety, this product cannot be located in the cabinet above the microwave oven. NOTE: For easier installation and personal safety, it replaced with a standard three-prong (grounding) wall receptacle to the ... THIS APPLIANCE MUST BE PROPERLY GROUNDED TO AVOID SEVERE OR FATAL SHOCK. DO NOT USE WITH AN EXTENSION CORD. Installation Instructions IMPORTANT SAFETY INSTRUCTIONS This product requires a three-prong grounded outlet. ELECTRICAL REQUIREMENTS Product rating is properly grounded. The power supply cord and ...
...Electrical Code or the prevailing local code. 3 CAUTION: For personal safety, this product cannot be located in the cabinet above the microwave oven. NOTE: For easier installation and personal safety, it replaced with a standard three-prong (grounding) wall receptacle to the ... THIS APPLIANCE MUST BE PROPERLY GROUNDED TO AVOID SEVERE OR FATAL SHOCK. DO NOT USE WITH AN EXTENSION CORD. Installation Instructions IMPORTANT SAFETY INSTRUCTIONS This product requires a three-prong grounded outlet. ELECTRICAL REQUIREMENTS Product rating is properly grounded. The power supply cord and ...
Installation Instructions (All Languages)
Page 4
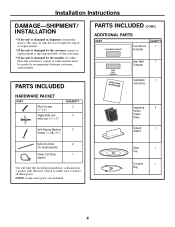
...(CONT.) ADDITIONAL PARTS PART TOP CABINET TEMPLATE Top Cabinet Template QUANTITY 1 REAR WALL TEMPLATE ININSSTTRAULCLTAITOIONNS Rear Wall 1 Template Installation 1 Instructions Separately 2 Packed Grease Filters Exhaust 1 adaptor Nylon Grommet 2 (for repair or replacement. • If the unit is damaged... arrangement between customer and installer. NOTE: Some extra parts are included. Glass 1 Tray Turntable 1 Ring 4 Installation Instructions DAMAGE-SHIPMENT/ INSTALLATION • If the unit is damaged by the installer (if other than the customer), repair or...
...(CONT.) ADDITIONAL PARTS PART TOP CABINET TEMPLATE Top Cabinet Template QUANTITY 1 REAR WALL TEMPLATE ININSSTTRAULCLTAITOIONNS Rear Wall 1 Template Installation 1 Instructions Separately 2 Packed Grease Filters Exhaust 1 adaptor Nylon Grommet 2 (for repair or replacement. • If the unit is damaged... arrangement between customer and installer. NOTE: Some extra parts are included. Glass 1 Tray Turntable 1 Ring 4 Installation Instructions DAMAGE-SHIPMENT/ INSTALLATION • If the unit is damaged by the installer (if other than the customer), repair or...
Installation Instructions (All Languages)
Page 5
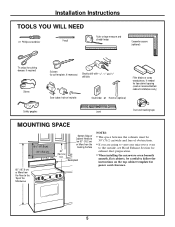
... to the outside, see Hood Exhaust Section for exhaust duct preparation. • When installing the microwave oven beneath smooth, flat cabinets, be careful to follow the instructions on the top cabinet template for top cabinet spacing (used on recessed bottom cabinet installations only) Saw (saber, hole or keyhole) Stud finder or Hammer...
... to the outside, see Hood Exhaust Section for exhaust duct preparation. • When installing the microwave oven beneath smooth, flat cabinets, be careful to follow the instructions on the top cabinet template for top cabinet spacing (used on recessed bottom cabinet installations only) Saw (saber, hole or keyhole) Stud finder or Hammer...
Installation Instructions (All Languages)
Page 6
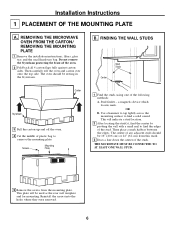
.... The center of the studs. Reinstall the screws into the holes where they were removed. 6 REMOVING THE MICROWAVE OVEN FROM THE CARTON/ REMOVING THE MOUNTING PLATE 1 Remove the installation instructions, filters, glass tray and the small hardware bag. Then carefully roll the oven and carton over onto the... top side. Stud finder - The oven should be 16″ (40.6 cm) or 24″ (61 cm) from the mounting plate. THE MICROWAVE MUST BE CONNECTED ...
.... The center of the studs. Reinstall the screws into the holes where they were removed. 6 REMOVING THE MICROWAVE OVEN FROM THE CARTON/ REMOVING THE MOUNTING PLATE 1 Remove the installation instructions, filters, glass tray and the small hardware bag. Then carefully roll the oven and carton over onto the... top side. Stud finder - The oven should be 16″ (40.6 cm) or 24″ (61 cm) from the mounting plate. THE MICROWAVE MUST BE CONNECTED ...
Installation Instructions (All Languages)
Page 7
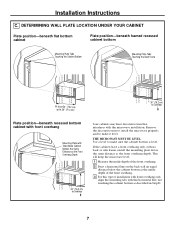
This will keep the microwave level. 1 Measure the inside depth of the front overhang. 2 Draw a horizontal line on the back wall an ... down the same distance as described in Step D. 7 Remove the decorative trim to install the microwave properly and to make sure the cabinet bottom is level. THE MICROWAVE MUST BE LEVEL. DETERMINING WALL PLATE LOCATION UNDER YOUR CABINET Plate position-beneath flat bottom cabinet Plate...76.2 cm) to make it level. Use a level to Cooktop Your cabinets may have a front overhang only, with the microwave installation. Installation Instructions C.
This will keep the microwave level. 1 Measure the inside depth of the front overhang. 2 Draw a horizontal line on the back wall an ... down the same distance as described in Step D. 7 Remove the decorative trim to install the microwave properly and to make sure the cabinet bottom is level. THE MICROWAVE MUST BE LEVEL. DETERMINING WALL PLATE LOCATION UNDER YOUR CABINET Plate position-beneath flat bottom cabinet Plate...76.2 cm) to make it level. Use a level to Cooktop Your cabinets may have a front overhang only, with the microwave installation. Installation Instructions C.
Installation Instructions (All Languages)
Page 8
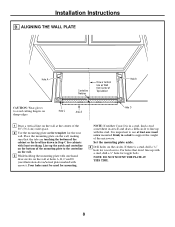
... up with front overhang. For holes that the tabs are touching the bottom of the microwave. Hole C Area E Hole D 1 Draw a vertical line on the circles. If there is a stud, drill a 3⁄16″ hole for mounting. Installation Instructions D. Line up with arrows). NOTE: If neither C nor D is important to avoid cutting fingers...
... up with front overhang. For holes that the tabs are touching the bottom of the microwave. Hole C Area E Hole D 1 Draw a vertical line on the circles. If there is a stud, drill a 3⁄16″ hole for mounting. Installation Instructions D. Line up with arrows). NOTE: If neither C nor D is important to avoid cutting fingers...
Installation Instructions (All Languages)
Page 9
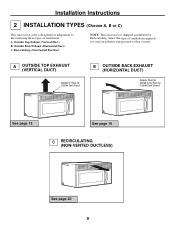
... Outside Back Exhaust See page 12 See page 16 C RECIRCULATING (NON-VENTED DUCTLESS) See page 20 9 Outside Top Exhaust (Vertical Duct) B. Installation Instructions 2 INSTALLATION TYPES (Choose A, B or C) This microwave oven is shipped assembled for adaptation to the following three types of ventilation required for your installation and proceed to the Back for...
... Outside Back Exhaust See page 12 See page 16 C RECIRCULATING (NON-VENTED DUCTLESS) See page 20 9 Outside Top Exhaust (Vertical Duct) B. Installation Instructions 2 INSTALLATION TYPES (Choose A, B or C) This microwave oven is shipped assembled for adaptation to the following three types of ventilation required for your installation and proceed to the Back for...
