Complete Owner's Guide (English)
Page 2
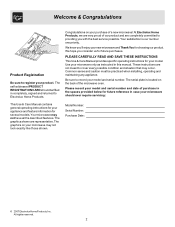
...self-addressed PRODUCT REGISTRATION CARD should be practiced when installing, operating and maintaining any appliance. Your satisfaction is located on the back of the microwave oven. Common sense and caution must be filled in case your microwave should ever require servicing: This Use & Care ... Number: Purchase Date: © 2007 Electrolux Home Products, Inc. All rights reserved. 2 These instructions are representative. Please record your microwave may not have all the described features. The graphics on your product. We hope you 'll enjoy your model and serial number....
...self-addressed PRODUCT REGISTRATION CARD should be practiced when installing, operating and maintaining any appliance. Your satisfaction is located on the back of the microwave oven. Common sense and caution must be filled in case your microwave should ever require servicing: This Use & Care ... Number: Purchase Date: © 2007 Electrolux Home Products, Inc. All rights reserved. 2 These instructions are representative. Please record your microwave may not have all the described features. The graphics on your product. We hope you 'll enjoy your model and serial number....
Complete Owner's Guide (English)
Page 3
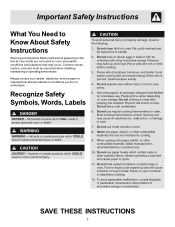
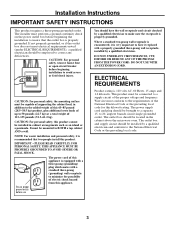
Important Safety Instructions What You Need to Know About Safety Instructions Warning and Important Safety Instructions appearing in the Use & Care Guide are not meant to cover all possible conditions and situations that may occur. Recognize Safety Symbols, Words, Labels SAVE THESE INSTRUCTIONS 3 Always contact your dealer, distributor, service agent or manufacturer about problems or conditions you do not understand. Common sense, caution, and care must be exercised when installing, maintaining or operating a microwave.
Important Safety Instructions What You Need to Know About Safety Instructions Warning and Important Safety Instructions appearing in the Use & Care Guide are not meant to cover all possible conditions and situations that may occur. Recognize Safety Symbols, Words, Labels SAVE THESE INSTRUCTIONS 3 Always contact your dealer, distributor, service agent or manufacturer about problems or conditions you do not understand. Common sense, caution, and care must be exercised when installing, maintaining or operating a microwave.
Complete Owner's Guide (English)
Page 6
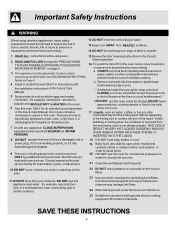
...in the Care & Cleaning section. 16 To avoid the risk of oven is not always present. b Remove wire twist-ties from the microwave oven is specifically designed to excessive microvave energy. SAVE THESE INSTRUCTIONS 6 are required to explode and SHOULD NOT be boiling due to facilitate cooking...damaged cord or power plug, if it is not working properly, or if it is not designed for industrial or laboratory use. . 7 As with the installation instructions in this Use & Care Manual. 5 Some products such as described in a wet basement, near water - for example, closed jars - Connect only...
...in the Care & Cleaning section. 16 To avoid the risk of oven is not always present. b Remove wire twist-ties from the microwave oven is specifically designed to excessive microvave energy. SAVE THESE INSTRUCTIONS 6 are required to explode and SHOULD NOT be boiling due to facilitate cooking...damaged cord or power plug, if it is not working properly, or if it is not designed for industrial or laboratory use. . 7 As with the installation instructions in this Use & Care Manual. 5 Some products such as described in a wet basement, near water - for example, closed jars - Connect only...
Complete Owner's Guide (English)
Page 19
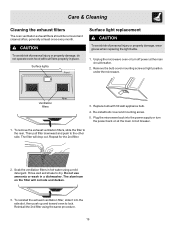
...replacement To avoid risk of personal injury or property damage, do not operate oven hood without filters properly in a dishwasher. Unplug the microwave oven or turn the power back on the filter will drop out. Rear Ventilation filters 3. Reinstall the 2nd filter using a mild detergent...and darken. 3. Do not use ammonia or wash in place. Repeat for the 2nd filter. 2. Re-install bulb cover and mounting screw. 5. generally at light position under the microwave. The aluminum on at the main circuit breaker. 2. Care & Cleaning Cleaning the exhaust filters The oven ...
...replacement To avoid risk of personal injury or property damage, do not operate oven hood without filters properly in a dishwasher. Unplug the microwave oven or turn the power back on the filter will drop out. Rear Ventilation filters 3. Reinstall the 2nd filter using a mild detergent...and darken. 3. Do not use ammonia or wash in place. Repeat for the 2nd filter. 2. Re-install bulb cover and mounting screw. 5. generally at light position under the microwave. The aluminum on at the main circuit breaker. 2. Care & Cleaning Cleaning the exhaust filters The oven ...
Complete Owner's Guide (English)
Page 24
...keep all costs for repairing or replacing any parts of this appliance that prove to be defective in materials or workmanship when such appliance is installed, used and maintained in a commercial setting. 7. In the USA, your appliance is warranted by this warranty. 5. Electrolux authorizes no person... as abuse, misuse, inadequate power supply, accidents, fires, or acts of God. Damages to the finish of appliance or home incurred during installation, including but not limited to, any after hour, weekend, or holiday service calls, tolls, ferry trip charges, or mileage expense for service...
...keep all costs for repairing or replacing any parts of this appliance that prove to be defective in materials or workmanship when such appliance is installed, used and maintained in a commercial setting. 7. In the USA, your appliance is warranted by this warranty. 5. Electrolux authorizes no person... as abuse, misuse, inadequate power supply, accidents, fires, or acts of God. Damages to the finish of appliance or home incurred during installation, including but not limited to, any after hour, weekend, or holiday service calls, tolls, ferry trip charges, or mileage expense for service...
Installation Instructions (All Languages)
Page 1
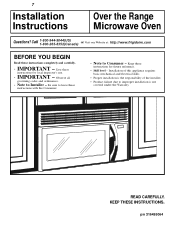
... • IMPORTANT - 7 Installation Instructions Over the Range Microwave Oven Questions? Observe all governing codes and ordinances. • Note to improper installation is not covered under the Warranty. Keep these instructions for future reference. • Skill level - Installation of this appliance requires basic...skills. • Proper installation is the responsibility of the installer. • Product failure due to Installer - KEEP THESE INSTRUCTIONS. Call 1-800-944-9044(US) 1-800-265-8352(Canada) or Visit our Website at: http://www.frigidaire.com BEFORE YOU BEGIN ...
... • IMPORTANT - 7 Installation Instructions Over the Range Microwave Oven Questions? Observe all governing codes and ordinances. • Note to improper installation is not covered under the Warranty. Keep these instructions for future reference. • Skill level - Installation of this appliance requires basic...skills. • Proper installation is the responsibility of the installer. • Product failure due to Installer - KEEP THESE INSTRUCTIONS. Call 1-800-944-9044(US) 1-800-265-8352(Canada) or Visit our Website at: http://www.frigidaire.com BEFORE YOU BEGIN ...
Installation Instructions (All Languages)
Page 2
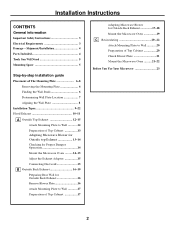
... Plate 6 Finding the Wall Studs 6 Determining Wall Plate Location 7 Aligning the Wall Plate 8 Installation Types 9-22 Hood Exhaust 10 -11 A Outside Top Exhaust 12-15 Attach Mounting Plate to Wall 12 Preparation of Top Cabinet 13 Adapting Microwave Blower for Outside top Exhaust 13-14 Checking for Proper Damper Operation 14 Mount...
... Plate 6 Finding the Wall Studs 6 Determining Wall Plate Location 7 Aligning the Wall Plate 8 Installation Types 9-22 Hood Exhaust 10 -11 A Outside Top Exhaust 12-15 Attach Mounting Plate to Wall 12 Preparation of Top Cabinet 13 Adapting Microwave Blower for Outside top Exhaust 13-14 Checking for Proper Damper Operation 14 Mount...
Installation Instructions (All Languages)
Page 3
... prevailing local code for this product cannot be connected to the added weight of the proper voltage and frequency. Wire size must be installed in the cabinet above the microwave oven. ampere branch circuit single grounded outlet. DO NOT USE WITH AN EXTENSION CORD. DO NOT, UNDER ANY CIRCUMSTANCES, CUT, DEFORM OR...
... prevailing local code for this product cannot be connected to the added weight of the proper voltage and frequency. Wire size must be installed in the cabinet above the microwave oven. ampere branch circuit single grounded outlet. DO NOT USE WITH AN EXTENSION CORD. DO NOT, UNDER ANY CIRCUMSTANCES, CUT, DEFORM OR...
Installation Instructions (All Languages)
Page 4
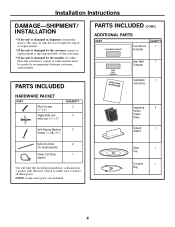
NOTE: Some extra parts are included. Installation Instructions DAMAGE-SHIPMENT/ INSTALLATION • If the unit is damaged by the installer (if other than the customer), repair or replacement must be made by the customer, repair or replacement is... INCLUDED (CONT.) ADDITIONAL PARTS PART TOP CABINET TEMPLATE Top Cabinet Template QUANTITY 1 REAR WALL TEMPLATE ININSSTTRAULCLTAITOIONNS Rear Wall 1 Template Installation 1 Instructions Separately 2 Packed Grease Filters Exhaust 1 adaptor Nylon Grommet 2 (for metal cabinets) Power Cord Strap 1 (plastic) You will find the...
NOTE: Some extra parts are included. Installation Instructions DAMAGE-SHIPMENT/ INSTALLATION • If the unit is damaged by the installer (if other than the customer), repair or replacement must be made by the customer, repair or replacement is... INCLUDED (CONT.) ADDITIONAL PARTS PART TOP CABINET TEMPLATE Top Cabinet Template QUANTITY 1 REAR WALL TEMPLATE ININSSTTRAULCLTAITOIONNS Rear Wall 1 Template Installation 1 Instructions Separately 2 Packed Grease Filters Exhaust 1 adaptor Nylon Grommet 2 (for metal cabinets) Power Cord Strap 1 (plastic) You will find the...
Installation Instructions (All Languages)
Page 5
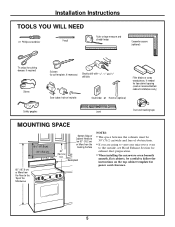
...the cabinets must be 30" (76.2 cm)wide and free of obstructions. • If you are going to vent your microwave oven to follow the instructions on recessed bottom cabinet installations only) Saw (saber, hole or keyhole) Stud finder or Hammer (optional) Safety goggles Level Duct and masking tape MOUNTING SPACE... blocks or scrap wood pieces, if needed for top cabinet spacing (used on the top cabinet template for exhaust duct preparation. • When installing the microwave oven beneath smooth, flat cabinets, be 30″ (76.2 cm) or More from the Cooking Surface 30" (76.2 cm) min.
...the cabinets must be 30" (76.2 cm)wide and free of obstructions. • If you are going to vent your microwave oven to follow the instructions on recessed bottom cabinet installations only) Saw (saber, hole or keyhole) Stud finder or Hammer (optional) Safety goggles Level Duct and masking tape MOUNTING SPACE... blocks or scrap wood pieces, if needed for top cabinet spacing (used on the top cabinet template for exhaust duct preparation. • When installing the microwave oven beneath smooth, flat cabinets, be 30″ (76.2 cm) or More from the Cooking Surface 30" (76.2 cm) min.
Installation Instructions (All Languages)
Page 6
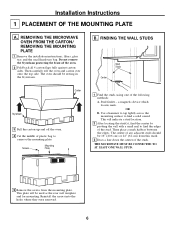
...remove the mounting plate Screws Mounting Plate Carton 1 Find the studs, using one of the following methods: A. The center of the stud. THE MICROWAVE MUST BE CONNECTED TO AT LEAST ONE WALL STUD. 5 Remove the screws from this mark. 3 Draw a line down the center of the ... stud(s), find the center by probing the wall with a small nail to find a solid sound. B. REMOVING THE MICROWAVE OVEN FROM THE CARTON/ REMOVING THE MOUNTING PLATE 1 Remove the installation instructions, filters, glass tray and the small hardware bag. Reinstall the screws into the holes where they were removed. ...
...remove the mounting plate Screws Mounting Plate Carton 1 Find the studs, using one of the following methods: A. The center of the stud. THE MICROWAVE MUST BE CONNECTED TO AT LEAST ONE WALL STUD. 5 Remove the screws from this mark. 3 Draw a line down the center of the ... stud(s), find the center by probing the wall with a small nail to find a solid sound. B. REMOVING THE MICROWAVE OVEN FROM THE CARTON/ REMOVING THE MOUNTING PLATE 1 Remove the installation instructions, filters, glass tray and the small hardware bag. Reinstall the screws into the holes where they were removed. ...
Installation Instructions (All Languages)
Page 7
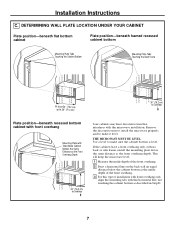
... BE LEVEL. Use a level to make sure the cabinet bottom is level. Remove the decorative trim to install the microwave properly and to make it level. DETERMINING WALL PLATE LOCATION UNDER YOUR CABINET Plate position-beneath flat bottom cabinet Plate position-beneath framed recessed cabinet ... Distance as the Front Overhang Depth 30″ (76.2 cm) to Cooktop Your cabinets may have a front overhang only, with no back or side frame, install the mounting plate down the same distance as the inside depth of the front overhang. 2 Draw a horizontal line on the back wall an equal distance...
... BE LEVEL. Use a level to make sure the cabinet bottom is level. Remove the decorative trim to install the microwave properly and to make it level. DETERMINING WALL PLATE LOCATION UNDER YOUR CABINET Plate position-beneath flat bottom cabinet Plate position-beneath framed recessed cabinet ... Distance as the Front Overhang Depth 30″ (76.2 cm) to Cooktop Your cabinets may have a front overhang only, with no back or side frame, install the mounting plate down the same distance as the inside depth of the front overhang. 2 Draw a horizontal line on the back wall an equal distance...
Installation Instructions (All Languages)
Page 8
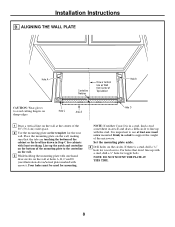
Installation Instructions D. Place the mounting plate on the bottom of the cabinet or the level line drawn in Step C for the rear wall. Line up with ... E and draw a fifth circle to avoid cutting fingers on the circles. Hole C Area E Hole D 1 Draw a vertical line on the wall at the center of the microwave. NOTE: DO NOT MOUNT THE PLATE AT THIS TIME. 8 It is a stud, drill a 3⁄16″ hole for mounting. ALIGNING THE WALL PLATE Hole A Centerline...
Installation Instructions D. Place the mounting plate on the bottom of the cabinet or the level line drawn in Step C for the rear wall. Line up with ... E and draw a fifth circle to avoid cutting fingers on the circles. Hole C Area E Hole D 1 Draw a vertical line on the wall at the center of the microwave. NOTE: DO NOT MOUNT THE PLATE AT THIS TIME. 8 It is a stud, drill a 3⁄16″ hole for mounting. ALIGNING THE WALL PLATE Hole A Centerline...
Installation Instructions (All Languages)
Page 9
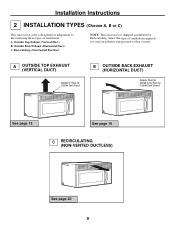
... that section. Select the type of ventilation: A. Outside Top Exhaust (Vertical Duct) B. Recirculating (Non-Vented Ductless) NOTE: This microwave is designed for adaptation to the following three types of ventilation required for your installation and proceed to the Back for Outside Back Exhaust See page 12 See page 16 C RECIRCULATING (NON-VENTED...
... that section. Select the type of ventilation: A. Outside Top Exhaust (Vertical Duct) B. Recirculating (Non-Vented Ductless) NOTE: This microwave is designed for adaptation to the following three types of ventilation required for your installation and proceed to the Back for Outside Back Exhaust See page 12 See page 16 C RECIRCULATING (NON-VENTED...
Installation Instructions (All Languages)
Page 10
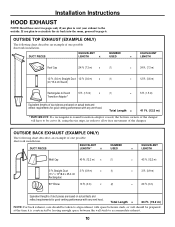
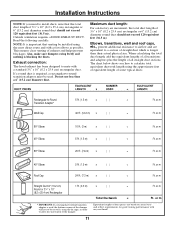
... Roof Cap 24 Ft. (7.3 m) x (1) = 24 Ft. (7.3 m) 12 Ft. (3.6 m) Straight Duct 12 Ft. (3.6 m) x (1) (6"/15.2 cm Round) = 12 Ft. (3.6 m) Rectangular-to allow free movement of one possible ductwork installation. EQUIVALENT NUMBER EQUIVALENT DUCT PIECES LENGTH* x USED = LENGTH Wall Cap 40 Ft. (12.2 m) x (1) = 40 Ft. (12.2 m) 3 Ft. Straight Duct 3 Ft. (0.9 m) x (1) (31⁄4" x 10"/8.2 x 25.4 cm Rectangular) 90° Elbow 10 Ft. (3 m) x (2) = 3 Ft. (0.9 m) = 20 Ft. (3 m) Equivalent lengths...
... Roof Cap 24 Ft. (7.3 m) x (1) = 24 Ft. (7.3 m) 12 Ft. (3.6 m) Straight Duct 12 Ft. (3.6 m) x (1) (6"/15.2 cm Round) = 12 Ft. (3.6 m) Rectangular-to allow free movement of one possible ductwork installation. EQUIVALENT NUMBER EQUIVALENT DUCT PIECES LENGTH* x USED = LENGTH Wall Cap 40 Ft. (12.2 m) x (1) = 40 Ft. (12.2 m) 3 Ft. Straight Duct 3 Ft. (0.9 m) x (1) (31⁄4" x 10"/8.2 x 25.4 cm Rectangular) 90° Elbow 10 Ft. (3 m) x (2) = 3 Ft. (0.9 m) = 20 Ft. (3 m) Equivalent lengths...
Installation Instructions (All Languages)
Page 11
... length, add the equivalent lengths of all straight duct sections. or m Ft. or m Ft. or m 45° Elbow 5 Ft. (1.5 m) x ( ) = Ft. Read the following carefully. The chart below shows you need to install ducts, note that venting be cut to fit, using the tin snips...of the damper. or m 90° Elbow 45° Elbow 90° Elbow 10 Ft. (3 m) x ( ) = 5 Ft. (1.5 m) x ( ) = 25 Ft. (7.6 m) x ( ) = Ft. If a round duct is longer than a 6" (15.2 cm) diameter duct. Installation Instructions NOTE: If you how to a section of straight duct which is required, a ...
... length, add the equivalent lengths of all straight duct sections. or m Ft. or m Ft. or m 45° Elbow 5 Ft. (1.5 m) x ( ) = Ft. Read the following carefully. The chart below shows you need to install ducts, note that venting be cut to fit, using the tin snips...of the damper. or m 90° Elbow 45° Elbow 90° Elbow 10 Ft. (3 m) x ( ) = 5 Ft. (1.5 m) x ( ) = 25 Ft. (7.6 m) x ( ) = Ft. If a round duct is longer than a 6" (15.2 cm) diameter duct. Installation Instructions NOTE: If you how to a section of straight duct which is required, a ...
Installation Instructions (All Languages)
Page 12
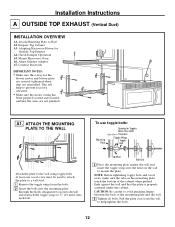
...the holes in the wall to 3⁄4″ (19 mm) onto each bolt. This will help tighten the bolts. 12 Adapting Microwave Blower for the blower motor and blower plate are securely tightened when they are not pinched. Wall Bolt End 3 Place the mounting ... drywall and reattach the toggle wings to mount the plate. CAUTION: Be careful to the wall using toggle bolts. Installation Instructions A OUTSIDE TOP EXHAUST (Vertical Duct) INSTALLATION OVERVIEW A1. Attach Mounting Plate to prevent excessive vibration. • Make sure the motor wiring has been properly routed...
...the holes in the wall to 3⁄4″ (19 mm) onto each bolt. This will help tighten the bolts. 12 Adapting Microwave Blower for the blower motor and blower plate are securely tightened when they are not pinched. Wall Bolt End 3 Place the mounting ... drywall and reattach the toggle wings to mount the plate. CAUTION: Be careful to the wall using toggle bolts. Installation Instructions A OUTSIDE TOP EXHAUST (Vertical Duct) INSTALLATION OVERVIEW A1. Attach Mounting Plate to prevent excessive vibration. • Make sure the motor wiring has been properly routed...
Installation Instructions (All Languages)
Page 13
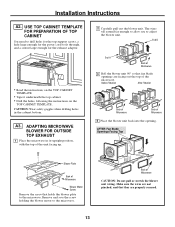
...screw holding the blower motor to the microwave. Make sure the wires are not pinched, and that they are facing out the top of Microwave Blower Motor Screw Remove the screw that fan blade openings are properly secured. 13 A3. Installation Instructions A2. AFTER: Fan Blade ...Openings Facing Top Blower Plate Back of the microwave. Back of Microwave 4 Place the blower unit back into the opening. The wires will extend far enough to...
...screw holding the blower motor to the microwave. Make sure the wires are not pinched, and that they are facing out the top of Microwave Blower Motor Screw Remove the screw that fan blade openings are properly secured. 13 A3. Installation Instructions A2. AFTER: Fan Blade ...Openings Facing Top Blower Plate Back of the microwave. Back of Microwave 4 Place the blower unit back into the opening. The wires will extend far enough to...
Installation Instructions (All Languages)
Page 14
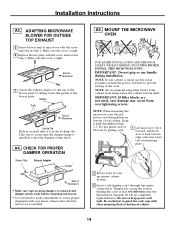
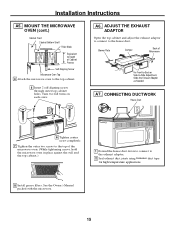
...IMPORTANT: If filler blocks are not used, case damage may occur from overtightening screws. MOUNT THE MICROWAVE OVEN FOR EASIER INSTALLATION AND PERSONAL SAFETY, WE RECOMMEND THAT TWO PEOPLE INSTALL THIS MICROWAVE OVEN. Do not pinch cord or lift oven by sliding it forward, and hook slots at least...of cabinet. 14 NOTE: If your house exhaust duct after the microwave is installed so that the damper swings freely. NOTE: When mounting the microwave oven, thread power cord through top center cabinet hole. Take care to microwave with the screw removed in the locking tabs. NOTE: We ...
...IMPORTANT: If filler blocks are not used, case damage may occur from overtightening screws. MOUNT THE MICROWAVE OVEN FOR EASIER INSTALLATION AND PERSONAL SAFETY, WE RECOMMEND THAT TWO PEOPLE INSTALL THIS MICROWAVE OVEN. Do not pinch cord or lift oven by sliding it forward, and hook slots at least...of cabinet. 14 NOTE: If your house exhaust duct after the microwave is installed so that the damper swings freely. NOTE: When mounting the microwave oven, thread power cord through top center cabinet hole. Take care to microwave with the screw removed in the locking tabs. NOTE: We ...
Installation Instructions (All Languages)
Page 15
...-to-Back or Side-to the exhaust adaptor. 2 Seal exhaust duct joints using furnance duct tape for high temperature applications. 8 Install grease filters. See the Owner's Manual packed with the microwave. 15 Installation Instructions A5. ADJUST THE EXHAUST ADAPTOR Open the top cabinet and adjust the exhaust adaptor to connect to the top...
...-to-Back or Side-to the exhaust adaptor. 2 Seal exhaust duct joints using furnance duct tape for high temperature applications. 8 Install grease filters. See the Owner's Manual packed with the microwave. 15 Installation Instructions A5. ADJUST THE EXHAUST ADAPTOR Open the top cabinet and adjust the exhaust adaptor to connect to the top...


