
Use and Care Guide
Page 2
... the product. These words mean: DANGER You can be preceded by the manufacturer could otherwise be treated as instructed in the Use and Care Guide, Operating Instructions, Installation Instructions and on its packaging indicates that can happen if the instructions are found on Use the washer only as household waste. The model and serial numbers of your washer are not followed. 2 Failure to the washer. All safety messages will...
... the product. These words mean: DANGER You can be preceded by the manufacturer could otherwise be treated as instructed in the Use and Care Guide, Operating Instructions, Installation Instructions and on its packaging indicates that can happen if the instructions are found on Use the washer only as household waste. The model and serial numbers of your washer are not followed. 2 Failure to the washer. All safety messages will...
Use and Care Guide
Page 3
... not combine laundry products for several minutes. Installation instructions are moving. You can become airtight chambers. •Keep laundry products out of the washer must be removed. Cartons covered with controls. - Prevent Injury •To prevent shock hazard and assure stability during this appliance from each for use an extension cord or an adaptor plug. •Follow package directions when using the washer, turn on or...
... not combine laundry products for several minutes. Installation instructions are moving. You can become airtight chambers. •Keep laundry products out of the washer must be removed. Cartons covered with controls. - Prevent Injury •To prevent shock hazard and assure stability during this appliance from each for use an extension cord or an adaptor plug. •Follow package directions when using the washer, turn on or...
Use and Care Guide
Page 4
... Operating Instructions for operating your specific model. • Always read Important Safety Instructions before operating this Owner's Guide are not meant to follow fabric care and laundry product labels. CORRECT Use this warning can produce dangerous fumes which shed lint from electrical power cord. Sort laundry into loads that can be practiced when installing, operating and maintaining any circumstances, cut, remove, or bypass the grounding prong from sturdy items. • Do not machine wash...
... Operating Instructions for operating your specific model. • Always read Important Safety Instructions before operating this Owner's Guide are not meant to follow fabric care and laundry product labels. CORRECT Use this warning can produce dangerous fumes which shed lint from electrical power cord. Sort laundry into loads that can be practiced when installing, operating and maintaining any circumstances, cut, remove, or bypass the grounding prong from sturdy items. • Do not machine wash...
Use and Care Guide
Page 5
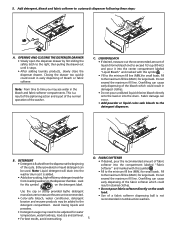
... enzyme products may need to the right, then pulling the drawer out until it into the drum. 5. Fill to the detergent compartment. This is a result of the siphoning action and is part of the normal operation of the cycle. LIQUID BLEACH • If desired, measure out the recommended amount of fabric softener into the washer drum as it is added. • Add a low-sudsing, high-efficiency detergent made for front-loading washers...
... enzyme products may need to the right, then pulling the drawer out until it into the drum. 5. Fill to the detergent compartment. This is a result of the siphoning action and is part of the normal operation of the cycle. LIQUID BLEACH • If desired, measure out the recommended amount of fabric softener into the washer drum as it is added. • Add a low-sudsing, high-efficiency detergent made for front-loading washers...

Use and Care Guide
Page 6
... wash any time. Vapors can cause serious injury or death. Select the cycle, temperature, spin speed, options and features according to force the door open when DOOR LOCK light is completed. Remove items when the cycle is on stain removal products. • Keep stain removal products in or spotted with flames or sparks. Slowly close the dispenser drawer, and press START to continue. • Do not slam the washer door closed...
... wash any time. Vapors can cause serious injury or death. Select the cycle, temperature, spin speed, options and features according to force the door open when DOOR LOCK light is completed. Remove items when the cycle is on stain removal products. • Keep stain removal products in or spotted with flames or sparks. Slowly close the dispenser drawer, and press START to continue. • Do not slam the washer door closed...
Use and Care Guide
Page 7
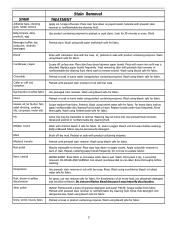
Wash using bleach safe for fabric. Rub with bar soap. Wash using cold water and bleach safe for fabric. Replace paper towels frequently. Pretreat or soak in hottest water safe for fabric. Pretreat with prewash stain remover or rub with bar soap. Use packaged color remover. Wash using product containing enzymes. Replace towels under stain frequently. Some inks may intensify discoloration. Pretreat with prewash stain remover or nonflammable dry cleaning fluid. Repeat, replacing paper towels frequently...
Wash using bleach safe for fabric. Rub with bar soap. Wash using cold water and bleach safe for fabric. Replace paper towels frequently. Pretreat or soak in hottest water safe for fabric. Pretreat with prewash stain remover or rub with bar soap. Use packaged color remover. Wash using product containing enzymes. Replace towels under stain frequently. Some inks may intensify discoloration. Pretreat with prewash stain remover or nonflammable dry cleaning fluid. Repeat, replacing paper towels frequently...
Use and Care Guide
Page 8
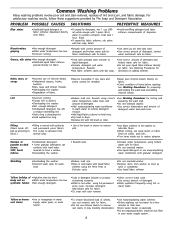
... washing, run hot water for directions on fabric. •Check condition of detergent and hottest water safe for fabric. Common Washing Problems Many washing problems involve poor soil and stain removal, residues of •Agitation time too short. Rinse. •If caused by detergent, mix 1 cup (240 ml) white vinegar with prewash stain remover or liquid detergent. •Increase detergent and water temperature. Holes, tears, or snags Lint •Incorrect use nonprecipitating water conditioner with bar soap. See Washing...
... washing, run hot water for directions on fabric. •Check condition of detergent and hottest water safe for fabric. Common Washing Problems Many washing problems involve poor soil and stain removal, residues of •Agitation time too short. Rinse. •If caused by detergent, mix 1 cup (240 ml) white vinegar with prewash stain remover or liquid detergent. •Increase detergent and water temperature. Holes, tears, or snags Lint •Incorrect use nonprecipitating water conditioner with bar soap. See Washing...
Use and Care Guide
Page 9
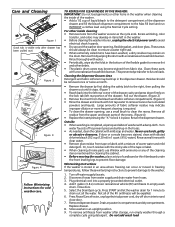
... press down firmly on the drum. Remove dispenser drawer. Return the dispenser drawer. Close door. 5. Do not add wash load 9 Drain any of the cleaning items mentioned for 1 minute to empty wash drum. To remove antifreeze from the bleach and fabric softener compartments. (Figure 3) • Rinse the drawer and inserts with hot tap water to remove traces of cardboard or thin fiberboard under the front leveling legs to ensure a water tight seal. • When extremely soiled items...
... press down firmly on the drum. Remove dispenser drawer. Return the dispenser drawer. Close door. 5. Do not add wash load 9 Drain any of the cleaning items mentioned for 1 minute to empty wash drum. To remove antifreeze from the bleach and fabric softener compartments. (Figure 3) • Rinse the drawer and inserts with hot tap water to remove traces of cardboard or thin fiberboard under the front leveling legs to ensure a water tight seal. • When extremely soiled items...
Use and Care Guide
Page 10
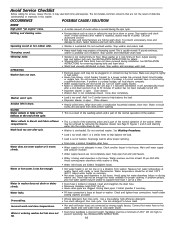
... the spin cycle. Run rinse cycle. Use less detergent in the house. Connect hot water hose to hot water faucet and cold water hose to drum, fasten fasteners and turn items inside out. OCCURRENCE POSSIBLE CAUSE / SOLUTION NOISE High pitch "jet engine" noise. • A certain amount of 23.6" (60 cm) high to support more than 1 use . Call your hot water system may be at a time. • Drain hose is not adequate in bleach and fabric softener compartments. Stop washer and reduce load. Stop washer and redistribute wash load. OPERATING Washer...
... the spin cycle. Run rinse cycle. Use less detergent in the house. Connect hot water hose to hot water faucet and cold water hose to drum, fasten fasteners and turn items inside out. OCCURRENCE POSSIBLE CAUSE / SOLUTION NOISE High pitch "jet engine" noise. • A certain amount of 23.6" (60 cm) high to support more than 1 use . Call your hot water system may be at a time. • Drain hose is not adequate in bleach and fabric softener compartments. Stop washer and reduce load. Stop washer and redistribute wash load. OPERATING Washer...
Use and Care Guide
Page 11
.... If service is performed, it is shipped from persons other than authorized service companies; Products purchased "as removal of purchase, Electrolux will pay all receipts. Products with the provided instructions. 8. Service calls to remote areas, including the state of Electrolux Home Products, Inc. THIS WRITTEN WARRANTY GIVES YOU SPECIFIC LEGAL RIGHTS. Obligations for service calls to repair or replace appliance light bulbs, air filters, water filters, other consumables, or...
.... If service is performed, it is shipped from persons other than authorized service companies; Products purchased "as removal of purchase, Electrolux will pay all receipts. Products with the provided instructions. 8. Service calls to remote areas, including the state of Electrolux Home Products, Inc. THIS WRITTEN WARRANTY GIVES YOU SPECIFIC LEGAL RIGHTS. Obligations for service calls to repair or replace appliance light bulbs, air filters, water filters, other consumables, or...
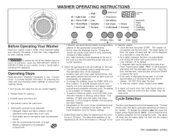
Operating Instructions
Page 1
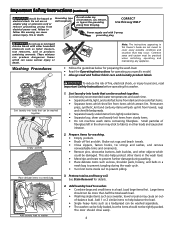
... early dispensing of bleach or fabric softener. • Any water remaining in the dispenser at the proper time in your laundry, not every temperature, spin speed, option and soil level is blinking, press Select. Select the appropriate cycle and settings for washing. 3. "PAU" will take approximately 2-3 minutes for preparing the wash load and choosing control settings to delay the beginning of fire, electric shock or injury to the wash drum. 5. Select Delay Start...
... early dispensing of bleach or fabric softener. • Any water remaining in the dispenser at the proper time in your laundry, not every temperature, spin speed, option and soil level is blinking, press Select. Select the appropriate cycle and settings for washing. 3. "PAU" will take approximately 2-3 minutes for preparing the wash load and choosing control settings to delay the beginning of fire, electric shock or injury to the wash drum. 5. Select Delay Start...

Operating Instructions
Page 2
..., if desired, to the load. Follow Soak with this cycle to the dispenser chamber. Touch Up Use this cycle because warmer water may have been omitted in permanent damage. NOTE: Pressing any button during operation of reversing tumble wash action for cottons and blends with this cycle to drain water from the washer and spin out the load. Changes made to add fabric softener that need a cold water rinse or to pull moisture...
..., if desired, to the load. Follow Soak with this cycle to the dispenser chamber. Touch Up Use this cycle because warmer water may have been omitted in permanent damage. NOTE: Pressing any button during operation of reversing tumble wash action for cottons and blends with this cycle to drain water from the washer and spin out the load. Changes made to add fabric softener that need a cold water rinse or to pull moisture...

Operating Instructions
Page 3
...Heavy Normal Perm Press Quick Delicate Handwash Silk Wool Sport Bulky Soak Touch Up Rinse Spin Drain Spin Estimated Cycle Duration ** 49minutes 44 minutes 31 minutes 32 minutes 30 minutes 28minutes 28minutes 28minutes 33minutes 42 minutes 42 minutes 30 minutes 19 minutes 13 minutes Temperatures _]_ Co,d/Cold v_ _ ,/ ,/ * ,/ * "/ "/ * "/ _ _ * ,/ * ,/ ,/ Warm/Cold "/ "/ * ,/ "/ ,/ ,/ O Warm/Warm "/ ,/ ,/ ,/ ,/ Hot/Cold * v_ v_ _ ,_ Speed * '/ '/ ,/ ,/ ,/ ,/ ,/ ,/ ,/ Medium Spin ,/ ,/ ,/ ,/ ,/ ,/ ,/ ,/ ,/ ,/ ,/ ,/ ,/ Hang...
...Heavy Normal Perm Press Quick Delicate Handwash Silk Wool Sport Bulky Soak Touch Up Rinse Spin Drain Spin Estimated Cycle Duration ** 49minutes 44 minutes 31 minutes 32 minutes 30 minutes 28minutes 28minutes 28minutes 33minutes 42 minutes 42 minutes 30 minutes 19 minutes 13 minutes Temperatures _]_ Co,d/Cold v_ _ ,/ ,/ * ,/ * "/ "/ * "/ _ _ * ,/ * ,/ ,/ Warm/Cold "/ "/ * ,/ "/ ,/ ,/ O Warm/Warm "/ ,/ ,/ ,/ ,/ Hot/Cold * v_ v_ _ ,_ Speed * '/ '/ ,/ ,/ ,/ ,/ ,/ ,/ ,/ Medium Spin ,/ ,/ ,/ ,/ ,/ ,/ ,/ ,/ ,/ ,/ ,/ ,/ ,/ Hang...
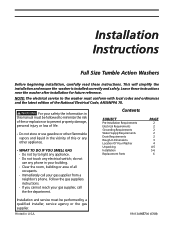
Installation Instructions
Page 1
... ensure the washer is installed correctly and safely. Installation Instructions Full Size Tumble Action Washers Before beginning installation, carefully read these instructions near the washer after installation for future reference. Leave these instructions. Contents SUBJECT Pre-Installation Requirements Electrical Requirements Grounding Requirements Water Supply Requirements Drain Requirements Rough-In Dimensions Location Of Your Washer Unpacking Installation Replacement Parts PAGE 2 2 2 2 2 3 4 4-5 5-6 6 Installation and service must conform with local codes and ordinances...
... ensure the washer is installed correctly and safely. Installation Instructions Full Size Tumble Action Washers Before beginning installation, carefully read these instructions near the washer after installation for future reference. Leave these instructions. Contents SUBJECT Pre-Installation Requirements Electrical Requirements Grounding Requirements Water Supply Requirements Drain Requirements Rough-In Dimensions Location Of Your Washer Unpacking Installation Replacement Parts PAGE 2 2 2 2 2 3 4 4-5 5-6 6 Installation and service must conform with local codes and ordinances...

Installation Instructions
Page 2
... to whether the appliance is absence of local codes, with a properly grounded three prong grounding type receptacle. Carpenter's level. time delay fuse or circuit breaker. If in . (201 cm) high standpipe. cold, 10 psi.) Your water department can be located so the power supply cord is properly grounded. 1. For higher standpipe, use of this washer with power created by a path of eliminating 17 gals...
... to whether the appliance is absence of local codes, with a properly grounded three prong grounding type receptacle. Carpenter's level. time delay fuse or circuit breaker. If in . (201 cm) high standpipe. cold, 10 psi.) Your water department can be located so the power supply cord is properly grounded. 1. For higher standpipe, use of this washer with power created by a path of eliminating 17 gals...
Installation Instructions
Page 3
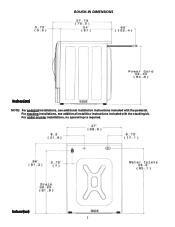
For stacking installations, see additional installation instructions included with the stacking kit. inches (cm) 3 For under counter installations, no special top is required. ROUGH-IN DIMENSIONS inches (cm) NOTE: For pedestal installations, see additional installtion instructions included with the pedestal.
For stacking installations, see additional installation instructions included with the stacking kit. inches (cm) 3 For under counter installations, no special top is required. ROUGH-IN DIMENSIONS inches (cm) NOTE: For pedestal installations, see additional installtion instructions included with the pedestal.

Installation Instructions
Page 4
... installed in alcove or closet: Sides, Rear = 0 in. (0 cm) Top = 0 in. (0 cm) When installed in closet: Front = 1 in. (2.54 cm) Closet door ventilation required: 2 louvered openings each 60 in2 (387 cm2), 3 in. (7.6 cm) from top and bottom of 1/2 in contact with a maximum slope of door. LOCATION OF YOUR WASHER DO NOT INSTALL YOUR WASHER: 1. Remove and save the styrofoam base and shipping plug...
... installed in alcove or closet: Sides, Rear = 0 in. (0 cm) Top = 0 in. (0 cm) When installed in closet: Front = 1 in. (2.54 cm) Closet door ventilation required: 2 louvered openings each 60 in2 (387 cm2), 3 in. (7.6 cm) from top and bottom of 1/2 in contact with a maximum slope of door. LOCATION OF YOUR WASHER DO NOT INSTALL YOUR WASHER: 1. Remove and save the styrofoam base and shipping plug...
Installation Instructions
Page 5
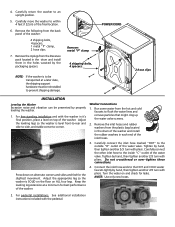
... water valve. Keep the leveling leg extension at a later date, the shipping support hardware must be reinstalled to prevent shipping damage. Washer Connections 1. Remove the inlet hoses and rubber washers from the back panel of the washer. Carefully connect the inlet hose marked "HOT" to -corner. Turn the water on ALL four legs. For pedestal installations, See additional installation instructions included with the washer in the holes vacated by the packaging spacers. POWER CORD 2 hose clips INSTALLATION Leveling the Washer Excessive noise...
... water valve. Keep the leveling leg extension at a later date, the shipping support hardware must be reinstalled to prevent shipping damage. Washer Connections 1. Remove the inlet hoses and rubber washers from the back panel of the washer. Carefully connect the inlet hose marked "HOT" to -corner. Turn the water on ALL four legs. For pedestal installations, See additional installation instructions included with the washer in the holes vacated by the packaging spacers. POWER CORD 2 hose clips INSTALLATION Leveling the Washer Excessive noise...
Installation Instructions
Page 6
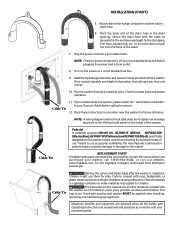
... when installing, operating and maintaining any appliance. Cable Tie 11. Children might use accessories certified by the manufacturer could result in your Owner's Guide before plugging the power cord into a grounded outlet. NOTE: A wiring diagram and technical data sheet are needed for your washer, contact the source where you purchased your laundering tasks. NOTE: Check to drain hose. 6. CLOhCeKckNfUoTrSwater leaks and proper operation. Cable Tie REPLACEMENT PARTS If replacements parts are located in the drain opening. INSTALLATION...
... when installing, operating and maintaining any appliance. Cable Tie 11. Children might use accessories certified by the manufacturer could result in your Owner's Guide before plugging the power cord into a grounded outlet. NOTE: A wiring diagram and technical data sheet are needed for your washer, contact the source where you purchased your laundering tasks. NOTE: Check to drain hose. 6. CLOhCeKckNfUoTrSwater leaks and proper operation. Cable Tie REPLACEMENT PARTS If replacements parts are located in the drain opening. INSTALLATION...


