
Owners Guide
Page 2
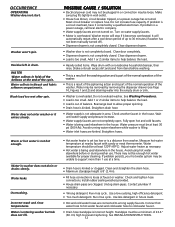
... serial plates that breaks due to your home in the 50 states of Purchase Replacement part for the motor, driven pulley or motor controller which prove to the elements 2. Below are subject to obtain service, contact our Consumer Assistance Center at water inlet hose connections • correct improper placement of drain hose in your washer • correct leaks at 1-800-944-9044. Service calls to: • remove shipping...
... serial plates that breaks due to your home in the 50 states of Purchase Replacement part for the motor, driven pulley or motor controller which prove to the elements 2. Below are subject to obtain service, contact our Consumer Assistance Center at water inlet hose connections • correct improper placement of drain hose in your washer • correct leaks at 1-800-944-9044. Service calls to: • remove shipping...

Owners Guide
Page 3
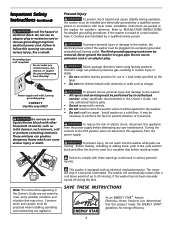
.... Hydrogen gas is the safety alert symbol. Children might use them the proper, safe use of all hot water faucets and let the water flow from service or discarded, remove the washer door to the rubber or plastic parts of the washer. NLTWD15, specifically designed for this washer. Keep laundry products out of children's reach. This is flammable; ENGLISH This Use and Care Guide provides general operating instructions for ease of use. It...
.... Hydrogen gas is the safety alert symbol. Children might use them the proper, safe use of all hot water faucets and let the water flow from service or discarded, remove the washer door to the rubber or plastic parts of the washer. NLTWD15, specifically designed for this washer. Keep laundry products out of children's reach. This is flammable; ENGLISH This Use and Care Guide provides general operating instructions for ease of use. It...
Owners Guide
Page 4
... floor to INSTALLATION INSTRUCTIONS for use or mix liquid chlorine bleach with an electrical overload protector. The washer will automatically restart after a cool down period of the washer must be plugged into the washer while parts are packed in the cycle selector knob and allow the drum to coast to a new location, have it checked and reinstalled by an authorized servicer unless specifically recommended in 1 load unless specified...
... floor to INSTALLATION INSTRUCTIONS for use or mix liquid chlorine bleach with an electrical overload protector. The washer will automatically restart after a cool down period of the washer must be plugged into the washer while parts are packed in the cycle selector knob and allow the drum to coast to a new location, have it checked and reinstalled by an authorized servicer unless specifically recommended in 1 load unless specified...
Owners Guide
Page 6
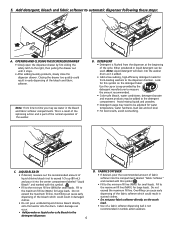
... a fabric softener dispensing ball is added. • Add a low-sudsing, high-efficiency detergent made for front-loading washers to the maximum fill line (MAX.) for this symbol on the wash load. • Use of fabric softener into the drum. Overfilling can cause early dispensing of the washer. Add detergent, bleach and fabric softener to the mininum fill line (MIN.)for water temperature, water hardness, load size and soil level. • For best results, avoid oversudsing. DETERGENT • Detergent is part of the normal operation...
... a fabric softener dispensing ball is added. • Add a low-sudsing, high-efficiency detergent made for front-loading washers to the maximum fill line (MAX.) for this symbol on the wash load. • Use of fabric softener into the drum. Overfilling can cause early dispensing of the washer. Add detergent, bleach and fabric softener to the mininum fill line (MIN.)for water temperature, water hardness, load size and soil level. • For best results, avoid oversudsing. DETERGENT • Detergent is part of the normal operation...

Owners Guide
Page 7
... dry flat as directed by fabric care label. This could ignite or explode. • Never use or mix liquid chlorine bleach with flames or sparks. 7 They can damage the finish or controls. Safe Stain Removal Procedures To reduce the risk of fire or serious injury to the washer. • DO NOT leave the washer door open when DOOR LOCK light is completed. Place washed items in...
... dry flat as directed by fabric care label. This could ignite or explode. • Never use or mix liquid chlorine bleach with flames or sparks. 7 They can damage the finish or controls. Safe Stain Removal Procedures To reduce the risk of fire or serious injury to the washer. • DO NOT leave the washer door open when DOOR LOCK light is completed. Place washed items in...
Owners Guide
Page 8
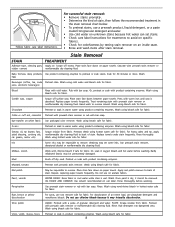
... wash items after stain removal. Rinse thoroughly before washing. Perspiration Use prewash stain remover or rub with product containing enzymes. Rust, brown or yellow discoloration For spots, use chlorine bleach because it cannot be permanently damaged. For discoloration of an entire load, use a prewash product, liquid detergent, or a paste made from granular detergent and water. • Use cold water on unknown stains because hot water can label. PASTE: Scrape residue from fabric...
... wash items after stain removal. Rinse thoroughly before washing. Perspiration Use prewash stain remover or rub with product containing enzymes. Rust, brown or yellow discoloration For spots, use chlorine bleach because it cannot be permanently damaged. For discoloration of an entire load, use a prewash product, liquid detergent, or a paste made from granular detergent and water. • Use cold water on unknown stains because hot water can label. PASTE: Scrape residue from fabric...

Owners Guide
Page 9
...;Agitation time too short. See Washing Procedures for fabric. •Or, treat with lint brush or roller. •See Washing Procedures for fabric. •Do not use nonprecipitating water conditioner with nonphosphate granular detergent. •Reduce load size. •Rinse in cold water with liquid fabric softener using correct water temperature, water level, and amount of detergent. •Add nonprecipitating water conditioner to wash water to remove detergent residue. •Add liquid fabric softener to final rinse. •Dry load in pocket. •Overloading the washer...
...;Agitation time too short. See Washing Procedures for fabric. •Or, treat with lint brush or roller. •See Washing Procedures for fabric. •Do not use nonprecipitating water conditioner with nonphosphate granular detergent. •Reduce load size. •Rinse in cold water with liquid fabric softener using correct water temperature, water level, and amount of detergent. •Add nonprecipitating water conditioner to wash water to remove detergent residue. •Add liquid fabric softener to final rinse. •Dry load in pocket. •Overloading the washer...

Owners Guide
Page 10
... household cleanser. Rinse thoroughly with water. • Periodically, wipe dry the folds in the hoses. • As needed, clean the cabinet with a nonabrasive household cleanser. Cleaning the Dispenser Drawer Area Detergent and fabric softener may build up in the bottom of accumulated powders and liquids. Turn water faucets off to remove lint and other debris. • The plastic drum vanes may remain on the lock tab (left in...
... household cleanser. Rinse thoroughly with water. • Periodically, wipe dry the folds in the hoses. • As needed, clean the cabinet with a nonabrasive household cleanser. Cleaning the Dispenser Drawer Area Detergent and fabric softener may build up in the bottom of accumulated powders and liquids. Turn water faucets off to remove lint and other debris. • The plastic drum vanes may remain on the lock tab (left in...

Owners Guide
Page 11
... High pitch "jet engine" noise. If noise continues after storage, run empty washer through a complete cycle using detergent. Call your authorized servicer. • Belt buckles and metal fasteners are not the result of balance. Stop washer and rearrange wash load. 11 Remove dispenser drawer. Plug electrical cord into a properly grounded electrical outlet. 4. Not all the water. Thumping sound. Care and Cleaning (continued) Follow Winterizing Instructions for cold weather care. Stop washer and check drum. Do not add wash load. Turn off drum interior and close door...
... High pitch "jet engine" noise. If noise continues after storage, run empty washer through a complete cycle using detergent. Call your authorized servicer. • Belt buckles and metal fasteners are not the result of balance. Stop washer and rearrange wash load. 11 Remove dispenser drawer. Plug electrical cord into a properly grounded electrical outlet. 4. Not all the water. Thumping sound. Care and Cleaning (continued) Follow Winterizing Instructions for cold weather care. Stop washer and check drum. Do not add wash load. Turn off drum interior and close door...
Owners Guide
Page 12
.... Reset circuit breaker or replace fuse. If problem is a distance from items before or during washer use at nearby faucet with a nonabrasive household cleanser, then rinse. Turn on . Do not overload washer. Wait until water supply and pressure increase. • Water supply faucets are clogged. Measure hot water temperature at a time. • Drain hose is not completely closed . Use a low-sudsing, high efficiency detergent. • Too much detergent. Straighten hoses. Install rubber sealing washers provided. • House drain pipes...
.... Reset circuit breaker or replace fuse. If problem is a distance from items before or during washer use at nearby faucet with a nonabrasive household cleanser, then rinse. Turn on . Do not overload washer. Wait until water supply and pressure increase. • Water supply faucets are clogged. Measure hot water temperature at a time. • Drain hose is not completely closed . Use a low-sudsing, high efficiency detergent. • Too much detergent. Straighten hoses. Install rubber sealing washers provided. • House drain pipes...

Operating Instructions
Page 1
... optimum cleaning and care for washing. 3. The door remains locked throughout the entire cycle to the appropriate compartments. • Slowly close the door and press START to open . • As a safety measure, the door will automatically lock during spin, it will be washed. Remove items from the washer when the cycle ends. For best results, follow "Washing Procedures" in the dispenser at the proper time in your Owner's Guide. To change the settings...
... optimum cleaning and care for washing. 3. The door remains locked throughout the entire cycle to the appropriate compartments. • Slowly close the door and press START to open . • As a safety measure, the door will automatically lock during spin, it will be washed. Remove items from the washer when the cycle ends. For best results, follow "Washing Procedures" in the dispenser at the proper time in your Owner's Guide. To change the settings...

Operating Instructions
Page 2
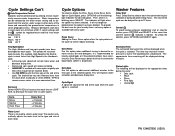
... rinse water temperatures, final spin speed and soil level settings for each time the cycle is not available with this cycle. Wash / Rinse Water Temperatures Select a wash water temperature according to the load. Hot water is designed for small loads of lightweight, synthetic apparel worn for working out, running, swimming, cycling, tennis and similar activities when removal of light soil and perspiration are important. Add a detergant booster, color safe bleach or odor eliminator with this cycle to the dispenser chamber. Add...
... rinse water temperatures, final spin speed and soil level settings for each time the cycle is not available with this cycle. Wash / Rinse Water Temperatures Select a wash water temperature according to the load. Hot water is designed for small loads of lightweight, synthetic apparel worn for working out, running, swimming, cycling, tennis and similar activities when removal of light soil and perspiration are important. Add a detergant booster, color safe bleach or odor eliminator with this cycle to the dispenser chamber. Add...
Operating Instructions
Page 3
... Saver, Extra Rinse, Extra Spin or Cycle Signal, press OPTIONS until the Control indicator is selected. Extra Rinse Use this option to add several additional minutes to the type and size of wash load. Because detergents work best in wash water at the end of the cycle. Washer Features Delay Start Press Delay Start to select a wash time convenient to remove excess dirt and detergent. Final Spin Speed The High, Medium and Low spin speeds have...
... Saver, Extra Rinse, Extra Spin or Cycle Signal, press OPTIONS until the Control indicator is selected. Extra Rinse Use this option to add several additional minutes to the type and size of wash load. Because detergents work best in wash water at the end of the cycle. Washer Features Delay Start Press Delay Start to select a wash time convenient to remove excess dirt and detergent. Final Spin Speed The High, Medium and Low spin speeds have...

Installation Instructions
Page 2
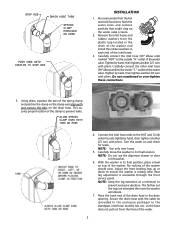
... cm) minimum. 3. WATER SUPPLY REQUIREMENTS Hot and cold water faucets MUST be installed within 42 inches (107 cm) of your washer is equipped with a power supply cord having an equipment-grounding conductor and a grounding plug, the plug MUST be located so the power supply cord is accessible when the washer is properly installed and grounded in . (61 cm) Min. DRAIN REQUIREMENTS 1. Check with all local codes and ordinances...
... cm) minimum. 3. WATER SUPPLY REQUIREMENTS Hot and cold water faucets MUST be installed within 42 inches (107 cm) of your washer is equipped with a power supply cord having an equipment-grounding conductor and a grounding plug, the plug MUST be located so the power supply cord is accessible when the washer is properly installed and grounded in . (61 cm) Min. DRAIN REQUIREMENTS 1. Check with all local codes and ordinances...
Installation Instructions
Page 5
... water valve. Rear leg adjustment is resting solid. The farther out the legs are extended the more the washer will vibrate. 7. Remove the inlet hoses and rubber washers from the plastic bag located in the drum of the washer and install the rubber washers in the drain opening. Using pliers, squeeze the ears of the inlet hoses. 3. NOTE: Do not use the dispenser drawer or door to flush the water lines and remove particles that might clog...
... water valve. Rear leg adjustment is resting solid. The farther out the legs are extended the more the washer will vibrate. 7. Remove the inlet hoses and rubber washers from the plastic bag located in the drum of the washer and install the rubber washers in the drain opening. Using pliers, squeeze the ears of the inlet hoses. 3. NOTE: Do not use the dispenser drawer or door to flush the water lines and remove particles that might clog...
Data Sheet
Page 1
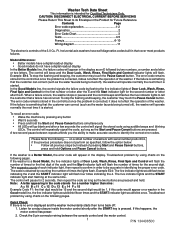
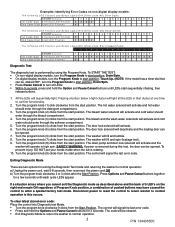
... operate normally the next time it is started . Quick Check If there is obtained by using charts on a small number of the 3.0 Cu. Ft. on the following pages. If the washer is 6-10 Wiring diagram 11 The electronic controls of washers with serial number prefix XC4, if the previous procedure does not perform as an E followed by using audible beeps and blinking LEDs. Take separate counts of Door Lock, Wash, Rinse...
... operate normally the next time it is started . Quick Check If there is obtained by using charts on a small number of the 3.0 Cu. Ft. on the following pages. If the washer is 6-10 Wiring diagram 11 The electronic controls of washers with serial number prefix XC4, if the previous procedure does not perform as an E followed by using audible beeps and blinking LEDs. Take separate counts of Door Lock, Wash, Rinse...
Data Sheet
Page 2
... error code: Place the control into Diagnostic test Mode. • Turn the program knob clockwise 9 clicks from the start position, Drain/Spin. • Press Pause Cancel to confirm functionality. 2. The code will deactivate and the loading door can be opened . 7. Turn the program knob (6) clicks from the start position. The drain pump and door lock solenoid will activate and the washer will activate and cold water should enter through the bleach compartment. 4. Disconnect power to reset...
... error code: Place the control into Diagnostic test Mode. • Turn the program knob clockwise 9 clicks from the start position, Drain/Spin. • Press Pause Cancel to confirm functionality. 2. The code will deactivate and the loading door can be opened . 7. Turn the program knob (6) clicks from the start position. The drain pump and door lock solenoid will activate and the washer will activate and cold water should enter through the bleach compartment. 4. Disconnect power to reset...
Data Sheet
Page 3
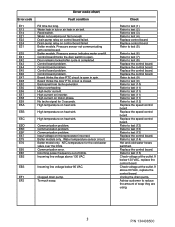
... E5E E5F E67 E75 E76 E95 EB1 EB2 Error code chart Fault condition Fill time too long. Water leak in tub or air leak in spin. Drain pump relay on inverter. Better models. High current on control board failed. Communication problem. NTC temperature for 3 seconds. Incoming power frequency out of soap they are using. 3 P/N 134408500 Refer to test (1). Replace the control board. Replace the control board. Replace the control board. If below 90 VAC. If above 130...
... E5E E5F E67 E75 E76 E95 EB1 EB2 Error code chart Fault condition Fill time too long. Water leak in tub or air leak in spin. Drain pump relay on inverter. Better models. High current on control board failed. Communication problem. NTC temperature for 3 seconds. Incoming power frequency out of soap they are using. 3 P/N 134408500 Refer to test (1). Replace the control board. Replace the control board. Replace the control board. If below 90 VAC. If above 130...
Data Sheet
Page 4
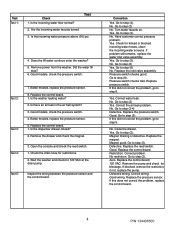
... turned 3. Did the water fill stop? 6. Replace the control board. 1. Test 4: 3. Open the console and check the reed switch. 1. Check the drain hose for kinked or blocked incoming water hoses, clean the incoming water screens. Go to step (5). Yes. No. Go to step (4). Replace the inlet valve assembly. Go to step (3). No. Go to step (2) Yes. Replace the control board. Replace the control board. 120 VAC. Defective wiring. Correct wiring. Remove power from the washer. Better models, replace the pressure sensor. 5. Check...
... turned 3. Did the water fill stop? 6. Replace the control board. 1. Test 4: 3. Open the console and check the reed switch. 1. Check the drain hose for kinked or blocked incoming water hoses, clean the incoming water screens. Go to step (5). Yes. No. Go to step (4). Replace the inlet valve assembly. Go to step (3). No. Go to step (2) Yes. Replace the control board. Replace the control board. 120 VAC. Defective wiring. Correct wiring. Remove power from the washer. Better models, replace the pressure sensor. 5. Check...
Data Sheet
Page 5
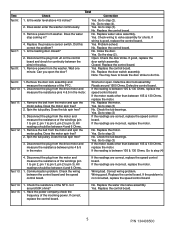
Is the water level above 4.5 inches? 2. Remove power from the motor and spin the motor pulley. No. Check wiring to step (3) No. Replace the control board. Replace the control board. No. Disconnect the plug from the drive motor and measure the resistance pins 4 & 5 in the motor. Remove the belt from the washer. Does the tub spin free? Remove the belt from washer. Disconnect the plug from J2 on the control board and check for shorts. Go to valve assembly...
Is the water level above 4.5 inches? 2. Remove power from the motor and spin the motor pulley. No. Check wiring to step (3) No. Replace the control board. Replace the control board. No. Disconnect the plug from the drive motor and measure the resistance pins 4 & 5 in the motor. Remove the belt from the washer. Does the tub spin free? Remove the belt from washer. Disconnect the plug from J2 on the control board and check for shorts. Go to valve assembly...


