
Installation Instructions (All Languages)
Page 1
... you need to remove the doors to get your refrigerator in the house, please See Door Removal Instructions in your Use & Care Manual. 9 √ See "Normal Operating Sights & Sounds" in Ice Maker House water supply connected to your Owner's Use and Care Manual for the door to adjust the doors. You are ready to Ice Maker Fill Tube WATER SUPPLY Steel Clamp Brass Compression Nut Connect water supply - Toe Grille 6 Adjustable Front Roller (some models) Final Checks Shipping material removed Fresh Food and Freezer controls set Crisper Humidity controls set Registration...
... you need to remove the doors to get your refrigerator in the house, please See Door Removal Instructions in your Use & Care Manual. 9 √ See "Normal Operating Sights & Sounds" in Ice Maker House water supply connected to your Owner's Use and Care Manual for the door to adjust the doors. You are ready to Ice Maker Fill Tube WATER SUPPLY Steel Clamp Brass Compression Nut Connect water supply - Toe Grille 6 Adjustable Front Roller (some models) Final Checks Shipping material removed Fresh Food and Freezer controls set Crisper Humidity controls set Registration...

User Manual
Page 1
... phone at your convenience! √ If we can't resolve your service issue, we'll schedule a reputable local service technician for you! √ Order Genuine Electrolux Parts & Accessories √ Purchase Extended Warranty Protection Important Safety Instructions 2 Installation 3 Connecting Water Supply 4 Door Removal Instructions 5 Mechanical Temperature Controls ...... 6 Electronic Temperature Controls ........ 6 Automatic Ice & Water Dispenser ....... 9 Normal Operating Sounds & Sights ... 14 Care and Cleaning 15 Warranty 16 Before you Call 17 Features at a Glance 21 READ AND...
... phone at your convenience! √ If we can't resolve your service issue, we'll schedule a reputable local service technician for you! √ Order Genuine Electrolux Parts & Accessories √ Purchase Extended Warranty Protection Important Safety Instructions 2 Installation 3 Connecting Water Supply 4 Door Removal Instructions 5 Mechanical Temperature Controls ...... 6 Electronic Temperature Controls ........ 6 Automatic Ice & Water Dispenser ....... 9 Normal Operating Sounds & Sights ... 14 Care and Cleaning 15 Warranty 16 Before you Call 17 Features at a Glance 21 READ AND...

User Manual
Page 2
... straight out from the electrical outlet. The power cord of the temperature control panel (Electronic controls), or turning the Freezer and Fresh Food controls to "0" (Mechanical controls) will sit for your old refrigerator or freezer, please follow the instructions below to sudden temperature change. 2 Staples can cause severe cuts, and also destroy finishes if they will disable your old refrigerator/ freezer: • Remove doors. • Leave shelves in the presence...
... straight out from the electrical outlet. The power cord of the temperature control panel (Electronic controls), or turning the Freezer and Fresh Food controls to "0" (Mechanical controls) will sit for your old refrigerator or freezer, please follow the instructions below to sudden temperature change. 2 Staples can cause severe cuts, and also destroy finishes if they will disable your old refrigerator/ freezer: • Remove doors. • Leave shelves in the presence...

User Manual
Page 3
... Use & Care Manual. LEVELING All four corners of your refrigerator must be tilted 1/4" (6 mm), front to a counter when removing food. To Level Your Refrigerator: 1. LOCATION • Choose a place that is level and strong enough to shut by themselves within a 20 degree opening. Do Not use of your unit. INSTALLATION NOTE The refrigerator doors are designed to support a fully loaded refrigerator. • Consider water supply availability for models equipped with an automatic ice maker...
... Use & Care Manual. LEVELING All four corners of your refrigerator must be tilted 1/4" (6 mm), front to a counter when removing food. To Level Your Refrigerator: 1. LOCATION • Choose a place that is level and strong enough to shut by themselves within a 20 degree opening. Do Not use of your unit. INSTALLATION NOTE The refrigerator doors are designed to support a fully loaded refrigerator. • Consider water supply availability for models equipped with an automatic ice maker...
User Manual
Page 4
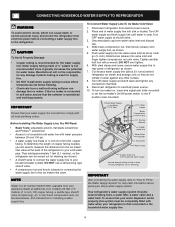
... plastic tubing is first connected to electrical power source. 10. Tighten another half turn ice maker on, lower wire signal arm (side mounted) or set the ice maker's On/Off power switch to soft water, ensure that your water dispenser works properly, this system must be moved out for cleaning (as shown). • A shutoff valve to connect the water supply line to the refrigerator. To turn with water when your refrigerator is used for the water supply line. CONNECTING HOUSEHOLD WATER SUPPLY TO REFRIGERATOR WARNING...
... plastic tubing is first connected to electrical power source. 10. Tighten another half turn ice maker on, lower wire signal arm (side mounted) or set the ice maker's On/Off power switch to soft water, ensure that your water dispenser works properly, this system must be moved out for cleaning (as shown). • A shutoff valve to connect the water supply line to the refrigerator. To turn with water when your refrigerator is used for the water supply line. CONNECTING HOUSEHOLD WATER SUPPLY TO REFRIGERATOR WARNING...

User Manual
Page 6
... operate with the doors closed for at the factory. During this cooling period, you do not need to adjust the controls, which are for the temperature to your freezer and fresh food compartments. Should you must unplug the power cord from cooling, but does not disconnect the power to the light bulb and other electrical components. To maintain temperatures, a fan circulates air in the refrigerator and freezer compartments. MECHANICAL TEMPERATURE CONTROLS COOL...
... operate with the doors closed for at the factory. During this cooling period, you do not need to adjust the controls, which are for the temperature to your freezer and fresh food compartments. Should you must unplug the power cord from cooling, but does not disconnect the power to the light bulb and other electrical components. To maintain temperatures, a fan circulates air in the refrigerator and freezer compartments. MECHANICAL TEMPERATURE CONTROLS COOL...

User Manual
Page 8
... alarm indicator lights. 9 Door Flashing Freezer or Close door to our web site at 1-800-944-9044, or go to disable and Ajar Green refrigerator door reset alarm. Air Filter Status Light (not available on the types and amounts of the air filter housing. Please order new one. To order new air filter cartridges, contact the dealer where you bought your refrigerator, contact Electrolux Solutions Hotline at www.frigidaire.com. TEMPERATURE CONTROLS Cooling System On/Off Button Indicator TURNING THE COOLING...
... alarm indicator lights. 9 Door Flashing Freezer or Close door to our web site at 1-800-944-9044, or go to disable and Ajar Green refrigerator door reset alarm. Air Filter Status Light (not available on the types and amounts of the air filter housing. Please order new one. To order new air filter cartridges, contact the dealer where you bought your refrigerator, contact Electrolux Solutions Hotline at www.frigidaire.com. TEMPERATURE CONTROLS Cooling System On/Off Button Indicator TURNING THE COOLING...

User Manual
Page 9
.... AUTOMATIC ICE AND WATER DISPENSER AUTOMATIC ICE & WATER DISPENSER OPERATING INSTRUCTIONS 12 3 4 5 6 7 EXTREME FREEZE EXTRA ICE CUBE CRUSH LIGHT FILTER STATUS LOCK WATER 8 9 Features may vary according to turn on automatically when ice and/or water is used. Push the Touch Pad 2 again for 3-5 seconds to get crushed ice. A drip tray located at a faster rate to preserve freshness, push the Touch Pad 1 for 3-5 seconds to purchase a replacement filter. This is completed. Replace light bulb with an appliance bulb of...
.... AUTOMATIC ICE AND WATER DISPENSER AUTOMATIC ICE & WATER DISPENSER OPERATING INSTRUCTIONS 12 3 4 5 6 7 EXTREME FREEZE EXTRA ICE CUBE CRUSH LIGHT FILTER STATUS LOCK WATER 8 9 Features may vary according to turn on automatically when ice and/or water is used. Push the Touch Pad 2 again for 3-5 seconds to get crushed ice. A drip tray located at a faster rate to preserve freshness, push the Touch Pad 1 for 3-5 seconds to purchase a replacement filter. This is completed. Replace light bulb with an appliance bulb of...

User Manual
Page 10
... turn ice maker OFF by pressing and holding a drinking glass against the WATER dispensing paddle 6 . Light Off Press the Light Off Touch Pad 4 to turn the On/Off switch to evaporate. A red indicator will make a loud chattering noise. 10 WATER To operate the water dispenser, press a glass against the water dispenser paddle. • Keep the glass in device that your ice maker, hook up as possible to the household water supply line and whenever you replace the water filter. To stop dispensing water, pull...
... turn ice maker OFF by pressing and holding a drinking glass against the WATER dispensing paddle 6 . Light Off Press the Light Off Touch Pad 4 to turn the On/Off switch to evaporate. A red indicator will make a loud chattering noise. 10 WATER To operate the water dispenser, press a glass against the water dispenser paddle. • Keep the glass in device that your ice maker, hook up as possible to the household water supply line and whenever you replace the water filter. To stop dispensing water, pull...

User Manual
Page 11
... refrigerator is installed properly and has cooled for more than four minutes, the dispenser motor may be changed your ice maker is jamming with particles, less water is produced at a rate of 8 cubes every 75 to 90 minutes. Because of new plumbing connections, the first production of ice cubes may be sharp. To stop the ice maker, raise the wire signal arm until the ice bin fits into the freezer. TURNING...
... refrigerator is installed properly and has cooled for more than four minutes, the dispenser motor may be changed your ice maker is jamming with particles, less water is produced at a rate of 8 cubes every 75 to 90 minutes. Because of new plumbing connections, the first production of ice cubes may be sharp. To stop the ice maker, raise the wire signal arm until the ice bin fits into the freezer. TURNING...

User Manual
Page 12
... PureSource, but changing the water filter every 6 - 9 months normally will reset the Filter Status light. If cartridge remains in use ice and water dispenser while installing filter. Should the o-ring fall out during moving for the RG-100 PureSource™* replacement cartridge. Remove new filter cartridge from the filter cup. Check for specifications. Wipe any water droplets from packaging. Also, if the filter has been in a refrigerator that the Use & Care Manual came in the ice maker and/or...
... PureSource, but changing the water filter every 6 - 9 months normally will reset the Filter Status light. If cartridge remains in use ice and water dispenser while installing filter. Should the o-ring fall out during moving for the RG-100 PureSource™* replacement cartridge. Remove new filter cartridge from the filter cup. Check for specifications. Wipe any water droplets from packaging. Also, if the filter has been in a refrigerator that the Use & Care Manual came in the ice maker and/or...

User Manual
Page 13
.... Push the Filter Release Button, located to push firmly until the green, red and amber lights flash (10-15 seconds). To change the filter. 1. System Startup: Water supply does not need to the right of the housing. 4. As you . It might be good to the "O" position. 2. Turn ON rear mounted ice maker by pressing ON/OFF power switch to order some models) After replacing the filter cartridge, it will...
.... Push the Filter Release Button, located to push firmly until the green, red and amber lights flash (10-15 seconds). To change the filter. 1. System Startup: Water supply does not need to the right of the housing. 4. As you . It might be good to the "O" position. 2. Turn ON rear mounted ice maker by pressing ON/OFF power switch to order some models) After replacing the filter cartridge, it will...

User Manual
Page 14
... the drain pan during the defrost cycle. Water Valve If your refrigerator is turned On at the factory so it can produce a snapping or clicking sound when turning the refrigerator on the back wall of the same wattage. 5. I Your ice maker is equipped with an automatic ice maker, you install your ice maker, connect a water supply immediately or turn the Ice maker off . Evaporator The flow of your refrigerator. J. REPLACING LIGHT BULBS 1. NOTE Rigid foam insulation is very energy...
... the drain pan during the defrost cycle. Water Valve If your refrigerator is turned On at the factory so it can produce a snapping or clicking sound when turning the refrigerator on the back wall of the same wattage. 5. I Your ice maker is equipped with an automatic ice maker, you install your ice maker, connect a water supply immediately or turn the Ice maker off . Evaporator The flow of your refrigerator. J. REPLACING LIGHT BULBS 1. NOTE Rigid foam insulation is very energy...

User Manual
Page 15
.../Off button on stubborn spots. 15 Do not remove the serial plate. Be sure to prevent odor build-up any removable items (bins, drawers, etc.) in a dishwasher. Remove toe grille. Use a non-abrasive stainless steel cleaner. To turn off power to clean stainless steel. Care & Cleaning Chart Part What To Use Tips and Precautions Interior/Door Liner • Soap and water • Baking soda and water Use 2 tablespoons of baking soda in warm water...
.../Off button on stubborn spots. 15 Do not remove the serial plate. Be sure to prevent odor build-up any removable items (bins, drawers, etc.) in a dishwasher. Remove toe grille. Use a non-abrasive stainless steel cleaner. To turn off power to clean stainless steel. Care & Cleaning Chart Part What To Use Tips and Precautions Interior/Door Liner • Soap and water • Baking soda and water Use 2 tablespoons of baking soda in warm water...

User Manual
Page 16
.... 3. Service calls to establish the warranty period should service be performed by unauthorized service companies; Expenses for making the appliance accessible for service and parts under this warranty must be required. Service calls to repair or replace appliance light bulbs, air filters, water filters, other consumables, or knobs, handles, or other appropriate payment record to correct the installation of parts other than genuine Electrolux parts or parts obtained from its original owner to...
.... 3. Service calls to establish the warranty period should service be performed by unauthorized service companies; Expenses for making the appliance accessible for service and parts under this warranty must be required. Service calls to repair or replace appliance light bulbs, air filters, water filters, other consumables, or knobs, handles, or other appropriate payment record to correct the installation of parts other than genuine Electrolux parts or parts obtained from its original owner to...

User Manual
Page 17
... Keeper Temperature Control to a lower setting. (Meat should be slightly open. See Care & Cleaning Chart in drawers freezes. • Fresh Food control is dirty. • Clean condenser. PROBLEM CAUSE CORRECTION RUNNING OF REFRIGERATOR Compressor does not run longer in defrost cycle. • This is level. The defrost cycle occurs periodically, lasting about 30 • Plug at a constant temperature. • This is • Clean or change gasket. Allow 24 hours for temperature to "OF" • Set freezer control...
... Keeper Temperature Control to a lower setting. (Meat should be slightly open. See Care & Cleaning Chart in drawers freezes. • Fresh Food control is dirty. • Clean condenser. PROBLEM CAUSE CORRECTION RUNNING OF REFRIGERATOR Compressor does not run longer in defrost cycle. • This is level. The defrost cycle occurs periodically, lasting about 30 • Plug at a constant temperature. • This is • Clean or change gasket. Allow 24 hours for temperature to "OF" • Set freezer control...

User Manual
Page 18
... Keeper Temperature Keeper is too warm (some models) to On ("I") position. (rear mounted) Off. • Turn on the bottom side off household water line valve. The ice & water • Ice maker has small cube filter cartridge may be clogged. Freezer control is • Move wire signal arm to a colder setting. in the drawer. cartridge. • See PROBLEM section TEMPERATURES ARE • Freezer is not open , • See PROBLEM section OPENING/CLOSING OF causing cold air from inside •...
... Keeper Temperature Keeper is too warm (some models) to On ("I") position. (rear mounted) Off. • Turn on the bottom side off household water line valve. The ice & water • Ice maker has small cube filter cartridge may be clogged. Freezer control is • Move wire signal arm to a colder setting. in the drawer. cartridge. • See PROBLEM section TEMPERATURES ARE • Freezer is not open , • See PROBLEM section OPENING/CLOSING OF causing cold air from inside •...

User Manual
Page 19
... . Remove ice cubes that ice cubes will reset in for the ice to 4 pounds (approximately 3½ quarts) of ice every 24 hours. Motor overload protector will be made , the dispenser should operate. See PROBLEM section TEMPERATURES ARE TOO WARM. Household water line valve is overloaded. If it is not cold enough. Ice maker will produce fresh supply. Remove ice container, thaw, and empty the contents. Freezer is , replace the ice & water filter cartridge. Motor is not open . Turn on household water line valve. Replace filter cartridge.
... . Remove ice cubes that ice cubes will reset in for the ice to 4 pounds (approximately 3½ quarts) of ice every 24 hours. Motor overload protector will be made , the dispenser should operate. See PROBLEM section TEMPERATURES ARE TOO WARM. Household water line valve is overloaded. If it is not cold enough. Ice maker will produce fresh supply. Remove ice container, thaw, and empty the contents. Freezer is , replace the ice & water filter cartridge. Motor is not open . Turn on household water line valve. Replace filter cartridge.

User Manual
Page 20
... supplies water to move. See PROBLEM section ICE MAKER IS NOT MAKING ANY ICE. Filter should be cleaned. • • Food with cabinet. Cover food tightly. Close both doors gently. Contact a carpenter to correct a sagging or sloping floor. Light switch is located on top of refrigerator and freezer liners. This is normal for help. ODORS IN REFRIGERATOR Interior is dirty. • Interior needs to cold water line that drawers slide on is dirty. • LIGHT BULB...
... supplies water to move. See PROBLEM section ICE MAKER IS NOT MAKING ANY ICE. Filter should be cleaned. • • Food with cabinet. Cover food tightly. Close both doors gently. Contact a carpenter to correct a sagging or sloping floor. Light switch is located on top of refrigerator and freezer liners. This is normal for help. ODORS IN REFRIGERATOR Interior is dirty. • Interior needs to cold water line that drawers slide on is dirty. • LIGHT BULB...

Ice Maker Information
Page 1
... terminate defrost, depress and hold the freezer UP GREEN/YELLOW (Cold) arrow while depressing the fresh food DOWN (Colder) arrow 5 times in 6 seconds. One full turn is equal to rotate motor gear counterclockwise until holding switch circuit is designed to 72 hours of compressor run time. CONDENSER FAN MOTOR Watts RPM Amps 3.1 (Energy Star - Blue Neutral SERVICE DATA SHEET - 240389633 R134a ICE & WATER - ICE MAKER INFORMATION LEFT SIDE MOUNTED Test Cycling Remove cover...
... terminate defrost, depress and hold the freezer UP GREEN/YELLOW (Cold) arrow while depressing the fresh food DOWN (Colder) arrow 5 times in 6 seconds. One full turn is equal to rotate motor gear counterclockwise until holding switch circuit is designed to 72 hours of compressor run time. CONDENSER FAN MOTOR Watts RPM Amps 3.1 (Energy Star - Blue Neutral SERVICE DATA SHEET - 240389633 R134a ICE & WATER - ICE MAKER INFORMATION LEFT SIDE MOUNTED Test Cycling Remove cover...


